Creating and verifying identities in Amazon SES
In Amazon SES, you can create an identity at the domain level or you can create an email address identity. These identity types aren’t mutually exclusive. In most cases, creating a domain identity eliminates the need for creating and verifying individual email address identities, unless you want to apply custom configurations to a specific email address. Whether you create a domain and utilize email addresses based on the domain, or create individual email addresses, there are benefits to both approaches. Which method you choose is dependent on your specific needs as discussed below.
Creating and verifying an email address identity is the fastest way to get started in SES, but there are benefits to verifying an identity at the domain level. When you verify an email address identity, only that email address can be used to send mail, but when you verify a domain identity, you can send email from any subdomain or email address of the verified domain without having to verify each one individually. For example, if you create and verify a domain identity called example.com, you don't need to create separate subdomain identities for a.example.com, a.b.example.com, nor separate email address identities for user@example.com, user@a.example.com, and so on.
However, keep in mind that an email address identity that's using the inherited verification from its domain is limited to straightforward email sending. If you want to do more advanced sending, you'll have to also explicitly verify it as an email address identity. Advanced sending includes using the email address with configuration sets, policy authorizations for delegate sending, and configurations that override the domain settings.
To help clarify the verification inheritance and email sending capabilities discussed above, the following table categorizes each combination of domain/email address verification and lists the inheritance, sending level, and display status for each:
| Only domain verified | Only email address verified | Both domain & email address verified | |
|---|---|---|---|
| Inheritance level | Subdomains and email addresses inherit verification from the parent domain. | Email address explicitly verified. |
|
| Sending level | Email addresses limited to straightforward email sending. | Email address can be used in advanced sending*. | Email address can be used in advanced sending*. |
| Displayed status | Console/API status:
|
Console/API status:
|
Console/API status:
|
*Advanced sending includes using the email address with configuration sets, policy authorizations for delegate sending, and configurations that override the domain settings.
To send email from the same domain or email address in more than one AWS Region, you must create and verify a separate identity for each Region. You can verify as many as 10,000 identities in each Region.
When you create and verify domain and email address identities, consider the following:
-
You can send email from any subdomain or email address of the verified domain without having to verify each one individually. For example, if you create and verify an identity for example.com, you don't need to create separate identities for a.example.com, a.b.example.com, user@example.com, user@a.example.com, and so on.
-
As specified in RFC 1034
, each DNS label can have up to 63 characters, and the whole domain name must not exceed a total length of 255 characters. -
If you verify a domain, subdomain, or email address that shares a root domain, the identity settings (such as feedback notifications) apply at the most granular level you verified.
-
Verified email address identity settings override verified domain identity settings.
-
Verified subdomain identity settings override verified domain identity settings, with lower-level subdomain settings overriding higher-level subdomain settings.
For example, assume you verify user@a.b.example.com, a.b.example.com, b.example.com, and example.com. These are the verified identity settings that will be used in the following scenarios:
-
Emails sent from user@example.com (an email address that isn’t specifically verified) will use the settings for example.com.
-
Emails sent from user@a.b.example.com (an email address that is specifically verified) will use the settings for user@a.b.example.com.
-
Emails sent from user@b.example.com (an email address that isn’t specifically verified) will use the settings for b.example.com.
-
-
-
You can add labels to verified email addresses without performing additional verification steps. To add a label to an email address, add a plus sign (+) between the account name and the "at" sign (@), followed by a text label. For example, if you already verified sender@example.com, you can use sender+myLabel@example.com as the "From" or "Return-Path" address for your emails. You can use this feature to implement Variable Envelope Return Path (VERP). Then you can use VERP to detect and remove undeliverable email addresses from your mailing lists.
-
Domain names are case-insensitive. If you verify example.com, you can send from EXAMPLE.com also.
-
Email addresses are case sensitive. If you verify sender@EXAMPLE.com, you can't send email from sender@example.com unless you verify sender@example.com as well.
-
In each AWS Region, you can verify as many as 10,000 identities (domains and email addresses, in any combination).
Tip
If you're a first time user of SES, you can use the Get started wizard to create and verify your first identity (email address or domain).
Contents
Creating a domain identity
Part of creating a domain identity is configuring its DKIM-based verification. DomainKeys Identified Mail (DKIM) is an email authentication method that Amazon SES uses to verify domain ownership, and receiving mail servers use to validate email authenticity. You can choose to configure DKIM by using either Easy DKIM or Bring Your Own DKIM (BYODKIM), and depending on your choice, you'll have to configure the signing key length of the private key as follows:
-
Easy DKIM - either accept the Amazon SES default of 2048 bits, or override it by selecting 1024 bits.
-
BYODKIM - private key length must be at least 1024 bits and up to 2048-bits.
See DKIM signing key length to learn more about DKIM signing key lengths and how to change them.
The following procedure shows you how to create a domain identity using the Amazon SES console.
-
If you've already created your domain and just need to verify it, skip to the procedure Verifying a DKIM domain identity with your DNS provider on this page.
To create a domain identity
Sign in to the AWS Management Console and open the Amazon SES console at https://console.aws.amazon.com/ses/
. -
In the navigation pane, under Configuration, choose Identities.
-
Choose Create identity.
-
Under Identity details, select Domain as the type of identity you want to create. You must have access to the domain’s DNS settings to complete the domain verification process.
-
Enter the name of the domain or subdomain in the Domain field.
Tip
If your domain is www.example.com, enter example.com as your domain. Don't include the "www." part, because the domain verification process won't succeed if you do.
-
(Optional) If you want to Assign a default configuration set, select the check box.
-
For Default configuration set, select the existing configuration set that you want to assign to your identity. If you haven’t created any configuration sets yet, see Using configuration sets in Amazon SES.
Note
Amazon SES only defaults to the assigned configuration set when no other set is specified at the time of sending. If a configuration set is specified, Amazon SES applies the specified set in place of the default set.
-
-
(Optional) If you want to Use a custom MAIL FROM domain, select the check box and complete the following steps. For more information, see Using a custom MAIL FROM domain.
-
For MAIL FROM domain, enter the subdomain that you want to use as the MAIL FROM domain. This must be a subdomain of the domain identity that you’re verifying. The MAIL FROM domain shouldn't be a domain from which you send email.
-
For Behavior on MX failure, indicate which action Amazon SES should take if it can’t find the required MX record at the time of sending. Choose one of the following options:
-
Use default MAIL FROM domain - If the custom MAIL FROM domain's MX record is not set up correctly, Amazon SES will use a subdomain of amazonses.com. The subdomain varies based on the AWS Region in which you use Amazon SES.
-
Reject message - If the custom MAIL FROM domain's MX record is not set up correctly, Amazon SES will return a
MailFromDomainNotVerifiederror. If you choose this option, emails that you attempt to send from this domain are automatically rejected.
-
-
For Publish DNS records to Route53, if your domain is hosted through Amazon Route 53, you have the option to let SES publish the associated TXT and MX records at the time of creation by leaving Enabled checked. If you'd rather publish these records later, clear the Enabled checkbox. (You can come back at a later time to publish the records to Route 53 by editing the identity - see Edit an identity using the SES console.)
-
-
(Optional) To configure customized DKIM-based verification, other than the SES default setting which uses Easy DKIM with a 2048 bit signing length, under Verifying your domain, expand Advanced DKIM settings and choose the type of DKIM you want to configure:
-
Easy DKIM:
-
Under Identity type, choose Easy DKIM.
-
In the DKIM signing key length field, choose either RSA_2048_BIT or RSA_1024_BIT.
-
For Publish DNS records to Route53, if your domain is hosted through Amazon Route 53, you have the option to let SES publish the associated CNAME records at the time of creation by leaving Enabled checked. If you'd rather publish these records later, clear the Enabled checkbox. (You can come back at a later time to publish the records to Route 53 by editing the identity - see Edit an identity using the SES console.)
-
-
Deterministic Easy DKIM (DEED):
Tip
This form of DKIM is to be used if you're creating a Global (replica) identity. DEED will utilize the Easy DKIM setup of an existing identity of the same name from a parent region and sign the new identity without requiring you to perform additional DNS setup. For more information, see DEED.
-
Under Identity type, choose Deterministic Easy DKIM.
-
From the Parent region dropdown menu, select a parent region where an Easy DKIM-signed identity with the same name as you entered for your Global (replica) identity resides. (Your replica region defaults to the region you signed into the SES console with.)
-
-
Provide DKIM authentication token (BYODKIM):
-
Ensure you've already generated a public-private key pair and have added the public key to your DNS host provider. For more information, see Provide your own DKIM authentication token (BYODKIM) in Amazon SES.
-
Under Identity type, choose Provide DKIM authentication token (BYODKIM).
-
For Private key, paste the private key you generated from your public-private key pair. The private key must use at least 1024-bit RSA encryption and up to 2048-bit, and must be encoded using base64 (PEM)
encoding. Note
You have to delete the first and last lines (
-----BEGIN PRIVATE KEY-----and-----END PRIVATE KEY-----, respectively) of the generated private key. Additionally, you have to remove the line breaks in the generated private key. The resulting value is a string of characters with no spaces or line breaks. -
For Selector name, enter the name of the selector to be specified in your domain’s DNS settings.
-
-
-
Ensure that the Enabled box is checked in the DKIM signatures field.
-
(Optional) Add one or more Tags to your domain identity by including a tag key and an optional value for the key:
-
Choose Add new tag and enter the Key. You can optionally add a Value for the tag.
-
Repeat for additional tags not to exceed 50, or choose Remove to remove tags.
-
-
Choose Create identity.
Now that you’ve created and configured your domain identity with DKIM, you must complete the verification process with your DNS provider - proceed to Verifying a DKIM domain identity with your DNS provider and follow the DNS authentication procedures for the type of DKIM you configured your identity with.
Note
Verifying a DKIM domain identity with your DNS provider
After you’ve created your domain identity configured with DKIM, you must complete the verification process with your DNS provider by following the respective authentication procedures for the type of DKIM you chose.
If you haven't created a domain identity, see Creating a domain identity.
Note
-
Verifying a domain identity requires access to the domain’s DNS settings. Changes to these settings can take up to 72 hours to propagate.
-
If you created a Global (replica) identity using Deterministic Easy DKIM (DEED), no additional DNS setup is required—you can skip this step. For more information, see DEED.
To verify a DKIM domain identity with your DNS provider
-
From the Loaded identities table, select the domain you want to verify.
-
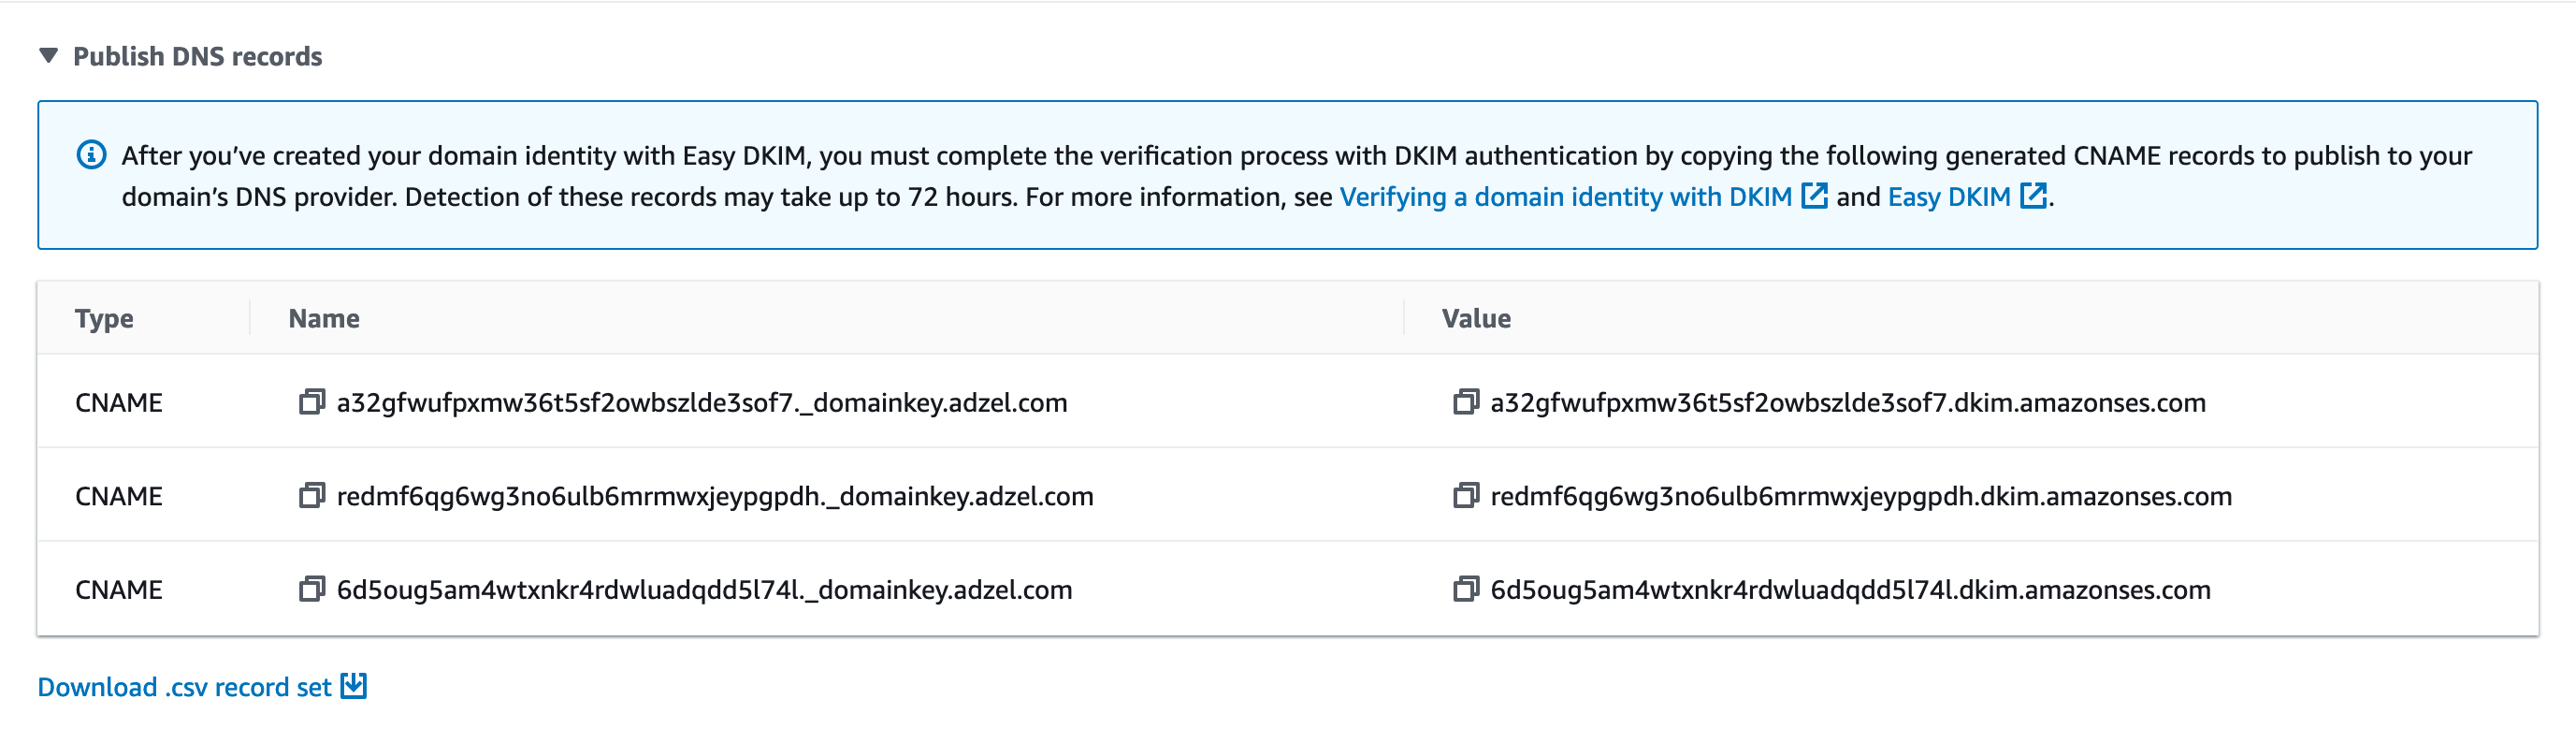
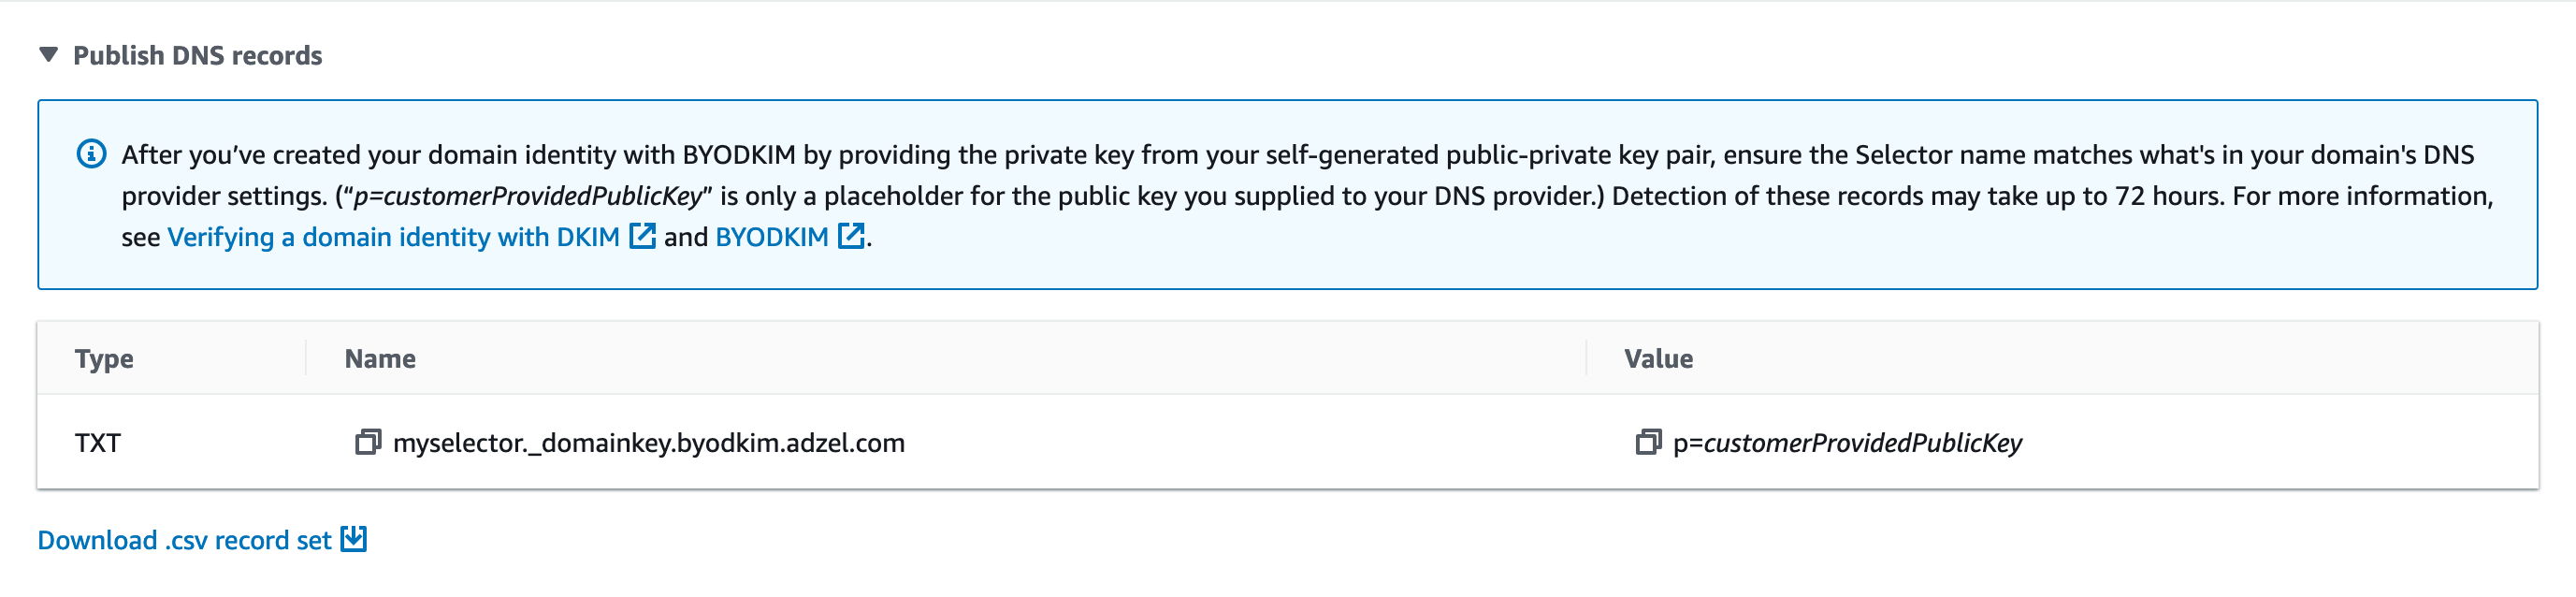
On the Authentication tab of the identity details page, expand Publish DNS records.
-
Depending on which flavor of DKIM you configured your domain with, Easy DKIM or BYODKIM, follow the respective instructions:
Tip
When adding CNAME records to your DNS configuration:
-
Use the exact record names as provided in the SES console.
-
Do not add any additional underscores (
_) at the beginning of the CNAME record names. -
The
_domainkeyportion is part of the record name and should be used exactly as shown.
Example showing correct vs incorrect CNAME Record implementation:
-
Correct:
abc123._domainkey.domain.com -
Incorrect:
_abc123._domainkey.domain.com
-
-
It can take up to 72 hours for changes to DNS settings to propagate. As soon as Amazon SES detects all of the required DKIM records in your domain’s DNS settings, the verification process is complete. Your domain’s DKIM configuration appears as Successful and the Identity status appears as Verified.
-
If want to configure and verify a custom MAIL FROM domain, follow the procedures in Configuring your custom MAIL FROM domain.
The following table includes links to the documentation for a few widely used DNS providers. This list isn't exhaustive and doesn't signify endorsement; likewise, if your DNS provider isn't listed, it doesn't imply you can't use the domain with Amazon SES.
| DNS/Hosting provider | Documentation link |
|---|---|
|
GoDaddy |
Add
a CNAME record |
|
DreamHost |
How do I add custom DNS records? |
|
Cloudflare |
Managing DNS records in Cloudflare |
|
HostGator |
Manage DNS Records with HostGator/eNom |
|
Namecheap |
How do I add TXT/SPF/DKIM/DMARC records for my domain? |
|
Names.co.uk |
Changing your domains DNS Settings |
|
Wix |
Adding or Updating CNAME Records in Your Wix Account |
Troubleshooting domain verification
If you completed the steps above, but your domain isn't verified after 72 hours, check the following:
-
Make sure that you entered the values for the DNS records in the correct fields. Some DNS providers refer to the Name/host field as Host or Hostname. In addition, some providers refer to the Record value field as Points to or Result.
-
Make sure that your provider didn't automatically append your domain name to the Name/host value that you entered in the DNS record. Some providers append the domain name without indicating that they've done so. If your provider appended your domain name to the Name/host value, remove the domain name from the end of the value. You can also try adding a period to the end of the value in the DNS record. This period indicates to the provider that the domain name is fully qualified.
-
The underscore character (_) is required in the Name/host value of each DNS record. If your provider doesn't allow underscores in DNS record names, contact the provider's customer support department for additional assistance.
-
The validation records that you have to add to your domain’s DNS settings are different for each AWS Region. If you want to use a domain to send email from multiple AWS Regions, you have to create and verify a separate domain identity for each of those Regions.
Creating an email address identity
Complete the following procedure to create an email address identity by using the Amazon SES console.
To create an email address identity (console)
Sign in to the AWS Management Console and open the Amazon SES console at https://console.aws.amazon.com/ses/
. -
In the navigation pane, under Configuration, choose Identities.
-
Choose Create identity.
-
Under Identity details, choose Email address as the identity type you want to create.
-
For Email address, enter the email address that you want to use. The email address must be an address that’s able to receive mail and that you have access to.
-
(Optional) If you want to Assign a default configuration set, select the check box.
-
For Default configuration set, select the existing configuration set that you want to assign to your identity. If you haven’t created any configuration sets yet, see Using configuration sets in Amazon SES.
Note
Amazon SES only defaults to the assigned configuration set when no other set is specified at the time of sending. If a configuration set is specified, Amazon SES applies the specified set in place of the default set.
-
-
(Optional) Add one or more Tags to your domain identity by including a tag key and an optional value for the key:
-
Choose Add new tag and enter the Key. You can optionally add a Value for the tag.
-
Repeat for additional tags not to exceed 50, or choose Remove to remove tags.
-
-
To create your email address identity, choose Create identity. After it's created, you should receive a verification email within five minutes. The next step is to verify your email address by following the verification procedure in the next section.
Note
You can customize the messages that are sent to the email addresses you attempt to verify. For more information, see Using custom verification email templates.
Now that you’ve created your email address identity, you must complete the verification process - proceed to Verifying an email address identity.
Verifying an email address identity
After you’ve created your email address identity, you must complete the verification process.
If you haven't created an email address identity, see Creating an email address identity.
To verify an email address identity
-
Check the inbox of the email address used to create your identity and look for an email from no-reply-aws@amazon.com.
-
Open the email and click the link to complete the verification process for the email address. After it's complete, the Identity status updates to Verified.
Troubleshooting email address verification
If you don't receive the verification email within five minutes of creating your identity, try the following troubleshooting steps:
-
Make sure you entered the email address correctly.
-
Make sure the email address that you're attempting to verify can receive email. You can test this by using another email address to send a test email to the address that you want to verify.
-
Check your junk mail folder.
-
The link in the verification email expires after 24 hours. To send a new verification email, choose Resend at the top of the identity details page.
Create and verify an identity and assign a default configuration set at the same time
You can use the CreateEmailIdentity operation in the Amazon SES API v2 to create a new email identity and set its default configuration set at the same time.
Note
Before you complete the procedure in this section, you have to install and configure the AWS CLI. For more information, see the AWS Command Line Interface User Guide.
To set a default configuration set using the AWS CLI
-
At the command line, enter the following command to use the CreateEmailIdentity operation.
aws sesv2 create-email-identity --email-identityADDRESS-OR-DOMAIN--configuration-set-nameCONFIG-SET
In the preceding commands, replace ADDRESS-OR-DOMAIN with the
email identity that you want to verify. Replace CONFIG-SET with
the name of the configuration set you want to set as the default configuration set for the
identity.
If the command executes successfully, it exits without providing any output.
To verify your email address
-
Check the inbox for the email address that you're verifying. You'll receive a message with the following subject line: "Amazon Web Services - Email Address Verification Request in region
RegionName," whereRegionNameis the name of the AWS Region that you attempted to verify the email address in.Open the message, and then click the link in it.
Note
The link in the verification message expires 24 hours after the message was sent. If 24 hours have passed since you received the verification email, repeat steps 1–5 to receive a verification email with a valid link.
-
In the Amazon SES console, under Identity Management, choose Email Addresses. In the list of email addresses, locate the email address you're verifying. If the email address was verified, the value in the Status column is "verified".
To verify your domain
If you entered a domain name for the --email-identity parameter in the above
command line procedure, see Verifying a domain
identity for more information.
Using custom verification email templates
When you attempt to verify an email address, Amazon SES sends an email to that address that resembles the example shown in the following image.
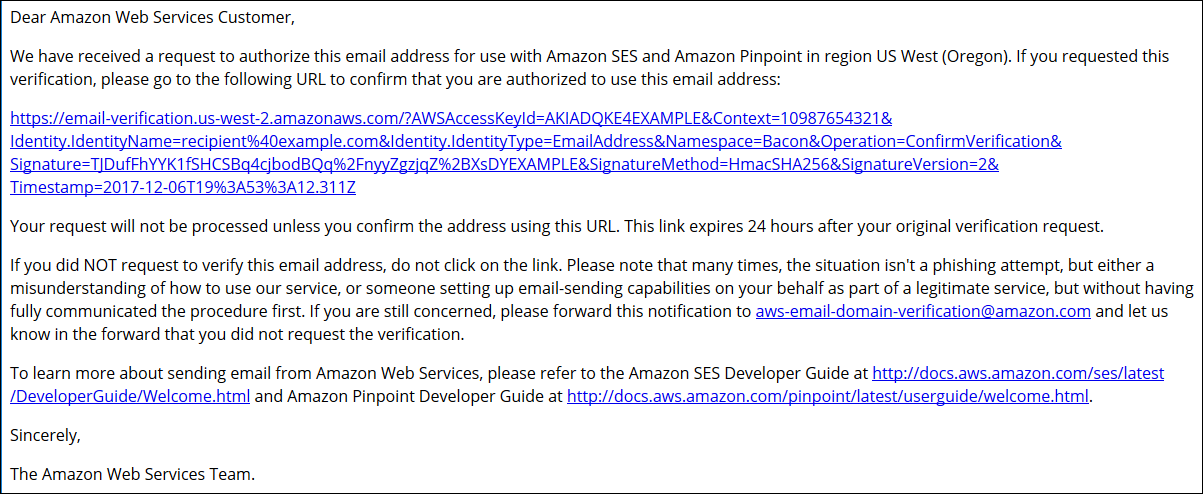
Several Amazon SES customers build applications (such as email marketing suites or ticketing systems) that send email through Amazon SES on behalf of their own customers. For the end users of these applications, the email verification process can be confusing: the verification email uses Amazon SES branding, rather than the branding of the application, and those end users never signed up to use Amazon SES directly.
If your Amazon SES use case requires your customers to have their email addresses verified for use with Amazon SES, you can create customized verification emails. These customized emails help reduce customer confusion and increase the rates at which your customers complete the registration process.
Note
To use this feature, your Amazon SES account has to be out of the sandbox. For more information, see Request production access (Moving out of the Amazon SES sandbox).
Topics in this section:
Creating a custom verification email template
To create a custom verification email, use the
CreateCustomVerificationEmailTemplate API operation. This operation
takes the following inputs:
| Attribute | Description |
|---|---|
TemplateName |
The name of the template. The name you specify must be unique. |
FromEmailAddress |
The email address that the verification email is sent from. The
address or domain you specify must be verified for use with your Amazon SES account.NoteThe |
TemplateSubject |
The subject line of the verification email. |
TemplateContent |
The body of the email. The email body can contain HTML, with certain restrictions. For more information, see Custom verification email frequently asked questions. |
SuccessRedirectionURL |
The URL that users are sent to, if their email addresses are successfully verified. |
FailureRedirectionURL |
The URL that users are sent to, if their email addresses are not successfully verified. |
You can use the AWS SDKs or the AWS CLI to create a custom verification email template
with the CreateCustomVerificationEmailTemplate operation. To learn more
about the AWS SDKs, see Tools for
Amazon Web Services
The following section includes procedures for creating a custom verification email using the AWS CLI. These procedures assume that you have installed and configured the AWS CLI. For more information about installing and configuring the AWS CLI, see the AWS Command Line Interface User Guide.
Note
To complete the procedure in this section, you must use version 1.14.6 or later of the AWS CLI. For best results, upgrade to the latest version of the AWS CLI. For more information about updating the AWS CLI, see Installing the AWS Command Line Interface in the AWS Command Line Interface User Guide.
-
In a text editor, create a new file. Paste the following content into the editor:
{
  "TemplateName": "SampleTemplate",
  "FromEmailAddress": "sender@example.com",
  "TemplateSubject": "Please confirm your email address",
  "TemplateContent": "<html>
                      <head></head>
                      <body style='font-family:sans-serif;'>
                        <h1 style='text-align:center'>Ready to start sending
                        email with ProductName?</h1>
                        <p>We here at Example Corp are happy to have you on
                          board! There's just one last step to complete before
                          you can start sending email. Just click the following
                          link to verify your email address. Once we confirm that
                          you're really you, we'll give you some additional
                          information to help you get started with ProductName.</p>
                      </body>
                      </html>",
  "SuccessRedirectionURL": "https://www.example.com/verifysuccess",
  "FailureRedirectionURL": "https://www.example.com/verifyfailure"
}
Important
To make the preceding example easier to read, the
TemplateContentattribute contains line breaks. If you paste the preceding example into your text file, remove the line breaks before proceeding.Replace the values of
TemplateName,FromEmailAddress,TemplateSubject,TemplateContent,SuccessRedirectionURL, andFailureRedirectionURLwith your own values.Note
The email address that you specify for the
FromEmailAddressparameter has to be verified, or has to be an address on a verified domain. For more information, see Verified identities in Amazon SES.When you finish, save the file as
customverificationemail.json. -
At the command line, type the following command to create the custom verification email template:
aws sesv2 create-custom-verification-email-template --cli-input-json file://customverificationemail.json -
(Optional) You can confirm that the template was created by typing the following command:
aws sesv2 list-custom-verification-email-templates
Editing a custom verification email template
You can edit a custom verification email template by using the
UpdateCustomVerificationEmailTemplate operation. This operation accepts
the same inputs as the CreateCustomVerificationEmailTemplate operation
(that is, the TemplateName, FromEmailAddress,
TemplateSubject, TemplateContent,
SuccessRedirectionURL, and FailureRedirectionURL
attributes). However, with the UpdateCustomVerificationEmailTemplate
operation, none of these attributes are required. When you pass a value for
TemplateName that is the same as the name of an existing custom
verification email template, the attributes you specify overwrite the attributes that
were originally in the template.
Sending verification emails using custom templates
After you create at least one custom verification email template, you can send it to
your customers by calling the SendCustomVerificationEmail API operation. You can call the
SendCustomVerificationEmail operation by using any of the AWS SDKs or
the AWS CLI. The SendCustomVerificationEmail operation takes the following
inputs:
| Attribute | Description |
|---|---|
EmailAddress |
The email address that is being verified. |
TemplateName |
The name of the custom verification email template that is sent to email address that is being verified. |
ConfigurationSetName |
(Optional) The name of a configuration set to use when sending the verification email. |
For example, assume your customers register for your service using a form in your
application. When the customer completes the form and submits it, your application calls
the SendCustomVerificationEmail operation, passing the customer's email
address and the name of the template you want to use.
Your customer receives an email that uses the customized email template you created. Amazon SES automatically adds a unique link to the recipient, and also a brief disclaimer. The following image shows a sample verification email that uses the template created in Creating a custom verification email template.

Custom verification email frequently asked questions
This section contains answers to frequently asked questions about the custom verification email template feature.
Q1. How many custom verification email templates can I create?
You can create up to 50 custom verification email templates per Amazon SES account.
Q2. How do custom verification emails appear to recipients?
Custom verification emails include the content you specified when you created the template, followed by a link that recipients must click to verify their email addresses.
Q3. Can I preview the custom verification email?
To preview a custom verification email, use the
SendCustomVerificationEmail operation to send a verification email
to an address you own. If you don't click the verification link, Amazon SES does not
create a new identity. If you do click the verification link, you can optionally
delete the newly created identity by using the DeleteIdentity
operation.
Q4. Can I include images in my custom verification email templates?
You can embed images in the HTML for your templates by using base64 encoding. When you embed images in this way, Amazon SES automatically converts them into attachments. You can encode an image at the command line by issuing one of the following commands:
Replace imagefile.pngoutput.txt.
You can embed the base64-encoded image by including the following in the HTML for
the template: <img
src="data:image/png;base64,base64EncodedImage"/>
In the previous example, replace pngbase64EncodedImageoutput.txt from one of
the preceding commands).
Q5. Are there any limits to the content that I can include in custom verification email templates?
Custom verification email templates can't exceed 10 MB in size. Additionally, custom verification email templates that contain HTML can only use the tags and attributes listed in the following table.
| HTML tag | Allowed attributes |
|---|---|
abbr |
class, id, style, title |
acronym |
class, id, style, title |
address |
class, id, style, title |
area |
class, id, style, title |
b |
class, id, style, title |
bdo |
class, id, style, title |
big |
class, id, style, title |
blockquote |
cite, class, id, style, title |
body |
class, id, style, title |
br |
class, id, style, title |
button |
class, id, style, title |
caption |
class, id, style, title |
center |
class, id, style, title |
cite |
class, id, style, title |
code |
class, id, style, title |
col |
class, id, span, style, title, width |
colgroup |
class, id, span, style, title, width |
dd |
class, id, style, title |
del |
class, id, style, title |
dfn |
class, id, style, title |
dir |
class, id, style, title |
div |
class, id, style, title |
dl |
class, id, style, title |
dt |
class, id, style, title |
em |
class, id, style, title |
fieldset |
class, id, style, title |
font |
class, id, style, title |
form |
class, id, style, title |
h1 |
class, id, style, title |
h2 |
class, id, style, title |
h3 |
class, id, style, title |
h4 |
class, id, style, title |
h5 |
class, id, style, title |
h6 |
class, id, style, title |
head |
class, id, style, title |
hr |
class, id, style, title |
html |
class, id, style, title |
i |
class, id, style, title |
img |
align, alt, class, height, id, src, style, title,
width |
input |
class, id, style, title |
ins |
class, id, style, title |
kbd |
class, id, style, title |
label |
class, id, style, title |
legend |
class, id, style, title |
li |
class, id, style, title |
map |
class, id, style, title |
menu |
class, id, style, title |
ol |
class, id, start, style, title, type |
optgroup |
class, id, style, title |
option |
class, id, style, title |
p |
class, id, style, title |
pre |
class, id, style, title |
q |
cite, class, id, style, title |
s |
class, id, style, title |
samp |
class, id, style, title |
select |
class, id, style, title |
small |
class, id, style, title |
span |
class, id, style, title |
strike |
class, id, style, title |
strong |
class, id, style, title |
sub |
class, id, style, title |
sup |
class, id, style, title |
table |
class, id, style, summary, title, width |
tbody |
class, id, style, title |
td |
abbr, axis, class, colspan, id, rowspan, style, title,
width |
textarea |
class, id, style, title |
tfoot |
class, id, style, title |
th |
abbr, axis, class, colspan, id, rowspan, scope, style,
title, width |
thead |
class, id, style, title |
tr |
class, id, style, title |
tt |
class, id, style, title |
u |
class, id, style, title |
ul |
class, id, style, title, type |
var |
class, id, style, title |
Note
Custom verification email templates can't include comment tags.
Q6. How many verified email addresses can exist in my account?
Your Amazon SES account can have up to 10,000 verified identities in each AWS Region. In Amazon SES, identities include both verified domains and email addresses.
Q7. Can I create custom verification email templates using the Amazon SES console?
Currently, it's only possible to create, edit, and delete custom verification emails using the Amazon SES API.
Q8. Can I track open and click events that occur when customers receive custom verification emails?
Custom verification emails can't include open or click tracking.
Q9. Can custom verification emails include custom headers?
Custom verification emails can't include custom headers.
Q10. Can I remove the text that appears at the bottom of custom verification emails?
The following text is automatically added to the end of every custom verification email and can't be removed:
If you did not request to verify this email address, please disregard this message.
Q11. Are custom verification emails DKIM-signed?
In order for verification emails to be DKIM-signed, the email address that you
specify in the FromEmailAddress attribute when you create the
verification email template must be configured to generate a DKIM signature. For
more information about setting up DKIM for domains and email addresses, see Authenticating Email with DKIM in Amazon SES.
Q12. Why don't the custom verification email template API operations appear in the SDK or CLI?
If you're unable to use the custom verification email template operations in an SDK or the AWS CLI, you may be using an older version of the SDK or CLI. The custom verification email template operations are available in the following SDKs and CLIs:
-
Version 1.14.6 or later of the AWS Command Line Interface
-
Version 3.3.205.0 or later of the AWS SDK for .NET
-
Version 1.3.20170531.19 or later of the AWS SDK for C++
-
Version 1.12.43 or later of the AWS SDK for Go
-
Version 1.11.245 or later of the AWS SDK for Java
-
Version 2.166.0 or later of the AWS SDK for JavaScript
-
Version 3.45.2 or later of the AWS SDK for PHP
-
Version 1.5.1 or later of the AWS SDK for Python (Boto)
-
Version 1.5.0 or later of the
aws-sdk-sesgem in the AWS SDK for Ruby
Q13. Why do I receive ProductionAccessNotGranted errors when I send custom verification emails?
The ProductionAccessNotGranted error indicates that your account is
still in the Amazon SES sandbox. You can only send custom verification emails if your
account has been removed from the sandbox. For more information, see Request production access (Moving out of the Amazon SES sandbox).
