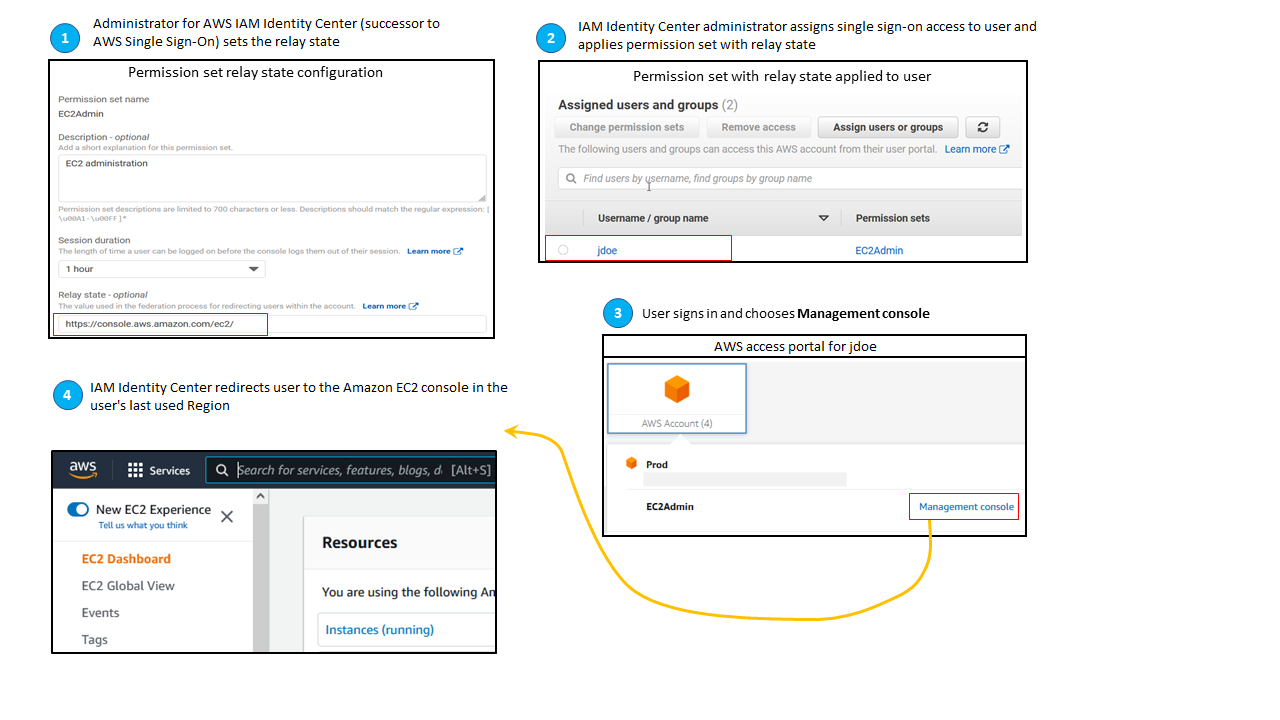
Set relay state for quick access to the AWS Management Console
By default, when a user signs into the AWS access portal, chooses an account, and then chooses the role that AWS creates from the assigned permission set, IAM Identity Center redirects the user’s browser to the AWS Management Console. You can change this behavior by setting the relay state to a different console URL.
Setting the relay state enables you to provide the user with quick access to
the console that is most appropriate for their role. For example, you can set the
relay state to the Amazon EC2 console URL
(https://console.aws.amazon.com/ec2/) to redirect the
user to that console when they choose the Amazon EC2 administrator role. During the
redirection to the default URL or relay state URL, IAM Identity Center routes the user’s
browser to the console endpoint in the last AWS Region used by the user. For
example, if a user ended their last console session in the Europe (Stockholm) Region
(eu-north-1), the user is redirected to the Amazon EC2 console in that Region.

To configure IAM Identity Center to redirect the user to a console in a specific
AWS Region, include the Region specification as part of the URL. For example,
to redirect the user to the Amazon EC2 console in the US East (Ohio) Region
(us-east-2), specify the URL for the Amazon EC2 console in that Region
(https://us-east-2.console.aws.amazon.com/ec2/).
If you enabled IAM Identity Center in the US West (Oregon) Region (us-west-2) Region and you want to
direct the user to that Region, specify
https://us-west-2.console.aws.amazon.com.
Configure the relay state
Use the following procedure to configure the relay state URL for a permission set.
-
Open the IAM Identity Center console
. -
Under Multi-account permissions, choose Permission sets.
-
Choose the name of the permission set for which you want to set the new relay state URL.
-
On the details page for the permission set, to the right of the General settings section heading, choose Edit.
-
On the Edit general permission set settings page, under Relay state, type a console URL for any of the AWS services. For example:
https://console.aws.amazon.com/ec2/Note
The relay state URL must be within the AWS Management Console.
-
If the permission set is provisioned in any AWS accounts, the names of the accounts appear under AWS accounts to reprovision automatically. After the relay state URL for the permission set is updated, all AWS accounts that use the permission set are reprovisioned. This means that the new value for this setting is applied to all AWS accounts that use the permission set.
-
Choose Save changes.
-
At the top of the AWS Organization page, a notification appears.
-
If the permission set is provisioned in one or more AWS accounts, the notification confirms that the AWS accounts were reprovisioned successfully, and the updated permission set was applied to the accounts.
-
If the permission set isn't provisioned in an AWS account, the notification confirms that the settings for the permission set were updated.
-
Note
You can automate this process by using the AWS API, an AWS SDK, or the AWS Command Line Interface(AWS CLI). For more information, see:
-
The
CreatePermissionSetorUpdatePermissionSetactions in the IAM Identity Center API Reference -
The
create-permission-setorupdate-permission-setcommands in the sso-admin section of the AWS CLI Command Reference.