Creating data products
With Automated Data Analytics on AWS, you can join datasets from different source locations and file types by creating data products.
-
A dataset is a singular collection of data, such as a database table.
-
A Data Product is a dataset that has successfully been imported into Automated Data Analytics on AWS and is ready to be queried.
In Automated Data Analytics on AWS, you must create a Data Product in order to query a dataset.
Step 1: Create a domain
In Automated Data Analytics on AWS, a domain is a user defined group of data products. For example, this might be a team or a project. Domains are used as a structured way for users to access data products. Before you create a Data Product, you must first create a Domain.
The following steps describe the process of creating a domain.
-
On the Data Products screen, select Create Domain. The Create Domain dialog is displayed.
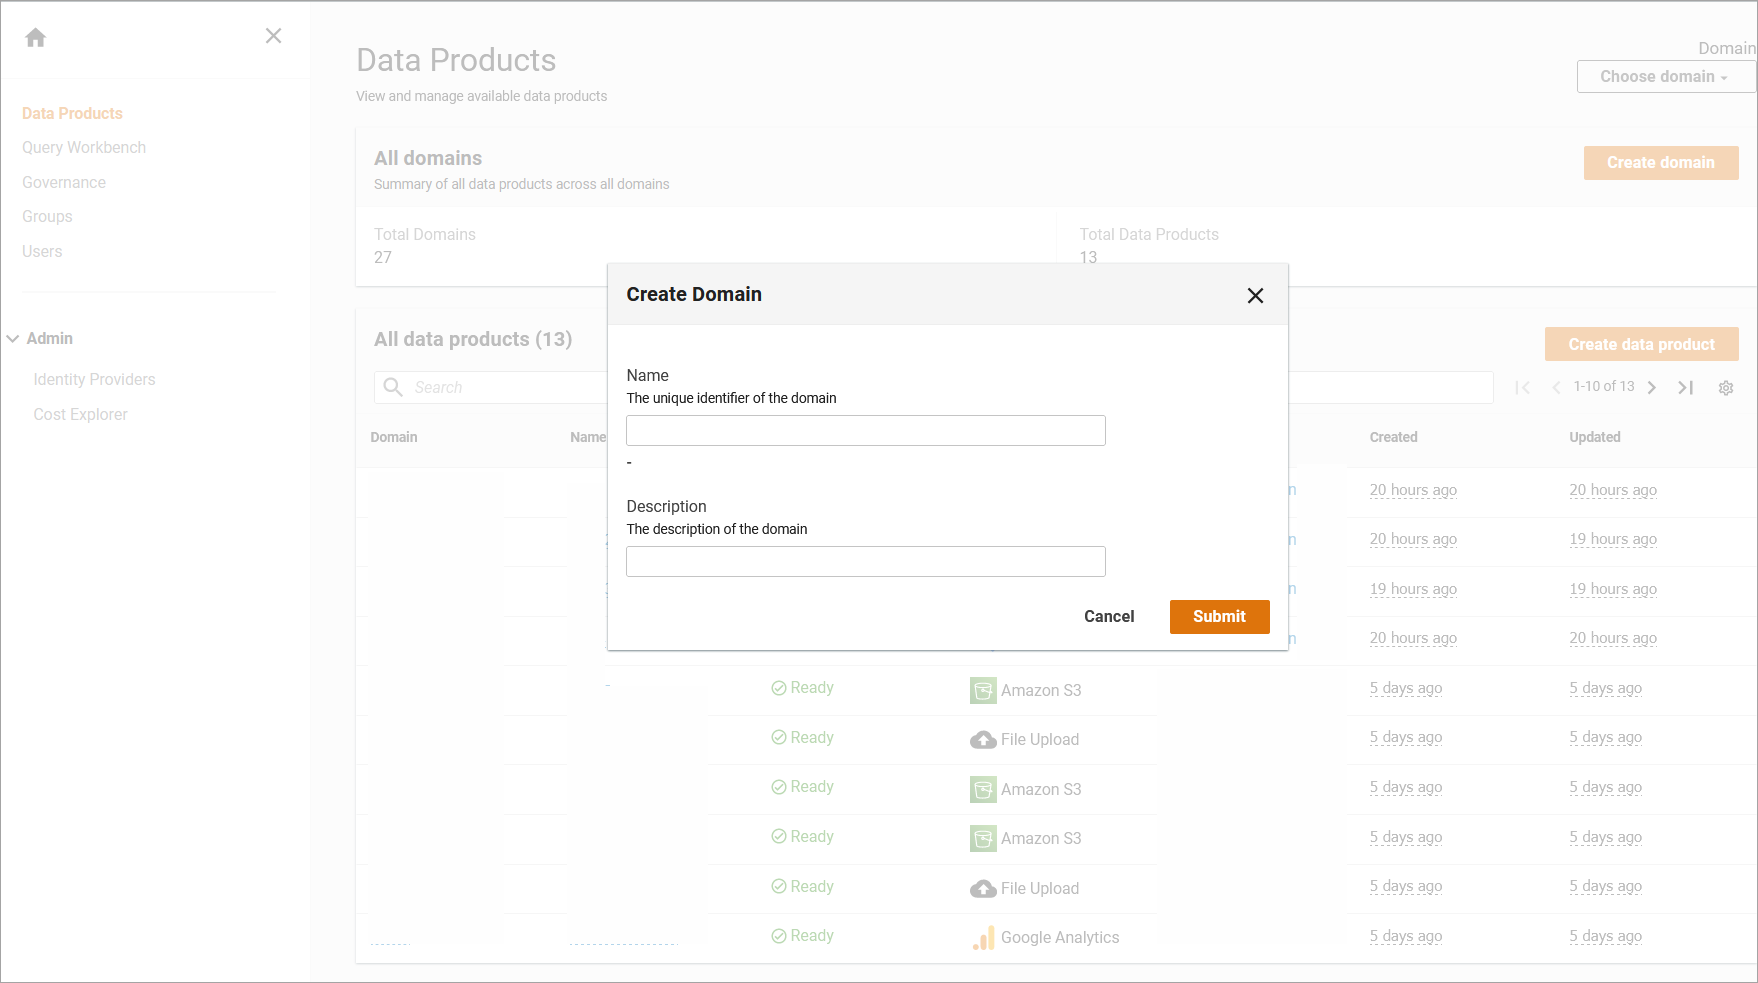
Create a new domain
-
On the Create Domain dialog, enter a Domain Name and Description, and select Submit. You can also add tags to the Domain and use them to give context to the domain.
-
A Domain Name must have at least 2 characters and cannot exceed 2,048 characters. Additionally, the Domain Name must start with a letter and cannot contain and special such as colons, asterisks, or exclamation marks.
-
A tag is a user specified piece of data that makes it easier to identify the resources.Tags used throughout the Automated Data Analytics on AWS solution to enhance the search functionality. For more information, refer to the Search section.
-
Step 2: Create a new data product
Before you create a data product, ensure you have created a domain. The following steps describe how to create a data product.
-
Using the left side navigation pane, select Data Products.
-
On the Data Products page, under the Data Products section, select Create data product.
-
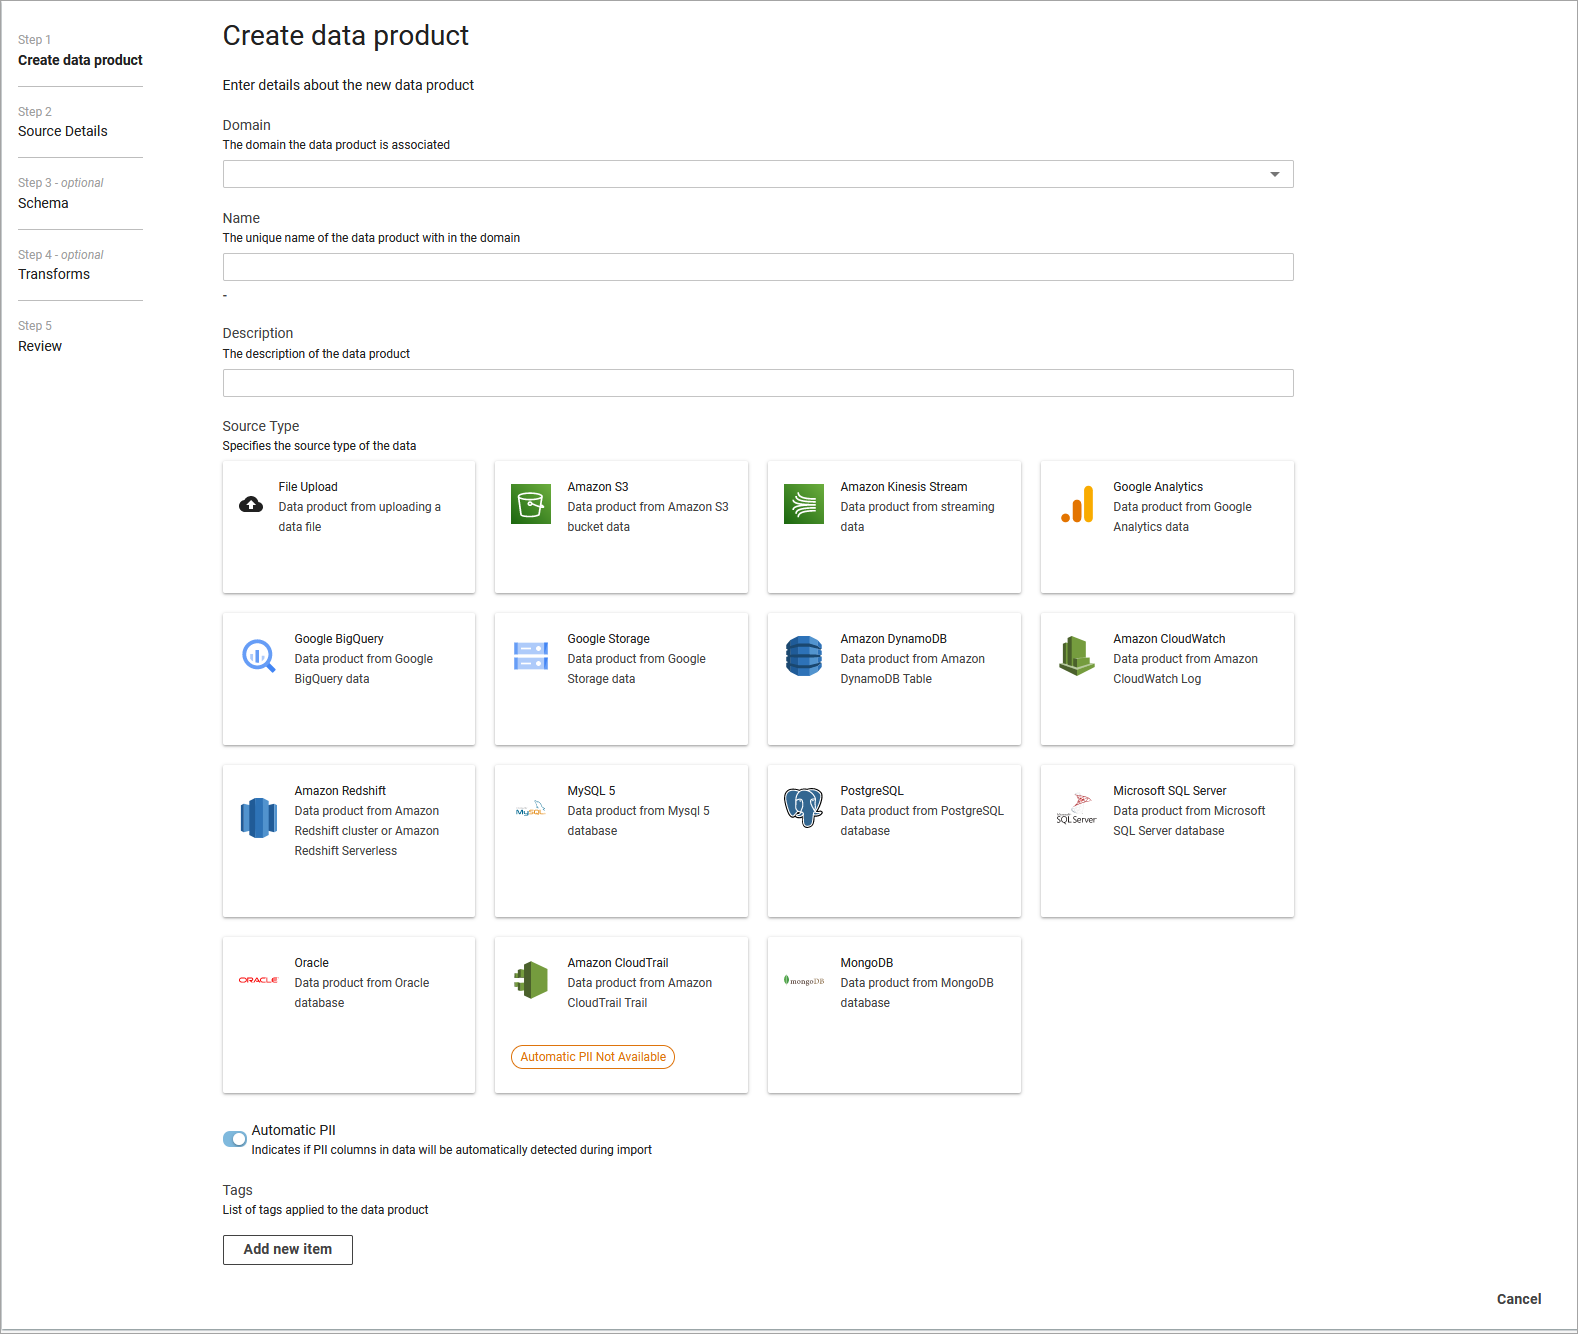
On the Create data product page, choose the domain you have previously created.
-
Add a name, description, and any tags.
-
Select Source. For detailed instructions on data connectors, refer to the Data connectors guide.
-
A source is the origin of a dataset. You can import data from Amazon S3, Amazon Kinesis Stream, Amazon CloudWatch, File Upload, Google Cloud Storage, Google Analytics, Google BigQuery, MySQL5, PostgreSQL, Microsoft SQL Server, DynamoDB, MongoDB, or CloudTrail.
Note
Automated Data Analytics on AWS will not grant itself, or its users’, permissions to access resources, maintaining the defined access policies of the source resource. Access to source data must be granted by the maintainer of the source resource outside of the solution to allow the solution to read the source for purposes of creating data products from source and federating queries including source within Automated Data Analytics on AWS. Whenever the solution accesses an AWS-based source, it applies principal tags which specify the Automated Data Analytics on AWS service, groups, and user performing the action.
-
-
Many businesses interact with datasets that contain sensitive customer information like emails, credit card numbers, or passport numbers. This is often referred to as Personally Identifiable Information (PII) and must be only be viewed by privileged users. To automatically detect PII, select Automatic PII Detection on the upper right hand side of the screen. This scans your dataset for any potentially PII information and applies the user defined Governance controls. For more information on these controls, refer to the Governance section.
Create a new data product
-
Select Next. The Source Details page is displayed.
Step 3: Provide source details
For importing a dataset, you will need to provide access to the data source and specify the update frequency.
-
On the Source Details page, enter the source details.
Note
The source details will vary depending on the type of source selected in the previous step. For detailed instructions on data connectors, refer to the Data connectors guide.
-
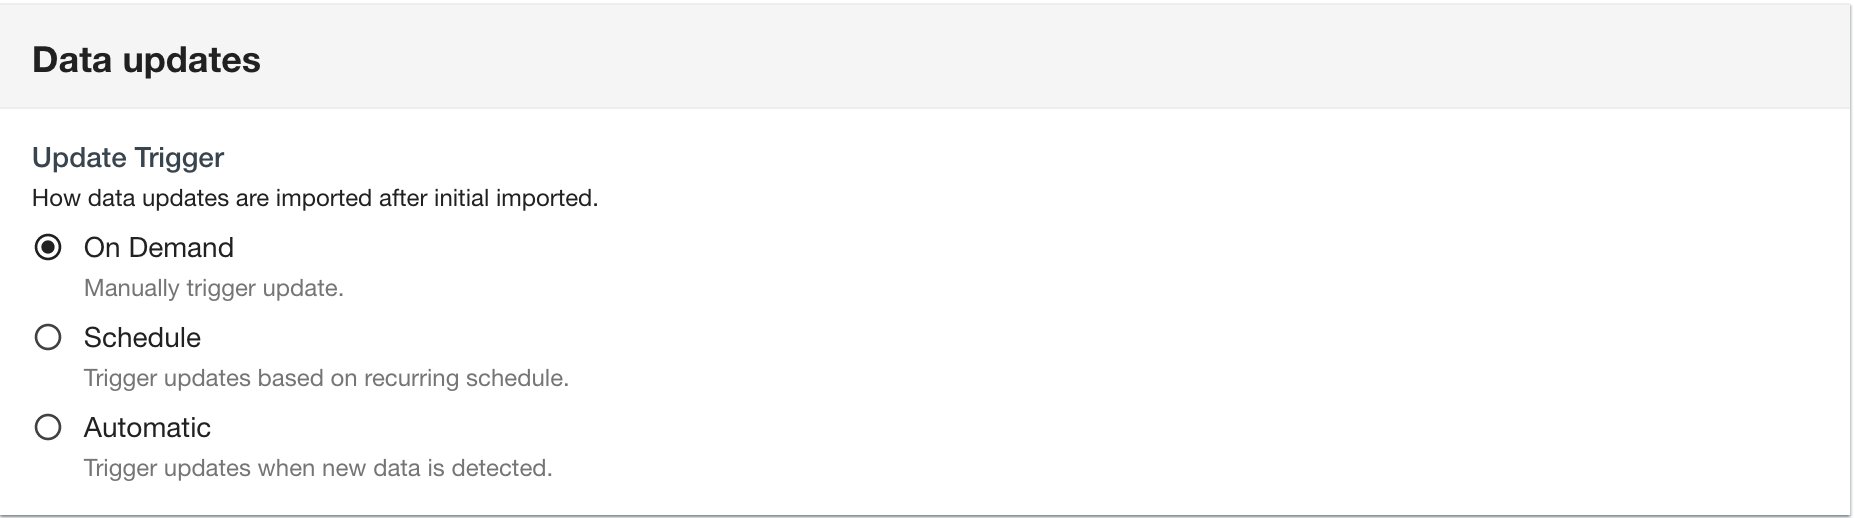
Under Data updates, select the Update Trigger for your source.
Update data trigger
-
Automatic
-
The Automatic option will refresh data continuously.
-
-
On Demand
-
The On Demand option will only import the data at the time of creating the new data pproduct. Once the data product has been created, you can refresh the data by choosing Start Data Update in the dataproduct table or making a call via the Automated Data Analytics on AWS API.
-
For Google Analytics, when user selects the On Demand trigger type, they need to configure the start and end date for the import process.
-
-
Schedule
-
Use the Schedule option to choose the interval you would like data to be refreshed. This includes hourly, daily, weekly, monthly, or a custom window.
-
For the Google Analytics connector, Automated Data Analytics on AWS only supports daily, weekly and monthly scheduled frequency. Users can choose append or replace as the update policy as part of the scheduling.
-
Note
Depending on the trigger selected, your AWS costs for operating the Automated Data Analytics on AWS solution may vary.
-
-
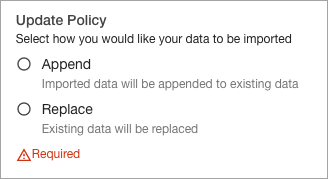
Select the Update Policy for your data source.
Update policy
-
Append: If you select the Append update policy for your data product, every time new data is created in the data source (e.g. new data files are dropped into S3 bucket), ADA will only process the incoming data and append it to the existing dataset. Use this option when the data source has new data added to the data source regularly.
-
Replace: If you select the Replace update policy, every time ADA updates a data product from the data source, it will re-import all the data from the data source. Use this option when you want the source data to be regularly updated in an existing dataset.
-
-
Select Next. The Schema page is displayed.
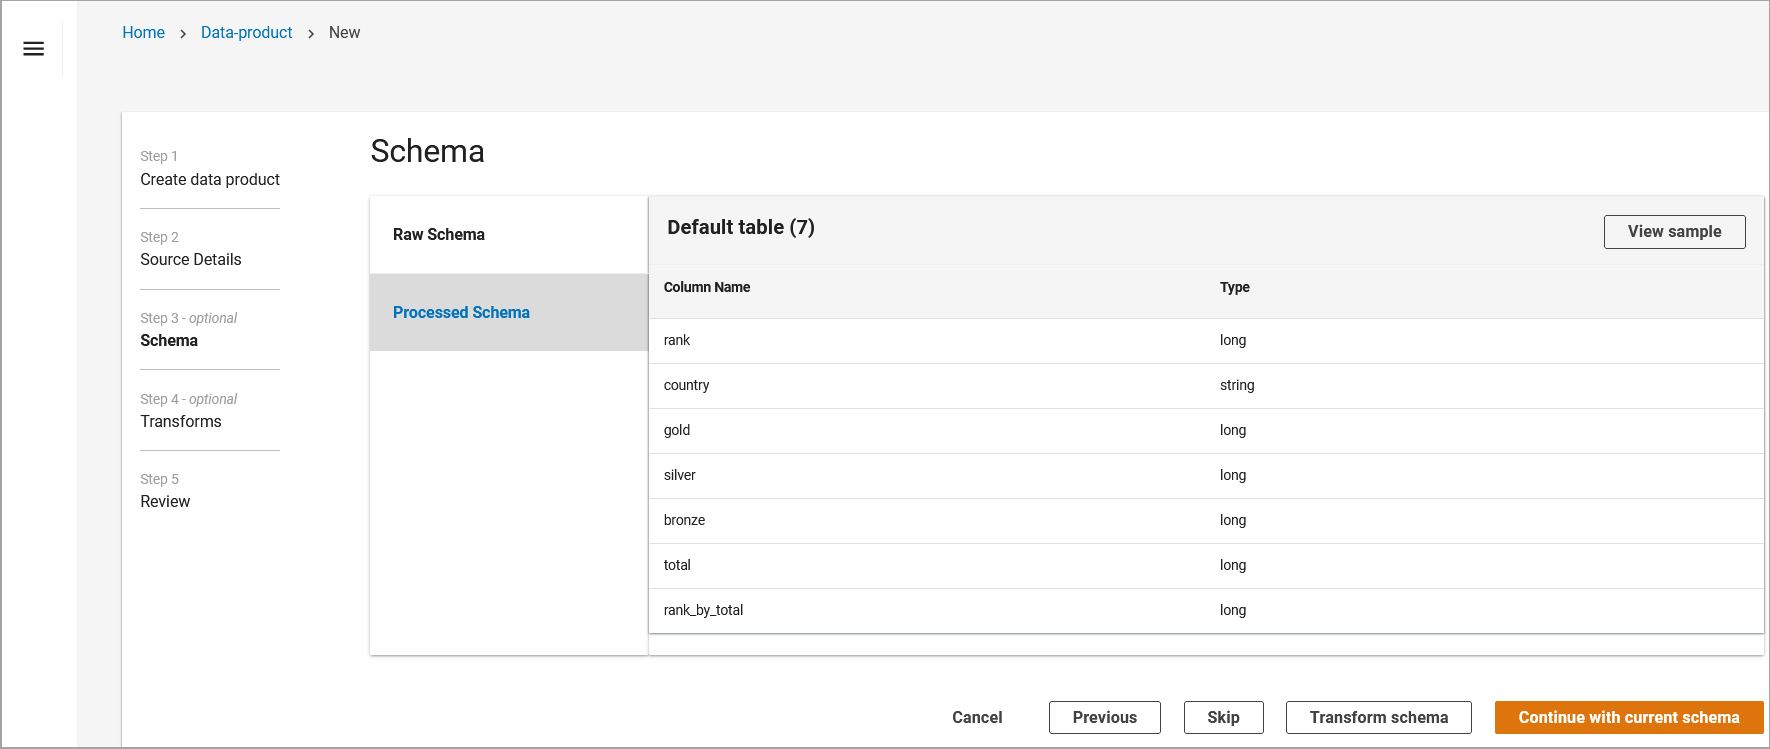
Step 4: Review data schema
After entering source details, Automated Data Analytics on AWS will scan your data to generate a preview of its schema. This is displayed as Transformed Schema.
Transformed schema page
-
You can use the schema preview to inspect the sample data. To do this, select Sample.
-
You might receive a notification stating there may be PII data in the dataset. Users must confirm that the dataset does not contain PII or they have privileged access rights. To confirm, select Agree.
-
The sample data displays a table containing the first 10 rows of the dataset.

Display data
-
Once you review the data, you can either use the inferred schema or transform the schema.
-
If the schema looks correct, select Continue with Current Schema, and Submit. This will start the workflow to import the data, making it available to be queried.
-
If you want to modify the data using Transforms, refer to the section.
-
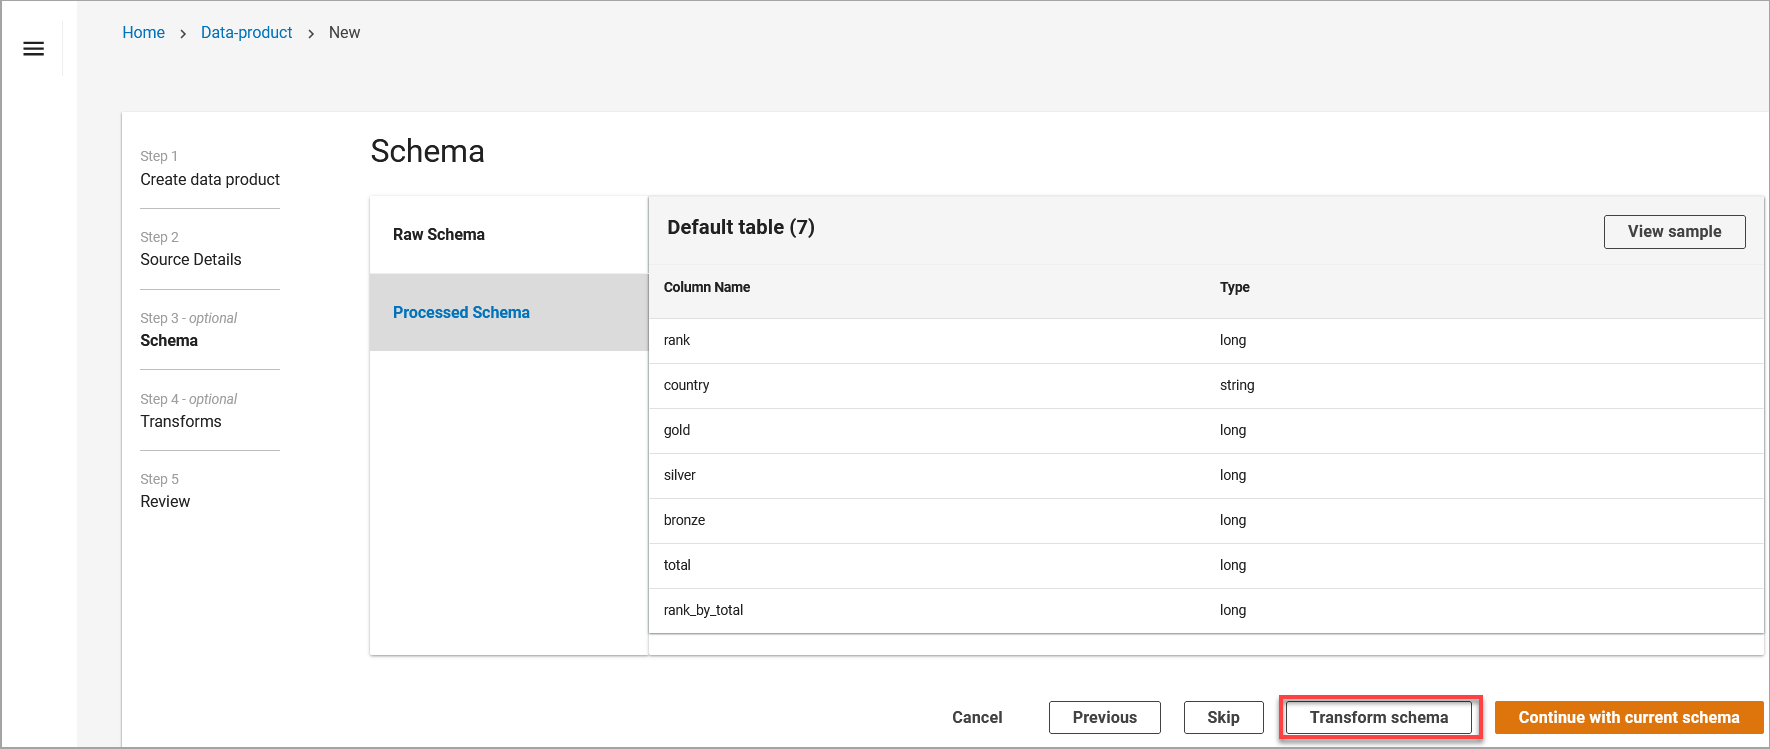
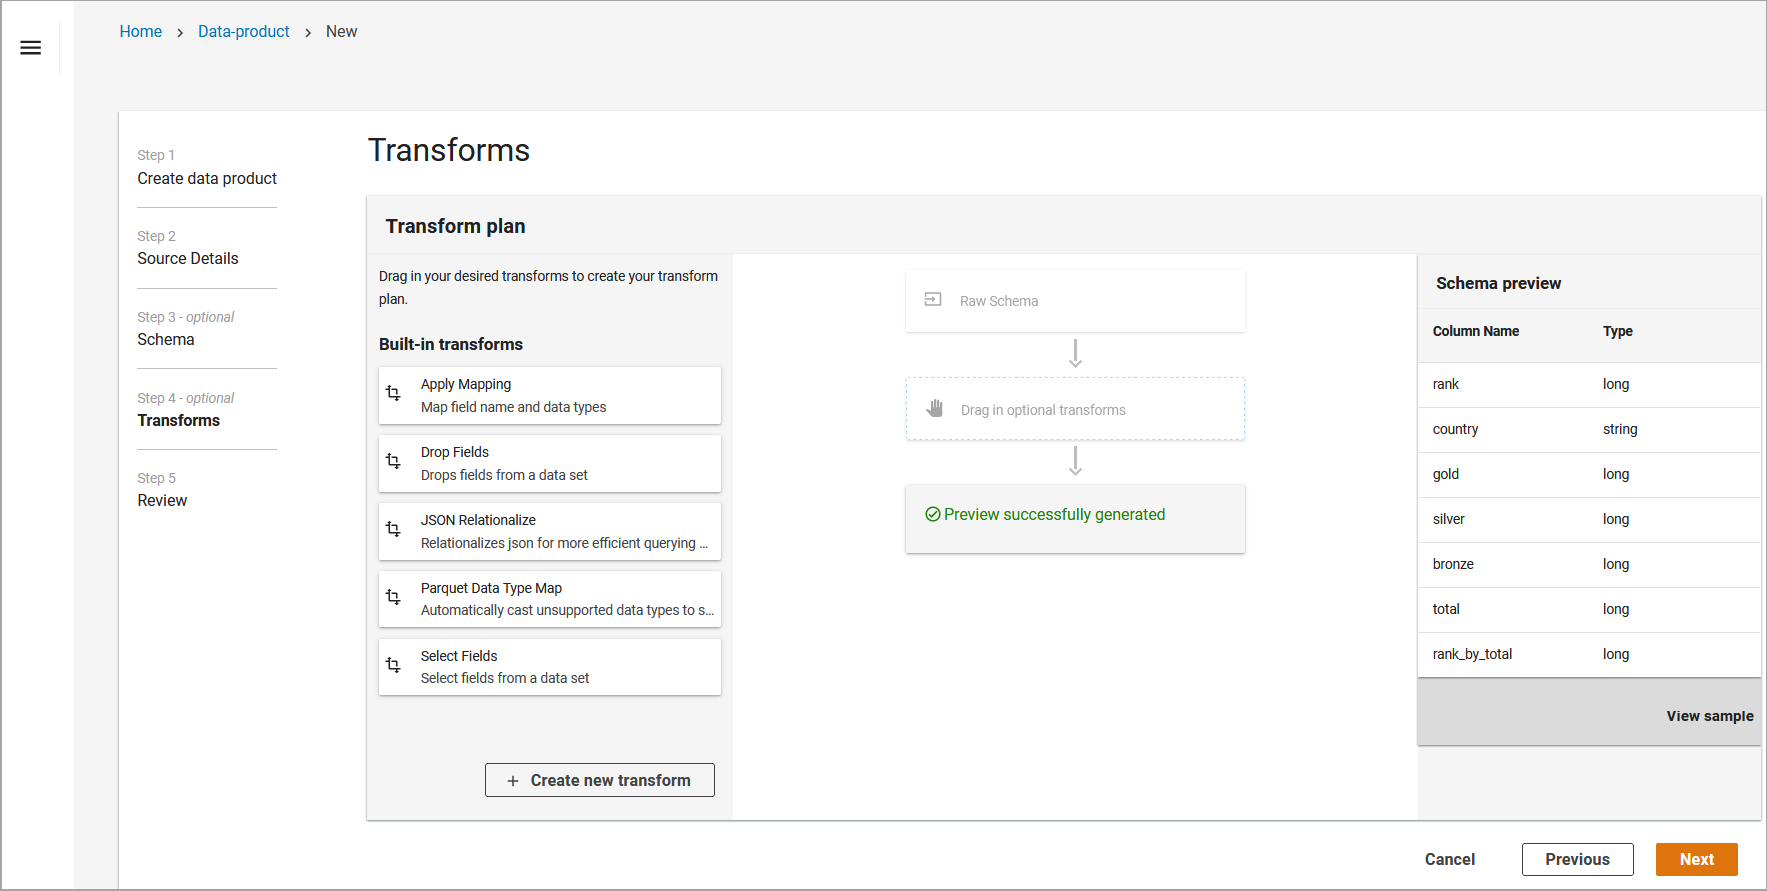
Step 5: Transform your schema
During the dataset import process, you can modify your dataset through transforms.
A transform is the process of converting data from one format to another. In Automated Data Analytics on AWS, this helps to clean the data into a useable format to run queries.
-
To use Transform, on the Schema Preview page, select Transform Schema.
Transform schema
Automated Data Analytics on AWS has 4 default transforms: Apply Mapping, Drop Fields, JSON Relationalize, Select Fields. You can use these transforms through the Transform plan screen. Transformations can be applied individually, or multiple transformations can be layered in a sequence.
-
Drag the desired transform from the left hand panel into the center panel.
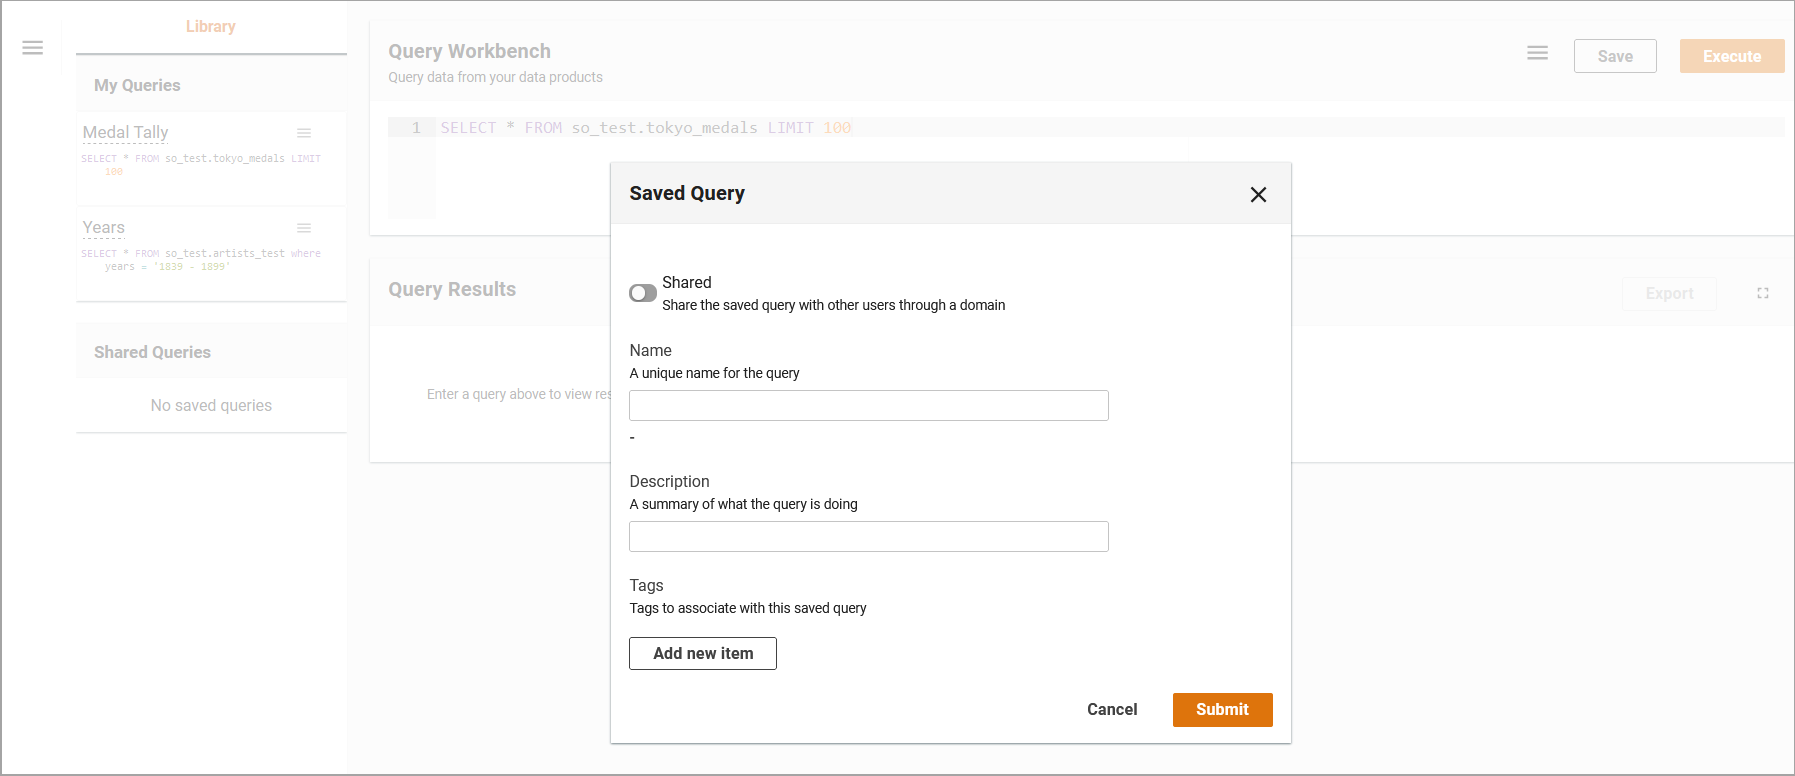
Saved query dialog
-
You can use Apply Mapping to modify the name and data type for columns i.e. string, date, integer, etc. To do this, select Add new item. The Apply Mapping Input Parameters dialog box is displayed.
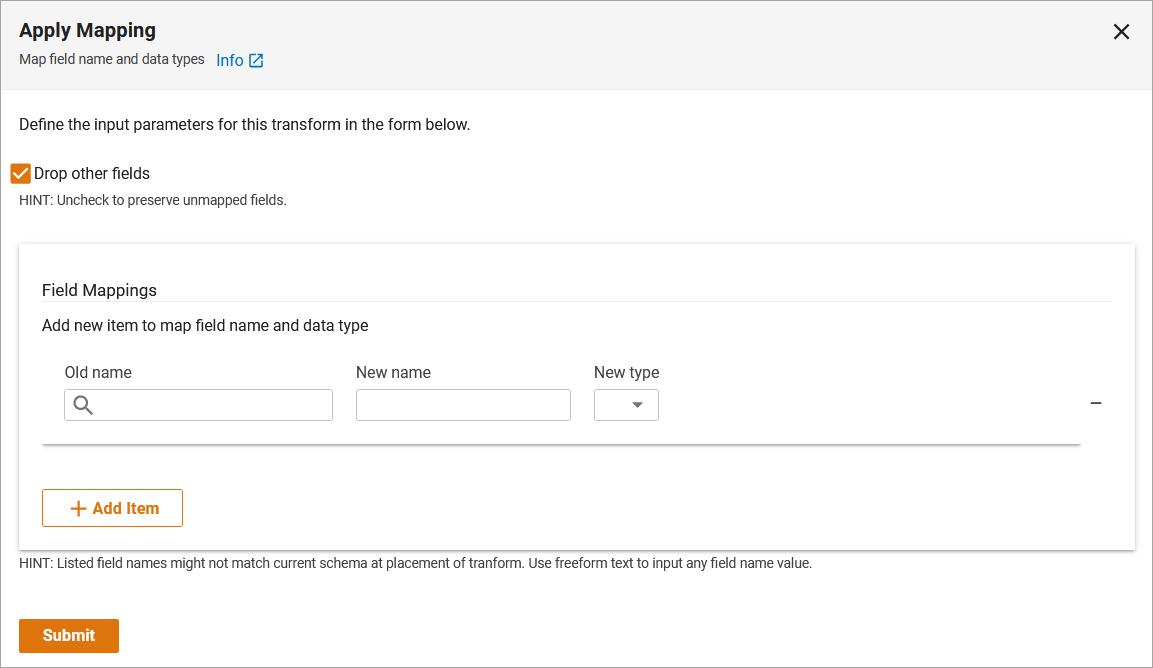
Apply Mapping
-
-
Select the desired source name (column) and choose from changing the Target Name (column name) or Target Type (data type). Note: You can perform simultaneously or independent of one another. For more information on the Apply Mapping transform, refer to the ApplyMapping Class - AWS Glue documentation.
Apply transforms
-
Drop Fields allows you to drop a field in the dataset, such as top-level or nested field. You can do this by typing or selecting from the list of fields to drop. Select Submit to submit your changes. For more information on the Drop Fields transform, refer to the SelectFields Class - AWS Glue documentation.
-
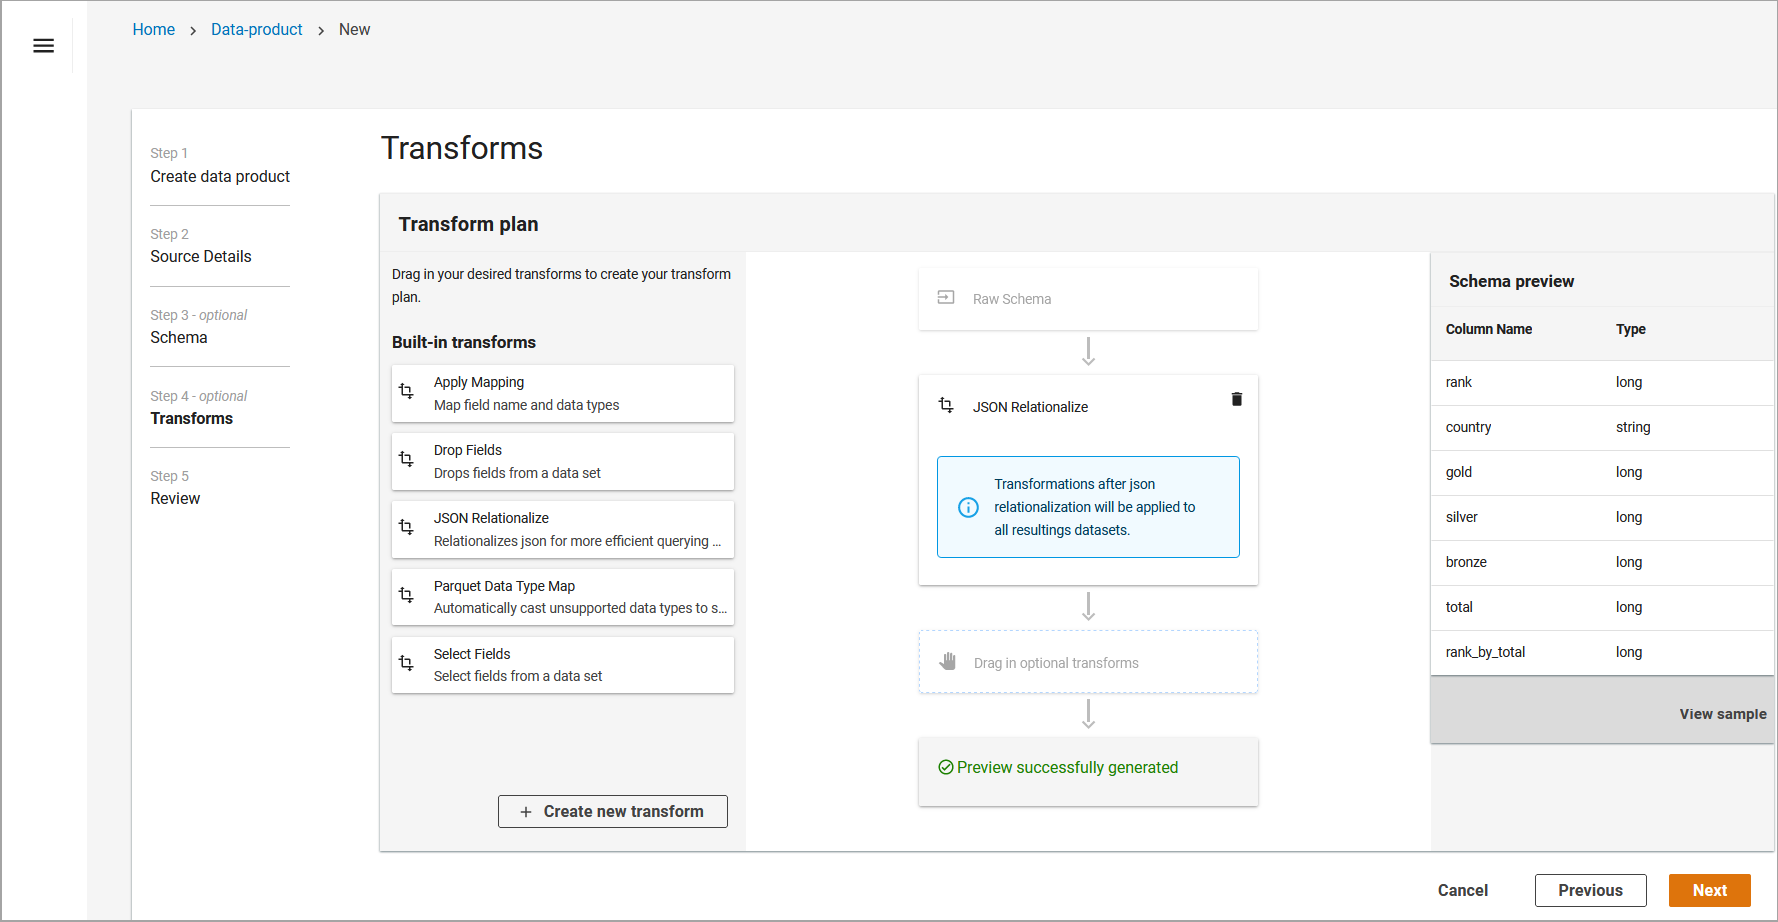
JSON Relationalize allows you convert nested JSON into columns for more efficient queries. To do this, drag the JSON Relationalize transform into the Transform Planner. For more information on the JSON Relationalize transform, refer to SelectFields Class - AWS Glue documentation.
JSON Relationalize
-
Select Fields allows you to select fields in the dataset. To do this, type or select from the list of fields. For more information on the JSON Relationalize transform, refer to the SelectFields Class - AWS Glue documentation.
-
-
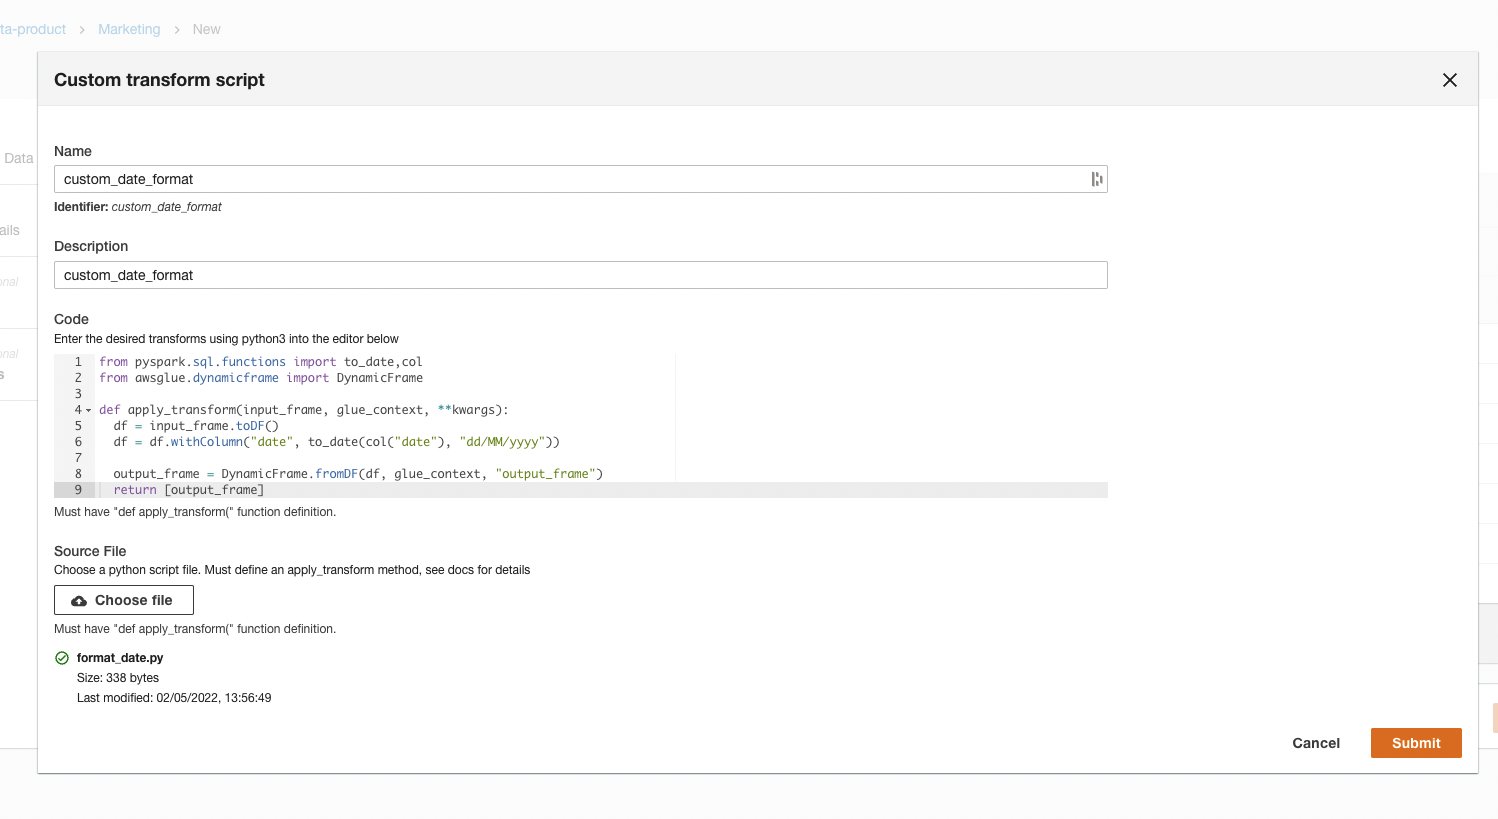
You also have the ability to add your own custom transforms through a Python script. To do so, select Add Custom Transform at the bottom left hand side of the screen. You will need to add a Name, Identifier and Description of the transform, along with the script added manually or by file upload. If you are using a file upload, select Choose File and Submit
Custom transform script
-
Once you have applied all of the required transforms, select Next.
-
Review the transformed schema and select Submit.
