Automated deployment - Stacks
Note
For multi-account customers, we strongly recommend deployment with StackSets.
Before you launch the solution, review the architecture, solution components, security, and design considerations discussed in this guide. Follow the step-by-step instructions in this section to configure and deploy the solution into your account.
Time to deploy: Approximately 30 minutes
Prerequisites
Before you deploy this solution, ensure that AWS Security Hub is in the same AWS Region as your primary and secondary accounts. If you have previously deployed this solution, you must uninstall the existing solution. For more information, refer to Update the solution.
Deployment overview
Use the following steps to deploy this solution on AWS.
(Optional) Step 0: Launch a ticket system integration stack
-
If you intend to use the ticketing feature, deploy the ticketing integration stack into your Security Hub admin account first.
-
Copy the Lambda function name from this stack and provide it as input to the admin stack (see Step 1).
Step 1: Launch the admin stack
-
Launch the
automated-security-response-admin.templateAWS CloudFormation template into your AWS Security Hub admin account. -
Choose which security standards to install.
-
Choose an existing Orchestrator log group to use (select
YesifSO0111-ASR-Orchestratoralready exists from a previous installation).
Step 2: Install the remediation roles into each AWS Security Hub member account
-
Launch the
automated-security-response-member-roles.templateAWS CloudFormation template into one Region per member account. -
Enter the 12-digit account IG for the AWS Security Hub admin account.
Step 3: Launch the member stack
-
Specify the name of the CloudWatch Logs group to use with CIS 3.1-3.14 remediations. It must be the name of a CloudWatch Logs log group that receives CloudTrail logs.
-
Choose whether to install the remediation roles. Install these roles only once per account.
-
Select which playbooks to install.
-
Enter the account ID of the AWS Security Hub admin account.
Step 4: (Optional) Adjust the available remediations
-
Remove any remediations on a per-member account basis. This step is optional.
(Optional) Step 0: Launch a ticket system integration stack
-
If you intend to use the ticketing feature, launch the respective integration stack first.
-
Choose the provided integration stacks for Jira or ServiceNow, or use them as a blueprint to implement your own custom integration.
To deploy the Jira stack:
-
Enter a name for your stack.
-
Provide the URI to your Jira instance.
-
Provide the project key for the Jira project that you want to send tickets to.
-
Create a new key-value secret in Secrets Manager that holds your Jira
UsernameandPassword.Note
You can choose to use a Jira API key in place of your password by providing your username as
Usernameand your API key as thePassword. -
Add the ARN of this secret as input to the stack.
"Provide a stack name Jira project information, and Jira API credentials.

To deploy the ServiceNow stack:
-
Enter a name for your stack.
-
Provide the URI of your ServiceNow instance.
-
Provide your ServiceNow table name.
-
Create an API key in ServiceNow with permission to modify the table you intend to write to.
-
Create a secret in Secrets Manager with the key
API_Keyand provide the secret ARN as input to the stack.Provide a stack name ServiceNow project information, and ServiceNow API credentials.

To create a custom integration stack: Include a Lambda function that the solution orchestrator Step Functions can call for each remediation. The Lambda function should take the input provided by Step Functions, construct a payload according to the requirements of your ticketing system, and make a request to your system to create the ticket.
-
Step 1: Launch the admin stack
Important
This solution includes an option to send anonymized operational metrics to AWS. We use this data to better understand how customers use this solution and related services and products. AWS owns the data gathered though this survey. Data collection is subject to the AWS Privacy Notice
To opt out of this feature, download the template, modify the AWS CloudFormation mapping section, and then use the AWS CloudFormation console to upload your template and deploy the solution. For more information, refer to the Anonymized data collection section of this guide.
This automated AWS CloudFormation template deploys the Automated Security Response on AWS solution in the AWS Cloud. Before you launch the stack, you must enable Security Hub and complete the prerequisites.
Note
You are responsible for the cost of the AWS services used while running this solution. For more details, visit to the Cost section in this guide, and refer to the pricing webpage for each AWS service used in this solution.
-
Sign in to the AWS Management Console from the account where the AWS Security Hub is currently configured, and use the button below to launch the
automated-security-response-admin.templateAWS CloudFormation template.
You can also download the template
as a starting point for your own implementation. -
The template launches in the US East (N. Virginia) Region by default. To launch this solution in a different AWS Region, use the Region selector in the AWS Management Console navigation bar.
Note
This solution uses AWS Systems Manager which is currently available in specific AWS Regions only. The solution works in all of the Regions that support this service. For the most current availability by Region, refer to the AWS Regional Services List
. -
On the Create stack page, verify that the correct template URL is in the Amazon S3 URL text box and then choose Next.
-
On the Specify stack details page, assign a name to your solution stack. For information about naming character limitations, refer to IAM and STS limits in the AWS Identity and Access Management User Guide.
-
On the Parameters page, choose Next.
Parameter Default Description Load SC Admin Stack
yesSpecify whether to install the admin components for automated remediation of SC controls.
Load AFSBP Admin Stack
noSpecify whether to install the admin components for automated remediation of FSBP controls.
Load CIS120 Admin Stack
noSpecify whether to install the admin components for automated remediation of CIS120 controls.
Load CIS140 Admin Stack
noSpecify whether to install the admin components for automated remediation of CIS140 controls.
Load CIS300 Admin Stack
noSpecify whether to install the admin components for automated remediation of CIS300 controls.
Load PC1321 Admin Stack
noSpecify whether to install the admin components for automated remediation of PC1321 controls.
Load NIST Admin Stack
noSpecify whether to install the admin components for automated remediation of NIST controls.
Reuse Orchestrator Log Group
noSelect whether or not to reuse an existing
SO0111-ASR-OrchestratorCloudWatch Logs group. This simplifies reinstallation and upgrades without losing log data from a previous version. Reuse existingOrchestrator Log Groupchooseyesif theOrchestrator Log Groupstill exists from an earlier deployment in this account, otherwiseno. If you are performing a stack update from an earlier version than v2.3.0 choosenoUse CloudWatch Metrics
yesSpecify whether to enable CloudWatch Metrics for monitoring the solution. This will create a CloudWatch Dashboard for viewing metrics.
Use CloudWatch Metrics Alarms
yesSpecify whether to enable CloudWatch Metrics Alarms for the solution. This will create Alarms for certain metrics collected by the solution.
RemediationFailureAlarmThreshold
5Specify the threshold for percentage of remediation failures per control ID. For example, if you enter
5, you receive an alarm if a control ID fails more than 5% of remediations at a given day.This parameter functions only if alarms are created (see the Use CloudWatch Metrics Alarms parameter).
EnableEnhancedCloudWatchMetrics
noIf
yes, creates additional CloudWatch metrics to track all control IDs individually on the CloudWatch dashboard and as CloudWatch alarms.See the Cost section to understand the additional cost that this incurs.
TicketGenFunctionName
(Optional input)
Optional. Leave blank if you don’t want to integrate a ticketing system. Otherwise, provide the Lambda function name from the stack output of Step 0, for example:
SO0111-ASR-ServiceNow-TicketGenerator.TargetAccountIDs
ALLA list of AWS account IDs to control the scope of automated remediation.
Use "ALL" to target all accounts in the organization.
Or provide a comma-separated list of 12-digit AWS Account IDs. Example: "123456789012,098765432109"
TargetAccountIDsStrategy
INCLUDEDefines how the solution applies automated remediations based on the TargetAccountIDs list.
INCLUDE: Run automated remediations only for accounts listed.
EXCLUDE: Run automated remediations for all accounts except those listed.
Note
You must manually enable automatic remediations in the Admin account after deploying or updating the solution’s CloudFormation stacks.
-
On the Configure stack options page, choose Next.
-
On the Review page, review and confirm the settings. Check the box acknowledging that the template will create AWS Identity and Access Management (IAM) resources.
-
Choose Create stack to deploy the stack.
You can view the status of the stack in the AWS CloudFormation console in the Status column. You should receive a CREATE_COMPLETE status in approximately 15 minutes.
Step 2: Install the remediation roles into each AWS Security Hub member account
The automated-security-response-member-roles.template StackSet must be deployed in only one Region per member account. It defines the global roles that allow cross-account API calls from the ASR Orchestrator step function.
-
Sign in to the AWS Management Console for each AWS Security Hub member account (including the admin account, which is also a member). Select the button to launch the
automated-security-response-member-roles.templateAWS CloudFormation template. You can also download the templateas a starting point for your own implementation.
-
The template launches in the US East (N. Virginia) Region by default. To launch this solution in a different AWS Region, use the Region selector in the AWS Management Console navigation bar.
-
On the Create stack page, verify that the correct template URL is in the Amazon S3 URL text box and then choose Next.
-
On the Specify stack details page, assign a name to your solution stack. For information about naming character limitations, refer to IAM and STS limits in the AWS Identity and Access Management User Guide.
-
On the Parameters page, specify the following parameters and choose Next.
Parameter Default Description Namespace
<Requires input>Enter a string of up to 9 lowercase alphanumeric characters. Unique namespace to be added as a suffix to remediation IAM role names. The same namespace should be used in the Member Roles and Member stacks. This string should be unique for each solution deployment, but does not need to be changed during stack updates. The namespace value does not need to be unique per member account.
Sec Hub Account Admin
<Requires input>Enter the 12-digit account ID for the AWS Security Hub admin account. This value grants permissions to the admin account’s solution role.
-
On the Configure stack options page, choose Next.
-
On the Review page, review and confirm the settings. Check the box acknowledging that the template will create AWS Identity and Access Management (IAM) resources.
-
Choose Create stack to deploy the stack.
You can view the status of the stack in the AWS CloudFormation console in the Status column. You should receive a CREATE_COMPLETE status in approximately 5 minutes. You may continue with the next step while this stack loads.
Step 3: Launch the member stack
Important
This solution includes an option to send anonymized operational metrics to AWS. We use this data to better understand how customers use this solution and related services and products. AWS owns the data gathered though this survey. Data collection is subject to the AWS Privacy Policy.
To opt out of this feature, download the template, modify the AWS CloudFormation mapping section, and then use the AWS CloudFormation console to upload your template and deploy the solution. For more information, refer to the Collection of operational metrics section of this guide.
The automated-security-response-member stack must be installed into each Security Hub member account. This stack defines the runbooks for automated remediation. The admin for each member account can control what remediations are available via this stack.
-
Sign in to the AWS Management Console for each AWS Security Hub member account (including the admin account, which is also a member). Select the button to launch the
automated-security-response-member.templateAWS CloudFormation template.
You can also download the template
+
Note
This solution uses AWS Systems Manager, which is currently available in the majority of AWS Regions.
The solution works in all of the Regions that support these services.
For the most current availability by Region, refer to the AWS Regional Services List
-
On the Create stack page, verify that the correct template URL is in the Amazon S3 URL text box and then choose Next.
-
On the Specify stack details page, assign a name to your solution stack. For information about naming character limitations, refer to IAM and STS limits in the AWS Identity and Access Management User Guide.
-
On the Parameters page, specify the following parameters and choose Next.
Parameter Default Description Provide the name of the LogGroup to be used to create Metric Filters and Alarms
<Requires input>Specify the name of a CloudWatch Logs group where CloudTrail logs API calls. This is used for CIS 3.1-3.14 remediations.
Load SC Member Stack
yesSpecify whether to install the member components for automated remediation of SC controls.
Load AFSBP Member Stack
noSpecify whether to install the member components for automated remediation of FSBP controls.
Load CIS120 Member Stack
noSpecify whether to install the member components for automated remediation of CIS120 controls.
Load CIS140 Member Stack
noSpecify whether to install the member components for automated remediation of CIS140 controls.
Load CIS300 Member Stack
noSpecify whether to install the member components for automated remediation of CIS300 controls.
Load PC1321 Member Stack
noSpecify whether to install the member components for automated remediation of PC1321 controls.
Load NIST Member Stack
noSpecify whether to install the member components for automated remediation of NIST controls.
Create S3 Bucket For Redshift Audit Logging
noSelect
yesif the S3 bucket should be created for the FSBP RedShift.4 remediation. For details of the S3 bucket and the remediation, review the Redshift.4 remediation in the AWS Security Hub User Guide.Sec Hub Admin Account
<Requires input>Enter the 12-digit account ID for the AWS Security Hub admin account.
Namespace
<Requires input>Enter a string of up to 9 lowercase alphanumeric characters. This string becomes part of the IAM role names and Action Log S3 bucket. Use the same value for member stack deployment and member roles stack deployment. String should be unique for each solution deployment, but does not need to be changed during stack updates.
EnableCloudTrailForASRActionLog
noSelect
yesif you want to monitor management events conducted by the solution on the CloudWatch dashboard. The solution creates a CloudTrail trail in each member account where you selectyes. You must deploy the solution into an AWS Organization to enable this feature. See the Cost section to understand the additional cost that this incurs. -
On the Configure stack options page, choose Next.
-
On the Review page, review and confirm the settings. Check the box acknowledging that the template will create AWS Identity and Access Management (IAM) resources.
-
Choose Create stack to deploy the stack.
You can view the status of the stack in the AWS CloudFormation console in the Status column. You should receive a CREATE_COMPLETE status in approximately 15 minutes.
Step 4: (Optional) Adjust the available remediations
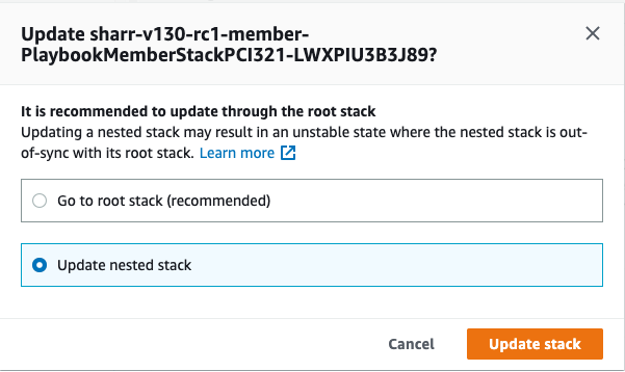
If you want to remove specific remediations from a member account, you can do so by updating the nested stack for the security standard. For simplicity, the nested stack options are not propagated to the root stack.
-
Sign in to the AWS CloudFormation console
and select the nested stack. -
Choose Update.
-
Select Update nested stack and choose Update stack.
Update nested stack
-
Select Use current template and choose Next.
-
Adjust the available remediations. Change the values for desired controls to
Availableand undesired controls toNot available.Note
Turning off a remediation removes the solutions remediation runbook for the security standard and control.
-
On the Configure stack options page, choose Next.
-
On the Review page, review and confirm the settings. Check the box acknowledging that the template will create AWS Identity and Access Management (IAM) resources.
-
Choose Update stack.
You can view the status of the stack in the AWS CloudFormation console in the Status column. You should receive a CREATE_COMPLETE status in approximately 15 minutes.
