Configure AS2 connectors
The purpose of a connector is to establish a relationship between trading partners for outbound transfers—sending AS2 files from a Transfer Family server to an external, partner-owned destination. For the connector, you specify the local party, the remote partner, and their certificates (by creating local and partner profiles).
After you have a connector in place, you can transfer information to your trading partners. Each AS2 server is assigned three static IP addresses. AS2 connectors use these IP addresses for sending asynchronous MDNs to your trading partners over AS2.
Note
The message size received by a trading partner will not match the object size in Amazon S3. This discrepancy occurs because the AS2 message wraps the file in an envelope prior to sending. So, the file size might increase, even if the file is sent with compression. Therefore, make sure that the trading partner's maximum file size is greater than the size of the file that you are sending.
-
Create an AS2 connector
Create an AS2 connector
This procedure explains how to create AS2 connectors by using the AWS Transfer Family console. If you want to use the AWS CLI instead, see Step 6: Create a connector between you and your partner.
To create an AS2 connector
-
Open the AWS Transfer Family console at https://console.aws.amazon.com/transfer/
. -
In the left navigation pane, choose Connectors to send messages, from the AS2 Trading Partners menu, and then choose Create AS2 connector.
-
In the Connector configuration section, specify the following information:
-
URL – Enter the URL for outbound connections.
-
Access role – Choose the Amazon Resource Name (ARN) of the AWS Identity and Access Management (IAM) role to use. Make sure that this role provides read and write access to the parent directory of the file location that's used in the
StartFileTransferrequest. Additionally, make sure that the role provides read and write access to the parent directory of the files that you intend to send withStartFileTransfer.Note
If you're using Basic authentication for your connector, the access role requires the
secretsmanager:GetSecretValuepermission for the secret. If the secret is encrypted by using a customer managed key instead of the AWS managed key in AWS Secrets Manager, then the role also needs thekms:Decryptpermission for that key. If you name your secret with the prefixaws/transfer/, you can add the necessary permission with a wildcard character (*), as shown in Example permission to create secrets. -
Logging role (optional) – Choose the IAM role for the connector to use to push events to your CloudWatch logs.
-
-
In the AS2 configuration section, choose the local and partner profiles, the encryption and signing algorithms, and whether to compress the transferred information. Note the following:
-
The Preserve S3 Content-Type parameter is enabled by default.
When set, Transfer Family uses the Amazon S3
Content-Typethat is associated with objects in S3 instead of having the content type mapped based on the file extension. Clear this setting if you want the service to map content type for your AS2 messages based on file extension, rather than using the content type from the S3 object. -
For the encryption algorithm, do not choose
DES_EDE3_CBCunless you must support a legacy client that requires it, as it is a weak encryption algorithm. -
The Subject is used as the
subjectHTTP header attribute in AS2 messages that are being sent with the connector. -
If you choose to create a connector without an encryption algorithm, you must specify
HTTPSas your protocol.
-
-
In the Basic authentication section, specify the following information.
-
To send sign-on credentials along with outbound messages, select Enable Basic authentication. If you don't want to send any credentials with outbound messages, keep Enable Basic authentication cleared.
-
If you're using authentication, choose or create a secret.
-
To create a new secret, choose Create a new secret and then enter a username and password. These credentials must match the user that connects to the partner's endpoint.
-
To use an existing secret, choose Choose an existing secret, and then choose a secret from the dropdown menu. For the details of creating a correctly formatted secret in Secrets Manager, see Enable Basic authentication for AS2 connectors.
-
-
-
In the MDN configuration section, specify the following information:
-
Request MDN – You have the option to require your trading partner to send you an MDN after they have successfully received your message over AS2.
-
Signed MDN – You have the option to require that MDNs be signed. This option is available only if you have selected Request MDN.
-
-
After you've confirmed all of your settings, choose Create AS2 connector to create the connector.
The Connectors page appears, with the ID of your new connector added to the list. To view the details for your connectors, see View AS2 connector details.
AS2 connector algorithms
When you create an AS2 connector, the following security algorithms are attached to the connector.
| Type | Algorithm |
|---|---|
| TLS Cipher | TLS_ECDHE_ECDSA_WITH_AES_128_GCM_SHA256 TLS_ECDHE_RSA_WITH_AES_128_GCM_SHA256 TLS_ECDHE_ECDSA_WITH_AES_128_CBC_SHA256 TLS_ECDHE_RSA_WITH_AES_128_CBC_SHA256 TLS_ECDHE_ECDSA_WITH_AES_256_GCM_SHA384 TLS_ECDHE_RSA_WITH_AES_256_GCM_SHA384 TLS_ECDHE_ECDSA_WITH_AES_256_CBC_SHA384 TLS_ECDHE_RSA_WITH_AES_256_CBC_SHA384 |
Basic authentication for AS2 connectors
When you create or update a Transfer Family server that uses the AS2 protocol, you can add Basic authentication for outbound messages. You do this by adding authentication information to a connector.
Note
Basic authentication is available only if you're using HTTPS.
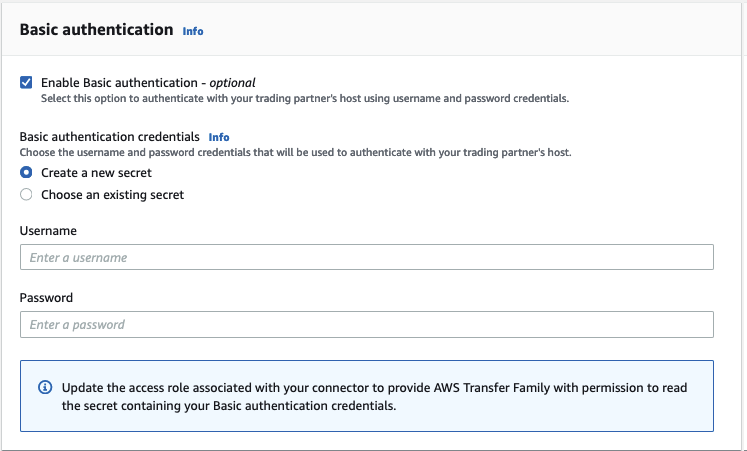
To use authentication for your connector, select Enable Basic authentication in the Basic authentication section. After you enable Basic authentication, you can choose to create a new secret, or use an existing one. In either case, the credentials in the secret are sent with outbound messages that use this connector. The credentials must match the user that is attempting to connect to the trading partner's remote endpoint.
The following screenshot shows Enable Basic authentication selected, and Create a new secret chosen. After making these choices, you can enter a username and password for the secret.
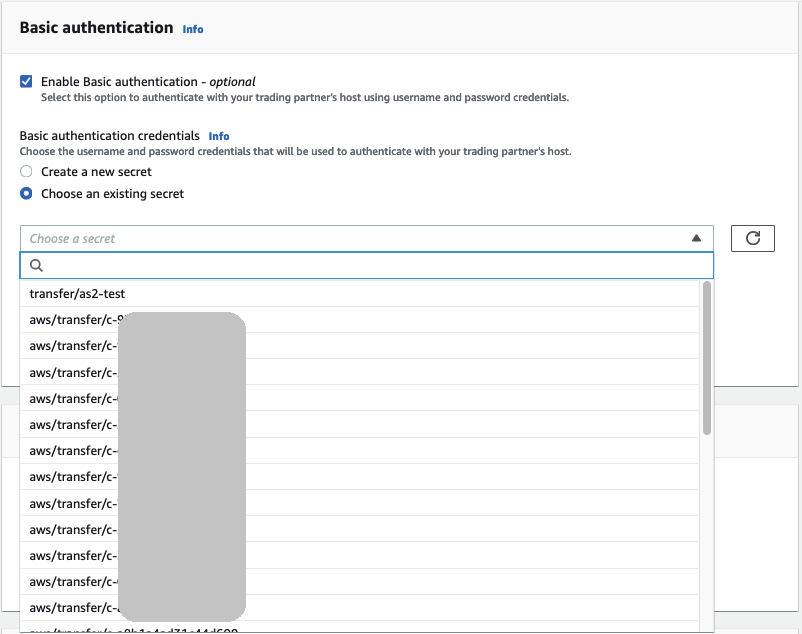
The following screenshot shows Enable Basic authentication selected, and Choose an existing secret chosen. Your secret must be in the correct format, as described in Enable Basic authentication for AS2 connectors.
Enable Basic authentication for AS2 connectors
When you enable Basic authentication for AS2 connectors, you can either create a new secret in the Transfer Family console, or you can use a secret that you create in AWS Secrets Manager. In either case, your secret is stored in Secrets Manager.
Topics
Create a new secret in the console
When you're creating a connector in the console, you can create a new secret.
To create a new secret, choose Create a new secret and then enter a username and password. These credentials must match the user that connects to the partner's endpoint.
Note
When you create a new secret in the console, the name of the secret
follows this naming convention:
/aws/transfer/,
where connector-idconnector-id is the ID of the connector
that you're creating. Consider this when you are trying to locate the
secret in AWS Secrets Manager.
Use an existing secret
When you're creating a connector in the console, you can specify an existing secret.
To use an existing secret, choose Choose an existing secret, and then choose a secret from the dropdown menu. For the details of creating a correctly formatted secret in Secrets Manager, see Create a secret in AWS Secrets Manager.
Create a secret in AWS Secrets Manager
The following procedure describes how to create an appropriate secret for use with your AS2 connector.
Note
Basic authentication is available only if you're using HTTPS.
To store user credentials in Secrets Manager for AS2 Basic authentication
-
Sign in to the AWS Management Console and open the AWS Secrets Manager console at https://console.aws.amazon.com/secretsmanager/
. -
In the left navigation pane, choose Secrets.
-
On the Secrets page, choose Store a new secret.
-
On the Choose secret type page, for Secret type, choose Other type of secret.
-
In the Key/value pairs section, choose the Key/value tab.
-
Key – Enter
Username. -
value – Enter the name of the user that is authorized to connect to the partner' server.
-
-
If you want to provide a password, choose Add row, and in the Key/value pairs section, choose the Key/value tab.
Choose Add row, and in the Key/value pairs section, choose the Key/value tab.
-
Key – Enter
Password. -
value – Enter the password for the user.
-
-
If you want to provide a private key, choose Add row, and in the Key/value pairs section, choose the Key/value tab.
-
Key – Enter
PrivateKey. -
value – Enter a private key for the user. This value must be stored in OpenSSH format, and must correspond to the public key that is stored for this user in the remote server.
-
-
Choose Next.
-
On the Configure secret page, enter a name and description for your secret. We recommend that you use a prefix of
aws/transfer/for the name. For example, you could name your secretaws/transfer/connector-1. -
Choose Next, and then accept the defaults on the Configure rotation page. Then choose Next.
-
On the Review page, choose Store to create and store the secret.
After you create the secret, you can choose it when you are creating a connector (see Configure AS2 connectors). In the step where you enable Basic authentication, choose the secret from the dropdown list of available secrets.
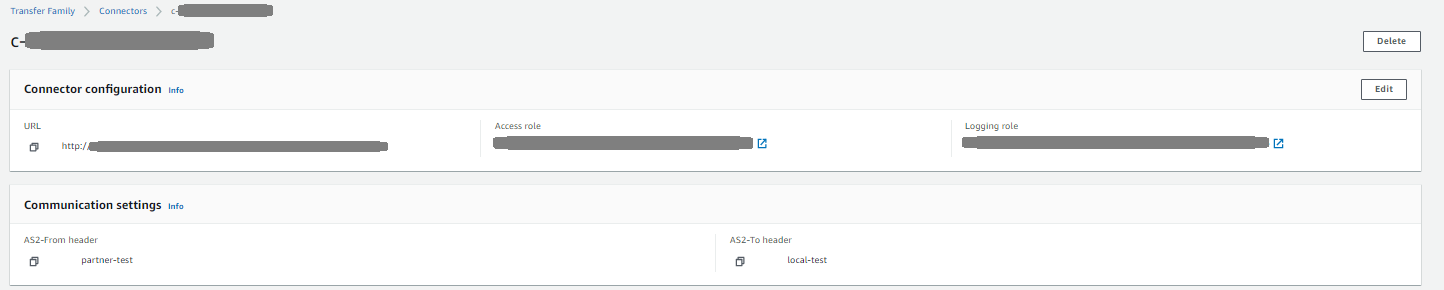
View AS2 connector details
You can find a list of details and properties for an AS2 AWS Transfer Family connector in the AWS Transfer Family console. An AS2 connector's properties include its URL, roles, profiles, MDNs, tags, and monitoring metrics.
This is the procedure for viewing connector details.
To view connector details
-
Open the AWS Transfer Family console at https://console.aws.amazon.com/transfer/
. -
In the left navigation pane, choose Connectors.
-
Choose the identifier in the Connector ID column to see the details page for the selected connector.
You can change the properties for the AS2 connector on the connector's details page by choosing Edit.


Note
You can get much of this information, albeit in a different format, by running the following AWS Command Line Interface (AWS CLI command:
aws transfer describe-connector --connector-idyour-connector-id
For more information, see DescribeConnector in the API reference.
