Create an AS2-enabled server configuration - AWS Transfer Family

Create an AS2-enabled server configuration

Applicability Statement 2 (AS2) is an RFC-defined file-transmission specification that includes strong message protection and verification mechanisms. The AS2 protocol is critical to workflows with compliance requirements that rely on having data protection and security features built into the protocol.

Note

AS2 for Transfer Family is Drummond certified.

Customers in industries such as retail, life sciences, manufacturing, financial services, and utilities that rely on AS2 for supply chain, logistics, and payments workflows can use AWS Transfer Family AS2 endpoints to securely transact with their business partners. The transacted data is natively accessible in AWS for processing, analysis, and machine learning. This data is also available for integrations with enterprise resource planning (ERP) and customer relationship management (CRM) systems that run on AWS. With AS2, customers can run their business-to-business (B2B) transactions at scale in AWS while maintaining existing business partner integrations and compliance.

If you are a Transfer Family customer who wants to exchange files with a partner who has a configured AS2-enabled server, the setup involves generating one public-private key pair for encryption and another for signing and exchanging the public keys with the partner.

Protecting an AS2 payload in transit typically involves the use of Cryptographic Message Syntax (CMS) and commonly uses encryption and a digital signature to provide data protection and peer authentication. A signed Message Disposition Notice (MDN) response payload provides verification (non-repudiation) that a message was received and successfully decrypted.

Transport of these CMS payloads and MDN responses occurs over HTTP.

Note

HTTPS AS2 server endpoints are not currently supported. TLS termination is currently the responsibility of the customer.

To create an AS2-enabled server, you must also specify the following components:

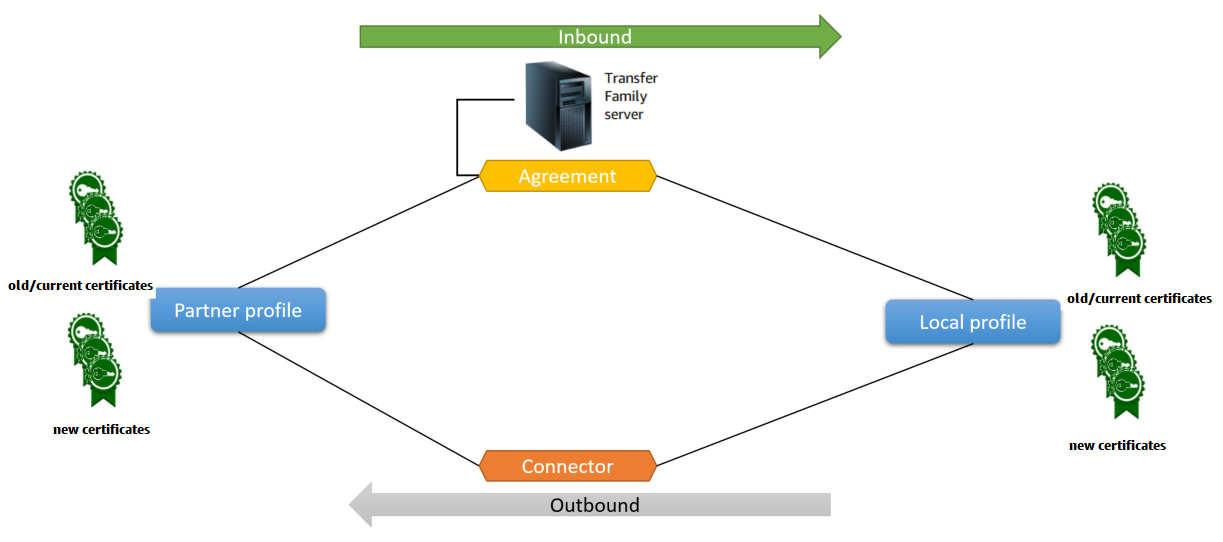
  • Agreements – Bilateral trading partner agreements, or partnerships, define the relationship between the two parties that are exchanging messages (files). To define an agreement, Transfer Family combines server, local profile, partner profile, and certificate information. Transfer Family AS2-inbound processes use agreements.

  • CertificatesPublic key (X.509) certificates are used in AS2 communication for message encryption and verification. Certificates are also used for connector endpoints.

  • Local profiles and partner profiles – A local profile defines the local (AS2-enabled Transfer Family server) organization or "party." Similarly, a partner profile defines the remote partner organization, external to Transfer Family.

While not required for all AS2-enabled servers, for outbound transfers, you need a connector. A connector captures the parameters for an outbound connection. The connector is required for sending files to a customer's external, non AWS server.

The following diagram shows the relationship between the AS2 objects involved in the inbound and outbound processes.


            Diagram that shows the relationship between the AS2 objects involved in the
                inbound and outbound processes.

For an end-to-end example AS2 configuration, see Enable your server endpoint for AS2.

AS2 use cases

If you are an AWS Transfer Family customer who wants to exchange files with a partner who has a configured AS2 server, the most complex part of the setup involves generating one public-private key pair for encryption and another for signing and exchanging the public keys with the partner.


                Diagram that shows the use of public-private key pairs for encryption and
                    signing.

Consider the following variations for using AWS Transfer Family with AS2.

Note

All mentions of MDN in the following table assume signed MDNs.

Inbound-only use cases

  • Transfer encrypted AS2 messages from a partner to a Transfer Family server.

    In this case, you do the following:

    1. Create profiles for your partner and yourself.

    2. Create a Transfer Family server that uses the AS2 protocol.

    3. Create an agreement and add it to your server.

    4. Import a certificate with a private key and add it to your profile, and then send the public key to your partner for encryption.

    5. After you have these items, send the public key for your certificate to your trading partner.

    Now your partner can send you encrypted messages and you can decrypt them and store them in your Amazon S3 bucket.

  • Transfer encrypted AS2 messages from a partner to a Transfer Family server and add signing.

    In this scenario, you are still doing only inbound transfers, but now you want to have your partner sign the messages that they send. In this case, import the partner's signing public key (as a signing certificate added to your partner's profile).

  • Transfer encrypted AS2 messages from a partner to a Transfer Family server and add signing and sending an MDN response.

    In this scenario, you are still doing only inbound transfers, but now, in addition to receiving signed payloads, your trading partner wants to receive a signed MDN response.

    1. Import your public and private signing keys (as a signing certificate to your profile).

    2. Send the public signing key to your partner.

Outbound-only use cases

  • Transfer encrypted AS2 messages from a Transfer Family server to a partner.

    This case is similar to the inbound-only transfer use case, except that instead of adding an agreement to your AS2 server, you create a connector. In this case, you import your partner's public key to their profile.

  • Transfer encrypted AS2 messages from a Transfer Family server to a partner and add signing.

    You are still doing only outbound transfers, but now your partner wants you to sign the message that you send to them.

    1. Import your signing private key (as a signing certificate added to your profile).

    2. Send your partner your public key.

  • Transfer encrypted AS2 messages from a Transfer Family server to a partner and add signing and send an MDN response.

    You are still doing only outbound transfers, but now, in addition to sending signed payloads, you want to receive a signed MDN response from your partner.

    1. Your partner sends you their public signing key.

    2. Import your partner's public key (as a signing certificate added to your partner's profile).

Inbound and outbound use cases

  • Transfer encrypted AS2 messages in both directions between a Transfer Family server and a partner.

    In this case, you do the following:

    1. Create profiles for your partner and yourself.

    2. Create a Transfer Family server that uses the AS2 protocol.

    3. Create an agreement and add it to your server.

    4. Create a connector.

    5. Import a certificate with a private key and add it to your profile, and then send the public key to your partner for encryption.

    6. Receive a public key from your partner and add it to their profile for encryption.

    7. After you have these items, send the public key for your certificate to your trading partner.

    Now you and your trading partner can exchange encrypted messages, and you can both decrypt them. You can store the messages that you receive in your Amazon S3 bucket, and your partner can decrypt and store the messages that you send to them.

  • Transfer encrypted AS2 messages in both directions between a Transfer Family server and a partner and add signing.

    Now you and your partner want signed messages.

    1. Import your signing private key (as a signing certificate added to your profile).

    2. Send your partner your public key.

    3. Import your partner's signing public key and add it to their profile.

  • Transfer encrypted AS2 messages in both directions between a Transfer Family server and a partner and add signing and send an MDN response.

    Now, you want to exchange signed payloads, and both you and your partner want MDN responses.

    1. Your partner sends you their public signing key.

    2. Import your partner's public key (as a signing certificate to your partner's profile).

    3. Send your public key to your partner.

AS2 inbound process

The inbound process is defined as a message or file that's being transferred to your AWS Transfer Family server. The sequence for inbound messages is as follows:

  1. An admin or automated process starts an AS2 file transfer on the partner's remote AS2 server.

  2. The partner's remote AS2 server signs and encrypts the file contents, then sends an HTTP POST request to an AS2 inbound endpoint hosted on Transfer Family.

  3. Using the configured values for the server, partners, certificates, and agreement, Transfer Family decrypts and verifies the AS2 payload. The file contents are stored in the configured Amazon S3 file store.

  4. The signed MDN response is returned either inline with the HTTP response, or asynchronously through a separate HTTP POST request back to the originating server.

  5. An audit trail is written to Amazon CloudWatch with details about the exchange.

  6. The decrypted file is available in a folder named inbox/processed.


                Diagram that shows the processing sequence for inbound messages.

AS2 outbound process

The outbound process is defined as a message or file being sent from AWS to an external client or service. The sequence for outbound messages is as follows:

  1. An admin calls the start-file-transfer AWS Command Line Interface (AWS CLI) command or the StartFileTransfer API operation. This operation references a connector configuration.

  2. Transfer Family detects a new file request and locates the file. The file is compressed, signed, and encrypted.

  3. A transfer HTTP client performs an HTTP POST request to transmit the payload to the partner's AS2 server.

  4. The process returns the signed MDN response, inline with the HTTP response (synchronous MDN).

  5. As the file moves between different stages of transmission, the process delivers the MDN response receipt and processing details to the customer.

  6. The remote AS2 server makes the decrypted and verified file available to the partner admin.


                Diagram that shows the processing sequence for outbound messages.

AS2 processing supports many of the RFC 4130 protocols, with a focus on common use cases and integration with existing AS2-enabled server implementations. For details of the supported configurations, see AS2 supported configurations.

File names and locations

This section discusses the file-naming conventions for AS2 transfers.

For inbound file transfers, note the following:

  • You specify the base directory in an agreement. The base directory is the Amazon S3 bucket name combined with a prefix, if any. For example, /DOC-EXAMPLE-BUCKET/AS2-folder.

  • If an incoming file is processed successfully, the file (and the corresponding JSON file) is saved to the /processed folder. For example, /DOC-EXAMPLE-BUCKET/AS2-folder/processed.

    The JSON file contains the following fields:

    • agreement-id

    • as2-from

    • as2-to

    • as2-message-id

    • transfer-id

    • client-ip

    • connector-id

    • failure-message

    • file-path

    • message-subject

    • mdn-message-id

    • mdn-subject

    • requester-file-name

    • requester-content-type

    • server-id

    • status-code

    • failure-code

    • transfer-size

  • If an incoming file cannot be processed successfully, the file (and the corresponding JSON file) is saved to the /failed folder. For example, /DOC-EXAMPLE-BUCKET/AS2-folder/failed.

  • The transferred file is stored in the processed folder as original_filename.messageId.original_extension. That is, the message ID for the transfer is appended to the name of the file, before its original extension.

  • A JSON file is created and saved as original_filename.messageId.original_extension.json. In addition to the message ID being added, the string .json is appended to the transferred file's name.

  • A Message Disposition Notice (MDN) file is created and saved as original_filename.messageId.original_extension.mdn. In addition to the message ID being added, the string .mdn is appended to the transferred file's name.

  • If there is an inbound file named ExampleFileInS3Payload.dat, the following files are created:

    • FileExampleFileInS3Payload.c4d6b6c7-23ea-4b8c-9ada-0cb811dc8b35@44313c54b0a46a36.dat

    • JSONExampleFileInS3Payload.c4d6b6c7-23ea-4b8c-9ada-0cb811dc8b35@44313c54b0a46a36.dat.json

    • MDNExampleFileInS3Payload.c4d6b6c7-23ea-4b8c-9ada-0cb811dc8b35@44313c54b0a46a36.dat.mdn

For outbound transfers, the naming is similar, with the difference that there is no incoming message file, and also, the transfer ID for the transferred message is added to the file name. The transfer ID is returned by the StartFileTransfer API operation (or when another process or script calls this operation).

  • The transfer-id is an identifier that is associated with a file transfer. All requests that are part of a StartFileTransfer call share a transfer-id.

  • The base directory is the same as the path that you use for the source file. That is, the base directory is the path that you specify in the StartFileTransfer API operation or start-file-transfer AWS CLI command. For example:

    aws transfer start-file-transfer --send-file-paths /DOC-EXAMPLE-BUCKET/AS2-folder/file-to-send.txt

    If you run this command, MDN and JSON files are saved in /DOC-EXAMPLE-BUCKET/AS2-folder/processed (for successful transfers), or /DOC-EXAMPLE-BUCKET/AS2-folder/failed (for unsuccessful transfers).

  • A JSON file is created and saved as original_filename.transferId.messageId.original_extension.json.

  • An MDN file is created and saved as original_filename.transferId.messageId.original_extension.mdn.

  • If there is an outbound file named ExampleFileOutTestOutboundSyncMdn.dat, the following files are created:

    • JSONExampleFileOutTestOutboundSyncMdn.dedf4601-4e90-4043-b16b-579af35e0d83.fbe18db8-7361-42ff-8ab6-49ec1e435f34@c9c705f0baaaabaa.dat.json

    • MDNExampleFileOutTestOutboundSyncMdn.dedf4601-4e90-4043-b16b-579af35e0d83.fbe18db8-7361-42ff-8ab6-49ec1e435f34@c9c705f0baaaabaa.dat.mdn

You can also check the CloudWatch logs to view the details of your transfers, including any that failed.

Sample JSON files

This section lists sample JSON files for both inbound and outbound transfers, including sample files for successful transfers and transfers that fail.

Sample outbound file that is successfully transferred:

{ "requester-content-type": "application/octet-stream", "mesage-subject": "File xyzTest from MyCompany_OID to partner YourCompany", "requester-file-name": "TestOutboundSyncMdn-9lmCr79hV.dat", "as2-from": "MyCompany_OID", "connector-id": "c-c21c63ceaaf34d99b", "status-code": "COMPLETED", "disposition": "automatic-action/MDN-sent-automatically; processed", "transfer-size": 3198, "mdn-message-id": "OPENAS2-11072022063009+0000-df865189-1450-435b-9b8d-d8bc0cee97fd@PartnerA_OID_MyCompany_OID", "mdn-subject": "Message be18db8-7361-42ff-8ab6-49ec1e435f34@c9c705f0baaaabaa has been accepted", "as2-to": "PartnerA_OID", "transfer-id": "dedf4601-4e90-4043-b16b-579af35e0d83", "file-path": "/DOC-EXAMPLE-BUCKET/as2testcell0000/openAs2/TestOutboundSyncMdn-9lmCr79hV.dat", "as2-message-id": "fbe18db8-7361-42ff-8ab6-49ec1e435f34@c9c705f0baaaabaa", "timestamp": "2022-07-11T06:30:10.791274Z" }

Sample outbound file that is unsuccessfully transferred:

{ "failure-code": "HTTP_ERROR_RESPONSE_FROM_PARTNER", "status-code": "FAILED", "requester-content-type": "application/octet-stream", "subject": "Test run from Id da86e74d6e57464aae1a55b8596bad0a to partner 9f8474d7714e476e8a46ce8c93a48c6c", "transfer-size": 3198, "requester-file-name": "openAs2TestOutboundWrongAs2Ids-necco-3VYn5n8wE.dat", "as2-message-id": "9a9cc9ab-7893-4cb6-992a-5ed8b90775ff@718de4cec1374598", "failure-message": "http://Test123456789.us-east-1.elb.amazonaws.com:10080 returned status 500 for message with ID 9a9cc9ab-7893-4cb6-992a-5ed8b90775ff@718de4cec1374598", "transfer-id": "07bd3e07-a652-4cc6-9412-73ffdb97ab92", "connector-id": "c-056e15cc851f4b2e9", "file-path": "/testbucket-4c1tq6ohjt9y/as2IntegCell0002/openAs2/openAs2TestOutboundWrongAs2Ids-necco-3VYn5n8wE.dat", "timestamp": "2022-07-11T21:17:24.802378Z" }

Sample inbound file that is successfully transferred:

{ "requester-content-type": "application/EDI-X12", "subject": "File openAs2TestInboundAsyncMdn-necco-5Ab6bTfCO.dat sent from MyCompany to PartnerA", "client-ip": "10.0.109.105", "requester-file-name": "openAs2TestInboundAsyncMdn-necco-5Ab6bTfCO.dat", "as2-from": "MyCompany_OID", "status-code": "COMPLETED", "disposition": "automatic-action/MDN-sent-automatically; processed", "transfer-size": 1050, "mdn-subject": "Message Disposition Notification", "as2-message-id": "OPENAS2-11072022233606+0000-5dab0452-0ca1-4f9b-b622-fba84effff3c@MyCompany_OID_PartnerA_OID", "as2-to": "PartnerA_OID", "agreement-id": "a-f5c5cbea5f7741988", "file-path": "processed/openAs2TestInboundAsyncMdn-necco-5Ab6bTfCO.OPENAS2-11072022233606+0000-5dab0452-0ca1-4f9b-b622-fba84effff3c@MyCompany_OID_PartnerA_OID.dat", "server-id": "s-5f7422b04c2447ef9", "timestamp": "2022-07-11T23:36:36.105030Z" }

Sample inbound file that is unsuccessfully transferred:

{ "failure-code": "INVALID_REQUEST", "status-code": "FAILED", "subject": "Sending a request from InboundHttpClientTests", "client-ip": "10.0.117.27", "as2-message-id": "testFailedLogs-TestRunConfig-Default-inbound-direct-integ-0c97ee55-af56-4988-b7b4-a3e0576f8f9c@necco", "as2-to": "0beff6af56c548f28b0e78841dce44f9", "failure-message": "Unsupported date format: 2022/123/456T", "agreement-id": "a-0ceec8ca0a3348d6a", "as2-from": "ab91a398aed0422d9dd1362710213880", "file-path": "failed/01187f15-523c-43ac-9fd6-51b5ad2b08f3.testFailedLogs-TestRunConfig-Default-inbound-direct-integ-0c97ee55-af56-4988-b7b4-a3e0576f8f9c@necco", "server-id": "s-0582af12e44540b9b", "timestamp": "2022-07-11T06:30:03.662939Z" }

Create an AS2-enabled server

This procedure explains how to create an AS2-enabled server by using the Transfer Family console. If you want to use the AWS CLI instead, see Step 2: Create a Transfer Family server that uses the AS2 protocol.

To create an AS2-enabled server
  1. Open the AWS Transfer Family console at https://console.aws.amazon.com/transfer/.

  2. In the left navigation pane, choose Servers, and then choose Create server.

  3. On the Choose protocols page, select AS2 (Applicability Statement 2), and then choose Next.

    
                            This image shows the Choose protocols screen with the AS2 protocol selected.
  4. On the Choose an identity provider page, choose Next.

    Note

    For AS2, you cannot choose an identity provider because basic authentication is not supported for the AS2 protocol. Instead, you control access through virtual private cloud (VPC) security groups.

  5. On the Choose an endpoint page, do the following:

    
                        Console screenshot showing the Choose an
                                endpoint page with VPC hosted
                            selected.
    1. For Endpoint type, choose VPC hosted to host your server's endpoint. For information about setting up your VPC-hosted endpoint, see Create a server in a virtual private cloud.

      Note

      Publicly accessible endpoints are not supported for the AS2 protocol. To make your VPC endpoint accessible over the internet, choose Internet Facing under Access, and then supply your Elastic IP addresses.

    2. For Access, choose one of the following options:

      • Internal – Choose this option to provide access from within your VPC and VPC-connected environments, such as an on-premises data center over AWS Direct Connect or VPN.

      • Internet Facing – Choose this option to provide access over the internet and from within your VPC and VPC-connected environments, such as an on-premises data center over AWS Direct Connect or VPN.

        If you choose Internet Facing, supply your Elastic IP addresses when prompted.

    3. For VPC, either choose an existing VPC or choose Create VPC to create a new VPC.

    4. For FIPS Enabled, keep the FIPS Enabled endpoint check box cleared.

      Note

      FIPS-enabled endpoints are not supported for the AS2 protocol.

    5. Choose Next.

  6. On the Choose a domain page, choose Amazon S3 to store and access your files as objects by using the selected protocol.

    Choose Next.

  7. On the Configure additional details page, choose the settings that you need.

    Note

    If you are configuring any other protocols along with AS2, all of the additional detail settings apply. However, for the AS2 protocol, the only settings that apply are those in the CloudWatch logging and Tags sections.

    Even though setting up a CloudWatch logging role is optional, we highly recommend setting it up so that you can see the status of your messages and troubleshoot configuration issues.

  8. On the Review and create page, review your choices to make sure they are correct.

    • If you want to edit any of your settings, choose Edit next to the step that you want to change.

      Note

      If you edit a step, we recommend that you review each step after the step that you chose to edit.

    • If you have no changes, choose Create server to create your server. You are taken to the Servers page, shown following, where your new server is listed.

      
                                Console screenshot showing the Servers
                                    page with a new server ID that has the status of
                                        Starting.

      It can take several minutes before the status for your new server changes to Online. At that point, your server can perform file operations for your users.

Import AS2 certificates

The Transfer Family AS2 process uses certificate keys for both encryption and signing of transferred information. Partners can use the same key for both purposes, or a separate key for each. If you have common encryption keys kept in escrow by a trusted third-party so that data can be decrypted in the event of a disaster or security breach, we recommend having separate signing keys. By using separate signing keys (which you do not escrow), you don't compromise the non-repudiation features of your digital signatures.

Note

The key length for AS2 certificates must be at least 2048 bits, and at most 4096.

The following points detail how AS2 certificates are used during the process.

  • Inbound AS2

    • The trading partner sends their public key for the signing certificate, and this key is imported to the partner profile.

    • The local party sends the public key for their encryption and signing certificates. The partner then imports the private key or keys. The local party can send separate certificate keys for signing and encryption, or can choose to use the same key for both purposes.

  • Outbound AS2

    • The partner sends the public key for their encryption certificate, and this key is imported to the partner profile.

    • The local party sends the public key for the certificate for signing, and imports the private key of the certificate for signing.

For details on how to create certificates, see Step 1: Create certificates for AS2.

This procedure explains how to import certificates by using the Transfer Family console. If you want to use the AWS CLI instead, see Step 3: Import certificates as Transfer Family certificate resources.

To specify an AS2-enabled certificate
  1. Open the AWS Transfer Family console at https://console.aws.amazon.com/transfer/.

  2. In the left navigation pane, under AS2 Trading Partners, choose Certificates.

  3. Choose Import certificate.

  4. In the Certificate description section, enter an easily identifiable name for the certificate. Make sure that you can identify the certificate's purpose by its description. Additionally, choose the role for the certificate.

  5. In the Certificate contents section, provide a public certificate from a trading partner, or the public and private keys for a local certificate.

  6. In the Certificate usage section, choose the purpose for this certificate. It can be used for encryption, signing, or both.

    Note

    If you choose Encryption and signing for the usage, Transfer Family creates two identical certificates (each having their own ID): one with a usage value of ENCRYPTION and one with a usage value of SIGNING.

  7. Fill in the Certificate contents section with the appropriate details.

    • If you choose Self-signed certificate, you do not provide the certificate chain.

    • Paste in the contents of the certificate.

    • If the certificate is not a self-signed certificate, provide the certificate chain.

    • If this certificate is a local certificate, paste in its private key.

  8. Choose Import certificate to complete the process and save the details for the imported certificate.

AS2 certificate rotation

Often, certificates are valid for a period of six months to a year. You might have set up profiles that you want to persist for a longer duration. To facilitate this, Transfer Family provides certificate rotation. You can specify multiple certificates for a profile, allowing you to keep using the profile for multiple years. Transfer Family uses certificates for signing (optional) and encryption (mandatory). You can specify a single certificate for both purposes, if you like.

Certificate rotation is the process of replacing an old expiring certificate with a newer certificate. The transition is a gradual one to avoid disrupting transfers where a partner in the agreement has yet to configure a new certificate for outbound transfers or might be sending payloads that are signed or encrypted with an old certificate during a period when a newer certificate might also be in use. The intermediate period where both old and new certificates are valid is referred to as a grace period.

X.509 certificates have Not Before and Not After dates. However, these parameters might not provide enough control for administrators. Transfer Family provides Active Date and Inactive Date settings to control which certificate is used for outbound payloads and which is accepted for inbound payloads.

Outbound certificate selection uses the maximum value that is prior to the date of the transfer as an Inactive Date. Inbound processes accept certificates within the range of Not Before and Not After and within the range of Active Date and Inactive Date.

The following table describes one possible way to configure two certificates for a single profile.

Two certificates in rotation
Name NOT BEFORE (controlled by certificate authority) ACTIVE DATE (set by Transfer Family) INACTIVE DATE (set by Transfer Family) NOT AFTER (set by certificate authority)
Cert1 (older certificate) 2019-11-01 2020-01-01 2020-12-31 2024-01-01
Cert2 (newer certificate) 2020-11-01 2020-06-01 2021-06-01 2025-01-01

Note the following:

  • When you specify an Active Date and Inactive Date for a certificate, the range must be inside the range between Not Before and Not After.

  • We recommend that you configure several certificates for each profile, making sure that the active date range for all the certificates combined covers the amount of time for which you want to use the profile.

  • We recommend that you specify some grace time between when your older certificate becomes inactive and when your newer certificate becomes active. In the preceding example, the first certificate does not become inactive until 2020-12-31, while the second certificate becomes active on 2020-06-01, providing a 6-month grace period. During the period from 2020-06-01 until 2020-12-31, both certificates are active.

Create AS2 profiles

Use this procedure to create both local and partner profiles. This procedure explains how to create AS2 profiles by using the Transfer Family console. If you want to use the AWS CLI instead, see Step 4: Create profiles for you and your trading partner.

To create an AS2 profile
  1. Open the AWS Transfer Family console at https://console.aws.amazon.com/transfer/.

  2. In the left navigation pane, under AS2 Trading Partners, choose Profiles, then choose Create profile.

  3. In the Profile configuration section, enter the AS2 ID for the profile. This value is used for the AS2 protocol-specific HTTP headers as2-from and as2-to to identify the trading partnership, which determines the certificates to use, and so on.

  4. In the Profile type section, choose Local profile or Partner profile.

  5. In the Certificates section, choose one or more certificates from the dropdown menu.

    Note

    If you want to import a certificate that is not listed in the dropdown menu, select Import a new Certificate. This opens a new browser window at the Import certificate screen. For the procedure about importing certificates see Import AS2 certificates.

  6. (Optional) In the Tags section, specify one or more key-value pairs to help identify this profile.

  7. Choose Create profile to complete the process and save the new profile.

Create AS2 connectors

The purpose of a connector is to establish a relationship between trading partners for outbound transfers—sending AS2 files from a Transfer Family server to an external, partner-owned destination. For the connector, you specify the local party, the remote partner, and their certificates (by creating local and partner profiles). After you have a connector in place, you can transfer information to your trading partners.

Note

The message size received by a trading partner will not match the object size in Amazon S3. This discrepancy occurs because the AS2 message wraps the file in an envelope prior to sending. So, the file size might increase, even if the file is sent with compression. Therefore, make sure that the trading partner's maximum file size is greater than the size of the file that you are sending.

Applicability Statement 2 (AS2) connectors establish a relationship between trading partners for outbound transfers. For more information about AS2 connectors, see AS2 connector details.

This procedure explains how to create AS2 connectors by using the AWS Transfer Family console. If you want to use the AWS CLI instead, see Step 6: Create a connector between you and your partner.

To create an AS2 connector
  1. Open the AWS Transfer Family console at https://console.aws.amazon.com/transfer/.

  2. In the left navigation pane, choose Connectors, and then choose Create connector.

  3. In the Connector configuration section, specify the following information:

    • URL – Enter the URL for outbound connections.

    • Access role – Choose the Amazon Resource Name (ARN) of the AWS Identity and Access Management (IAM) role to use. Make sure that this role provides read and write access to the parent directory of the file location that's used in the StartFileTransfer request. Additionally, make sure that the role provides read and write access to the parent directory of the files that you intend to send with StartFileTransfer.

      Note

      If you're using Basic authentication for your connector, the access role requires the secretsmanager:GetSecretValue permission for the secret. If the secret is encrypted by using a customer managed key instead of the AWS managed key in AWS Secrets Manager, then the role also needs the kms:Decrypt permission for that key. If you name your secret with the prefix aws/transfer/, you can add the necessary permission with a wildcard character (*), as shown in Example permission to create secrets.

    • Logging role (optional) – Choose the IAM role for the connector to use to push events to your CloudWatch logs.

  4. In the AS2 configuration section, choose the local and partner profiles, the encryption and signing algorithms, and whether to compress the transferred information.

    Note

    The Subject is used as the subject HTTP header attribute in AS2 messages that are being sent with the connector.

    Additionally, if you choose to create a connector without an encryption algorithm, you must specify HTTPS as your protocol.

  5. In the MDN configuration section, specify the following information:

    • Request MDN – You have the option to require your trading partner to send you an MDN after they have successfully received your message over AS2.

    • Signed MDN – You have the option to require that MDNs be signed. This option is available only if you have selected Request MDN.

  6. In the Basic authentication section, specify the following information.

    • To send sign-on credentials along with outbound messages, select Enable Basic authentication. If you don't want to send any credentials with outbound messages, keep Enable Basic authentication cleared.

    • If you're using authentication, choose or create a secret.

      • To create a new secret, choose Create a new secret and then enter a username and password. These credentials must match the user that connects to the partner's endpoint.

        
                                        The Create
                                                connector page in the AWS Transfer Family console, showing the
                                                Basic authentication section
                                            with Create a new secret
                                            chosen.
      • To use an existing secret, choose Choose an existing secret, and then choose a secret from the dropdown menu. For the details of creating a correctly formatted secret in Secrets Manager, see Enable Basic authentication for AS2 connectors.

        
                                        The Create
                                                connector page in the AWS Transfer Family console, showing the
                                                Basic authentication section
                                            with Choose an existing secret
                                            chosen.
  7. After you've confirmed all of your settings, choose Create connector to create the connector.

The Connectors page appears, with the ID of your new connector added to the list. To view the details for your connectors, see View AS2 connector details.

Create AS2 agreements

Agreements are associated with Transfer Family servers. They specify the details for trading partners that use the AS2 protocol to exchange messages or files by using Transfer Family, for inbound transfers—sending AS2 files from an external, partner-owned source to a Transfer Family server.

This procedure explains how to create AS2 agreements by using the Transfer Family console. If you want to use the AWS CLI instead, see Step 5: Create an agreement between you and your partner.

To create an agreement for a Transfer Family server
  1. Open the AWS Transfer Family console at https://console.aws.amazon.com/transfer/.

  2. In the left navigation pane, choose Servers, and then choose a server that uses the AS2 protocol.

  3. On the server details page, scroll down to the Agreements section.

    
                        Console screenshot showing the Agreements
                            section with an agreement ID and status of
                            ACTIVE.
  4. Choose Add agreement.

  5. Fill in the agreement parameters, as follows:

    1. In the Agreement configuration section, enter a descriptive name. Make sure that you can identify the agreement's purpose by its name. Also, set the Status for the agreement: either Active (selected by default) or Inactive.

    2. In the Communication configuration section, choose a local profile and a partner profile.

    3. In the Inbox folder configuration section, choose an Amazon S3 bucket to store incoming files and an IAM role that can access the bucket. Optionally, you can enter a prefix (folder) to use for storing files in the bucket.

      For example, if you enter DOC-EXAMPLE-BUCKET for your bucket and incoming for your prefix, your incoming files are saved to the /DOC-EXAMPLE-BUCKET/incoming folder.

    4. (Optional) Add tags in the Tags section.

    5. After you have entered all the information for the agreement, choose Create agreement.

The new agreement appears in the Agreements section of the server details page.

Enable Basic authentication for AS2 connectors

When you enable Basic authentication for AS2 connectors, you can either create a new secret in the Transfer Family console, or you can use a secret that you create in AWS Secrets Manager. In either case, your secret is stored in Secrets Manager.

Create a new secret in the console

When you're creating a connector in the console, you can create a new secret.

To create a new secret, choose Create a new secret and then enter a username and password. These credentials must match the user that connects to the partner's endpoint.


                    The AWS Transfer Family console Create
                        connector page, showing the
                        Basic authentication section
                        with Create a new secret
                        chosen.
Note

When you create a new secret in the console, the name of the secret follows this naming convention: /aws/transfer/connector-id, where connector-id is the ID of the connector that you're creating. Consider this when you are trying to locate the secret in AWS Secrets Manager.

Use an existing secret

When you're creating a connector in the console, you can specify an existing secret.

To use an existing secret, choose Choose an existing secret, and then choose a secret from the dropdown menu. For the details of creating a correctly formatted secret in Secrets Manager, see Create a secret in AWS Secrets Manager.


                    The AWS Transfer Family console Create
                        connector page, showing the
                        Basic authentication section
                        with Choose an existing secret
                        chosen.

Create a secret in AWS Secrets Manager

The following procedure describes how to create an appropriate secret for use with your AS2 connector.

Note

Basic authentication is available only if you're using HTTPS.

To store user credentials in Secrets Manager for AS2 Basic authentication
  1. Sign in to the AWS Management Console and open the AWS Secrets Manager console at https://console.aws.amazon.com/secretsmanager/.

  2. In the left navigation pane, choose Secrets.

  3. On the Secrets page, choose Store a new secret.

  4. On the Choose secret type page, for Secret type, choose Other type of secret.

  5. In the Key/value pairs section, choose the Key/value tab.

    • Key – Enter Username.

    • value – Enter the name of the user that is authorized to connect to the partner' server.

  6. If you want to provide a password, choose Add row, and in the Key/value pairs section, choose the Key/value tab.

    Choose Add row, and in the Key/value pairs section, choose the Key/value tab.

    • Key – Enter Password.

    • value – Enter the password for the user.

  7. If you want to provide a private key, choose Add row, and in the Key/value pairs section, choose the Key/value tab.

    • Key – Enter PrivateKey.

    • value – Enter a private key for the user. This value must be stored in OpenSSH format, and must correspond to the public key that is stored for this user in the remote server.

  8. Choose Next.

  9. On the Configure secret page, enter a name and description for your secret. We recommend that you use a prefix of aws/transfer/ for the name. For example, you could name your secret aws/transfer/connector-1.

  10. Choose Next, and then accept the defaults on the Configure rotation page. Then choose Next.

  11. On the Review page, choose Store to create and store the secret.

After you create the secret, you can choose it when you are creating a connector (see Create AS2 connectors). In the step where you enable Basic authentication, choose the secret from the dropdown list of available secrets.