Tutorial: Create an IPAM and pools using the console
In this tutorial, you create an IPAM, integrate with AWS Organizations, create IP address pools, and create a VPC with a CIDR from an IPAM pool.
This tutorial shows you how you can use IPAM to organize IP address space based on different development needs. Once you’ve completed this tutorial, you’ll have one IP address pool for pre-production resources. You can then create other pools based on your routing and security needs, such as a pool for production resources.
While you can use IPAM as a single user, integrating with AWS Organizations enables you to manage IP addresses across accounts in your organization. This tutorial covers integrating IPAM with accounts in an organization. It does not cover how to Integrate IPAM with accounts outside of your organization.
Note
For the purposes of this tutorial, the instructions will tell you to name IPAM resources in a particular way, create IPAM resources in specific Regions, and use specific IP address CIDR ranges for your pools. This is intended to streamline the choices available in IPAM and get you started with IPAM quickly. Once you’ve completed this tutorial, you may decide to create a new IPAM and configure it differently.
Prerequisites
Before you begin, you must have set up an AWS Organizations account with at least one member account. For how-to instructions, see Creating and managing an organization in the AWS Organizations User Guide.
How AWS Organizations integrates with IPAM
This section shows an example of the AWS Organizations accounts you use in this tutorial. There are three accounts in your organization that you use when you integrate with IPAM in this tutorial:
-
The management account (called example-management-account in the following image) to log into the IPAM console and delegate an IPAM admin. You cannot use the organization’s management account as your IPAM admin.
-
A member account (called example-member-account-1 in the following image) as the IPAM admin account. The IPAM admin account is responsible for creating an IPAM and using it to manage and monitor IP address usage across the organization. Any member account in your organization can be delegated as the IPAM admin.
-
A member account (called example-member-account-2 in the following above) as the developer account. This account creates a VPC with a CIDR allocated from an IPAM pool.

In addition to the accounts, you’ll need the ID of the organizational unit (ou-fssg-q5brfv9c in the preceding image) that contains the member account you’ll use as the developer account. You need this ID so that, in a later step, when you share your IPAM pool, you can share it with this OU.
Note
For more information about AWS Organizations account types like management and member accounts, see AWS Organizations terminology and concepts.
Step 1: Delegate an IPAM administrator
In this step, you’ll delegate an AWS Organizations member account as the IPAM admin. When you delegate an IPAM admin, a service-linked role is automatically created in each of your AWS Organizations member accounts. IPAM monitors the IP address usage in these accounts by assuming the service-linked role in each member account. It can then discover the resources and their CIDRs regardless of their Organizational Unit.
You cannot complete this step unless you have the required AWS Identity and Access Management (IAM) permissions. For more information, see Integrate IPAM with accounts in an AWS Organization.
To delegate an IPAM admin account
Using the AWS Organizations management account, open the IPAM console at https://console.aws.amazon.com/ipam/
. In the AWS Management Console, choose the AWS Region in which you want to work with IPAM.
-
In the navigation pane, choose Organization settings.
-
Choose Delegate. The Delegate option is available only if you logged in to the console as the AWS Organizations management account.
-
Enter the AWS account ID for an organization member account. The IPAM administrator must be an AWS Organizations member account, not the management account.

-
Choose Save changes. The Delegated administrator information is populated with details related to the member account.
Step 2: Create an IPAM
In this step you’ll create an IPAM. When you create an IPAM, IPAM automatically creates two scopes for the IPAM: the private scope that’s intended for all private space, and the public scope that’s intended for all public space. The scopes, together with pools and allocations, are key components of your IPAM. For more information, see How IPAM works.
To create an IPAM
-
Using the AWS Organizations member account delegated as the IPAM admin in the previous step, open the IPAM console at https://console.aws.amazon.com/ipam/
. In the AWS Management Console, choose the AWS Region in which you want to create the IPAM. Create the IPAM in your main Region of operations.
-
On the service home page, choose Create IPAM.
Select Allow Amazon VPC IP Address Manager to replicate data from source account(s) into the IPAM delegate account. If you do not select this option, you cannot create an IPAM.

Under Operating Regions, choose the AWS Regions in which this IPAM can manage and discover resources. The AWS Region in which you are creating your IPAM is automatically selected as one of the operating Regions. In this tutorial, the home Region of our IPAM is us-east-1, so we’ll choose us-west-1 and us-west-2 as additional operating Regions. If you forget an operating Region, you can edit your IPAM settings later and add or remove Regions.

Choose Create IPAM.

Step 3: Create a top-level IPAM pool
In this tutorial, you create a hierarchy of pools starting with the top-level IPAM pool. In the subsequent steps, you’ll create a pair of Regional pools and a pre-production development pool in one of the regional pools.
For more information about pool hierarchies that you can build with IPAM, see Example IPAM pool plans.
To create a top-level pool
-
Using the IPAM admin account, open the IPAM console at https://console.aws.amazon.com/ipam/
. -
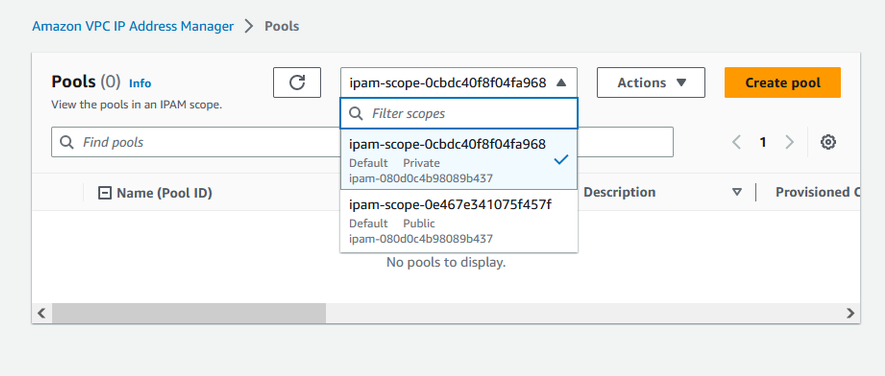
In the navigation pane, choose Pools.
-
Choose the private scope.
-
Choose Create pool.
-
Under IPAM scope, leave the private scope selected.
(Optional) Add a Name tag for the pool and a description for the pool, such as “Global pool”.
Under Source, choose IPAM scope. Because this is our top level pool, it will not have a source pool.
-
Under Address family, choose IPv4.
-
Under Resource planning, leave Plan IP space within the scope selected. For more information about using this option to plan for subnet IP space within a VPC, see Tutorial: Plan VPC IP address space for subnet IP allocations.
For the Locale, choose None. Locales are the AWS Regions where you want this IPAM pool to be available for allocations. You’ll set the locale for the Regional pools that you create in the next section of this tutorial.

-
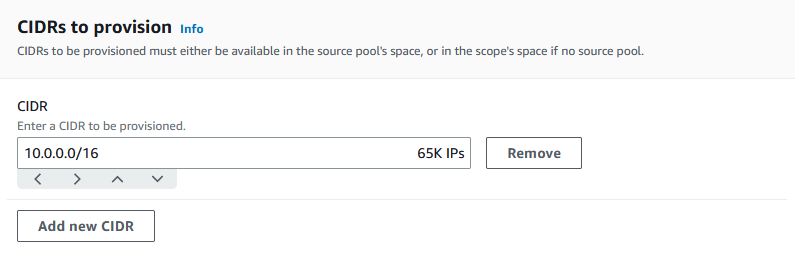
Choose a CIDR to provision for the pool. In this example, we provision 10.0.0.0/16.
Leave Configure this pool’s allocation rule settings disabled. This is our top-level pool, and you will not be allocating CIDRs to VPCs directly from this pool. Instead, you will allocate them from a sub-pool that you create from this pool.

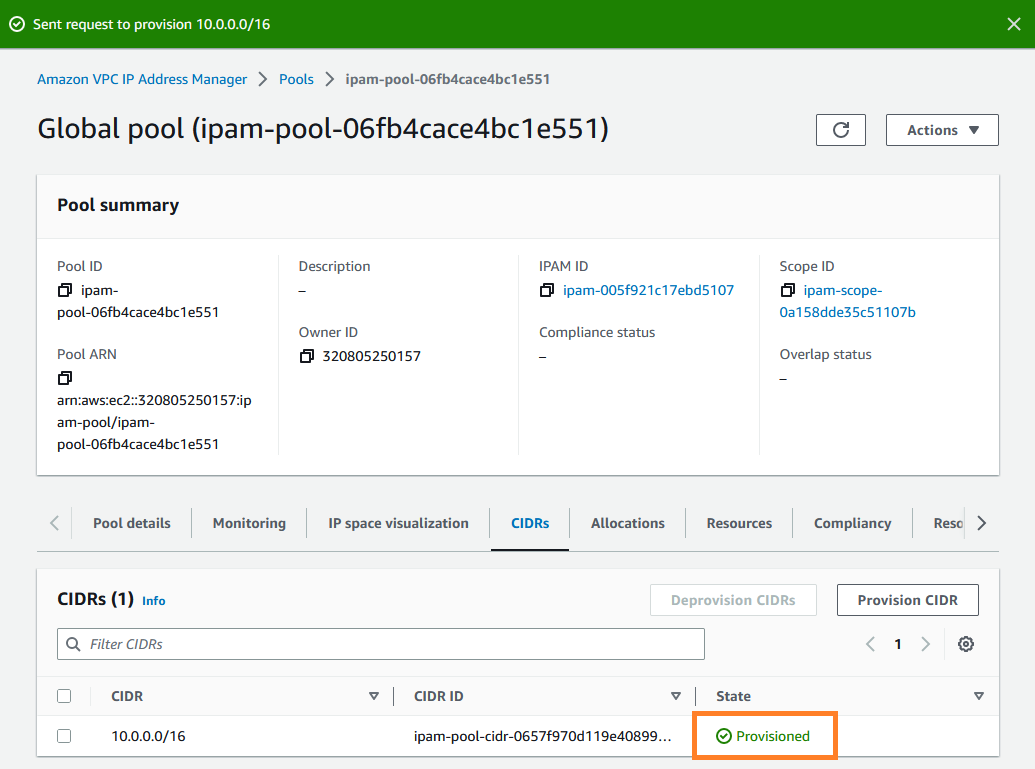
Choose Create pool. The pool is created and the CIDR is in a Pending-provision state:

Wait for the state to be Provisioned before you go to the next step.
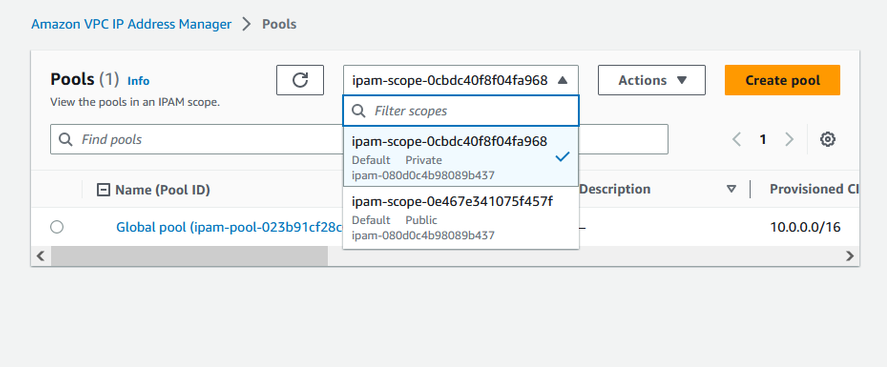
Now that you have created your top-level pool, you’ll create Regional pools in us-west-1 and us-west-2.
Step 4: Create Regional IPAM pools
This section shows you how to organize your IP addresses using two Regional pools. In this tutorial, we’re following one of the example IPAM pool plans and creating two Regional pools which can be used by the member accounts in your organization for allocating CIDRs to their VPCs.
To create a Regional pool
-
Using the IPAM admin account, open the IPAM console at https://console.aws.amazon.com/ipam/
. -
In the navigation pane, choose Pools.
-
Choose the private scope.
-
Choose Create pool.
Under IPAM scope, leave the private scope selected.
(Optional) Add a Name tag for the pool and a description for the pool, such as Regional pool us-west-1.
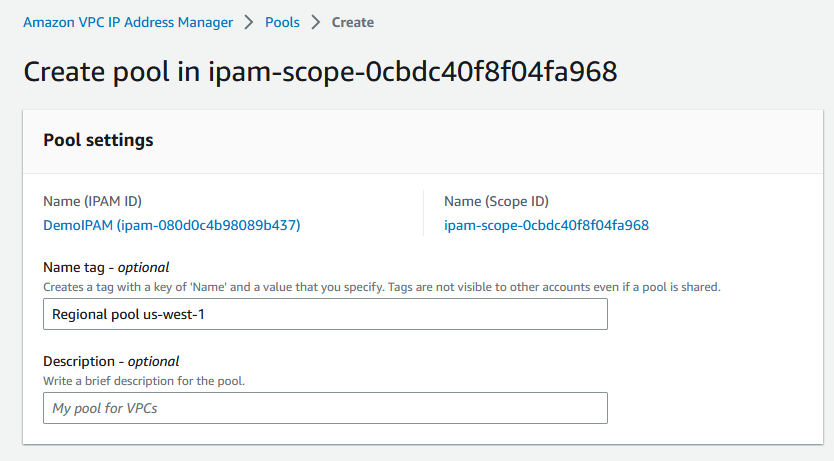
-
Under Source, select IPAM pool and select the top-level pool (“Global pool”) that you created in Step 3: Create a top-level IPAM pool. Then, under Locale, choose us-west-1.

-
Under Resource planning, leave Plan IP space within the scope selected. For more information about using this option to plan for subnet IP space within a VPC, see Tutorial: Plan VPC IP address space for subnet IP allocations.
-
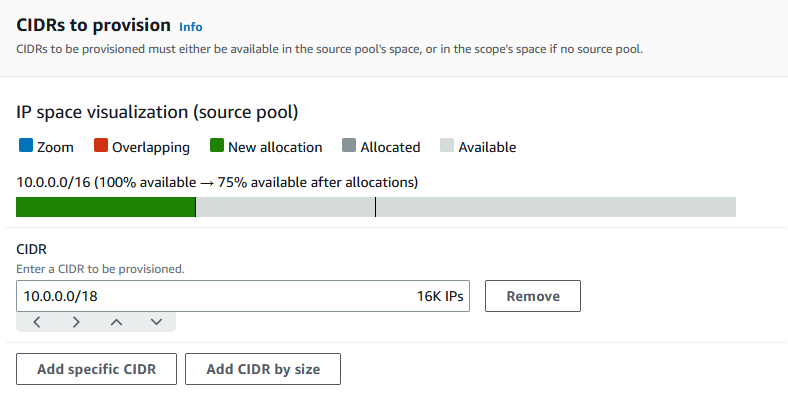
Under CIDRs to provision, enter 10.0.0.0/18, which will give this pool around 16,000 available IP addresses.
Leave Configure this pool’s allocation rule settings disabled. You will not be allocating CIDRs to VPCs directly from this pool. Instead, you will allocate them from a sub-pool that you create from this pool.
Choose Create pool.
Return to the Pools view to see the hierarchy of IPAM pools that you’ve created.

Repeat the steps in this section and create a second Regional pool in us-west-2 locale with the CIDR 10.0.64.0/18 provisioned to it. When you complete that process, you’ll have three pools in a hierarchy similar to this one:

Step 5: Create a pre-production development pool
Follow the steps in this section to create a development pool for pre-production resources within one of your Regional pools.
To create a pre-production development pool
-
In the same way that you did in the previous section, using the IPAM admin account, create a pool called Pre-prod pool, but this time use Regional pool us-west-1 as the source pool.

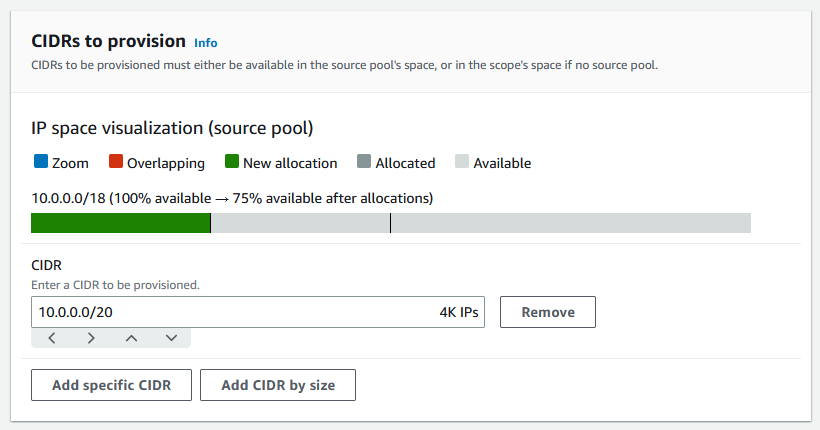
Specify a CIDR of 10.0.0.0/20 to provision, which will give this pool around 4,000 IP addresses.
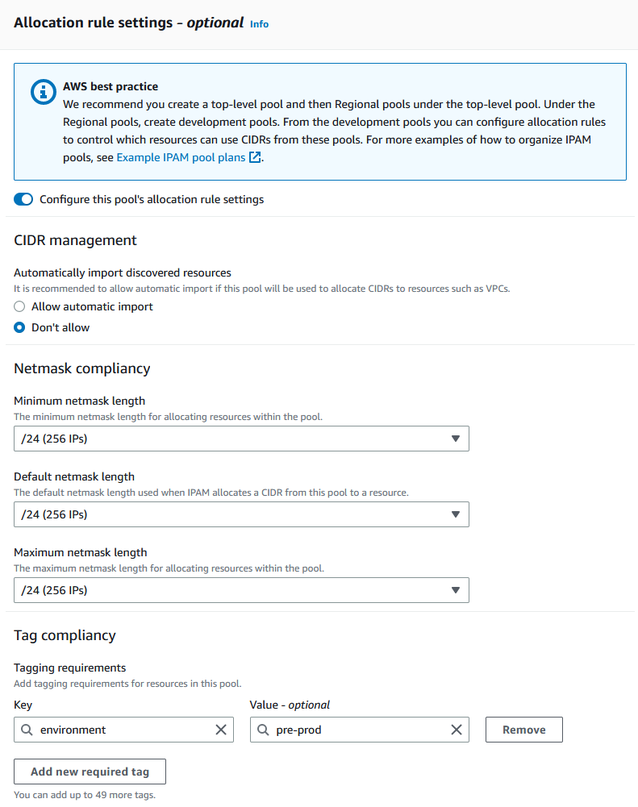
Toggle the option for Configure this pool's allocation rule settings. Do the following:
Under CIDR management, for Automatically import discovered resources, leave the default Don't allow option selected. This option would enable IPAM to automatically import resource CIDRs it discovers in the pool's locale. A detailed description of this option is outside the scope of this tutorial, but you can read more about the option in Create a top-level IPv4 pool.
Under Netmask compliancy, choose /24 for the minimum, default, and maximum netmask length. A detailed description of this option is outside the scope of this tutorial, but you can read more about the option in Create a top-level IPv4 pool. What’s important to note is that the VPC that you create later with a CIDR from this pool will be limited to /24 based on what we set here.
Under Tag compliance, enter environment/pre-prod. This tag will be required for VPCs to allocate space from the pool. We will demonstrate later how this works.
Choose Create pool.
-
The pool hierarchy now includes an additional subpool under Regional pool us-west-1:

Now you’re ready to share the IPAM pool with another member account in your organization and enable that account to allocate a CIDR from the pool to create a VPC.
Step 6: Share the IPAM pool
Follow the steps in this section to share the pre-production IPAM pool using AWS Resource Access Manager (RAM).
This section consists of two subsections:
-
Step 6.1. Enable resource sharing in AWS RAM: This step must be done by the AWS Organizations management account.
-
Step 6.2. Share an IPAM pool using AWS RAM: This step must be done by the IPAM admin.
Step 6.1. Enable resource sharing in AWS RAM
After you create your IPAM, you’ll want to share IP address pools with other accounts in your organization. Before you share an IPAM pool, complete the steps in this section to enable resource sharing with AWS RAM.
To enable resource sharing
-
Using the AWS Organizations management account, open the AWS RAM console at https://console.aws.amazon.com/ram/
. -
In the left navigation pane, choose Settings, choose Enable sharing with AWS Organizations, and then choose Save settings.
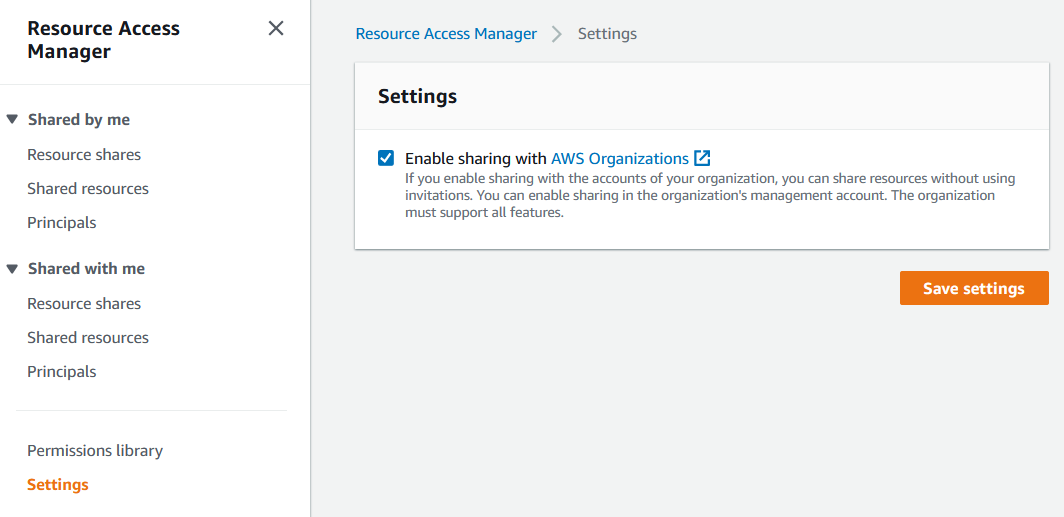
You can now share an IPAM pool with other members of the organization.
Step 6.2. Share an IPAM pool using AWS RAM
In this section you’ll share the pre-production development pool with another AWS Organizations member account. For complete instructions on sharing IPAM pools, including information on the required IAM permissions, see Share an IPAM pool using AWS RAM.
To share an IPAM pool using AWS RAM
-
Using the IPAM admin account, open the IPAM console at https://console.aws.amazon.com/ipam/
. -
In the navigation pane, choose Pools.
-
Choose the private scope, choose the pre-production IPAM pool, and choose Actions > View details.
-
Under Resource sharing, choose Create resource share. The AWS RAM console opens. You'll share the pool using AWS RAM.
-
Choose Create a resource share.
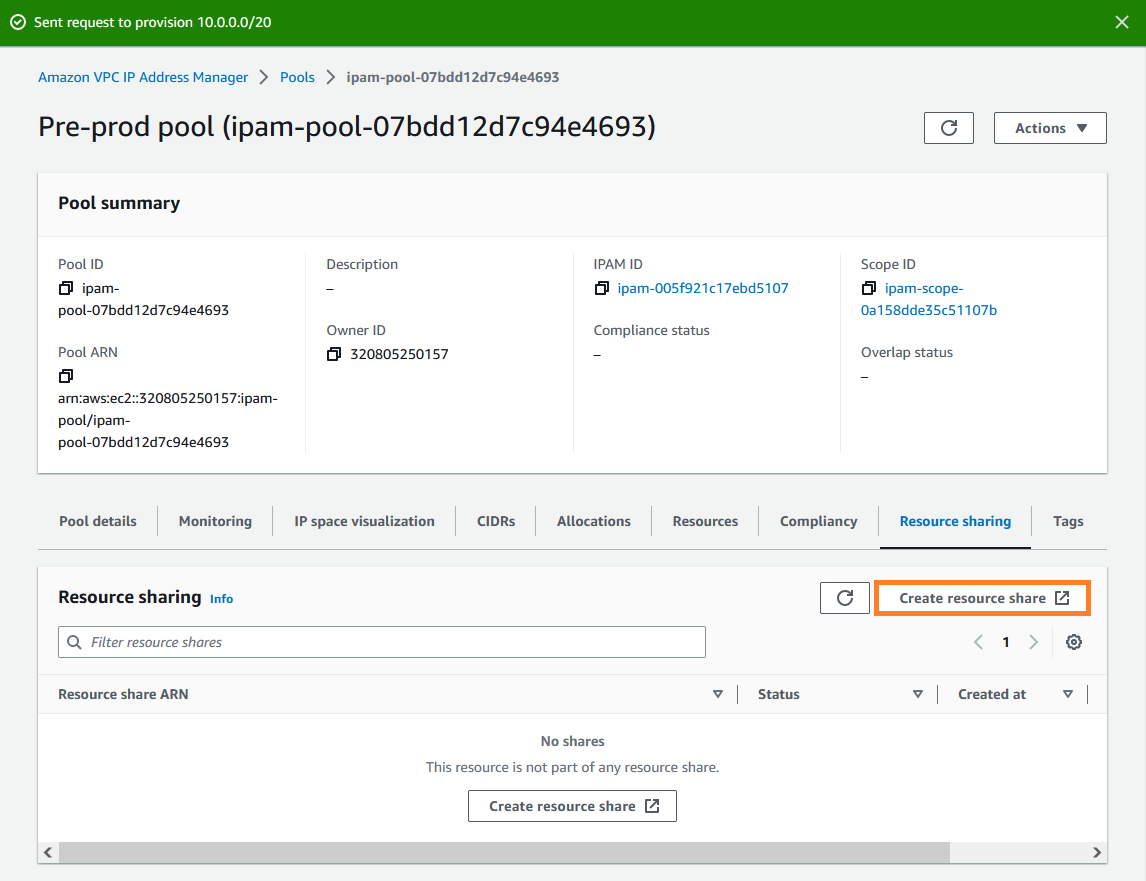
The AWS RAM console opens.
-
In the AWS RAM console, choose Create a resource share again.
-
Add a Name for the shared pool.
-
Under Select resource type, choose IPAM pools, and then choose the ARN of the pre-production development pool.

-
Choose Next.
-
Leave the default AWSRAMDefaultPermissionsIpamPool permission selected. The details of the permission options are out of scope for this tutorial, but you can find out more about these options in Share an IPAM pool using AWS RAM.

-
Choose Next.
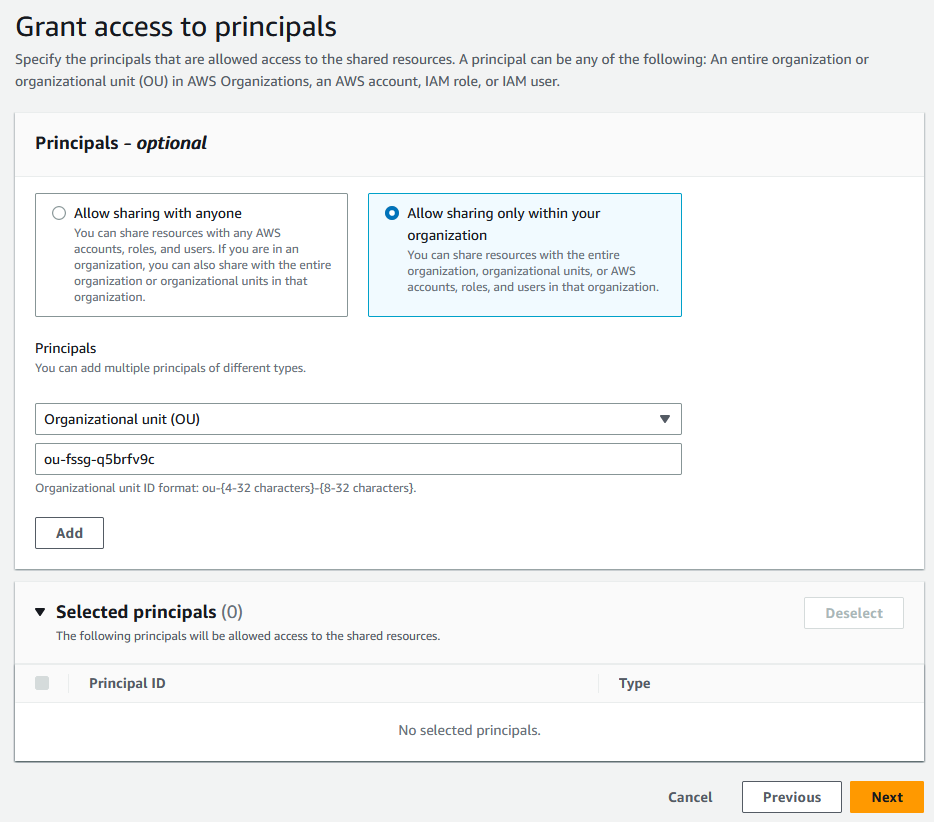
Under Principals, choose Allow sharing only within your organization. Enter your AWS Organizations organization unit ID (as mentioned in How AWS Organizations integrates with IPAM, and then choose Add .
-
Choose Next.
-
Review the resource share options and the principals that you’ll be sharing with, and then choose Create.
Now that the pool has been shared, go to the next step to create a VPC with a CIDR allocated from an IPAM pool.
Step 7: Create a VPC with a CIDR allocated from an IPAM pool
Follow the steps in this section to create a VPC with a CIDR allocated from the pre-production pool. This step should be completed by the member account in the OU that the IPAM pool was shared with in the previous section (called example-member-account-2 in How AWS Organizations integrates with IPAM). For more information about the IAM permissions that are required to create VPCs, see Amazon VPC policy examples in the Amazon VPC User Guide.
To create a VPC with a CIDR allocated from an IPAM pool
-
Using the member account, open the VPC console at https://console.aws.amazon.com/vpc/
as the member account that you'll use as the developer account. Choose Create VPC.
Do the following:
-
Enter a name, such as Example VPC.
-
Choose IPAM-allocated IPv4 CIDR block.
-
Under IPv4 IPAM pool, choose the ID of the pre-production pool.
-
Choose a Netmask length. Because you limited the available netmask length for this pool to /24 (in Step 5: Create a pre-production development pool), the only netmask option available is /24.

-
-
For demonstration purposes, under Tags, do not add any additional tags at this time. When you created the pre-prod pool (in Step 5: Create a pre-production development pool), you added an allocation rule that required any VPCs that are created with CIDRs from this pool to have an environment/pre-prod tag. Leave the environment/pre-prod tag off for now so that you can see that an error appears telling you that a required tag was not added.
-
Choose Create VPC.
An error appears telling you that a required tag was not added. The error appears because you set an allocation rule when you created the pre-prod pool (in Step 5: Create a pre-production development pool). The allocation rule required any VPCs that are created with CIDRs from this pool to have an environment/pre-prod tag.

Now, under Tags, add the tag environment/pre-prod and choose Create VPC again.

The VPC is created successfully, and the VPC complies with the tag rule on the pre-production pool:

In the Resources pane of the IPAM console, the IPAM admin will be able to see and manage the VPC and its allocated CIDR. Note that it takes some time for the VPC to appear in the Resources pane.
Step 8: Cleanup
In this tutorial, you created an IPAM with a delegated admin, created multiple pools, and enabled a member account in your organization to allocate a VPC CIDR from a pool.
Follow the steps in this section to clean up the resources that you created in this tutorial.
To cleanup the resources created in this tutorial
Using the member account that created the example VPC, delete the VPC. For detailed instructions, see Delete your VPC in the Amazon Virtual Private Cloud User Guide.
Using the IPAM admin account, delete the example resource share in the AWS RAM console. For detailed instructions, see Deleting a resource share in AWSAWS RAM in the AWS Resource Access Manager User Guide.
Using the IPAM admin account, log into the RAM console and disable sharing with AWS Organizations that you enable in Step 6.1. Enable resource sharing in AWS RAM.
Using the IPAM admin account, delete the example IPAM by selecting the IPAM in the IPAM console and then choosing Actions > Delete. For detailed instructions, see Delete an IPAM.
When you’re prompted to delete the IPAM, choose Cascade delete. This will delete all scopes and pools within the IPAM before deleting the IPAM.

Enter delete and then choose Delete.
Using the AWS Organizations management account, log into the IPAM console, choose Settings, and remove the delegated administrator account.
(Optional) When you integrate IPAM with AWS Organizations, IPAM automatically creates a service-linked role in each member account. Using each AWS Organizations member account, log into IAM and delete the AWSServiceRoleForIPAM service linked role in each member account.
-
Cleanup is complete.
