We have released a new version of the Well-Architected Framework. We also added new and updated lenses to the Lens Catalog. Learn more
Activating Trusted Advisor for a workload in IAM
Note
Workload owners should Activate Discovery support for their account before creating a Trusted Advisor workload. Choosing to Activate Discovery support creates the role required for the workload owner. Use the following steps for all other associated accounts.
The owners of associated accounts for workloads that have activated Trusted Advisor must create a role in IAM to see Trusted Advisor information in AWS Well-Architected Tool.
To create a role in IAM for AWS WA Tool to get information from Trusted Advisor
-
Sign in to the AWS Management Console and open the IAM console at https://console.aws.amazon.com/iam/
. -
In the navigation pane of the IAM console, choose Roles, and then choose Create role.
Under Trusted entity type choose Custom trust policy.
-
Copy and paste the following Custom trust policy into the JSON field in the IAM console, as shown in the following image. Replace
WORKLOAD_OWNER_ACCOUNT_ID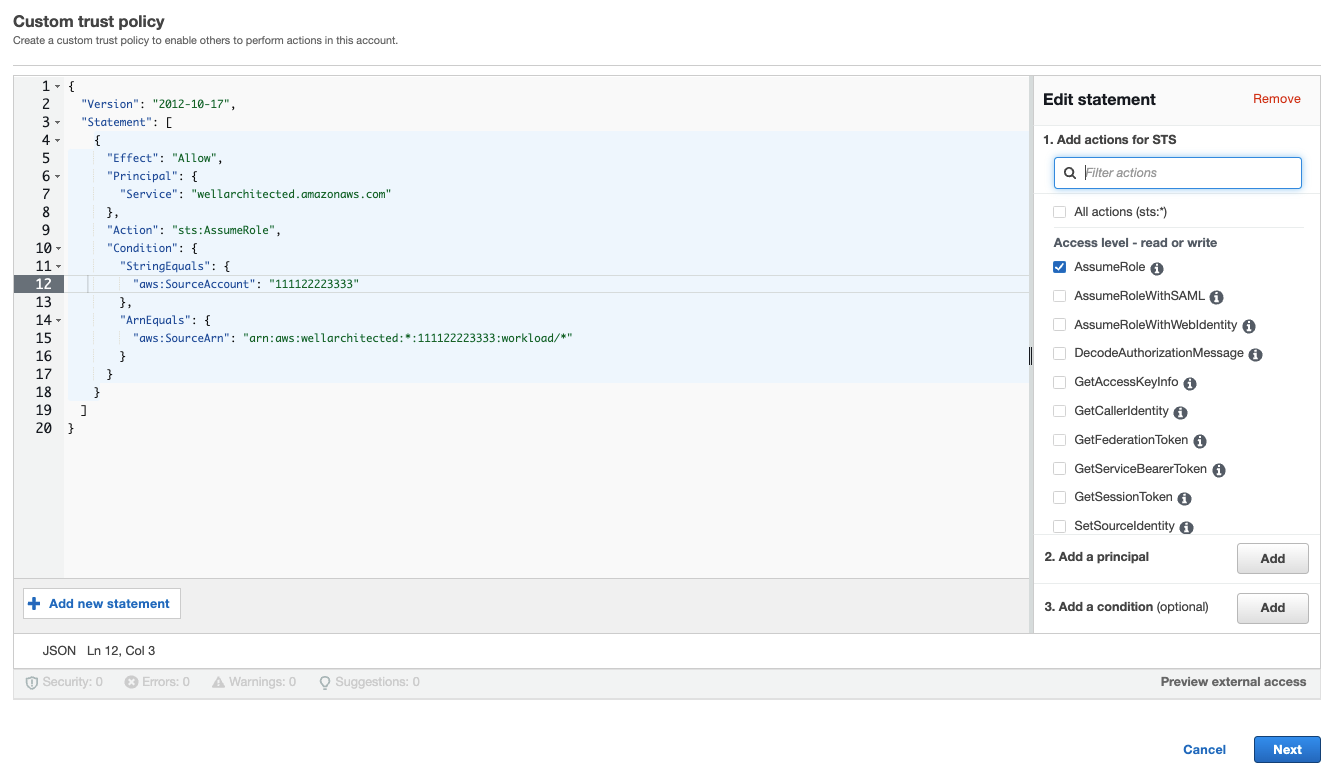
Note
The
aws:sourceArnin the condition block of the preceeding custom trust policy is"arn:aws:wellarchitected:*:, which is a generic condition stating this role can be used by AWS WA Tool for all of the workload owner's workloads. However, access can be narrowed to a specific workload ARN, or set of workload ARNs. To specify multiple ARNs, see the following example trust policy.WORKLOAD_OWNER_ACCOUNT_ID:workload/*" On the Add permissions page, for Permissions policies choose Create policy to give AWS WA Tool access to read data from Trusted Advisor. Selecting Create policy opens a new window.
Note
Additionally, you have the option to skip creating the permissions during the role creation and create an inline policy after creating the role. Choose View role in the successful role creation message and select Create inline policy from the Add permissions dropdown in the Permissions tab.
Copy and paste the following Permissions policy into the JSON field. In the
ResourceARN, replaceYOUR_ACCOUNT_ID*), and choose Next:Tags.For details about ARN formats, see Amazon Resource Name (ARN) in the AWS General Reference Guide.
-
If Trusted Advisor is activated for a workload and the Resource definition is set to AppRegistry or All, all of the accounts that own a resource in the AppRegistry application attached to the workload must add the following permission to their Trusted Advisor role's Permissions policy.
-
(Optional) Add tags. Choose Next: Review.
-
Review the policy, give it a name, and select Create policy.
-
On the Add permissions page for the role, select the policy name you just created, and select Next.
-
Enter the Role name, which must use the following syntax:
WellArchitectedRoleForTrustedAdvisor-and choose Create role. ReplaceWORKLOAD_OWNER_ACCOUNT_IDWORKLOAD_OWNER_ACCOUNT_IDYou should get a success message at the top of the page notifying you that the role has been created.
-
To view the role and associated permissions policy, in the left navigation pane under Access management, choose Roles and search for the
WellArchitectedRoleForTrustedAdvisor-name. Select the name of the role to verify that the Permissions and Trust relationships are correct.WORKLOAD_OWNER_ACCOUNT_ID
