This whitepaper is for historical reference only. Some content might be outdated and some links might not be available.
Controlling how long Amazon S3 content is cached by Amazon CloudFront
It is important to control how long your Amazon S3 content is cached at the CloudFront edge locations.
This helps make sure that website updates appear correctly. If you’re ever confused by a
situation in which you’ve updated your website, but you are still seeing stale content when
visiting your CloudFront powered website, one likely reason is that CloudFront is still serving up cached
content. You can control CloudFront caching behavior with a combination of Cache-Control
HTTP headers, CloudFront Minimum Time- to-Live (TTL) specifications, Maximum TTL specifications,
content versioning, and CloudFront Invalidation Requests. Using these correctly will help you manage
website updates.
CloudFront will typically serve cached content from an edge location until the content expires. After it expires, the next time that content is requested by an end user, CloudFront goes back to the Amazon S3 origin server to fetch the content and then cache it. CloudFront edge locations automatically expire content after Maximum TTL seconds elapse (by default, this is 31536000 seconds, or one year)).
However, it could be sooner because CloudFront reserves the flexibility to expire content if it needs to, before the Maximum TTL is reached. By default, the Minimum TTL is set to 0 (zero) seconds, but this value is configurable. Therefore, CloudFront may expire content anytime between the Minimum TTL (default is 0 seconds) and Maximum TTL (default is 31536000 seconds, or one year).
For example, if Minimum TTL=60s and Maximum TTL=600s, then content will be cached for at least 60 seconds and at most 600 seconds.
For example, say you deploy updates to your marketing website, with the latest and greatest product images. After uploading your new images to Amazon S3, you immediately browse to your website DNS, and you still see the old images! It is likely that one and possibly more CloudFront edge locations are still holding onto cached versions of the older images and serving the cached versions up to your website visitors. If you’re the patient type, you can wait for CloudFront to expire the content, but it could take up to Maximum TTL seconds for that to happen. There are several approaches to address this issue, each with its pros and cons.
Set maximum TTL value
Set the Maximum TTL to be a relatively low value. The tradeoff is that cached content expires faster because of the low Maximum TTL value. This results in more frequent requests to your Amazon S3 bucket because the CloudFront caches need to be repopulated more often. In addition, the Maximum TTL setting applies across the board to all CloudFront files, and for some websites you might want to control cache expiration behaviors based on file types.
Implement content versioning
Every time you update website content, embed a version identifier in the file names. It
can be a timestamp, a sequential number, or any other way that allows you to distinguish
between two versions of the same file. For example, instead of banner.jpg, call
it banner_20170401_v1.jpg. When you update the image, name the new version
banner_20170612_v1.jpg and update all files that need to link to the new image.
In the following example, the banner and logo images are updated and receive new file names. However, because those images are referenced by the HTML files, the HTML markup must also be updated to reference the new image file names. Note that the HTML file names shouldn’t have version identifiers in order to provide stable URLs for end users.
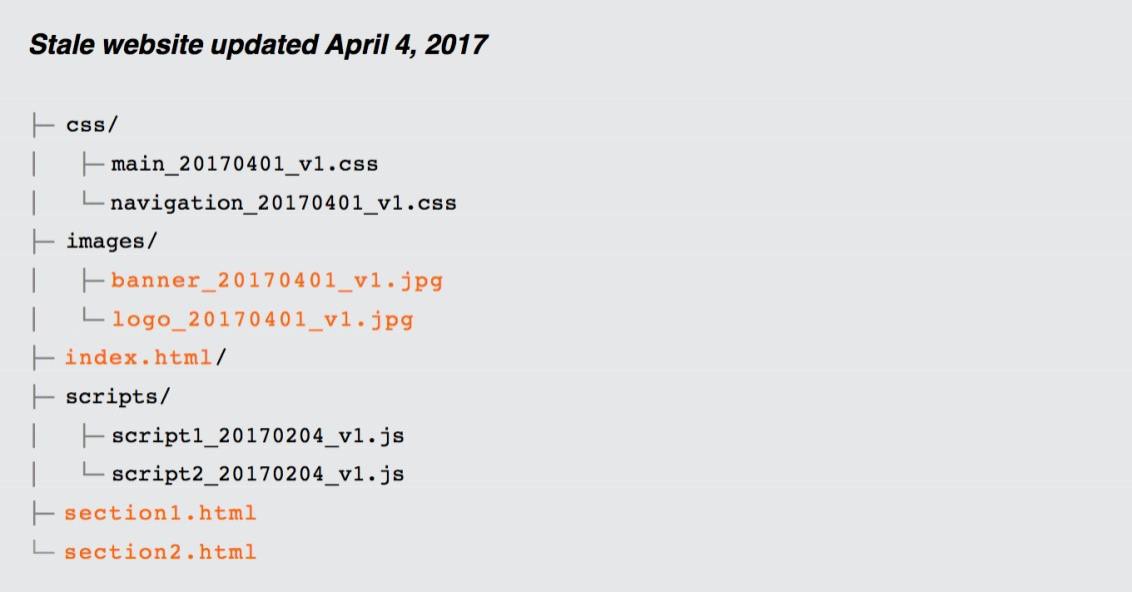
Example of code for an updated static website
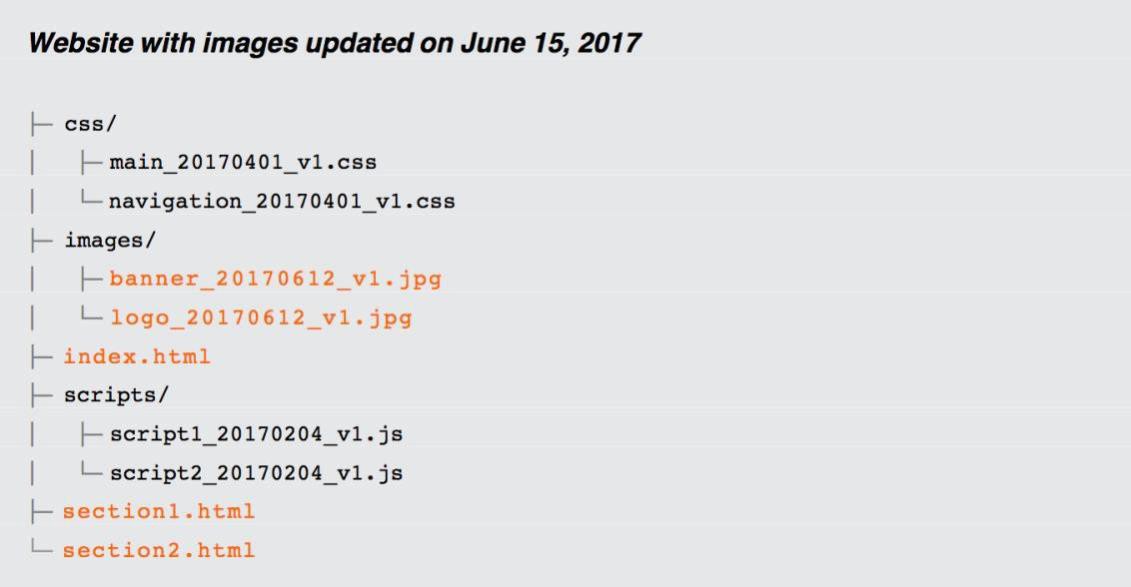
Example of code for a website with images
Content versioning has a clear benefit: it sidesteps CloudFront expiration behaviors altogether. Since new file names are involved, CloudFront immediately fetches the new files from Amazon S3 (and afterwards, cache them).
Non-HTML website changes are reflected immediately. Additionally, you can roll back and roll forward between different versions of your website.
The main challenge is that content update processes must be version-aware. File names must be versioned. Files with references to changed files must also be updated. For example, if an image is updated, the following items must be updated as well:
-
The image file name
-
Content in any HTML, CSS, and JavaScript files referencing the older image file name
-
The file names of any referencing files (with the exception of HTML files)
A few static site generator tools can automatically rename file names with version identifiers, but most tools aren’t version-aware. Manually managing version identifiers can be cumbersome and error-prone. If your website would benefit from content versioning, it may be worth investing in a few automation scripts to streamline your content update process.
Specify cache-control headers
You can manage CloudFront expiration behavior by specifying Cache-Control
headers for your website content. If you keep the Minimum TTL at the default 0
seconds, then CloudFront honors any Cache-Control: max-age HTTP header that is
individually set for your content. If an image is configured with a Cache-Control:
max-age=60 header, then CloudFront expires it at the 60 second mark. This gives you more
precise control over content expiration for individual files.
You can configure Amazon S3 to return a Cache-Control HTTP header with the value
of max-age=<seconds> when S3 serves up the content. This setting is on a
file-by-file basis, and we recommend using different values depending on the file type (HTML,
CSS, JavaScript, images, and so on). Since HTML files won’t have version identifiers in their
file names, we recommend using smaller max-age values for HTML files so that CloudFront
will expire the HTML files sooner than other content. You can set this by editing the Amazon S3
object metadata using the AWS Management Console.
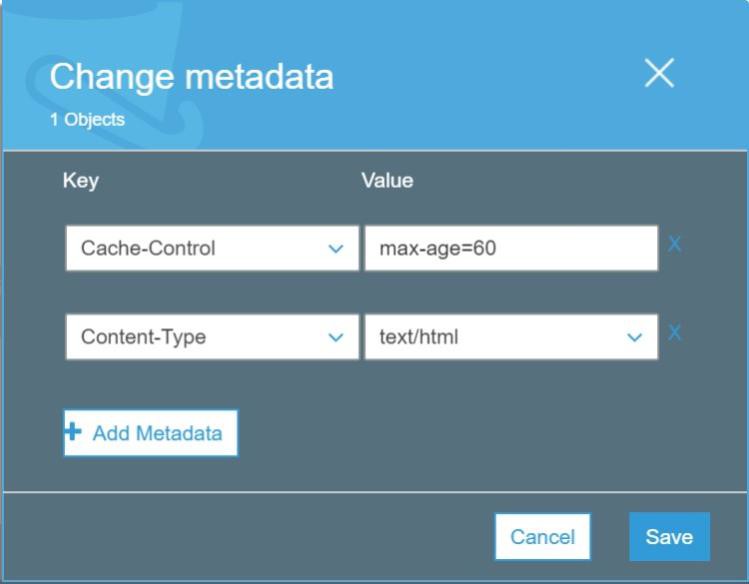
Setting Cache-Control values in the AWS Management Console
In practice, you should automate this as part of your Amazon S3 upload process. With AWS CLI, you can alter your deployment scripts like the following example:
aws s3 sync /path s3://yourbucket/ --delete –recursive \
     --cache-control max-age=60
Use CloudFront invalidation requests
CloudFront invalidation requests are a way to force CloudFront to expire content. Invalidation requests aren’t immediate. It takes several minutes from the time you submit one to the time that CloudFront actually expires the content. For the occasional requests, you can submit them using the AWS Management Console. Otherwise, use the AWS CLI or AWS APIs to script the invalidation. In addition, CloudFront lets you specify which content should be invalidated: You can choose to invalidate your entire Amazon S3 bucket, individual files, or just those matching a wildcard pattern. For example, to invalidate only the images directory, issue an invalidation request for:
/images/*.
In summary, the best practice is to understand and use the four approaches together. If
possible, implement content versioning. It gives you the ability to immediately review changes
and gives you the most precise control over the CloudFront and Amazon S3 experience. Set the Minimum TTL
to be 0 seconds and the Maximum TTL to be a relatively low value. Also, use Cache-Control
headers for individual pieces of content. If your website is infrequently updated, then set a
large value for Cache-Control:max-age=<seconds> and then issue CloudFront invalidation
requests every time your site is updated. If the website is updated more frequently, use a
relatively small value for Cache-Control:max-age=<seconds> and then issue CloudFront
invalidation requests only if the Cache-Control:max-age=<seconds> settings exceeds
several minutes.
