This whitepaper is for historical reference only. Some content might be outdated and some links might not be available.
Deployment
You will use App2Container to generate the artifacts needed to deploy your application container in AWS. App2Container pre-fills key values in the artifacts based on your profile, the application analysis, and best practices. In this guide you will deploy your application to Amazon ECS; however, Amazon EKS is also a supported option.
-
Run
app2container generate app-deploymentto automatically create a CloudFormation template for deploying the MvcMusicStore application to Amazon ECS.app2container generate app-deployment --application-id <net-app-id>This process will take a few minutes to complete, and will result in the following output.

Successful generation of CloudFormation template for MvcMusic deployment
This process creates an Amazon ECR repository and pushes your app image to the registry. It also creates an ECS task definition and registers it with ECS, then uploads all CloudFormation resources to the selected S3 bucket. Lastly, it creates a CloudFormation template for the deployment and fills it with the generated configurations from the previous steps. You can verify the creation of these assets by viewing the services in the AWS Management Console and by confirming the
ecs-master.ymlfile in the location specified in the output of the tool. -
Launch the CloudFormation stack by running the suggested
aws cloudformation
            deploy
command to pin the tool’s output. Replace the values in the following template with your actual value for your application’s ID.aws cloudformation deploy --template-file C:\Users\Administrator\AppData\Local\app2container\<net-app-id> \EcsDeployment\ecs-master.yml --capabilities CAPABILITY_NAMED_IAM --stack-name a2c-<net-app-id>-ECSThis process will take several minutes to complete while the infrastructure is deployed in AWS. You can track the progress in the CloudFormation service in the AWS Management Console. When the command completes, the result will be the following output.

Successful deployment using CloudFormation template
-
After your stack is deployed, you can verify that your containerized application is successfully running by navigating to Amazon ECS in the EC2 console. In Amazon ECS, choose Clusters in the left pane, and choose the link for your newly created cluster.

Choose Clusters in the left pane and choose the link for your newly created cluster
-
Select the link to Amazon ECS running on your ECS cluster.

Choose the link to Amazon ECS running on your ECS cluster
-
Select the Target Group Name link.

Select the Target Group Name link
-
Select the target group.

Select the target group
-
Select the Load Balancers details link.

Select the Load Balancers details link
-
On the Load Balancers page, note the DNS name in the Basic Configuration details. Copy and paste the DNS link into your browser to view your containerized application running in Amazon ECS.

Copy and paste the DNS link into your browser to view your containerized application running in Amazon ECS

Containerized application
Now that you have your application up and running, you will create a CI/CD pipeline for it using App2Container.
To create a CI/CD pipeline:
-
Navigate to Amazon ECS in the AWS Management Console and copy your Cluster name and Service name to your local machine.

Copy your Cluster name and Service name to your local machine
-
On your worker machine, open the
pipeline.jsonfile atC:\Users\Administrator\AppData\Local\app2container\<net-app-id>\and fill in the values for thebeta.clusterNameandbeta.serviceNamebased on your deployment. Additionally, changebeta.enabledtotrue, and save the file.
Open the
pipeline.jsonfile -
Open PowerShell and run the
app2container generate pipelinecommand as follows:app2container generate pipeline --application-id <net-app-id> -
You should see the following output:

PowerShell output
-
Run the suggested
aws cloudformation deploycommand to deploy your pipeline to AWS.aws cloudformation deploy --template-file C:\Users\Administrator\AppData\Local\app2container\<net-app-id>\ Artifacts\Pipeline\CodePipeline\ecs-pipeline-master.yml --capabilities CAPABILITY_NAMED_IAM CAPABILITY_AUTO_EXPAND --stack-name a2c-<net-app-id>-ecs-pipeline-stackThis will take several minutes, because the command will not complete until the pipeline phases complete. Part of this is a build phase, which requires a build of the application (and Windows Server base image). You can monitor the progress in the CloudFormation service in the AWS Management Console. You will see the following output upon completion:

Successful creation of the pipeline using CloudFormation
To confirm that the pipeline was successfully created, go to the CodePipeline service in the AWS Management Console and choose your newly created pipeline.

Confirm successful completion of newly created pipeline
You have successfully containerized a Windows VM-based application and deployed it on
Amazon ECS with a fully automated CI/CD pipeline. The following figure shows the architecture for
this setup. If you are interested in doing a migration of the SQL Server instance running on
Amazon EC2 to Amazon Relational Database Service, refer to the Amazon RDS for SQL
Server Workshop
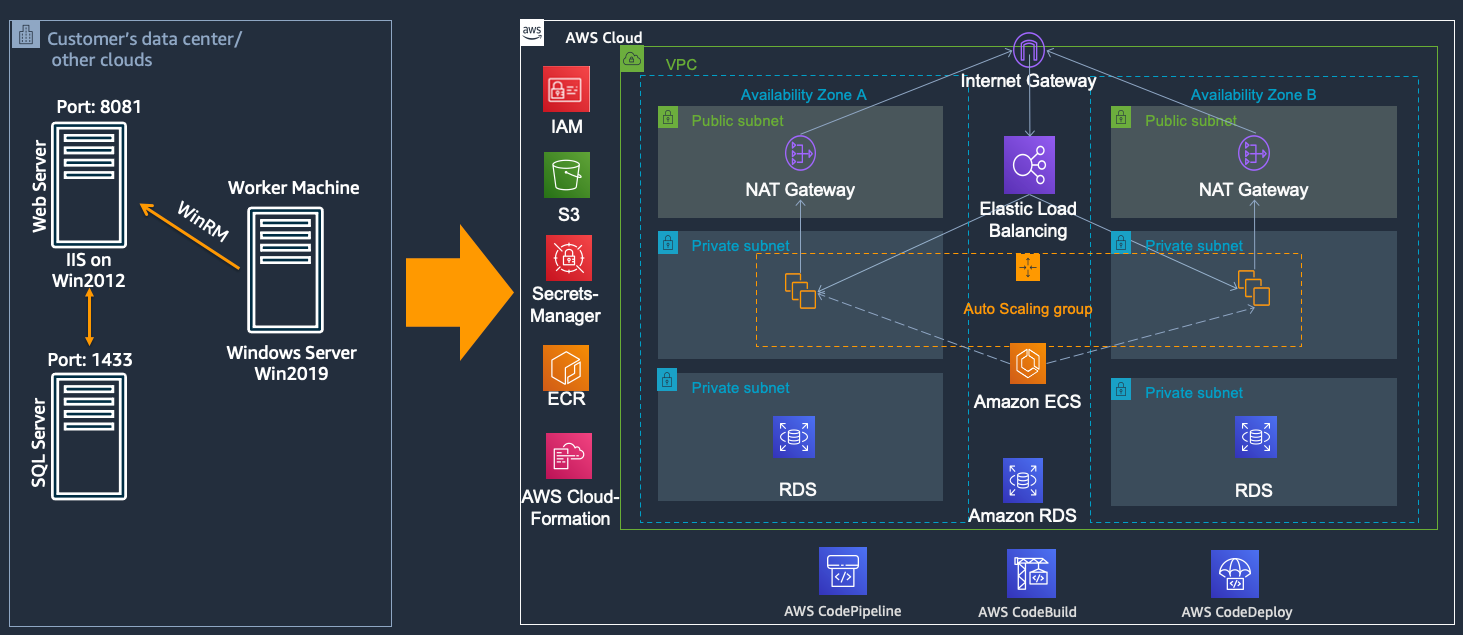
Architecture for containerizing a Windows VM-based application and deploying it on Amazon ECS with a fully automated CI/CD pipeline
