本文属于机器翻译版本。若本译文内容与英语原文存在差异,则一律以英文原文为准。
在中调用管道中的 AWS Lambda 函数 CodePipeline
AWS Lambda 是一项计算服务,可使您无需调配或管理服务器即可运行代码。您可以创建 Lambda 函数并将其作为操作添加到管道中。由于 Lambda 允许您编写函数来执行几乎任何任务,因此您可以自定义管道的工作方式。
重要
不要记录 CodePipeline 发送到 Lambda 的 JSON 事件,因为这可能会导致用户凭证记录到日志中 CloudWatch 。该 CodePipeline 角色使用 JSON 事件将临时证书传递给该artifactCredentials领域的 Lambda。有关示例事件,请参阅JSON 事件示例。
以下是可在管道中使用 Lambda 函数的一些方法:
-
在管道的一个阶段使用 CloudFormation 按需创建资源,然后在另一个阶段将其删除。
-
使用交换别名记录值的 Lambda 函数部署停机时间为零的应用程序版本。 AWS Elastic Beanstalk
-
部署到 Amazon ECS Docker 实例。
-
通过创建 AMI 快照在生成或部署之前备份资源。
-
将与第三方产品的集成添加到您的管道中,例如将消息发布到 IRC 客户端。
注意
创建和运行 Lambda 函数可能会导致您的 AWS 账户产生费用。有关更多信息,请参阅定价
本主题假设您熟悉 AWS CodePipeline AWS Lambda 并知道如何创建管道、函数以及它们所依赖的 IAM 策略和角色。此主题向您演示如何:
-
创建一个 Lambda 函数以测试网页是否已成功部署。
-
配置 CodePipeline 和 Lambda 执行角色以及作为管道一部分运行函数所需的权限。
-
编辑管道,将 Lambda 函数作为一个操作添加到其中。
-
通过手动发布更改来测试操作。
注意
CodePipeline在中使用跨区域 Lambda 调用操作时,使用PutJobSuccessResultPutJobFailureResult和执行 lambda 的状态应发送到 AWS 存在 Lambda 函数的区域,而不是发送到存在的区域。 CodePipeline
本主题包含示例函数,用于演示如何灵活地使用 Lambda 函数: CodePipeline
-
-
创建要与一起使用的基本 Lambda 函数。 CodePipeline
-
将成功或失败 CodePipeline 的结果返回到操作的详细信息链接。
-
-
使用 AWS CloudFormation 模板的 Python 函数示例
-
使用 JSON 编码的用户参数向函数 (
get_user_params) 传递多个配置值。 -
与项目存储桶 (
get_template) 中的 .zip 项目交互。 -
使用延续令牌监控长期异步过程 (
continue_job_later)。这将允许操作继续进行,使函数取得成功,即使已超过十五分钟的运行时(Lambda 中的限制)也不例外。
-
每个示例函数都包含有关您必须添加到角色的权限的信息。有关中限制的信息 AWS Lambda,请参阅《AWS Lambda 开发者指南》中的限制。
重要
本主题中包含的示例代码、角色和策略仅作为示例,并按原样提供。
主题
步骤 1:创建管道
在此步骤中,您将创建一个管道,稍后您将向其中添加 Lambda 函数。这与您在CodePipeline 教程中创建的管道相同。如果该管道仍然配置用于您的账户,并且属于您计划创建 Lambda 函数的相同区域,则可以跳过此步骤。
创建管道
-
按照中的教程:创建一个简单的管道(S3 存储桶)前三个步骤创建 Amazon S3 存储桶、 CodeDeploy资源和两阶段管道。为您的实例类型选择 Amazon Linux 选项。您可以使用要对管道使用的任何名称,但此主题中的步骤会使用 MyLambdaTestPipeline。
-
在管道的状态页面的 CodeDeploy 操作中,选择详细信息。在部署组的部署详细信息页中,从列表中选择一个实例 ID。
-
在 Amazon EC2 控制台中,在实例的详细信息选项卡上,复制公共 IPv4 地址中的 IP 地址(例如,
192.0.2.4)。您应将此地址用作 AWS Lambda中的函数的目标。
注意
的默认服务角色策略 CodePipeline 包括调用该函数所需的 Lambda 权限。但是,如果您修改了该默认服务角色或选择了另一个角色,请确保该角色的策略允许 lambda:InvokeFunction 和 lambda:ListFunctions 权限。否则,包含 Lambda 操作的管道将会失败。
第 2 步:创建 Lambda 函数
在此步骤中,您将创建一个 Lambda 函数,该函数会发出 HTTP 请求,并检查网页上的一行文本。作为此步骤的一部分,您还必须创建 IAM 策略和 IAM 执行角色。有关更多信息,请参阅 AWS Lambda 开发者指南 中的权限模型。
创建执行角色
登录 AWS 管理控制台 并打开 IAM 控制台,网址为https://console.aws.amazon.com/iam/
。 -
选择 Policies,然后选择 Create Policy。选择 JSON 选项卡,然后将以下策略粘贴到字段中。
-
选择查看策略。
-
在 Review policy (查看策略) 页面上,在 Name (名称) 中,键入策略的名称(例如,
CodePipelineLambdaExecPolicy)。在 Description (描述) 中,输入Enables Lambda to execute code。选择创建策略。
注意
这些是 Lambda 函数与 Amazon 互操作所需的最低权限。 CodePipeline CloudWatch如果您想扩展此策略以允许函数与其他 AWS 资源交互,则应修改此策略以允许这些 Lambda 函数所需的操作。
-
在策略控制面板页上,选择 Roles (角色),然后选择 Create role (创建角色)。
-
在创建角色页面上,选择 AWS 服务。选择 Lambda,然后选择 Next: Permissions (下一步: 权限)。
-
在 Attach permissions policies (附加权限策略) 页面上,选中 CodePipelineLambdaExecPolicy 旁边的复选框,然后选择 Next: Tags (下一步: 标签)。选择下一步:审核。
-
在 Review (审核) 页面上的 Role name (角色名称) 中,输入名称,然后选择 Create role (创建角色)。
创建要与一起使用的示例 Lambda 函数 CodePipeline
登录 AWS 管理控制台 并打开 AWS Lambda 控制台,网址为https://console.aws.amazon.com/lambda/
。 -
在 Functions (LAM 函数) 页面上,选择 Create function (创建函数)。
注意
如果您看到欢迎页面而不是 Lambda 页面,请选择立即开始使用。
-
在创建函数页面上,选择从头开始创作。在函数名称中,输入 Lambda 函数的名称(例如
MyLambdaFunctionForAWSCodePipeline)。在运行时中,选择 Node.js 20.x。 -
在 Role (角色) 下,选择 Choose an existing role (选择现有角色)。在 Existing role (现有角色) 中,选择角色,然后选择 Create function (创建函数)。
此时将打开供您创建函数的详细信息页面。
-
在 Function code (函数代码) 框中,复制贴以下代码:
import { CodePipelineClient, PutJobSuccessResultCommand, PutJobFailureResultCommand } from "@aws-sdk/client-codepipeline"; import http from 'http'; import assert from 'assert'; export const handler = (event, context) => { const codepipeline = new CodePipelineClient(); // Retrieve the Job ID from the Lambda action const jobId = event["CodePipeline.job"].id; // Retrieve the value of UserParameters from the Lambda action configuration in CodePipeline, in this case a URL which will be // health checked by this function. const url = event["CodePipeline.job"].data.actionConfiguration.configuration.UserParameters; // Notify CodePipeline of a successful job const putJobSuccess = async function(message) { const command = new PutJobSuccessResultCommand({ jobId: jobId }); try { await codepipeline.send(command); context.succeed(message); } catch (err) { context.fail(err); } }; // Notify CodePipeline of a failed job const putJobFailure = async function(message) { const command = new PutJobFailureResultCommand({ jobId: jobId, failureDetails: { message: JSON.stringify(message), type: 'JobFailed', externalExecutionId: context.awsRequestId } }); await codepipeline.send(command); context.fail(message); }; // Validate the URL passed in UserParameters if(!url || url.indexOf('http://') === -1) { putJobFailure('The UserParameters field must contain a valid URL address to test, including http:// or https://'); return; } // Helper function to make a HTTP GET request to the page. // The helper will test the response and succeed or fail the job accordingly const getPage = function(url, callback) { var pageObject = { body: '', statusCode: 0, contains: function(search) { return this.body.indexOf(search) > -1; } }; http.get(url, function(response) { pageObject.body = ''; pageObject.statusCode = response.statusCode; response.on('data', function (chunk) { pageObject.body += chunk; }); response.on('end', function () { callback(pageObject); }); response.resume(); }).on('error', function(error) { // Fail the job if our request failed putJobFailure(error); }); }; getPage(url, function(returnedPage) { try { // Check if the HTTP response has a 200 status assert(returnedPage.statusCode === 200); // Check if the page contains the text "Congratulations" // You can change this to check for different text, or add other tests as required assert(returnedPage.contains('Congratulations')); // Succeed the job putJobSuccess("Tests passed."); } catch (ex) { // If any of the assertions failed then fail the job putJobFailure(ex); } }); }; -
保留 Handler (处理程序) 和 Role (角色) 的默认值
CodePipelineLambdaExecRole。 -
在 Basic settings (基本设置) 中,对于 Timeout (超时),输入
20秒。 -
选择保存。
步骤 3:在控制台中将 Lambda 函数添加到管道中 CodePipeline
在此步骤中,您将在管道中添加一个新阶段,然后向该阶段添加调用您的函数的 Lambda 操作。
添加阶段
登录 AWS 管理控制台 并打开 CodePipeline 控制台,网址为 http://console.aws.amazon。 com/codesuite/codepipeline/home
。 -
在 Welcome (欢迎使用) 页面上,选择您创建的管道。
-
在管道视图页中,选择 Edit。
-
在 “编辑” 页面上,选择 “+ 添加阶段”,在部署阶段之后添加一个带有 CodeDeploy 操作的阶段。输入阶段的名称(例如,
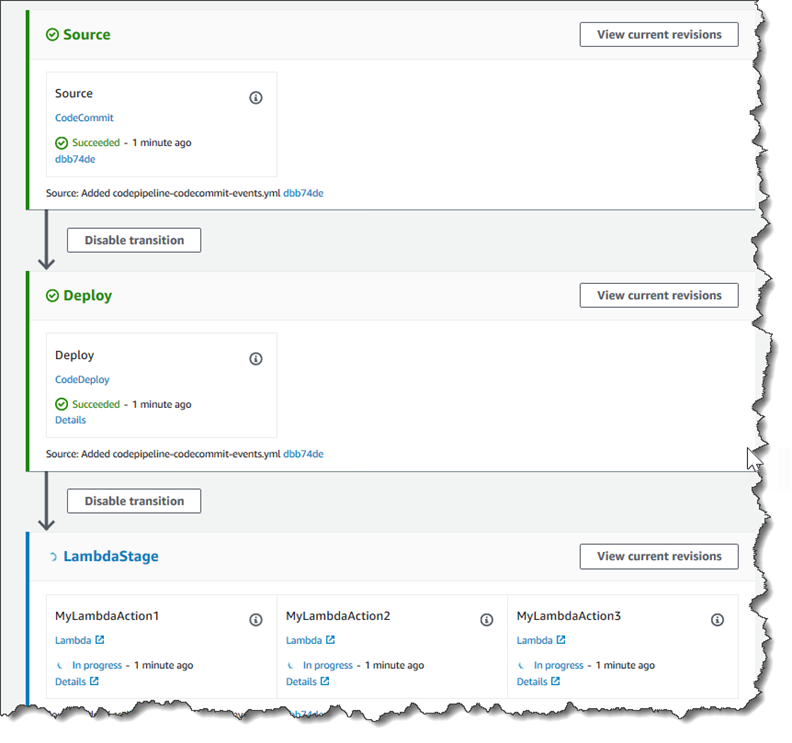
LambdaStage),然后选择 Add stage (添加阶段)。注意
您还可以选择将您的 Lambda 操作添加到现有阶段。出于演示目的,我们将 Lambda 函数作为阶段中的唯一操作进行添加,以便您可以轻松地在构件通过管道时查看该操作的进度。
-
选择 + 添加操作组。在编辑操作的操作名称中,键入 Lambda 操作的名称(例如,
MyLambdaAction)。在 Provider (提供方) 中,选择 AWS Lambda。在函数名称中,选择或输入 Lambda 函数的名称(例如,MyLambdaFunctionForAWSCodePipeline)。在用户参数中,指定前面复制的 Amazon EC2 实例的 IP 地址(例如,http://),然后选择完成。192.0.2.4注意
本主题使用 IP 地址,但在真实场景中,您可以提供您注册的网站名称(例如,
http://)。有关事件数据和处理程序的更多信息 AWS Lambda,请参阅《AWS Lambda 开发人员指南》中的编程模型。www.example.com -
在 Edit action (编辑操作) 页面上,选择 Save (保存)。
步骤 4:使用 Lambda 函数测试管道
要测试函数,请通过管道发布最近的更改。
使用控制台,通过管道运行最新版本的项目
-
在管道详细信息页中,选择发布更改。这会通过管道运行在源操作中指定的每个源位置中提供的最新修订。
-
Lambda 操作完成后,选择详细信息链接以在 Amazon 中查看该函数的日志流 CloudWatch,包括事件的计费时长。如果函数失败,则 CloudWatch 日志会提供有关原因的信息。
步骤 5:后续步骤
既然已成功创建 Lambda 函数并将其作为操作添加到管道中,接下来您便可以尝试以下操作:
-
向阶段中添加更多 Lambda 操作以检查其他网页。
-
修改 Lambda 函数以检查其他文本字符串。
-
探究 Lambda 函数并创建您自己的 Lambda 函数,然后将其添加到管道中。
在您完成 Lambda 函数的实验后,可以考虑将其从您的管道中删除、从 IAM 中删除并 AWS Lambda从 IAM 中删除该角色,以避免可能的费用。有关更多信息,请参阅在 CodePipeline 中编辑管道、在 CodePipeline 中删除管道和删除角色或实例配置文件。
JSON 事件示例
以下示例显示了发送给 Lambda 的 JSON 事件示例。 CodePipeline此事件的结构类似于对 GetJobDetails API 的响应,但没有 actionTypeId 和 pipelineContext 数据类型。JSON 事件和对 GetJobDetails API 的响应中都包含两个操作配置详细信息 FunctionName 和 UserParameters。中的值red italic text是示例或解释,而不是实际值。
{
    "CodePipeline.job": {
        "id": "11111111-abcd-1111-abcd-111111abcdef",
        "accountId": "111111111111",
        "data": {
            "actionConfiguration": {
                "configuration": {
                    "FunctionName": "MyLambdaFunctionForAWSCodePipeline",
                    "UserParameters": "some-input-such-as-a-URL"
                }
            },
            "inputArtifacts": [
                {
                    "location": {
                        "s3Location": {
                            "bucketName": "the name of the bucket configured as the pipeline artifact store in Amazon S3, for example codepipeline-us-east-2-1234567890",
                            "objectKey": "the name of the application, for example CodePipelineDemoApplication.zip"
                        },
                        "type": "S3"
                    },
                    "revision": null,
                    "name": "ArtifactName"
                }
            ],
            "outputArtifacts": [],
            "artifactCredentials": {
                "secretAccessKey": "wJalrXUtnFEMI/K7MDENG/bPxRfiCYEXAMPLEKEY",
                "sessionToken": "MIICiTCCAfICCQD6m7oRw0uXOjANBgkqhkiG9w
 0BAQUFADCBiDELMAkGA1UEBhMCVVMxCzAJBgNVBAgTAldBMRAwDgYDVQQHEwdTZ
 WF0dGxlMQ8wDQYDVQQKEwZBbWF6b24xFDASBgNVBAsTC0lBTSBDb25zb2xlMRIw
 EAYDVQQDEwlUZXN0Q2lsYWMxHzAdBgkqhkiG9w0BCQEWEG5vb25lQGFtYXpvbi5
 jb20wHhcNMTEwNDI1MjA0NTIxWhcNMTIwNDI0MjA0NTIxWjCBiDELMAkGA1UEBh
 MCVVMxCzAJBgNVBAgTAldBMRAwDgYDVQQHEwdTZWF0dGxlMQ8wDQYDVQQKEwZBb
 WF6b24xFDASBgNVBAsTC0lBTSBDb25zb2xlMRIwEAYDVQQDEwlUZXN0Q2lsYWMx
 HzAdBgkqhkiG9w0BCQEWEG5vb25lQGFtYXpvbi5jb20wgZ8wDQYJKoZIhvcNAQE
 BBQADgY0AMIGJAoGBAMaK0dn+a4GmWIWJ21uUSfwfEvySWtC2XADZ4nB+BLYgVI
 k60CpiwsZ3G93vUEIO3IyNoH/f0wYK8m9TrDHudUZg3qX4waLG5M43q7Wgc/MbQ
 ITxOUSQv7c7ugFFDzQGBzZswY6786m86gpEIbb3OhjZnzcvQAaRHhdlQWIMm2nr
 AgMBAAEwDQYJKoZIhvcNAQEFBQADgYEAtCu4nUhVVxYUntneD9+h8Mg9q6q+auN
 KyExzyLwaxlAoo7TJHidbtS4J5iNmZgXL0FkbFFBjvSfpJIlJ00zbhNYS5f6Guo
 EDmFJl0ZxBHjJnyp378OD8uTs7fLvjx79LjSTbNYiytVbZPQUQ5Yaxu2jXnimvw
 3rrszlaEXAMPLE=",
                "accessKeyId": "AKIAIOSFODNN7EXAMPLE"
            },
            "continuationToken": "A continuation token if continuing job",
            "encryptionKey": {
              "id": "arn:aws:kms:us-west-2:111122223333:key/1234abcd-12ab-34cd-56ef-1234567890ab",
              "type": "KMS"
            }
        }
    }
}
其他示例函数
以下 Lambda 函数示例,演示了可用于中的管道的其他功能。 CodePipeline要使用这些函数,您可能必须修改 Lambda 执行角色的策略,如每个示例的介绍中所述。
使用 AWS CloudFormation 模板的 Python 函数示例
以下示例显示了一个基于提供的 CloudFormation 模板创建或更新堆栈的函数。此模板将创建一个 Amazon S3 桶。它只用于演示用途,以将成本降至最低。理想情况下,您应该在向存储桶上传任何内容之前删除堆栈。如果您将文件上传到存储桶,那么在删除堆栈时将无法删除存储桶。您必须手动删除存储桶中的所有内容,然后才能删除存储桶本身。
该 Python 示例假设您有一个使用 Amazon S3 桶作为源操作的管道,或者您有权访问可与管道一起使用的版本控制型 Amazon S3 桶。您可以创建 CloudFormation 模板,对其进行压缩,然后将其作为.zip 文件上传到该存储桶。然后,您必须向管道中添加一个源操作,以从存储桶中检索此 .zip 文件。
注意
当 Amazon S3 是您的管道的源提供程序时,您可以将一个或多个源文件压缩到单个 .zip 文件中,然后将 .zip 文件上传到源桶。您也可以上传单个解压缩的文件;但是,需要 .zip 文件的下游操作将失败。
此示例演示:
-
使用 JSON 编码的用户参数向函数 (
get_user_params) 传递多个配置值。 -
与项目存储桶 (
get_template) 中的 .zip 项目交互。 -
使用延续令牌监控长期异步过程 (
continue_job_later)。这将允许操作继续进行,使函数取得成功,即使已超过十五分钟的运行时(Lambda 中的限制)也不例外。
要使用此示例 Lambda 函数,Lambda 执行角色的策略必须具有 A CloudFormation mazon S3 和 CodePipeline(如本示例策略所示)中的Allow权限:
要创建 CloudFormation 模板,请打开任何纯文本编辑器并复制并粘贴以下代码:
{
  "AWSTemplateFormatVersion" : "2010-09-09",
  "Description" : "CloudFormation template which creates an S3 bucket",
  "Resources" : {
    "MySampleBucket" : {
      "Type" : "AWS::S3::Bucket",
      "Properties" : {
      }
    }
  },
  "Outputs" : {
    "BucketName" : {
      "Value" : { "Ref" : "MySampleBucket" },
      "Description" : "The name of the S3 bucket"
    }
  }
}
使用名称 template.json 将此内容保存为名为 template-package 目录中的一个 JSON 文件。创建此目录和文件的压缩 (.zip) 文件并命名为 template-package.zip,然后将压缩文件上传到受版本控制的 Amazon S3 桶。如果您已经为管道配置了存储桶,则可以使用该存储桶。接下来,编辑您的管道以添加检索 .zip 文件的源操作。命名此操作的输出MyTemplate。有关更多信息,请参阅 在 CodePipeline 中编辑管道。
注意
示例 Lambda 函数期望使用这些文件名和压缩结构。但是,您可以用自己的 CloudFormation 模板代替此示例。如果您使用自己的模板,请务必修改 Lambda 执行角色的策略,以允许模板所需的任何其他功能。 CloudFormation
添加以下代码以作为 Lambda 中的函数
-
打开 Lambda 控制台,选择创建函数。
-
在创建函数页面上,选择从头开始创作。在函数名称中,为您的 Lambda 函数输入一个名称。
-
在 Runtime (运行时) 中,选择 Python 2.7。
-
在选择或创建执行角色下,选择使用现有角色。在 Existing role (现有角色) 中,选择角色,然后选择 Create function (创建函数)。
此时将打开供您创建函数的详细信息页面。
-
在 Function code (函数代码) 框中,复制贴以下代码:
from __future__ import print_function from boto3.session import Session import json import urllib import boto3 import zipfile import tempfile import botocore import traceback print('Loading function') cf = boto3.client('cloudformation') code_pipeline = boto3.client('codepipeline') def find_artifact(artifacts, name): """Finds the artifact 'name' among the 'artifacts' Args: artifacts: The list of artifacts available to the function name: The artifact we wish to use Returns: The artifact dictionary found Raises: Exception: If no matching artifact is found """ for artifact in artifacts: if artifact['name'] == name: return artifact raise Exception('Input artifact named "{0}" not found in event'.format(name)) def get_template(s3, artifact, file_in_zip): """Gets the template artifact Downloads the artifact from the S3 artifact store to a temporary file then extracts the zip and returns the file containing the CloudFormation template. Args: artifact: The artifact to download file_in_zip: The path to the file within the zip containing the template Returns: The CloudFormation template as a string Raises: Exception: Any exception thrown while downloading the artifact or unzipping it """ tmp_file = tempfile.NamedTemporaryFile() bucket = artifact['location']['s3Location']['bucketName'] key = artifact['location']['s3Location']['objectKey'] with tempfile.NamedTemporaryFile() as tmp_file: s3.download_file(bucket, key, tmp_file.name) with zipfile.ZipFile(tmp_file.name, 'r') as zip: return zip.read(file_in_zip) def update_stack(stack, template): """Start a CloudFormation stack update Args: stack: The stack to update template: The template to apply Returns: True if an update was started, false if there were no changes to the template since the last update. Raises: Exception: Any exception besides "No updates are to be performed." """ try: cf.update_stack(StackName=stack, TemplateBody=template) return True except botocore.exceptions.ClientError as e: if e.response['Error']['Message'] == 'No updates are to be performed.': return False else: raise Exception('Error updating CloudFormation stack "{0}"'.format(stack), e) def stack_exists(stack): """Check if a stack exists or not Args: stack: The stack to check Returns: True or False depending on whether the stack exists Raises: Any exceptions raised .describe_stacks() besides that the stack doesn't exist. """ try: cf.describe_stacks(StackName=stack) return True except botocore.exceptions.ClientError as e: if "does not exist" in e.response['Error']['Message']: return False else: raise e def create_stack(stack, template): """Starts a new CloudFormation stack creation Args: stack: The stack to be created template: The template for the stack to be created with Throws: Exception: Any exception thrown by .create_stack() """ cf.create_stack(StackName=stack, TemplateBody=template) def get_stack_status(stack): """Get the status of an existing CloudFormation stack Args: stack: The name of the stack to check Returns: The CloudFormation status string of the stack such as CREATE_COMPLETE Raises: Exception: Any exception thrown by .describe_stacks() """ stack_description = cf.describe_stacks(StackName=stack) return stack_description['Stacks'][0]['StackStatus'] def put_job_success(job, message): """Notify CodePipeline of a successful job Args: job: The CodePipeline job ID message: A message to be logged relating to the job status Raises: Exception: Any exception thrown by .put_job_success_result() """ print('Putting job success') print(message) code_pipeline.put_job_success_result(jobId=job) def put_job_failure(job, message): """Notify CodePipeline of a failed job Args: job: The CodePipeline job ID message: A message to be logged relating to the job status Raises: Exception: Any exception thrown by .put_job_failure_result() """ print('Putting job failure') print(message) code_pipeline.put_job_failure_result(jobId=job, failureDetails={'message': message, 'type': 'JobFailed'}) def continue_job_later(job, message): """Notify CodePipeline of a continuing job This will cause CodePipeline to invoke the function again with the supplied continuation token. Args: job: The JobID message: A message to be logged relating to the job status continuation_token: The continuation token Raises: Exception: Any exception thrown by .put_job_success_result() """ # Use the continuation token to keep track of any job execution state # This data will be available when a new job is scheduled to continue the current execution continuation_token = json.dumps({'previous_job_id': job}) print('Putting job continuation') print(message) code_pipeline.put_job_success_result(jobId=job, continuationToken=continuation_token) def start_update_or_create(job_id, stack, template): """Starts the stack update or create process If the stack exists then update, otherwise create. Args: job_id: The ID of the CodePipeline job stack: The stack to create or update template: The template to create/update the stack with """ if stack_exists(stack): status = get_stack_status(stack) if status not in ['CREATE_COMPLETE', 'ROLLBACK_COMPLETE', 'UPDATE_COMPLETE']: # If the CloudFormation stack is not in a state where # it can be updated again then fail the job right away. put_job_failure(job_id, 'Stack cannot be updated when status is: ' + status) return were_updates = update_stack(stack, template) if were_updates: # If there were updates then continue the job so it can monitor # the progress of the update. continue_job_later(job_id, 'Stack update started') else: # If there were no updates then succeed the job immediately put_job_success(job_id, 'There were no stack updates') else: # If the stack doesn't already exist then create it instead # of updating it. create_stack(stack, template) # Continue the job so the pipeline will wait for the CloudFormation # stack to be created. continue_job_later(job_id, 'Stack create started') def check_stack_update_status(job_id, stack): """Monitor an already-running CloudFormation update/create Succeeds, fails or continues the job depending on the stack status. Args: job_id: The CodePipeline job ID stack: The stack to monitor """ status = get_stack_status(stack) if status in ['UPDATE_COMPLETE', 'CREATE_COMPLETE']: # If the update/create finished successfully then # succeed the job and don't continue. put_job_success(job_id, 'Stack update complete') elif status in ['UPDATE_IN_PROGRESS', 'UPDATE_ROLLBACK_IN_PROGRESS', 'UPDATE_ROLLBACK_COMPLETE_CLEANUP_IN_PROGRESS', 'CREATE_IN_PROGRESS', 'ROLLBACK_IN_PROGRESS', 'UPDATE_COMPLETE_CLEANUP_IN_PROGRESS']: # If the job isn't finished yet then continue it continue_job_later(job_id, 'Stack update still in progress') else: # If the Stack is a state which isn't "in progress" or "complete" # then the stack update/create has failed so end the job with # a failed result. put_job_failure(job_id, 'Update failed: ' + status) def get_user_params(job_data): """Decodes the JSON user parameters and validates the required properties. Args: job_data: The job data structure containing the UserParameters string which should be a valid JSON structure Returns: The JSON parameters decoded as a dictionary. Raises: Exception: The JSON can't be decoded or a property is missing. """ try: # Get the user parameters which contain the stack, artifact and file settings user_parameters = job_data['actionConfiguration']['configuration']['UserParameters'] decoded_parameters = json.loads(user_parameters) except Exception as e: # We're expecting the user parameters to be encoded as JSON # so we can pass multiple values. If the JSON can't be decoded # then fail the job with a helpful message. raise Exception('UserParameters could not be decoded as JSON') if 'stack' not in decoded_parameters: # Validate that the stack is provided, otherwise fail the job # with a helpful message. raise Exception('Your UserParameters JSON must include the stack name') if 'artifact' not in decoded_parameters: # Validate that the artifact name is provided, otherwise fail the job # with a helpful message. raise Exception('Your UserParameters JSON must include the artifact name') if 'file' not in decoded_parameters: # Validate that the template file is provided, otherwise fail the job # with a helpful message. raise Exception('Your UserParameters JSON must include the template file name') return decoded_parameters def setup_s3_client(job_data): """Creates an S3 client Uses the credentials passed in the event by CodePipeline. These credentials can be used to access the artifact bucket. Args: job_data: The job data structure Returns: An S3 client with the appropriate credentials """ key_id = job_data['artifactCredentials']['accessKeyId'] key_secret = job_data['artifactCredentials']['secretAccessKey'] session_token = job_data['artifactCredentials']['sessionToken'] session = Session(aws_access_key_id=key_id, aws_secret_access_key=key_secret, aws_session_token=session_token) return session.client('s3', config=botocore.client.Config(signature_version='s3v4')) def lambda_handler(event, context): """The Lambda function handler If a continuing job then checks the CloudFormation stack status and updates the job accordingly. If a new job then kick of an update or creation of the target CloudFormation stack. Args: event: The event passed by Lambda context: The context passed by Lambda """ try: # Extract the Job ID job_id = event['CodePipeline.job']['id'] # Extract the Job Data job_data = event['CodePipeline.job']['data'] # Extract the params params = get_user_params(job_data) # Get the list of artifacts passed to the function artifacts = job_data['inputArtifacts'] stack = params['stack'] artifact = params['artifact'] template_file = params['file'] if 'continuationToken' in job_data: # If we're continuing then the create/update has already been triggered # we just need to check if it has finished. check_stack_update_status(job_id, stack) else: # Get the artifact details artifact_data = find_artifact(artifacts, artifact) # Get S3 client to access artifact with s3 = setup_s3_client(job_data) # Get the JSON template file out of the artifact template = get_template(s3, artifact_data, template_file) # Kick off a stack update or create start_update_or_create(job_id, stack, template) except Exception as e: # If any other exceptions which we didn't expect are raised # then fail the job and log the exception message. print('Function failed due to exception.') print(e) traceback.print_exc() put_job_failure(job_id, 'Function exception: ' + str(e)) print('Function complete.') return "Complete." -
将处理程序保留为默认值,将角色保留为您之前选择或创建的名称
CodePipelineLambdaExecRole。 -
在 Basic settings (基本设置) 中,对于 Timeout (超时),将默认值 3 秒替换为
20秒。 -
选择保存。
-
在 CodePipeline 控制台中,编辑管道,将该函数添加为管道中某个阶段的操作。对要更改的管道选择编辑,然后选择添加操作组。在编辑操作页面的操作名称中,为您的操作输入一个名称。在操作提供程序中,选择 Lambda。
在输入构件中,选择
MyTemplate。在中 UserParameters,您必须提供一个包含三个参数的 JSON 字符串:-
堆栈名称
-
CloudFormation 模板名称和文件路径
-
输入构件
使用大括号 ({}),并使用逗号分隔各个参数。例如,要为带有输入工件的管道创建名为的堆栈
MyTestStack,请在中UserParameters输入:{“stack”:” “MyTemplate,“file”: “template-package/template.json”,MyTestStack“artifact”:” “}。MyTemplate注意
即使您已在中指定了输入构件 UserParameters,也必须在 “输入构件” 中为操作指定此输入对象。
-
-
保存您对管道所做的更改,然后手动发布更改,以便测试操作和 Lambda 函数。
