本文属于机器翻译版本。若本译文内容与英语原文存在差异,则一律以英文原文为准。
在 Step Functions 中使用工作流程工作室创建工作流程
学习使用 Step Functions Workflow Studio 创建、编辑和运行工作流。工作流程准备就绪后,可以保存、运行或导出它。
创建状态机
在工作流程工作室中,可以选择初学者模板或空白模板来创建工作流程。
入门模板是一个 ready-to-run示例项目,它会自动创建工作流程原型和定义,并将项目所需的所有相关 AWS 资源部署到您的 AWS 账户项目中。您可以使用这些初学者模板按原样部署和运行,也可以使用工作流原型在其基础上进行构建。有关初学者模板的更多信息,请参阅 使用 Step Functions 的初学者模板部署状态机。
使用初学者模板创建状态机
-
打开 Step Functions 控制台
,然后选择创建状态机。 -
在选择模板对话框中,执行以下操作之一来选择示例项目:
-
在“按关键字搜索”框中键入
Task Timer,然后从搜索结果中选择任务计时器。 -
浏览右侧窗格中全部下列出的示例项目,然后选择任务计时器。
-
-
选择下一步继续。
-
选择如何使用模板:
-
选择使用模板继续进行选择。
-
运行演示 — 创建只读状态机。审核后,您可以创建工作流程和所有相关资源。
-
在此基础上构建 — 提供可编辑的工作流程定义,您可以使用自己的资源对其进行查看、自定义和部署。(相关资源,例如函数或队列,不会自动创建。)
使用空白模板创建工作流
当您想要从干净的画布开始时,可以从空白模板创建一个工作流程。
-
选择创建状态机。
-
选择 “从空白处创建”。
-
为状态机命名,然后选择 “继续”,在 Workflow Studio 中编辑状态机。
-
选择配置可在配置模式下管理工作流程的配置。例如,为工作流提供名称并选择其类型。
设计工作流
如果您知道要添加的状态的名称,请使用状态浏览器顶部的搜索框来查找该状态。否则,请在浏览器中查找所需的状态,并将其添加到画布上。
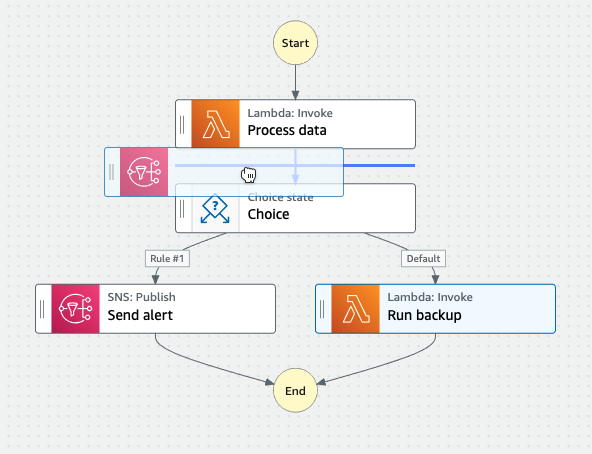
可以通过将状态拖到工作流程中的其它位置,来对工作流程中的状态进行重新排序。将状态拖到画布上时,会出现一条线来显示该状态将插入工作流程中的位置,如以下屏幕截图所示:
将状态拖放到画布上后,其代码会自动生成并添加到工作流程定义中。要查看定义,请打开 Inspector 面板上的定义切换开关。可以选择代码模式,以便使用内置的代码编辑器来编辑定义。
将状态拖放到画布上后,可以在右侧的 检查器面板 面板中对其进行配置。此面板包含您在画布上放置的每个状态或 API 操作的配置、输入、输出和错误处理选项卡。您可以在配置选项卡中配置工作流中包含的状态。
例如,Lambda 调用 API 操作的配置选项卡提供以下选项:
-
状态名称:可以使用自定义名称标识状态,也可以接受生成的默认名称。
-
API 显示状态使用哪个 API 操作。
-
集成类型:可以选择用于对其它服务调用 API 操作的服务集成类型。
-
函数名称提供执行以下操作的选项:
-
输入函数名称:您可以输入函数名称或其 ARN。
-
运行时从状态输入中获取函数名称:您可以使用此选项根据指定的路径从状态输入中动态获取函数名称。
-
选择函数名称:您可以直接从您的账户和区域的可用函数中进行选择。
-
-
有效载荷:可以选择使用状态输入、JSON 对象或无有效载荷,作为有效载荷传递给 Lambda 函数。如果选择 JSON,则可以同时包含静态值和从状态输入中选择的值。
-
(可选)某些状态可以选择等待任务完成或等待回调。如果可用,则可以选择以下服务集成模式之一:
-
未选择任何选项:Step Functions 将使用请求响应集成模式。Step Functions 将等待 HTTP 响应,然后进入下一个状态。Step Functions 不会等待作业完成。当没有可用选项时,状态将使用此模式。
-
等待任务完成:Step Functions 将使用运行作业 (.sync) 集成模式。
-
等待回调:Step Functions 将使用等待具有任务令牌的回调集成模式。
-
-
(可选)为了访问工作流程 AWS 账户 中不同配置的资源,Step Functions 提供跨账户访问权限。用于跨账户存取的 IAM 角色提供以下选项:
-
提供 IAM 角色 ARN:指定包含相应资源访问权限的 IAM 角色。这些资源可在目标账户中使用,您可以 AWS 账户 向该账户进行跨账户调用。
-
在运行时从状态输入中获取 IAM 角色 ARN:在包含 IAM 角色的状态 JSON 输入中指定一个指向现有键值对的引用路径。
-
-
下一个状态用于选择下一个要过渡的状态。
-
(可选)注释字段不会影响工作流程,但可以使用它为工作流程添加注释。
某些状态将有其它通用的配置选项。例如,Amazon ECS RunTask 状态配置包含一个填充了占位符值的 API Parameters 字段。对于此类状态,您可以将占位符值替换为适合您需求的配置。
删除状态
可以按退格键,右键单击并选择删除状态,或者在设计工具栏上选择删除。
运行工作流
工作流程准备就绪后,可以在 Step Functions 控制台
在 Workflow Studio 中运行工作流
-
在设计、代码或配置模式下,选择执行。
开始执行对话框将在新选项卡中打开。
-
在启动执行对话框中,执行以下操作:
-
(可选)输入自定义执行名称,以便覆盖生成的默认执行名称。
非 ASCII 名称和日志记录
Step Functions 对于状态机、执行、活动和标签接受包含非 ASCII 字符的名称。由于此类字符不适用于亚马逊 CloudWatch,因此我们建议您仅使用 ASCII 字符,以便您可以跟踪中的 CloudWatch指标。
-
(可选)在输入框中,以 JSON 格式输入输入值以便运行工作流。
-
选择启动执行。
-
Step Functions 控制台将您引导至标有您的执行 ID 的页面,即执行详情页面。您可以随着工作流程的进展和完成后查看执行结果。
要查看执行结果,请在图表视图上选择各个状态,然后在步骤详细信息窗格中选择各个选项卡,分别查看每个状态的详细信息,包括输入、输出和定义。有关可在执行详细信息页面上查看的执行信息的详细信息,请参阅执行详细信息概览。
-
编辑工作流
您可以在 Workflow Studio 的设计模式中直观地编辑现有工作流。
在 Step Functions 控制台
也可以在代码模式下编辑工作流程定义。选择代码按钮,以便在工作流程工作室中查看或编辑工作流程定义。
注意
如果您在工作流中发现错误,则必须在设计模式下进行修复。如果工作流中存在任何错误,则无法切换到代码或配置模式。
保存对工作流程的更改时,也可以选择发布新版本。使用版本,可以选择运行工作流程的原始版本或备用版本。要了解使用版本管理工作流程的更多信息,请参阅 Step Functions 工作流程中的状态机版本
导出工作流
您可以导出工作流程 Amazon States Language (ASL) 的定义和工作流图:
-
在 Step Functions 控制台
中选择您的工作流。 -
在状态机详细信息页面上,选择编辑。
-
选择操作下拉按钮,然后执行以下一项或两项操作:
-
要将工作流图表导出到 SVG 或 PNG 文件,请在导出图表下选择所需的格式。
-
要将工作流定义导出为 JSON 或 YAML 文件,请在导出定义下选择所需的格式。
-
使用占位符创建工作流程原型
可以使用工作流程工作室或Infrastructure Composer中的工作流程工作室,来创建包含占位符资源 的新工作流程原型,这些占位符资源是尚未存在的命名资源。
要创建工作流程原型,请执行以下操作:
-
选择创建状态机。
-
选择 “从空白处创建”。
-
为状态机命名,然后选择 “继续”,在 Workflow Studio 中编辑状态机。
-
打开 Workflow Studio 的设计模式。在 Workflow Studio 中设计您的工作流。要包含占位符资源,请执行以下操作:
-
选择要为其添加占位符资源的状态,然后在配置中:
-
对于 Lambda 调用状态,选择函数名称,然后选择输入函数名称。您也可以输入函数的自定义名称。
-
对于“Amazon SQS 发送消息”状态,选择队列 URL,然后选择输入队列 URL。输入占位符队列 URL。
-
对于“Amazon SNS 发布”状态,从主题中选择一个主题 ARN。
-
对于操作下列出的所有其他状态,您可以使用默认配置。
注意
如果您在工作流中发现错误,则必须在设计模式下进行修复。如果工作流中存在任何错误,则无法切换到代码或配置模式。
-
-
(可选)要查看自动生成的工作流 ASL 定义,请选择定义。
-
(可选)要在 Workflow Studio 中更新工作流定义,请选择代码按钮。
注意
如果您在工作流定义中看到错误,则必须在代码模式下对其进行修复。如果工作流定义中存在任何错误,则无法切换到设计或配置模式。
-
-
(可选)要编辑状态机名称,请选择默认状态机名称旁边的编辑图标,MyStateMachine然后在状态机名称框中指定名称。
您也可以切换到配置模式编辑默认状态机名称。
-
指定工作流设置,例如状态机类型及其执行角色。
-
选择创建。
现在,您已经创建了一个新的工作流,其中包含可用于原型的占位符资源。您可以导出工作流定义和工作流图表。
-
要将工作流定义导出为 JSON 或 YAML 文件,请在设计或代码模式下,选择操作下拉按钮。然后,在导出定义下,选择要导出的格式。您可以使用此导出的定义作为使用 AWS Toolkit for Visual Studio Code 进行本地开发的起点。
-
要将工作流图表导出为 SVG 或 PNG 文件,请在设计或代码模式下,选择操作下拉按钮。然后,在导出定义下,选择所需的格式。
