本文為英文版的機器翻譯版本,如內容有任何歧義或不一致之處,概以英文版為準。
教學課程:使用 OpenSearch Service 和 OpenSearch Dashboards,將客戶支援呼叫視覺化
此章節是一個完整的逐步解說,情況如下:業務收到不少客戶支援呼叫,想要對其進行分析。每個呼叫的主題為何? 有多少是正面的? 有多少是負面的? 主管人員如何搜尋或檢閱這些呼叫的文字記錄?
手動工作流程可能涉及員工聆聽錄音、記下每個呼叫的主題,以及判斷客戶互動是否正面。
這類的程序是非常費工的。假設每個呼叫平均時間為 10 分鐘,那麼每個員工每天只能聆聽 48 個呼叫。排除人的偏見後,所產生的資料使有極高的準確度,而資料量會降到最低:只需呼叫的主題,以及有關客戶是否滿意的布林值。若再加上更多資料如完整的文字記錄,便需要花大量時間。
使用 Amazon S3
您可以一字不漏地遵照此逐步解說來執行,用意只是為了讓您在 OpenSearch Service 中編製索引之前,激盪出有關如何使 JSON 文件更加豐富的想法。
評估成本
一般而言,執行這個逐步解說中的步驟的成本不到 2 美元。此逐步解說使用下列資源:
-
S3 儲存貯體的傳輸和儲存量少於 100 MB
如需進一步了解,請參閱 Amazon S3 定價
。 -
具有一個
t2.medium執行個體和 10 GiB 的 EBS 儲存空間,運作長達數小時的 OpenSearch Service 網域如需進一步了解,請參閱 Amazon OpenSearch Service 定價
。 -
對 Amazon Transcribe 的數個呼叫
如需進一步了解,請參閱 Amazon Transcribe 定價
。 -
對 Amazon Comprehend 的數個自然語言處理呼叫
如需進一步了解,請參閱 Amazon Comprehend 定價
。
步驟 1:設定先決條件
繼續之前,您必須準備好以下資源。
| 先決條件 | 描述 |
|---|---|
| Amazon S3 儲存貯體 | 如需詳細資訊,請參閱 Amazon Simple Storage Service 主控台使用者指南中的建立儲存貯體。 |
| OpenSearch Service 網域 | 資料的目的地。如需詳細資訊,請參閱建立 OpenSearch Service 網域。 |
如果尚未擁有這些資源,您可以使用下列 AWS CLI 命令建立資源:
aws s3 mb s3://my-transcribe-test --region us-west-2
aws opensearch create-domain --domain-name my-transcribe-test --engine-version OpenSearch_1.0 --cluster-config InstanceType=t2.medium.search,InstanceCount=1 --ebs-options EBSEnabled=true,VolumeType=standard,VolumeSize=10 --access-policies '{"Version":"2012-10-17","Statement":[{"Effect":"Allow","Principal":{"AWS":"arn:aws:iam::123456789012:root"},"Action":"es:*","Resource":"arn:aws:es:us-west-2:123456789012:domain/my-transcribe-test/*"}]}' --region us-west-2
注意
這些命令使用 us-west-2 區域,但您可以使用 Amazon Comprehend 支援的任何區域。如需進一步了解,請參閱AWS 一般參考。
步驟 2:複製範本程式碼
-
複製下列 Python 3 範本程式碼,並貼上到名為
call-center.py的新檔案:import boto3 import datetime import json import requests from requests_aws4auth import AWS4Auth import time import urllib.request # Variables to update audio_file_name = '' # For example, 000001.mp3 bucket_name = '' # For example, my-transcribe-test domain = '' # For example, https://search-my-transcribe-test-12345.us-west-2.es.amazonaws.com index = 'support-calls' type = '_doc' region = 'us-west-2' # Upload audio file to S3. s3_client = boto3.client('s3') audio_file = open(audio_file_name, 'rb') print('Uploading ' + audio_file_name + '...') response = s3_client.put_object( Body=audio_file, Bucket=bucket_name, Key=audio_file_name ) # # Build the URL to the audio file on S3. # # Only for the us-east-1 region. # mp3_uri = 'https://' + bucket_name + '.s3.amazonaws.com/' + audio_file_name # Get the necessary details and build the URL to the audio file on S3. # For all other regions. response = s3_client.get_bucket_location( Bucket=bucket_name ) bucket_region = response['LocationConstraint'] mp3_uri = 'https://' + bucket_name + '.s3-' + bucket_region + '.amazonaws.com/' + audio_file_name # Start transcription job. transcribe_client = boto3.client('transcribe') print('Starting transcription job...') response = transcribe_client.start_transcription_job( TranscriptionJobName=audio_file_name, LanguageCode='en-US', MediaFormat='mp3', Media={ 'MediaFileUri': mp3_uri }, Settings={ 'ShowSpeakerLabels': True, 'MaxSpeakerLabels': 2 # assumes two people on a phone call } ) # Wait for the transcription job to finish. print('Waiting for job to complete...') while True: response = transcribe_client.get_transcription_job(TranscriptionJobName=audio_file_name) if response['TranscriptionJob']['TranscriptionJobStatus'] in ['COMPLETED', 'FAILED']: break else: print('Still waiting...') time.sleep(10) transcript_uri = response['TranscriptionJob']['Transcript']['TranscriptFileUri'] # Open the JSON file, read it, and get the transcript. response = urllib.request.urlopen(transcript_uri) raw_json = response.read() loaded_json = json.loads(raw_json) transcript = loaded_json['results']['transcripts'][0]['transcript'] # Send transcript to Comprehend for key phrases and sentiment. comprehend_client = boto3.client('comprehend') # If necessary, trim the transcript. # If the transcript is more than 5 KB, the Comprehend calls fail. if len(transcript) > 5000: trimmed_transcript = transcript[:5000] else: trimmed_transcript = transcript print('Detecting key phrases...') response = comprehend_client.detect_key_phrases( Text=trimmed_transcript, LanguageCode='en' ) keywords = [] for keyword in response['KeyPhrases']: keywords.append(keyword['Text']) print('Detecting sentiment...') response = comprehend_client.detect_sentiment( Text=trimmed_transcript, LanguageCode='en' ) sentiment = response['Sentiment'] # Build the Amazon OpenSearch Service URL. id = audio_file_name.strip('.mp3') url = domain + '/' + index + '/' + type + '/' + id # Create the JSON document. json_document = {'transcript': transcript, 'keywords': keywords, 'sentiment': sentiment, 'timestamp': datetime.datetime.now().isoformat()} # Provide all details necessary to sign the indexing request. credentials = boto3.Session().get_credentials() awsauth = AWS4Auth(credentials.access_key, credentials.secret_key, region, 'opensearchservice', session_token=credentials.token) # Index the document. print('Indexing document...') response = requests.put(url, auth=awsauth, json=json_document, headers=headers) print(response) print(response.json()) -
更新初始六個變數。
-
使用以下命令安裝所需套件:
pip install boto3 pip install requests pip install requests_aws4auth -
將 MP3 放置在和
call-center.py相同的目錄,並執行指令碼。範例輸出如下:$ python call-center.py Uploading 000001.mp3... Starting transcription job... Waiting for job to complete... Still waiting... Still waiting... Still waiting... Still waiting... Still waiting... Still waiting... Still waiting... Detecting key phrases... Detecting sentiment... Indexing document... <Response [201]> {u'_type': u'call', u'_seq_no': 0, u'_shards': {u'successful': 1, u'failed': 0, u'total': 2}, u'_index': u'support-calls4', u'_version': 1, u'_primary_term': 1, u'result': u'created', u'_id': u'000001'}
call-center.py 執行一些操作:
-
指令碼上傳音訊檔案 (此案例為,MP3,但 Amazon Transcribe 支援數種格式) 到您的 S3 儲存貯體。
-
它會將音訊檔案的 URL 傳送到 Amazon Transcribe,並等待文字記錄任務完成。
完成文字記錄工作的時間取決於音訊檔案長度。採用分鐘數,而非秒數。
提示
為了改善文字記錄的品質,您可以設定 Amazon Transcribe 適用的自訂詞彙。
-
文字記錄任務完成後,指令碼會擷取文字,裁剪到 5,000 個字元,然後將其傳送至 Amazon Comprehend 進行關鍵字和情感分析。
-
最後,指令碼會新增完整的文字記錄、關鍵字、情感及目前時間戳記至 JSON 文件,並在 OpenSearch Service 中編製索引。
提示
LibriVox
(選用) 步驟 3:索引範例資料
如果您手邊沒有大量呼叫記錄 (誰有呢)?您可以在 sample-calls.zip 中為範例文件編製索引,這與 call-center.py 所產生的結果相當。
-
建立名為
bulk-helper.py的檔案:import boto3 from opensearchpy import OpenSearch, RequestsHttpConnection import json from requests_aws4auth import AWS4Auth host = '' # For example, my-test-domain.us-west-2.es.amazonaws.com region = '' # For example, us-west-2 service = 'es' bulk_file = open('sample-calls.bulk', 'r').read() credentials = boto3.Session().get_credentials() awsauth = AWS4Auth(credentials.access_key, credentials.secret_key, region, service, session_token=credentials.token) search = OpenSearch( hosts = [{'host': host, 'port': 443}], http_auth = awsauth, use_ssl = True, verify_certs = True, connection_class = RequestsHttpConnection ) response = search.bulk(bulk_file) print(json.dumps(response, indent=2, sort_keys=True)) -
更新
host和region兩個初始變數。 -
使用以下命令安裝所需套件:
pip install opensearch-py -
下載並解壓縮 sample-calls.zip。
-
將
sample-calls.bulk放置在和bulk-helper.py相同的目錄,並執行協助程式。範例輸出如下:$ python bulk-helper.py { "errors": false, "items": [ { "index": { "_id": "1", "_index": "support-calls", "_primary_term": 1, "_seq_no": 42, "_shards": { "failed": 0, "successful": 1, "total": 2 }, "_type": "_doc", "_version": 9, "result": "updated", "status": 200 } },...], "took": 27 }
步驟 4:分析和視覺化您的資料
既然您在 OpenSearch Service 中有一些資料,您可以使用 OpenSearch Dashboards 將資料視覺化。
-
導覽至
https://search-。domain.region.es.amazonaws.com/_dashboards -
在使用 OpenSearch Dashboards 之前,您需要索引模式。Dashboards 使用索引模式將分析縮小至一個或多個索引。若要匹配
call-center.py建立的support-calls索引,請前往 Stack Management (堆疊管理)、Index Patterns (索引模式),並定義support*的索引模式,然後選擇 Next step (下一個步驟)。 -
對於 Time Filter field name (時間篩選條件欄位名稱),請選擇 timestamp (時間戳記)。
-
您現在可以開始建立視覺化效果。選擇 Visualize (視覺化),然後新增視覺化。
-
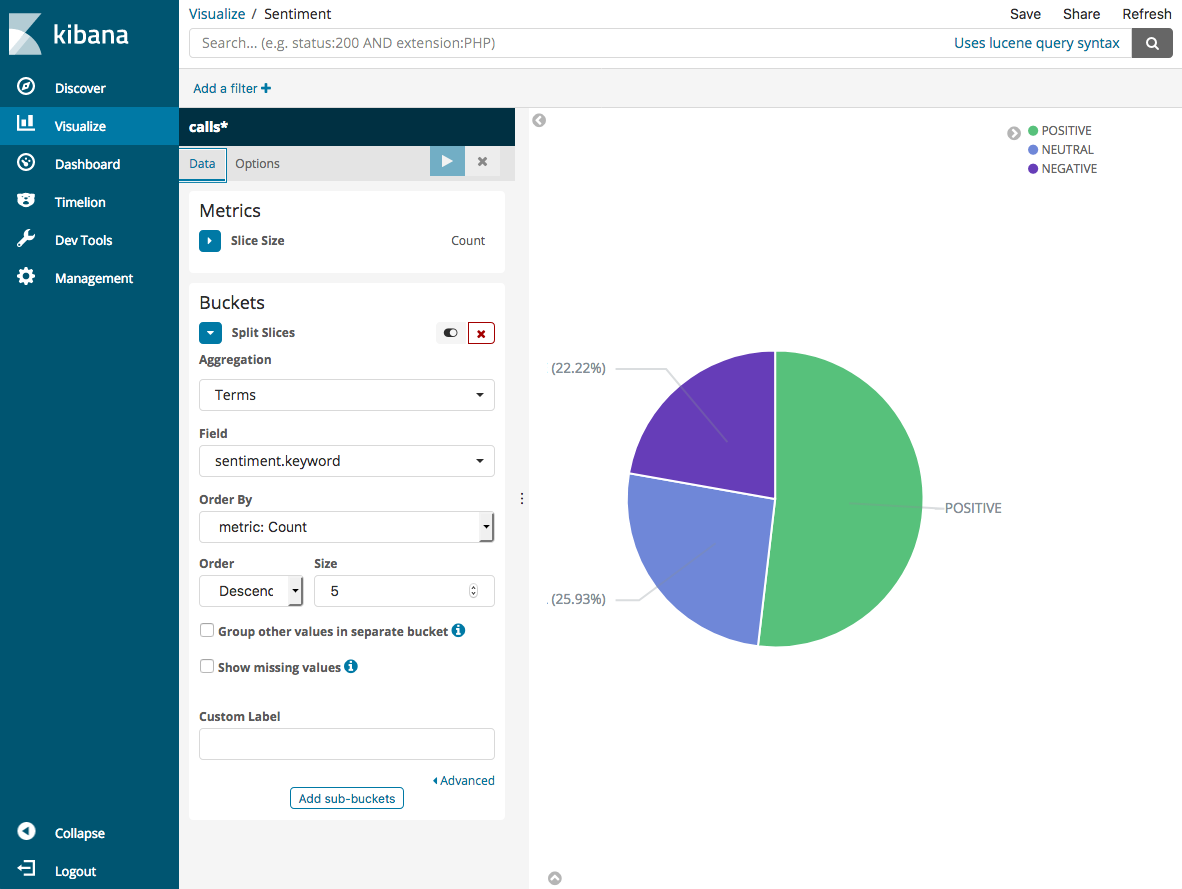
選擇圓餅圖和
support*索引模式。 -
預設視覺化是基本的,因此選擇 Split Slices (分割切片) 來建立更有趣的視覺化效果。
對於 Aggregation (集合) 選項,請選擇 Terms (條款)。對於 Field (欄位),選擇 sentiment.keyword。然後選擇 Apply changes (套用變更) 和 Save (儲存)。
-
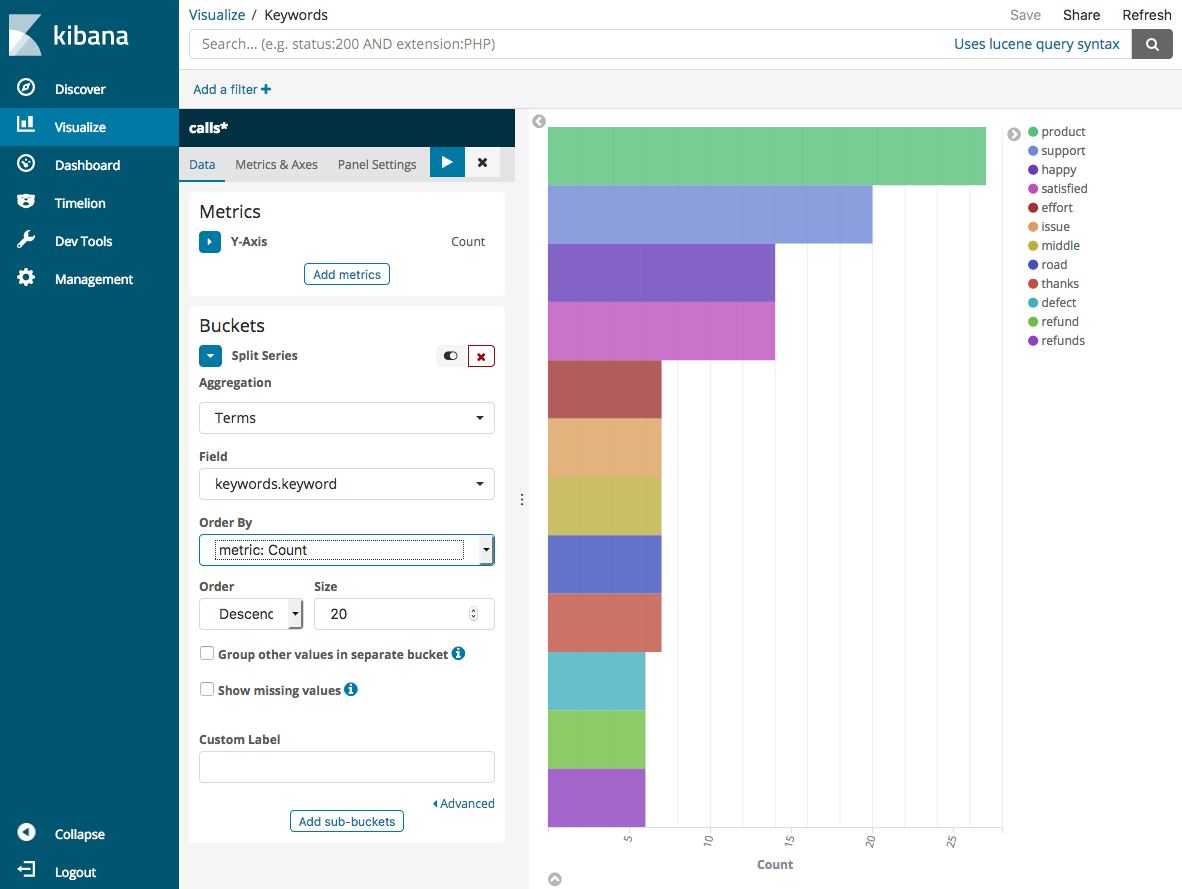
返回 Visualize (視覺化) 頁面,並新增另一個視覺化。這時,選擇水平長條圖。
-
選擇 Split Series (分割系列)。
對於 Aggregation (集合) 選項,請選擇 Terms (條款)。對於 Field (欄位),選擇 keywords.keyword,並將 Size (大小) 變更為 20。然後選擇 Apply Changes (套用變更) 和 Save (儲存)。
-
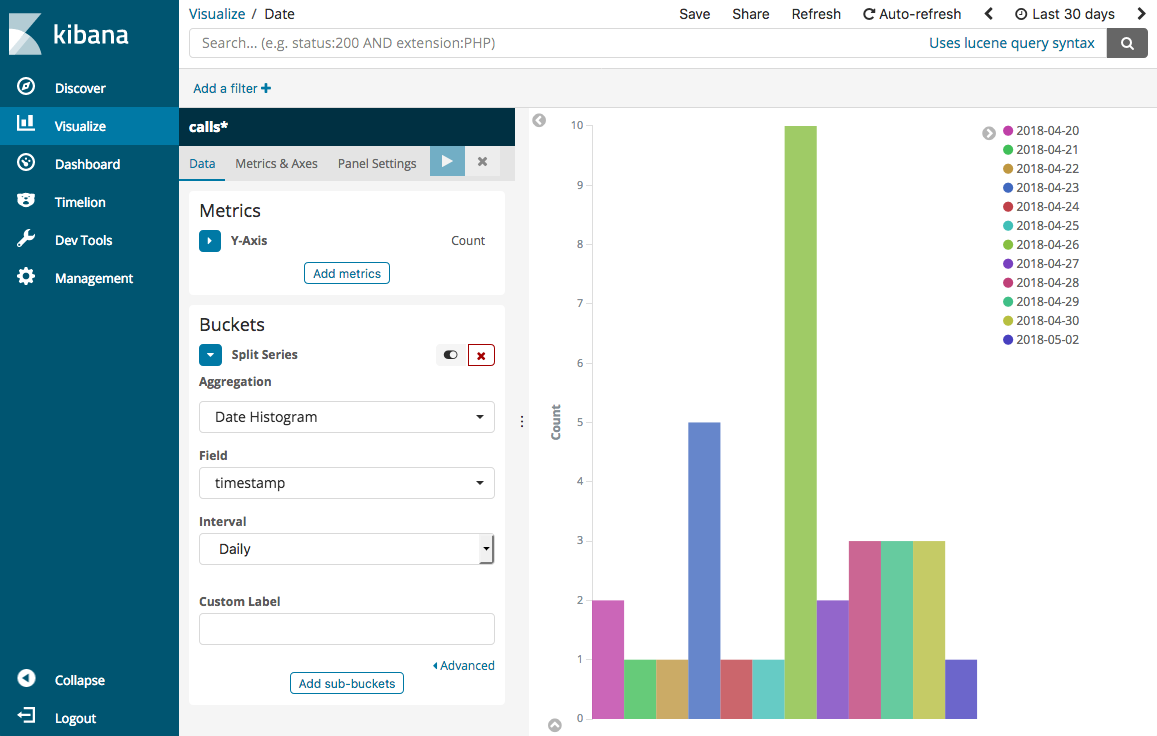
返回 Visualize (視覺化) 頁面,並新增一個最終視覺化垂直長條圖。
-
選擇 Split Series (分割系列)。對於 Aggregation (彙總),選擇 Date Histogram (日期分佈圖)。對於 Field (欄位),選擇 timestamp (時間戳記),將 Interval (間隔) 變更為 Daily (每日)。
-
選擇 Metrics & Axes (指標和軸),並將變更 Mode (模式) 變更為 normal (正常)。
-
選擇 Apply Changes (套用變更) 和 Save (儲存)。
-
既然您有三個視覺效果,您可以將它們新增到 Dashboards 視覺效果。選擇 Dashboard (儀表板)、建立儀表板,並新增視覺化效果。

步驟 5:清除資源和後續步驟
為避免不必要的費用,請刪除 S3 儲存貯體和 OpenSearch Service 網域。如需進一步了解,請參閱 Amazon Simple Storage Service 使用者指南中的刪除儲存貯體以及本指南中的刪除 OpenSearch Service 網域。
文字記錄需要比 MP3 檔更少的磁碟空間。您也許可以縮短您的 MP3 保留時段 (例如,從三個月的呼叫記錄到一個月),保留數年文字記錄,並且仍能節省儲存成本。
您也可以使用 AWS Step Functions 和 Lambda 自動化轉錄程序、在編製索引之前新增其他中繼資料,或製作更複雜的視覺化效果,以符合您的確切使用案例。
