本文為英文版的機器翻譯版本,如內容有任何歧義或不一致之處,概以英文版為準。
註冊模型版本
您可以透過建立 SageMaker 模型版本來註冊 Amazon 模型,以指定模型所屬的模型群組。模型版本必須同時包含模型成品 (模型的訓練權重) 和模型的推論程式碼。
推論管線是由處理推論請求的二到十五個容器的線性序列組成的 SageMaker 模型。您可以透過指定容器和相關聯的環境變數來註冊推論管道。如需與推論管道相關的詳細資訊,請參閱主機模型以及預處理邏輯作為一個端點後面的序列推論管道。
您可以透過指定容器和關聯的環境變數,在推論管道中註冊模型。若要使用 Amazon SageMaker Studio 主控台或在模型建置管道中 AWS SDK for Python (Boto3)建立步驟,使用推論管道建立 SageMaker 模型版本,請使用下列步驟。
註冊模型版本 (SageMaker管道)
若要使用模型建置管線註冊 SageMaker 模型版本,請在管線中建立RegisterModel步驟。如需與作為管道的一部分建立 RegisterModel 相關的詳細資訊,請參閱步驟 8:定義建立模型套件的 RegisterModel 步驟。
註冊模型版本 (Boto3)
若要使用 Boto3 註冊模型版本,請呼叫 create_model_package API 作業。
首先,設定要傳遞給 create_model_package API 作業的參數字典。
# Specify the model source model_url = "s3://your-bucket-name/model.tar.gz" modelpackage_inference_specification = { "InferenceSpecification": { "Containers": [ { "Image":image_uri, "ModelDataUrl":model_url} ], "SupportedContentTypes": [ "text/csv" ], "SupportedResponseMIMETypes": [ "text/csv" ], } } # Alternatively, you can specify the model source like this: # modelpackage_inference_specification["InferenceSpecification"]["Containers"][0]["ModelDataUrl"]=model_url create_model_package_input_dict = { "ModelPackageGroupName" : model_package_group_name, "ModelPackageDescription" : "Model to detect 3 different types of irises (Setosa, Versicolour, and Virginica)", "ModelApprovalStatus" : "PendingManualApproval" } create_model_package_input_dict.update(modelpackage_inference_specification)
然後您呼叫 create_model_package API 作業,傳入您剛才設定的參數字典。
create_model_package_response = sm_client.create_model_package(**create_model_package_input_dict)
model_package_arn = create_model_package_response["ModelPackageArn"]
print('ModelPackage Version ARN : {}'.format(model_package_arn))
註冊模型版本(工作室或工作室經典版)
若要在 Amazon SageMaker Studio 主控台中註冊模型版本,請根據您使用的是工作室還是工作室傳統版完成以下步驟。
從其他帳戶註冊模型版本
若要使用不同 AWS 帳號建立的模型群組註冊模型版本,您必須新增跨帳號 AWS Identity and Access Management 資源策略才能啟用該帳號。例如,您組織中的一個 AWS 帳戶負責訓練模型,而另一個帳戶則負責管理、部署和更新模型。您可以建立 IAM 資源政策,並將政策套用至您想要在此案例中授予存取權的特定帳戶資源。如需有關中跨帳號資源策略的詳細資訊 AWS,請參閱《AWS Identity and Access Management 使用者指南》中的跨帳號策略評估邏輯。
注意
在跨帳戶模型部署訓練期間,您還必須使用 KMS 金鑰來對輸出資料設定動作進行加密。
若要在中啟用跨帳戶模型登錄 SageMaker,您必須為包含模型版本的模型群組提供跨帳號資源策略。下列範例為模型群組建立了跨帳戶政策,並將這些政策套用至特定資源。
必須為在模型群組中註冊模型跨帳戶存取權的來源帳戶設定下列組態。在此範例中,來源帳戶是模型訓練帳戶,該帳戶將訓練模型,然後將模型跨帳戶存取權註冊到模型註冊表帳戶的模型註冊表中。
此範例假設您先前已定義下列變數:
-
sm_client— 一個 SageMaker 肉毒桿菌 3 客戶端. -
model_package_group_name— 您要授與存取權的「模型群組」。 -
model_package_group_arn— 您要授予跨帳戶存取權的模型群組 ARN。 -
bucket— 存放模型訓練成品的 Amazon S3 儲存貯體。
若要能夠部署在不同帳戶中建立的模型,使用者必須具有 SageMaker 動作存取權的角色,例如具有AmazonSageMakerFullAccess受管理策略的角色。如需 SageMaker 受管政策的相關資訊,請參閱 AWS Amazon 的受管政策 SageMaker。
必要的 IAM 資源政策
下圖展示允許跨帳戶模型註冊時所必要的政策。如圖所示,這些政策必須在模型訓練期間處於作用中狀態,模型才能正確註冊至模型註冊表帳戶。
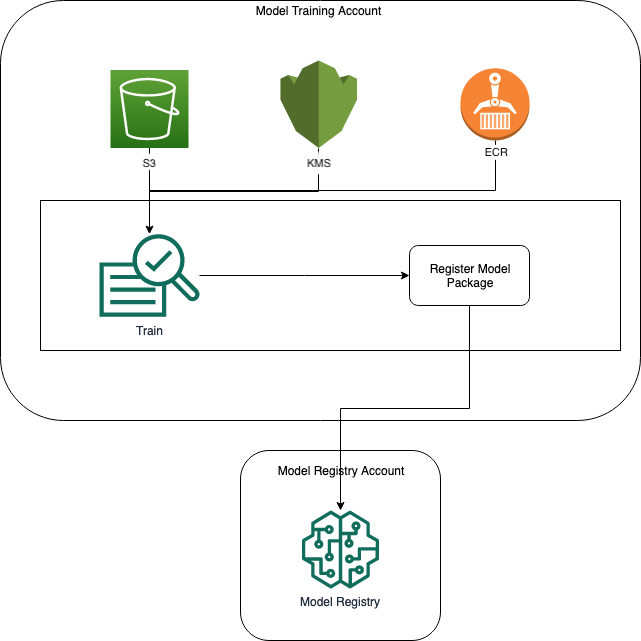
Amazon ECR、Amazon S3 和 AWS KMS 政策將在下列程式碼範例中展示。
Amazon ECR 政策範例
{
  "Version": "2012-10-17",
  "Statement": [
    {
      "Sid": "AddPerm",
      "Effect": "Allow",
      "Principal": {
        "AWS": "arn:aws:iam::{model_registry_account}:root"
      },
      "Action": [
        "ecr:BatchGetImage",
        "ecr:Describe*"
      ]
    }
  ]
}
Amazon S3 政策範例
{
  "Version": "2012-10-17",
  "Statement": [
    {
      "Sid": "AddPerm",
      "Effect": "Allow",
      "Principal": {
        "AWS": "arn:aws:iam::{model_registry_account}:root"
      },
      "Action": [
        "s3:GetObject",
        "s3:GetBucketAcl",
        "s3:GetObjectAcl"
      ],
      "Resource": "arn:aws:s3:::{bucket}/*"
    }
  ]
}
樣本 AWS KMS 政策
{
  "Version": "2012-10-17",
  "Statement": [
    {
      "Sid": "AddPerm",
      "Effect": "Allow",
      "Principal": {
        "AWS": "arn:aws:iam::{model_registry_account}:root"
      },
      "Action": [
        "kms:Decrypt",
        "kms:GenerateDataKey*"
      ],
      "Resource": "*"
    }
  ]
}
將資源政策套用至帳戶
下列政策組態會套用前一節中討論的政策,且必須放入模型訓練帳戶。
import json # The Model Registry account id of the Model Group model_registry_account = "111111111111" # The model training account id where training happens model_training_account = "222222222222" # 1. Create a policy for access to the ECR repository # in the model training account for the Model Registry account Model Group ecr_repository_policy = {"Version": "2012-10-17", "Statement": [{"Sid": "AddPerm", "Effect": "Allow", "Principal": { "AWS": f"arn:aws:iam::{model_registry_account}:root" }, "Action": [ "ecr:BatchGetImage", "ecr:Describe*" ] }] } # Convert the ECR policy from JSON dict to string ecr_repository_policy = json.dumps(ecr_repository_policy) # Set the new ECR policy ecr = boto3.client('ecr') response = ecr.set_repository_policy( registryId = model_training_account, repositoryName = "decision-trees-sample", policyText = ecr_repository_policy ) # 2. Create a policy in the model training account for access to the S3 bucket # where the model is present in the Model Registry account Model Group bucket_policy = {"Version": "2012-10-17", "Statement": [{"Sid": "AddPerm", "Effect": "Allow", "Principal": {"AWS": f"arn:aws:iam::{model_registry_account}:root" }, "Action": [ "s3:GetObject", "s3:GetBucketAcl", "s3:GetObjectAcl" ], "Resource": [ "arn:aws:s3:::{bucket}/*", "Resource: arn:aws:s3:::{bucket}" ] }] } # Convert the S3 policy from JSON dict to string bucket_policy = json.dumps(bucket_policy) # Set the new bucket policy s3 = boto3.client("s3") response = s3.put_bucket_policy( Bucket =bucket, Policy = bucket_policy) # 3. Create the KMS grant for the key used during training for encryption # in the model training account to the Model Registry account Model Group client = boto3.client("kms") response = client.create_grant( GranteePrincipal=model_registry_account, KeyId=kms_key_id Operations=[ "Decrypt", "GenerateDataKey", ], )
下列組態必須放入模型群組所在的模型註冊表帳戶。
# The Model Registry account id of the Model Group model_registry_account = "111111111111" # 1. Create policy to allow the model training account to access the ModelPackageGroup model_package_group_policy = {"Version": "2012-10-17", "Statement": [ { "Sid": "AddPermModelPackageVersion", "Effect": "Allow", "Principal": {"AWS": f"arn:aws:iam::{model_training_account}:root"}, "Action": ["sagemaker:CreateModelPackage"], "Resource": f"arn:aws:sagemaker:{region}:{model_registry_account}:model-package/{model_package_group_name}/*" } ] } # Convert the policy from JSON dict to string model_package_group_policy = json.dumps(model_package_group_policy) # Set the new policy response = sm_client.put_model_package_group_policy( ModelPackageGroupName =model_package_group_name, ResourcePolicy = model_package_group_policy)
最後,透過模型訓練帳戶使用 create_model_package 動作跨帳戶註冊模型套件。
# Specify the model source model_url = "s3://{bucket}/model.tar.gz" #Set up the parameter dictionary to pass to the create_model_package API operation modelpackage_inference_specification = { "InferenceSpecification": { "Containers": [ { "Image": f"{model_training_account}.dkr.ecr.us-east-2.amazonaws.com/decision-trees-sample:latest", "ModelDataUrl": model_url } ], "SupportedContentTypes": [ "text/csv" ], "SupportedResponseMIMETypes": [ "text/csv" ], } } # Alternatively, you can specify the model source like this: # modelpackage_inference_specification["InferenceSpecification"]["Containers"][0]["ModelDataUrl"]=model_url create_model_package_input_dict = { "ModelPackageGroupName" :model_package_group_arn, "ModelPackageDescription" : "Model to detect 3 different types of irises (Setosa, Versicolour, and Virginica)", "ModelApprovalStatus" : "PendingManualApproval" } create_model_package_input_dict.update(modelpackage_inference_specification) # Create the model package in the Model Registry account create_model_package_response = sm_client.create_model_package(**create_model_package_input_dict) model_package_arn = create_model_package_response["ModelPackageArn"] print('ModelPackage Version ARN : {}'.format(model_package_arn))
