本文為英文版的機器翻譯版本,如內容有任何歧義或不一致之處,概以英文版為準。
教學課程:使用 部署 Hello World 應用程式 AWS SAM
在本教學課程中,您可以使用 AWS Serverless Application Model 命令列界面 (AWS SAMCLI) 來完成下列操作:
-
初始化、建置和部署範例 Hello World 應用程式。
-
進行本機變更並同步至 AWS CloudFormation。
-
在開發主機上執行本機測試。
-
從 刪除範例應用程式 AWS 雲端。
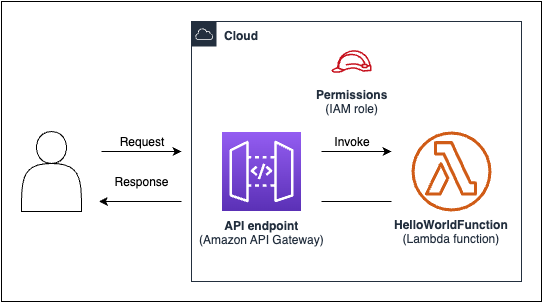
範例 Hello World 應用程式實作基本 API 後端。它包含下列資源:
-
Amazon API Gateway – 用來叫用函數的 API 端點。
-
AWS Lambda – 處理 HTTP API GET 請求並傳回
hello world訊息的函數。 -
AWS Identity and Access Management (IAM) 角色 – 為服務佈建安全互動的許可。
下圖顯示此應用程式的組件:
主題
先決條件
確認您已完成下列操作:
注意
如果您偏好使用 Visual Studio Code 進行無伺服器開發,請參閱 AWS Toolkit for VS Code 使用者指南中的建立無伺服器應用程式,以取得使用 VS Code 界面step-by-step說明。
步驟 1:初始化範例 Hello World 應用程式
在此步驟中,您將使用 在本機電腦上 AWS SAMCLI建立範例 Hello World 應用程式專案。
初始化範例 Hello World 應用程式
-
在命令列中,從您選擇的開始目錄執行下列項目:
$sam init注意
此命令會初始化無伺服器應用程式並建立專案目錄。目錄包含數個檔案和資料夾,包括
template.yaml檔案,也就是您的 AWS SAM 範本。安裝的 Python 版本必須符合 中指定的
Runtime屬性template.yaml。對於生產工作負載,我們建議使用 AWS 環境中完全支援的 Python 3.12 或更舊版本。如果 Python 版本不相符,您將會遇到建置錯誤。若要解決版本相容性問題:
-
在初始化期間指定相容的執行時間:
sam init --runtime python3.9 -
初始化
template.yaml後在 中修改Runtime屬性
-
-
AWS SAMCLI 將引導您初始化新的應用程式。設定下列項目:
-
選取 AWS Quick Start 範本以選擇開始範本。
-
選擇 Hello World 範例範本並下載。
-
使用Python執行期和
zip套件類型。 -
在本教學課程中,選擇退出 AWS X-Ray 追蹤。若要進一步了解,請參閱《 AWS X-Ray 開發人員指南》中的什麼是 AWS X-Ray?。
-
在本教學課程中,選擇不使用 Amazon CloudWatch Application Insights 進行監控。若要進一步了解,請參閱《Amazon CloudWatch 使用者指南》中的 Amazon CloudWatch Application Insights。 Amazon CloudWatch
-
在此教學課程中,選擇不在您的 Lambda 函數上設定 JSON 格式的結構化記錄。
-
將您的應用程式命名為 sam-app。
若要使用 AWS SAMCLI互動式流程:
-
括號 (
[ ]) 表示預設值。將答案保留空白以選取預設值。 -
輸入
yn
以下是
sam init互動式流程的範例:$sam init...Which template source would you like to use? 1 - AWS Quick Start Templates 2 - Custom Template Location Choice:1Choose an AWS Quick Start application template 1 - Hello World Example 2 - Data processing 3 - Hello World Example with Powertools for AWS Lambda 4 - Multi-step workflow 5 - Scheduled task 6 - Standalone function 7 - Serverless API 8 - Infrastructure event management 9 - Lambda Response Streaming 10 - GraphQLApi Hello World Example 11 - Full Stack 12 - Lambda EFS example 13 - Serverless Connector Hello World Example 14 - Multi-step workflow with Connectors 15 - DynamoDB Example 16 - Machine Learning Template:1Use the most popular runtime and package type? (Python and zip) [y/N]:yWould you like to enable X-Ray tracing on the function(s) in your application? [y/N]:ENTERWould you like to enable monitoring using CloudWatch Application Insights? For more info, please view https://docs.aws.amazon.com/AmazonCloudWatch/latest/monitoring/cloudwatch-application-insights.html [y/N]:ENTERWould you like to set Structured Logging in JSON format on your Lambda functions? [y/N]:ENTERProject name [sam-app]:ENTER -
-
會 AWS SAMCLI下載您的啟動範本,並在本機電腦上建立應用程式專案目錄結構。以下是 AWS SAMCLI輸出的範例:
Cloning from https://github.com/aws/aws-sam-cli-app-templates (process may take a moment) ----------------------- Generating application: ----------------------- Name: sam-app Runtime: python3.9 Architectures: x86_64 Dependency Manager: pip Application Template: hello-world Output Directory: . Configuration file: sam-app/samconfig.toml Next steps can be found in the README file at sam-app/README.md Commands you can use next ========================= [*] Create pipeline: cd sam-app && sam pipeline init --bootstrap [*] Validate SAM template: cd sam-app && sam validate [*] Test Function in the Cloud: cd sam-app && sam sync --stack-name {stack-name} --watch -
從您的命令列,移至新建立的
sam-app目錄。以下是 AWS SAMCLI建立的範例:注意
如果
tree命令未自動安裝,請執行此命令:brew install tree$cd sam-app$tree├── README.md ├── __init__.py ├── events │ └── event.json ├── hello_world │ ├── __init__.py │ ├── app.py │ └── requirements.txt ├── samconfig.toml ├── template.yaml └── tests ├── __init__.py ├── integration │ ├── __init__.py │ └── test_api_gateway.py ├── requirements.txt └── unit ├── __init__.py └── test_handler.py 6 directories, 14 files要強調的一些重要檔案:
-
hello_world/app.py– 包含您的 Lambda 函數程式碼。 -
hello_world/requirements.txt– 包含 Lambda 函數所需的任何Python相依性。 -
samconfig.toml– 應用程式的組態檔案,存放 使用的預設參數 AWS SAMCLI。 -
template.yaml– 包含應用程式基礎設施程式碼的 AWS SAM 範本。
-
您現在已在本機電腦上擁有完全撰寫的無伺服器應用程式!
步驟 2:建置您的應用程式
在此步驟中,您會使用 AWS SAMCLI來建置應用程式並準備部署。當您建置 時, AWS SAMCLI會建立.aws-sam目錄,並在該處組織您的函數相依性、專案程式碼和專案檔案。
建置您的應用程式
-
在您的命令列中,從
sam-app專案目錄執行下列動作:$sam build注意
如果您的Python本機電腦上沒有 ,請改用 sam build --use-container 命令。 AWS SAMCLI 會建立Docker容器,其中包含函數的執行時間和相依性。此命令Docker在您的本機電腦上需要 。若要安裝 Docker,請參閱 安裝 Docker。
以下是 AWS SAMCLI輸出的範例:
$sam buildStarting Build use cache Manifest file is changed (new hash: 3298f1304...d4d421) or dependency folder (.aws-sam/deps/4d3dfad6-a267-47a6-a6cd-e07d6fae318c) is missing for (HelloWorldFunction), downloading dependencies and copying/building source Building codeuri: /Users/.../Demo/sam-tutorial1/sam-app/hello_world runtime: python3.9 metadata: {} architecture: x86_64 functions: HelloWorldFunction Running PythonPipBuilder:CleanUp Running PythonPipBuilder:ResolveDependencies Running PythonPipBuilder:CopySource Running PythonPipBuilder:CopySource Build Succeeded Built Artifacts : .aws-sam/build Built Template : .aws-sam/build/template.yaml Commands you can use next ========================= [*] Validate SAM template: sam validate [*] Invoke Function: sam local invoke [*] Test Function in the Cloud: sam sync --stack-name {{stack-name}} --watch [*] Deploy: sam deploy --guided以下是 CLI 所 AWS SAM 建立
.aws-sam目錄的縮短範例:.aws-sam ├── build │ ├── HelloWorldFunction │ │ ├── __init__.py │ │ ├── app.py │ │ └── requirements.txt │ └── template.yaml └── build.toml
要強調的一些重要檔案:
-
build/HelloWorldFunction– 包含您的 Lambda 函數程式碼和相依性。會為應用程式中的每個函數 AWS SAMCLI建立目錄。 -
build/template.yaml– 包含在部署 AWS CloudFormation 時由 參考的 AWS SAM 範本副本。 -
build.toml– 組態檔案,存放建置和部署應用程式 AWS SAMCLI時 參考的預設參數值。
您現在可以將應用程式部署到 AWS 雲端。
步驟 3:將您的應用程式部署到 AWS 雲端
注意
此步驟需要 AWS 登入資料組態。如需詳細資訊,請參閱 AWS SAM 先決條件 中的 步驟 5:使用 AWS CLI 設定 AWS 登入資料。
在此步驟中,您會使用 AWS SAMCLI將應用程式部署到 AWS 雲端。 AWS SAMCLI 將執行下列動作:
-
引導您設定應用程式設定以進行部署。
-
將您的應用程式檔案上傳至 Amazon Simple Storage Service (Amazon S3)。
-
將您的 AWS SAM 範本轉換為 AWS CloudFormation 範本。接著會將您的範本上傳至 AWS CloudFormation 服務,以佈建您的 AWS 資源。
部署您的 應用程式
-
在您的命令列中,從
sam-app專案目錄執行下列動作:$sam deploy --guided -
遵循 AWS SAMCLI互動式流程來設定您的應用程式設定。設定下列項目:
-
AWS CloudFormation 堆疊名稱 – 堆疊是您可以單一單位管理的一組 AWS 資源。若要進一步了解,請參閱AWS CloudFormation 《 使用者指南》中的使用堆疊。
-
AWS 區域 要部署 AWS CloudFormation 堆疊的 。如需詳細資訊,請參閱AWS CloudFormation 《 使用者指南》中的AWS CloudFormation 端點。
-
在本教學課程中,選擇在部署之前不確認變更。
-
允許建立 IAM 角色 – 這可讓 AWS SAM 建立 API Gateway 資源和 Lambda 函數資源互動所需的 IAM 角色。
-
在本教學課程中,選擇不停用轉返。
-
允許 HelloWorldFunction 未定義授權 – 會顯示此訊息,因為您的 API Gateway 端點已設定為可公開存取,無需授權。由於這是 Hello World 應用程式的預期組態, AWS SAMCLI請允許 繼續。如需設定授權的詳細資訊,請參閱 使用 AWS SAM 範本控制 API 存取。
-
將引數儲存至組態檔案 – 這會使用您的部署偏好設定來更新應用程式的
samconfig.toml檔案。 -
選取預設組態檔案名稱。
-
選取預設組態環境。
以下是
sam deploy --guided互動式流程的範例輸出:$sam deploy --guidedConfiguring SAM deploy ====================== Looking for config file [samconfig.toml] : Found Reading default arguments : Success Setting default arguments for 'sam deploy' ========================================= Stack Name [sam-app]:ENTERAWS Region [us-west-2]:ENTER#Shows you resources changes to be deployed and require a 'Y' to initiate deploy Confirm changes before deploy [Y/n]:n#SAM needs permission to be able to create roles to connect to the resources in your template Allow SAM CLI IAM role creation [Y/n]:ENTER#Preserves the state of previously provisioned resources when an operation fails Disable rollback [y/N]:ENTERHelloWorldFunction may not have authorization defined, Is this okay? [y/N]:ySave arguments to configuration file [Y/n]:ENTERSAM configuration file [samconfig.toml]:ENTERSAM configuration environment [default]:ENTER -
-
會執行下列動作來 AWS SAMCLI部署您的應用程式:
-
AWS SAMCLI 會建立 Amazon S3 儲存貯體並上傳您的
.aws-sam目錄。 -
會將您的 AWS SAM 範本 AWS SAMCLI轉換為 , AWS CloudFormation 並將其上傳至 AWS CloudFormation 服務。
-
AWS CloudFormation 會佈建您的 資源。
在部署期間, AWS SAMCLI會顯示您的進度。以下是輸出範例:
Looking for resources needed for deployment: Managed S3 bucket: aws-sam-cli-managed-default-samclisam-s3-demo-bucket-1a4x26zbcdkqr A different default S3 bucket can be set in samconfig.toml Parameter "stack_name=sam-app" in [default.deploy.parameters] is defined as a global parameter [default.global.parameters]. This parameter will be only saved under [default.global.parameters] in /Users/.../Demo/sam-tutorial1/sam-app/samconfig.toml. Saved arguments to config file Running 'sam deploy' for future deployments will use the parameters saved above. The above parameters can be changed by modifying samconfig.toml Learn more about samconfig.toml syntax at https://docs.aws.amazon.com/serverless-application-model/latest/developerguide/serverless-sam-cli-config.html File with same data already exists at sam-app/da3c598813f1c2151579b73ad788cac8, skipping upload Deploying with following values =============================== Stack name : sam-app Region : us-west-2 Confirm changeset : False Disable rollback : False Deployment s3 bucket : aws-sam-cli-managed-default-samclisam-s3-demo-bucket-1a4x26zbcdkqr Capabilities : ["CAPABILITY_IAM"] Parameter overrides : {} Signing Profiles : {} Initiating deployment ===================== File with same data already exists at sam-app/2bebf67c79f6a743cc5312f6dfc1efee.template, skipping upload Waiting for changeset to be created.. CloudFormation stack changeset --------------------------------------------------------------------------------------------------------------------------------------------- Operation LogicalResourceId ResourceType Replacement --------------------------------------------------------------------------------------------------------------------------------------------- * Modify HelloWorldFunction AWS::Lambda::Function False * Modify ServerlessRestApi AWS::ApiGateway::RestApi False - Delete AwsSamAutoDependencyLayerNestedSt AWS::CloudFormation::Stack N/A ack --------------------------------------------------------------------------------------------------------------------------------------------- Changeset created successfully. arn:aws:cloudformation:us-west-2:012345678910:changeSet/samcli-deploy1678917603/22e05525-08f9-4c52-a2c4-f7f1fd055072 2023-03-15 12:00:16 - Waiting for stack create/update to complete CloudFormation events from stack operations (refresh every 0.5 seconds) --------------------------------------------------------------------------------------------------------------------------------------------- ResourceStatus ResourceType LogicalResourceId ResourceStatusReason --------------------------------------------------------------------------------------------------------------------------------------------- UPDATE_IN_PROGRESS AWS::Lambda::Function HelloWorldFunction - UPDATE_COMPLETE AWS::Lambda::Function HelloWorldFunction - UPDATE_COMPLETE_CLEANUP_IN_PROGRE AWS::CloudFormation::Stack sam-app - SS DELETE_IN_PROGRESS AWS::CloudFormation::Stack AwsSamAutoDependencyLayerNestedSt - ack DELETE_COMPLETE AWS::CloudFormation::Stack AwsSamAutoDependencyLayerNestedSt - ack UPDATE_COMPLETE AWS::CloudFormation::Stack sam-app - --------------------------------------------------------------------------------------------------------------------------------------------- CloudFormation outputs from deployed stack ---------------------------------------------------------------------------------------------------------------------------------------------- Outputs ---------------------------------------------------------------------------------------------------------------------------------------------- Key HelloWorldFunctionIamRole Description Implicit IAM Role created for Hello World function Value arn:aws:iam::012345678910:role/sam-app-HelloWorldFunctionRole-15GLOUR9LMT1W Key HelloWorldApi Description API Gateway endpoint URL for Prod stage for Hello World function Value https://<restapiid>.execute-api.us-west-2.amazonaws.com/Prod/hello/ Key HelloWorldFunction Description Hello World Lambda Function ARN Value arn:aws:lambda:us-west-2:012345678910:function:sam-app-HelloWorldFunction-yQDNe17r9maD ---------------------------------------------------------------------------------------------------------------------------------------------- Successfully created/updated stack - sam-app in us-west-2 -
您的應用程式現在已部署並在 中執行 AWS 雲端!
步驟 4:執行您的應用程式
在此步驟中,您將傳送 GET 請求到您的 API 端點,並查看您的 Lambda 函數輸出。
取得您的 API 端點值
-
從上一個步驟 AWS SAMCLI中 顯示的資訊中,找到
Outputs區段。在本節中,找到您的HelloWorldApi資源以尋找您的 HTTP 端點值。以下是輸出範例:---------------------------------------------------------------------------------------------------------------------------------------------- Outputs ---------------------------------------------------------------------------------------------------------------------------------------------- ... Key HelloWorldApi Description API Gateway endpoint URL for Prod stage for Hello World function Value https://ets1gv8lxi.execute-api.us-west-2.amazonaws.com/Prod/hello/ ... ----------------------------------------------------------------------------------------------------------------------------------------------
-
或者,您可以使用 sam list endpoints --output json命令來取得此資訊。以下是輸出範例:
$sam list endpoints --output json2023-03-15 12:39:19 Loading policies from IAM... 2023-03-15 12:39:25 Finished loading policies from IAM. [ { "LogicalResourceId": "HelloWorldFunction", "PhysicalResourceId": "sam-app-HelloWorldFunction-yQDNe17r9maD", "CloudEndpoint": "-", "Methods": "-" }, { "LogicalResourceId": "ServerlessRestApi", "PhysicalResourceId": "ets1gv8lxi", "CloudEndpoint": [ "https://ets1gv8lxi.execute-api.us-west-2.amazonaws.com/Prod", "https://ets1gv8lxi.execute-api.us-west-2.amazonaws.com/Stage" ], "Methods": [ "/hello['get']" ] } ]
叫用您的 函數
-
使用您的瀏覽器或命令列,將 GET 請求傳送至您的 API 端點。以下是使用 curl 命令的範例:
$curl https://ets1gv8lxi.execute-api.us-west-2.amazonaws.com/Prod/hello/{"message": "hello world"}
步驟 5:與 中的函數互動 AWS 雲端
在此步驟中,您會使用 AWS SAMCLI 在 中叫用 Lambda 函數 AWS 雲端。
在雲端中叫用 Lambda 函數
-
請記下上
LogicalResourceId一個步驟的 函數。它應該是HelloWorldFunction。 -
在您的命令列中,從
sam-app專案目錄執行下列動作:$sam remote invokeHelloWorldFunction--stack-namesam-app -
會在雲端 AWS SAMCLI中叫用您的 函數,並傳回回應。以下是輸出範例:
$sam remote invoke HelloWorldFunction --stack-name sam-appInvoking Lambda Function HelloWorldFunction START RequestId: d5ef494b-5f45-4086-86fd-d7322fa1a1f9 Version: $LATEST END RequestId: d5ef494b-5f45-4086-86fd-d7322fa1a1f9 REPORT RequestId: d5ef494b-5f45-4086-86fd-d7322fa1a1f9 Duration: 6.62 ms Billed Duration: 7 ms Memory Size: 128 MB Max Memory Used: 67 MB Init Duration: 164.06 ms {"statusCode":200,"body":"{\"message\":\"hello world\"}"}%
步驟 6:修改您的應用程式並將其同步至 AWS 雲端
在此步驟中,您可以使用 AWS SAMCLIsam sync --watch命令將本機變更同步至 AWS 雲端。
使用 sam 同步
-
在您的命令列中,從
sam-app專案目錄執行下列動作:$sam sync --watch -
會 AWS SAMCLI提示您確認是否同步開發堆疊。由於 sam sync --watch命令會自動 AWS 雲端 即時將本機變更部署到 ,因此我們建議僅用於開發環境。
會在開始監控本機變更之前 AWS SAMCLI執行初始部署。以下是輸出範例:
$sam sync --watchThe SAM CLI will use the AWS Lambda, Amazon API Gateway, and AWS StepFunctions APIs to upload your code without performing a CloudFormation deployment. This will cause drift in your CloudFormation stack. **The sync command should only be used against a development stack**. Confirm that you are synchronizing a development stack. Enter Y to proceed with the command, or enter N to cancel: [Y/n]:yQueued infra sync. Waiting for in progress code syncs to complete... Starting infra sync. Manifest is not changed for (HelloWorldFunction), running incremental build Building codeuri: /Users/.../Demo/sam-tutorial1/sam-app/hello_world runtime: python3.9 metadata: {} architecture: x86_64 functions: HelloWorldFunction Running PythonPipBuilder:CopySource Build Succeeded Successfully packaged artifacts and wrote output template to file /var/folders/45/5ct135bx3fn2551_ptl5g6_80000gr/T/tmpq3x9vh63. Execute the following command to deploy the packaged template sam deploy --template-file /var/folders/45/5ct135bx3fn2551_ptl5g6_80000gr/T/tmpq3x9vh63 --stack-name <YOUR STACK NAME> Deploying with following values =============================== Stack name : sam-app Region : us-west-2 Disable rollback : False Deployment s3 bucket : aws-sam-cli-managed-default-samclisam-s3-demo-bucket-1a4x26zbcdkqr Capabilities : ["CAPABILITY_NAMED_IAM", "CAPABILITY_AUTO_EXPAND"] Parameter overrides : {} Signing Profiles : null Initiating deployment ===================== 2023-03-15 13:10:05 - Waiting for stack create/update to complete CloudFormation events from stack operations (refresh every 0.5 seconds) --------------------------------------------------------------------------------------------------------------------------------------------- ResourceStatus ResourceType LogicalResourceId ResourceStatusReason --------------------------------------------------------------------------------------------------------------------------------------------- UPDATE_IN_PROGRESS AWS::CloudFormation::Stack sam-app Transformation succeeded CREATE_IN_PROGRESS AWS::CloudFormation::Stack AwsSamAutoDependencyLayerNestedSt - ack CREATE_IN_PROGRESS AWS::CloudFormation::Stack AwsSamAutoDependencyLayerNestedSt Resource creation Initiated ack CREATE_COMPLETE AWS::CloudFormation::Stack AwsSamAutoDependencyLayerNestedSt - ack UPDATE_IN_PROGRESS AWS::Lambda::Function HelloWorldFunction - UPDATE_COMPLETE AWS::Lambda::Function HelloWorldFunction - UPDATE_COMPLETE_CLEANUP_IN_PROGRE AWS::CloudFormation::Stack sam-app - SS UPDATE_COMPLETE AWS::CloudFormation::Stack sam-app - --------------------------------------------------------------------------------------------------------------------------------------------- CloudFormation outputs from deployed stack ---------------------------------------------------------------------------------------------------------------------------------------------- Outputs ---------------------------------------------------------------------------------------------------------------------------------------------- Key HelloWorldFunctionIamRole Description Implicit IAM Role created for Hello World function Value arn:aws:iam::012345678910:role/sam-app-HelloWorldFunctionRole-15GLOUR9LMT1W Key HelloWorldApi Description API Gateway endpoint URL for Prod stage for Hello World function Value https://ets1gv8lxi.execute-api.us-west-2.amazonaws.com/Prod/hello/ Key HelloWorldFunction Description Hello World Lambda Function ARN Value arn:aws:lambda:us-west-2:012345678910:function:sam-app-HelloWorldFunction-yQDNe17r9maD ---------------------------------------------------------------------------------------------------------------------------------------------- Stack update succeeded. Sync infra completed. Infra sync completed. CodeTrigger not created as CodeUri or DefinitionUri is missing for ServerlessRestApi.
接著,您將修改 Lambda 函數程式碼。 AWS SAMCLI 會自動偵測此變更,並將您的應用程式同步至 AWS 雲端。
修改和同步您的應用程式
-
在您所選的 IDE 中,開啟
sam-app/hello_world/app.py檔案。 -
變更
message並儲存您的 檔案。以下是範例:import json...def lambda_handler(event, context):...return { "statusCode": 200, "body": json.dumps({ "message": "hello everyone!",...}), } -
AWS SAMCLI 會偵測您的變更,並將您的應用程式同步至 AWS 雲端。以下是輸出範例:
Syncing Lambda Function HelloWorldFunction... Manifest is not changed for (HelloWorldFunction), running incremental build Building codeuri: /Users/
.../Demo/sam-tutorial1/sam-app/hello_world runtime: python3.9 metadata: {} architecture: x86_64 functions: HelloWorldFunction Running PythonPipBuilder:CopySource Finished syncing Lambda Function HelloWorldFunction. -
若要驗證您的變更,請再次傳送 GET 請求到您的 API 端點。
$curl https://ets1gv8lxi.execute-api.us-west-2.amazonaws.com/Prod/hello/{"message": "hello everyone!"}
步驟 7:(選用) 在本機測試您的應用程式
注意
此為選擇性步驟。
重要
此步驟Docker在本機電腦上需要 。您必須Docker安裝 並設定為使用 AWS SAMCLI進行本機測試。如需詳細資訊,請參閱安裝 Docker。
在此步驟中,您可以使用 AWS SAMCLIsam local命令在本機測試您的應用程式。為了達成此目的, 會使用 AWS SAMCLI建立本機環境Docker。此本機環境模擬 Lambda 函數的雲端型執行環境。
您可執行下列項目:
-
為您的 Lambda 函數建立本機環境並叫用它。
-
在本機託管 HTTP API 端點,並使用它來叫用 Lambda 函數。
在本機叫用 Lambda 函數
-
在您的命令列中,從
sam-app專案目錄執行下列動作:$sam local invoke -
AWS SAMCLI 會建立本機Docker容器並叫用您的 函數。以下是輸出範例:
$sam local invokeInvoking app.lambda_handler (python3.9) Local image was not found. Removing rapid images for repo public.ecr.aws/sam/emulation-python3.9 Building image..................... Using local image: public.ecr.aws/lambda/python:3.9-rapid-x86_64. Mounting /Users/.../Demo/sam-tutorial1/sam-app/.aws-sam/build/HelloWorldFunction as /var/task:ro,delegated inside runtime container START RequestId: b046db01-2a00-415d-af97-35f3a02e9eb6 Version: $LATEST END RequestId: b046db01-2a00-415d-af97-35f3a02e9eb6 REPORT RequestId: b046db01-2a00-415d-af97-35f3a02e9eb6 Init Duration: 1.01 ms Duration: 633.45 ms Billed Duration: 634 ms Memory Size: 128 MB Max Memory Used: 128 MB {"statusCode": 200, "body": "{\"message\": \"hello world\"}"}
在本機託管您的 API
-
在您的命令列中,從
sam-app專案目錄執行下列動作:$sam local start-api -
會為您的 Lambda 函數 AWS SAMCLI建立本機Docker容器,並建立本機 HTTP 伺服器來模擬您的 API 端點。以下是輸出範例:
$sam local start-apiInitializing the lambda functions containers. Local image is up-to-date Using local image: public.ecr.aws/lambda/python:3.9-rapid-x86_64. Mounting /Users/.../Demo/sam-tutorial1/sam-app/.aws-sam/build/HelloWorldFunction as /var/task:ro,delegated inside runtime container Containers Initialization is done. Mounting HelloWorldFunction at http://127.0.0.1:3000/hello [GET] You can now browse to the above endpoints to invoke your functions. You do not need to restart/reload SAM CLI while working on your functions, changes will be reflected instantly/automatically. If you used sam build before running local commands, you will need to re-run sam build for the changes to be picked up. You only need to restart AWS SAM CLI if you update your AWS SAM template 2023-03-15 14:25:21 WARNING: This is a development server. Do not use it in a production deployment. Use a production WSGI server instead. * Running on http://127.0.0.1:3000 2023-03-15 14:25:21 Press CTRL+C to quit -
使用您的瀏覽器或命令列,將 GET 請求傳送至本機 API 端點。以下是使用 curl 命令的範例:
$curl http://127.0.0.1:3000/hello{"message": "hello world"}
步驟 8:從 刪除您的應用程式 AWS 雲端
在此步驟中,您可以使用 AWS SAMCLIsam delete命令從 刪除您的應用程式 AWS 雲端。
從 刪除您的應用程式 AWS 雲端
-
在您的命令列中,從
sam-app專案目錄執行下列動作:$sam delete -
AWS SAMCLI 會要求您確認。然後,它會刪除應用程式的 Amazon S3 儲存貯體和 AWS CloudFormation 堆疊。以下是輸出範例:
$sam deleteAre you sure you want to delete the stack sam-app in the region us-west-2 ? [y/N]:yAre you sure you want to delete the folder sam-app in S3 which contains the artifacts? [y/N]:y- Deleting S3 object with key c6ce8fa8b5a97dd022ecd006536eb5a4 - Deleting S3 object with key 5d513a459d062d644f3b7dd0c8b56a2a.template - Deleting S3 object with key sam-app/2bebf67c79f6a743cc5312f6dfc1efee.template - Deleting S3 object with key sam-app/6b208d0e42ad15d1cee77d967834784b.template - Deleting S3 object with key sam-app/da3c598813f1c2151579b73ad788cac8 - Deleting S3 object with key sam-app/f798cdd93cee188a71d120f14a035b11 - Deleting Cloudformation stack sam-app Deleted successfully
故障診斷
若要對 進行故障診斷 AWS SAMCLI,請參閱 AWS SAMCLI 故障診斷。
進一步了解
若要繼續了解 AWS SAM,請參閱下列資源:
-
完成 AWS SAM 研討會
– 旨在教導您許多 AWS SAM 提供的主要功能的研討會。 -
使用 SAM 的工作階段
– 由我們的 AWS Serverless Developer Advocate 團隊在使用 時建立的影片系列 AWS SAM。 -
無伺服器土地
- 網站,集合無伺服器的最新資訊、部落格、影片、程式碼和學習資源 AWS 。
