Amazon Monitron is no longer open to new customers. Existing customers can
continue to use the service as normal. For capabilities similar to Amazon
Monitron, see our blog post
Setting up a project
The first step with Amazon Monitron is to set up your project in the Amazon Monitron console. A project is where your team sets up gateways, assets, and sensors in the Amazon Monitron mobile app.
Topics
Step 1: Create an account
Sign up for an AWS account
If you do not have an AWS account, complete the following steps to create one.
To sign up for an AWS account
Follow the online instructions.
Part of the sign-up procedure involves receiving a phone call or text message and entering a verification code on the phone keypad.
When you sign up for an AWS account, an AWS account root user is created. The root user has access to all AWS services and resources in the account. As a security best practice, assign administrative access to a user, and use only the root user to perform tasks that require root user access.
AWS sends you a confirmation email after the sign-up process is
complete. At any time, you can view your current account activity and manage your account by
going to https://aws.amazon.com/
Create a user with administrative access
After you sign up for an AWS account, secure your AWS account root user, enable AWS IAM Identity Center, and create an administrative user so that you don't use the root user for everyday tasks.
Secure your AWS account root user
-
Sign in to the AWS Management Console
as the account owner by choosing Root user and entering your AWS account email address. On the next page, enter your password. For help signing in by using root user, see Signing in as the root user in the AWS Sign-In User Guide.
-
Turn on multi-factor authentication (MFA) for your root user.
For instructions, see Enable a virtual MFA device for your AWS account root user (console) in the IAM User Guide.
Create a user with administrative access
-
Enable IAM Identity Center.
For instructions, see Enabling AWS IAM Identity Center in the AWS IAM Identity Center User Guide.
-
In IAM Identity Center, grant administrative access to a user.
For a tutorial about using the IAM Identity Center directory as your identity source, see Configure user access with the default IAM Identity Center directory in the AWS IAM Identity Center User Guide.
Sign in as the user with administrative access
-
To sign in with your IAM Identity Center user, use the sign-in URL that was sent to your email address when you created the IAM Identity Center user.
For help signing in using an IAM Identity Center user, see Signing in to the AWS access portal in the AWS Sign-In User Guide.
Assign access to additional users
-
In IAM Identity Center, create a permission set that follows the best practice of applying least-privilege permissions.
For instructions, see Create a permission set in the AWS IAM Identity Center User Guide.
-
Assign users to a group, and then assign single sign-on access to the group.
For instructions, see Add groups in the AWS IAM Identity Center User Guide.
Important
Amazon Monitron supports all IAM Identity Center regions except opt-in and government regions. For a list of supported regions, see Understanding SSO requirements.
Step 2: Create a project
Now that you've signed in to the AWS Management Console, you can use the Amazon Monitron console to create your project.
To create a project
-
Choose the AWS Region that you want to use in the Region selector. Amazon Monitron is available only in the US East (N. Virginia), Europe (Ireland), and Asia Pacific (Sydney) Regions.

-
Open the Amazon Monitron console at https://console.aws.amazon.com/monitron
. -
Choose Create project.

-
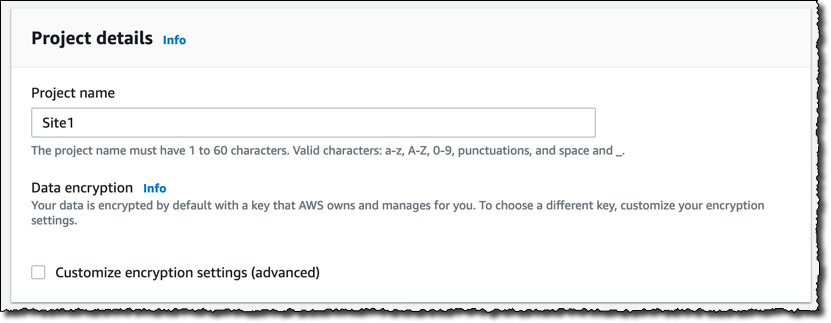
Under Project Details, for Project name, enter a name for the project.
-
(Optional) Under Data encryption, you can check Custom encryption settings (advanced) if you have an AWS KMS key in AWS Key Management Service. Amazon Monitron encrypts all data at rest and in transit. If you don't provide your own CMK, your data is encrypted by a CMK that Amazon Monitron owns and manages.
For more information about encryption for your project, see KMS and Data Encryption in Amazon Monitron.
-
(Optional) To add a tag to the project, enter a key-value pair under Tags and then choose Add tag.
For more information about tags, see Tags in Amazon Monitron.
-
Choose Next to create the project.
When you create your first project, the owner of the AWS account will get an email from AWS Organizations. No action needs to be taken based on this email.
Step 3: Create admin users
Give access to one or more people in your organization (such as reliability managers) as admin users. An admin user is a person who belongs to an Amazon Monitron project and who can add other users to the project.
When you add an admin user, Amazon Monitron creates an account for that user in AWS IAM Identity Center. IAM Identity Center is a service that helps you manage SSO access to AWS accounts and applications in your organization. Amazon Monitron uses IAM Identity Center to authenticate users for the Amazon Monitron mobile app.
If you haven't enabled IAM Identity Center in your AWS account, Amazon Monitron enables it for you when you create your first Amazon Monitron admin user. If you are already using IAM Identity Center in your account, then your IAM Identity Center users are shown in the Amazon Monitron console.
Complete the steps in this section to add yourself to your project as an admin user. Repeat them for each additional admin user that you want to create.
To create an admin user
Unless you already use IAM Identity Center in your AWS account, use Amazon Monitron to create admin users. If these users are already in IAM Identity Center, you can skip creating the users, and you are ready to assign the admin role to them.
-
Open the Amazon Monitron console at https://console.aws.amazon.com/monitron
. -
On the Add project admin user page, choose Create user.
-
In the Create user section, enter the admin user's email address and name.

-
Choose Create user.
Amazon Monitron creates a user in IAM Identity Center. IAM Identity Center sends the user an email that contains a link to activate the account. The link is valid for up to seven days. Within this time, each user must open the email and accept the invitation.
To assign the admin role to the admin users
-
On the Add project admin user page, select the checkbox for each admin user that you created.
-
Choose Add.
You can add admin users to your project even if those people have not yet accepted the invitations to their IAM Identity Center accounts.
Step 4: (optional) Add Amazon Monitron users to your project
In addition to admin users, you can also add users who lack admin permissions. For example, these users might be technicians who only use the Amazon Monitron mobile app to monitor assets, acknowledge notifications and enter closure codes.
For users who are not admin users:
-
You use IAM Identity Center, not Amazon Monitron, to create their user accounts.
-
You use the Amazon Monitron mobile app to add the users to projects, not the Amazon Monitron console.
The following steps are not required if all of your users are admin users.
To add users to IAM Identity Center
If your users already have accounts in IAM Identity Center in your AWS account, you can skip these steps. You are ready to add the users to your project in the mobile app. Otherwise, add your users to IAM Identity Center by completing the following steps.
Open the AWS IAM Identity Center console at https://console.aws.amazon.com/singlesignon/
. -
In the IAM Identity Center console, choose Users.
-
Repeat the following steps for each user that will access your project in the Amazon Monitron mobile app.
-
On the Users page choose Add user.
-
In the User details section, provide the username and contact information. Leave Password set to Send an email to the user with password setup instructions.

-
Choose Next: Groups.
-
Choose Add user. IAM Identity Center sends the user an email that contains a link to activate the IAM Identity Center user. The link is valid for up to seven days. Each user must open the email and accept the invitation before accessing your project in the Amazon Monitron mobile app.
-
-
Log into the Amazon Monitron mobile app on your smartphone.
-
Navigate to the project or site that you want to add a user to, and then to the Users list.
-
Choose Add user.

-
Enter a user name.
Amazon Monitron searches the user directory for the user.
-
Choose the user from the list.
-
Choose the role that you want to assign the user: Admin, Technician, or Viewer.
-
Choose Add.
The new user appears on the Users list.
-
Send the new user an email invitation with a link for accessing the project and downloading the Amazon Monitron mobile app. For more information, see Sending an email invitation.
-
Select Users from the navigation pane.
-
Choose Add user.

-
Enter a user name.
Amazon Monitron searches the user directory for the user.
-
Choose the user from the list.
-
Choose the role that you want to assign the user: Admin, Technician, or Read only.
-
Choose Add.
The new user appears on the Users list.
-
Send the new user an email invitation with a link for accessing the project and downloading the Amazon Monitron mobile app. For more information, see Sending an email invitation.

Step 5: Invite users to your project
Invite the users you've added to your Amazon Monitron project.
-
Open the Amazon Monitron console at https://console.aws.amazon.com/monitron
. -
In the navigation pane, choose Projects.
-
On the Projects page, choose your project name to open its details page.
-
Repeat the following steps for each user that you want to invite.
-
Under How it works, choose Email instructions.

Your email client opens a draft that contains an invitation to your Amazon Monitron project. It contains both a link to download the Amazon Monitron mobile app from the Google Play Store and a link to open the project.
-
Email this message to the user.
-
