Converting data warehouse schemas to Amazon RDS using AWS SCT
The AWS Schema Conversion Tool (AWS SCT) automates much of the process of converting your data warehouse schema to an Amazon RDS or Aurora database schema. Because the source and target database engines can have many different features and capabilities, AWS SCT attempts to create an equivalent schema in your target database wherever possible. If no direct conversion is possible, AWS SCT provides an assessment report with a list of possible actions for you to take. Using AWS SCT, you can manage keys, map data types and objects, and create manual conversions.
AWS SCT can convert the following data warehouse schemas.
Amazon Redshift
Azure Synapse Analytics (version 10)
BigQuery
Greenplum Database (version 4.3)
Microsoft SQL Server (version 2008 and higher)
Netezza (version 7.0.3 and higher)
Oracle (version 10.2 and higher)
Snowflake (version 3)
Teradata (version 13 and higher)
Vertica (version 7.2 and higher)
For information about converting an online transaction processing (OLTP) database schema, see Converting database schemas in AWS Schema Conversion Tool.
To convert a data warehouse schema, take the following steps:
-
Specify the optimization strategy and rules, and specify the migration rules that you want AWS SCT to use. You can set up rules that change the data type of columns, move objects from one schema to another, and change the names of objects.
You can specify optimization and migration rules in Settings. For more information on optimization strategies, see Choosing optimization strategies and rules for use with AWS SCT. for more information about migration rules, see Creating migration rules in AWS SCT
-
Provide statistics on your source data warehouse so that AWS SCT can optimize how your data warehouse is converted. You can either collect statistics directly from the database, or upload an existing statistics file. For more information about providing data warehouse statistics, see Collecting or uploading statistics for AWS SCT.
-
Create a database migration assessment report that details the schema elements that can't be converted automatically. You can use this report to identify where you need to manually create a schema in your target database that is compatible with your source database. For more information about the assessment report, see Using the assessment report in the AWS Schema Conversion Tool.
-
Convert the schema. AWS SCT creates a local version of the converted schema for you to review, but it doesn't apply it to your target database until you are ready. For more information about converting, see Converting your schema using AWS SCT
-
After you convert your schema, you can manage and edit your keys. Key management is the heart of a data warehouse conversion. For more information about managing keys, see Managing and customizing keys in AWS SCT.
-
If you have schema elements that can't be converted automatically, you have two choices: update the source schema and then convert again, or create equivalent schema elements in your target database. For more information on manually converting schema elements, see Handling manual conversions in AWS SCT. For more information about updating your source schema, see Updating and refreshing your converted schema in AWS SCT.
-
When you are ready, you can apply the converted schema to your target database. For more information about saving and applying the converted schema, see Saving and applying your converted schema in AWS SCT.
Permissions for Amazon Redshift as a target
The permissions required for Amazon Redshift as a target are listed following:
-
CREATE ON DATABASE – allows to create new schemas in the database.
-
CREATE ON SCHEMA – allows to create objects in the database schema.
-
GRANT USAGE ON LANGUAGE – allows to create new functions and procedures in the database.
-
GRANT SELECT ON ALL TABLES IN SCHEMA pg_catalog – provides the user with system information about the Amazon Redshift cluster.
-
GRANT SELECT ON pg_class_info – provides the user with information about tables distribution style.
You can use the following code example to create a database user and grant the permissions.
CREATE USERuser_namePASSWORDyour_password; GRANT CREATE ON DATABASEdb_nameTOuser_name; GRANT CREATE ON SCHEMAschema_nameTOuser_name; GRANT USAGE ON LANGUAGE plpythonu TOuser_name; GRANT USAGE ON LANGUAGE plpgsql TOuser_name; GRANT SELECT ON ALL TABLES IN SCHEMA pg_catalog TOuser_name; GRANT SELECT ON pg_class_info TOuser_name; GRANT SELECT ON sys_serverless_usage TOuser_name; GRANT SELECT ON pg_database_info TOuser_name; GRANT SELECT ON pg_statistic TOuser_name;
In the example preceding, replace user_name with the name of your user.
Then, replace db_name with the name of your target Amazon Redshift database.
Next, replace schema_name with the name of your Amazon Redshift schema.
Repeat the GRANT CREATE ON SCHEMA operation for each target schema where you will
apply the converted code or migrate data. Finally, replace your_password
with a secure password.
You can apply an extension pack on your target Amazon Redshift database. An extension pack is an add-on module that emulates source database functions that are required when converting objects to Amazon Redshift. For more information, see Using extension packs with AWS Schema Conversion Tool.
For this operation, AWS SCT needs permission to access the Amazon S3 bucket on your behalf. To provide this permission, create an AWS Identity and Access Management (IAM) user with the following policy.
Choosing optimization strategies and rules for use with AWS SCT
To optimize how the AWS Schema Conversion Tool converts your data warehouse schema, you can choose the strategies and rules you want the tool to use. After converting your schema, and reviewing the suggested keys, you can adjust your rules or change your strategy to get the results you want.
To choose your optimization strategies and rules
-
Choose Settings, and then choose Project Settings. The Current project settings dialog box appears.
-
In the left pane, choose Optimization Strategies. The optimization strategies appear in the right pane with the defaults selected.
-
For Strategy Sector, choose the optimization strategy you want to use. You can choose from the following:
-
Use metadata, ignore statistical information – In this strategy, only information from the metadata is used for optimization decisions. For example, if there is more than one index on a source table, the source database sort order is used, and the first index becomes a distribution key.
-
Ignore metadata, use statistical information – In this strategy, optimization decisions are derived from statistical information only. This strategy applies only to tables and columns for which statistics are provided. For more information, see Collecting or uploading statistics for AWS SCT.
-
Use metadata and use statistical information – In this strategy, both metadata and statistics are used for optimization decisions.
-
-
After you choose your optimization strategy, you can choose the rules you want to use. You can choose from the following:
Choose Distribution Key and Sort Keys using metadata
Choose fact table and appropriate dimension for collation
Analyze cardinality of indexes' columns
Find the most used tables and columns from the query log table
For each rule, you can enter a weight for the sort key and a weight for the distribution key. AWS SCT uses the weights you choose when it converts your schema. Later, when you review the suggested keys, if you are not satisfied with the results, you can return here and change your settings. For more information, see Managing and customizing keys in AWS SCT.
Collecting or uploading statistics for AWS SCT
To optimize how the AWS Schema Conversion Tool converts your data warehouse schema, you can provide statistics from your source database that the tool can use. You can either collect statistics directly from the database, or upload an existing statistics file.
To provide and review statistics
-
Open your project and connect to your source database.
-
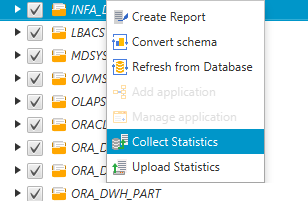
Choose a schema object from the left panel of your project, and open the context (right-click) menu for the object. Choose Collect Statistics or Upload Statistics as shown following.
-
Choose a schema object from the left panel of your project, and then choose the Statistics tab. You can review the statistics for the object.

Later, when you review the suggested keys, if you are not satisfied with the results, you can collect additional statistics and repeat this procedure. For more information, see Managing and customizing keys in AWS SCT.
Creating migration rules in AWS SCT
Before you convert your schema with AWS SCT, you can set up migration rules.
Migration rules can do such things as change the data type of columns, move objects from one schema to another,
and change the names of objects. For example, suppose that you have a set of tables in
your source schema named test_TABLE_NAME. You can set up a rule that
changes the prefix test_ to the prefix demo_ in the target
schema.
Note
You can create migration rules only for different source and target database engines.
You can create migration rules that perform the following tasks:
-
Add, remove, or replace a prefix
-
Add, remove, or replace a suffix
-
Change column collation
-
Change data type
-
Change the length of
char,varchar,nvarchar, andstringdata types -
Move objects
-
Rename objects
You can create migration rules for the following objects:
-
Database
-
Schema
-
Table
-
Column
Creating migration rules
You can create migration rules and save the rules as part of your project. With your project open, use the following procedure to create migration rules.
To create migration rules
-
On the View menu, choose Mapping view.
-
In Server mappings, choose a pair of source and target servers.
-
Choose New migration rule. The Transformation rules dialog box appears.
-
Choose Add new rule. A new row is added to the list of rules.
-
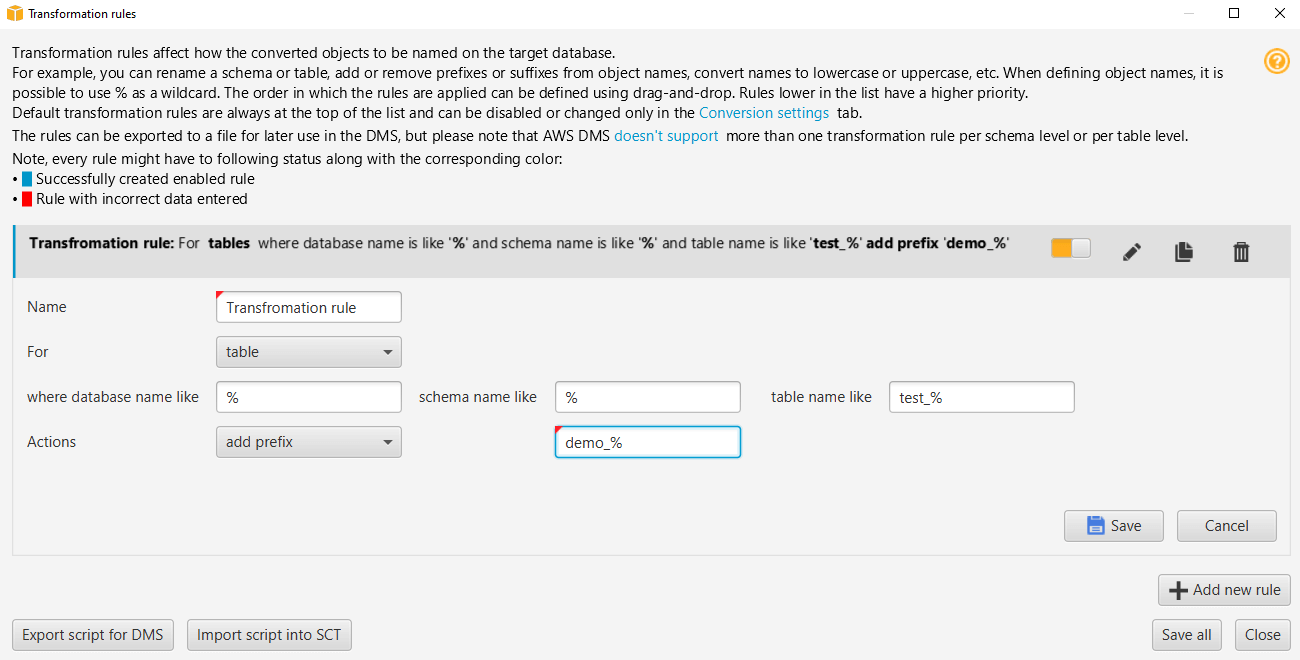
Configure your rule:
-
For Name, enter a name for your rule.
-
For For, choose the type of object that the rule applies to.
-
For where, enter a filter to apply to objects before applying the migration rule. The where clause is evaluated by using a like clause. You can enter an exact name to select one object, or you can enter a pattern to select multiple objects.
The fields available for the where clause are different depending on the type of the object. For example, if the object type is schema there is only one field available, for the schema name.
-
For Actions, choose the type of migration rule that you want to create.
-
Depending on the rule type, enter one or two additional values. For example, to rename an object, enter the new name of the object. To replace a prefix, enter the old prefix and the new prefix.
-
-
After you have configured your migration rule, choose Save to save your rule. You can also choose Cancel to cancel your changes.
-
After you are done adding, editing, and deleting rules, choose Save All to save all your changes.
-
Choose Close to close the Transformation rules dialog box.
You can use the toggle icon to turn off a migration rule without deleting it. You can use the copy icon to duplicate an existing migration rule. You can use the pencil icon to edit an existing migration rule. You can use the delete icon to delete an existing migration rule. To save any changes you make to your migration rules, choose Save All.
Exporting migration rules
If you use AWS Database Migration Service (AWS DMS) to migrate your data from your source database to your target database, you can provide information about your migration rules to AWS DMS. For more information about tasks, see Working with AWS Database Migration Service replication tasks.
To export migration rules
-
In the AWS Schema Conversion Tool, choose Mapping View on the View menu.
-
In Migration rules, choose a migration rule and then choose Modify migration rule.
-
Choose Export script for AWS DMS.
-
Browse to the location where you want to save your script, and then choose Save. Your migration rules are saved as a JSON script that can be consumed by AWS DMS.
Converting your schema using AWS SCT
After you have connected your project to both your source database and your target database, your AWS Schema Conversion Tool project displays the schema from your source database in the left panel. The schema is presented in a tree-view format, and each node of the tree is lazy loaded. When you choose a node in the tree view, AWS SCT requests the schema information from your source database at that time.
You can choose schema items from your source database and then convert the schema to equivalent schema for the database engine of your target database. You can choose any schema item from your source database to convert. If the schema item that you choose depends on a parent item, then AWS SCT also generates the schema for the parent item. For example, if you choose a column from a table to convert, then AWS SCT generates the schema for the column, the table that the column is in, and the database that the table is in.
Converting schema
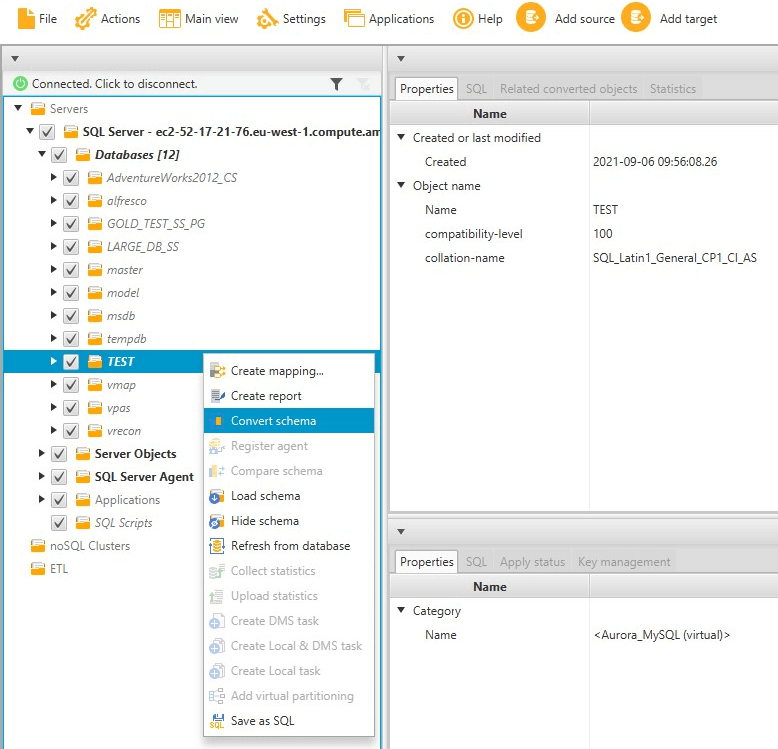
To convert a schema from your source database, select the check box for the name of schema to convert. Next, choose this schema from the left panel of your project. AWS SCT highlights the schema name in blue. Open the context (right-click) menu for the schema, and choose Convert schema, as shown following.
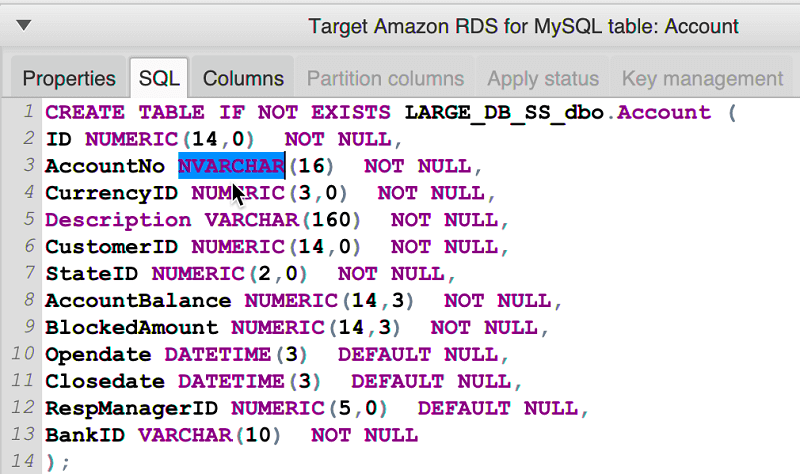
After you have converted the schema from your source database, you can choose schema items from the left panel of your project and view the converted schema in the center panels of your project. The lower-center panel displays the properties of and the SQL command to create the converted schema, as shown following.

After you have converted your schema, you can save your project. The schema information from your source database is saved with your project. This functionality means that you can work offline without being connected to your source database. AWS SCT connects to your source database to update the schema in your project if you choose Refresh from Database for your source database. For more information, see Updating and refreshing your converted schema in AWS SCT.
You can create a database migration assessment report of the items that can't be converted automatically. The assessment report is useful for identifying and resolving schema items that can't be converted automatically. For more information, see Using the assessment report in the AWS Schema Conversion Tool.
When AWS SCT generates a converted schema, it doesn't immediately apply it to the target database. Instead, the converted schema is stored locally until you are ready to apply it to the target database. For more information, see Applying your converted schema.
Editing converted schema
You can edit converted schema and save the changes as part of your project.
To edit converted schema
-
In the left panel that displays the schema from your source database, choose the schema item that you want to edit the converted schema for.
-
In the lower-center panel that displays the converted schema for the selected item, choose the SQL tab.
-
In the text displayed for the SQL tab, change the schema as needed. The schema is automatically saved with your project as you update it.
The changes that you make to converted schema are stored with your project as you make updates. If you newly convert a schema item from your source database, and you have made updates to previously converted schema for that item, those existing updates are replaced by the newly converted schema item based on your source database.
Clearing a converted schema
Until you apply the schema to your target database, AWS SCT only stores the converted schema locally in your project. You can clear the planned schema from your project by choosing the tree-view node for your target database, and then choosing Refresh from Database. Because no schema has been written to your target database, refreshing from the database removes the planned schema elements in your AWS SCT project to match what exists in your target database.
Managing and customizing keys in AWS SCT
After you convert your schema with the AWS Schema Conversion Tool, you can manage and edit your keys. Key management is the heart of a data warehouse conversion.
To manage keys, select a table in your target database, and then choose the Key Management tab as shown following.
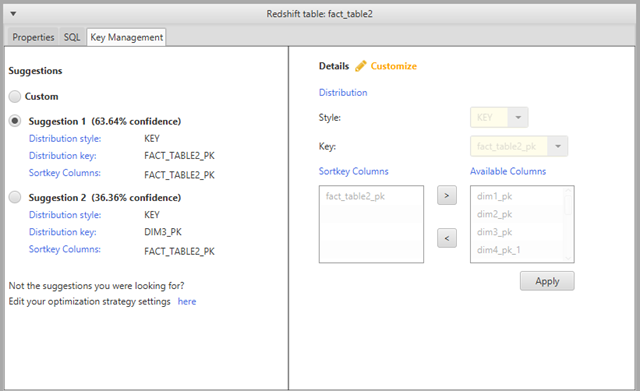
The left pane contains key suggestions, and includes the confidence rating for each suggestion. You can choose one of the suggestions, or you can customize the key by editing it in the right pane.
If the choices for the key don't look like what you expected, you can edit your edit your optimization strategies, and then retry the conversion. For more information, see Choosing optimization strategies and rules for use with AWS SCT.
Related topics
Creating and using the assessment report in AWS SCT
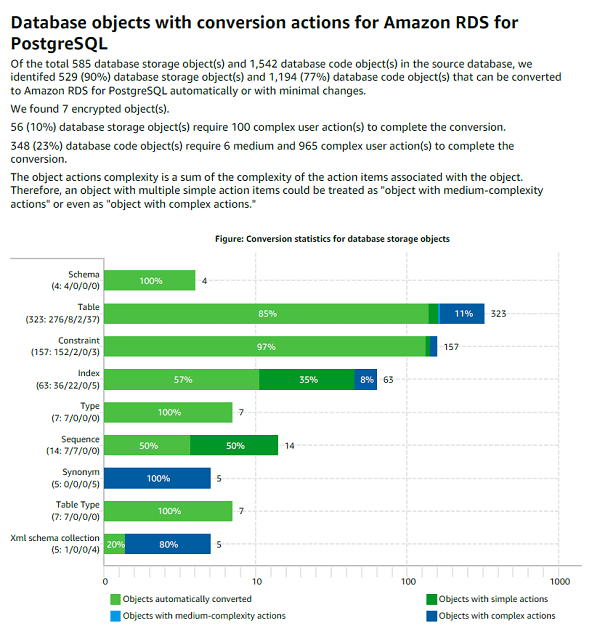
The AWS Schema Conversion Tool creates a database migration assessment report to help you convert your schema. The database migration assessment report provides important information about the conversion of the schema from your source database to your target database. The report summarizes all of the schema conversion tasks and details the action items for schema that can't be converted to the DB engine of your target database. The report also includes estimates of the amount of effort that it will take to write the equivalent code in your target database that can't be converted automatically.
Creating a database migration assessment report
Use the following procedure to create a database migration assessment report.
To create a database migration assessment report
-
In the left panel that displays the schema from your source database, choose a schema object to create an assessment report for.
-
Open the context (right-click) menu for the object, and then choose Create Report.

Assessment report summary
After you create an assessment report, the assessment report view opens, showing the Summary tab. The Summary tab displays the summary information from the database migration assessment report. It shows items that were converted automatically, and items that were not converted automatically.
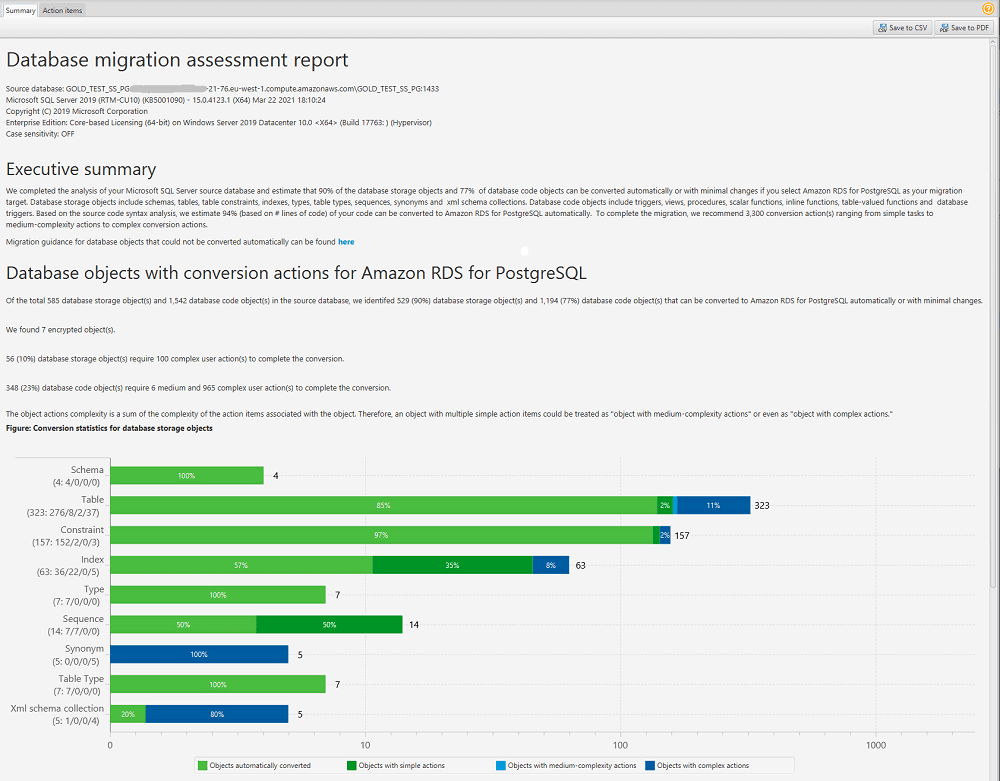
For schema items that can't be converted automatically to the target database engine, the summary includes an estimate of the effort required to create schema items in your target DB instance that are equivalent to those in your source.
The report categorizes the estimated time to convert these schema items as follows:
-
Simple – Actions that can be completed in less than one hour.
-
Medium – Actions that are more complex and can be completed in one to four hours.
-
Significant – Actions that are very complex and take more than four hours to complete.
Assessment report action items
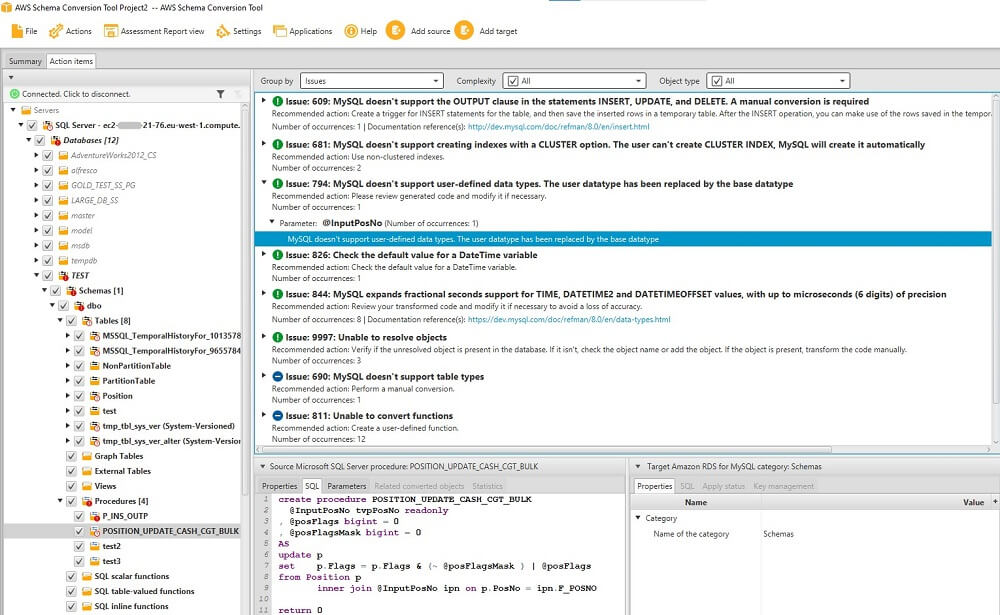
The assessment report view also includes an Action Items tab. This tab contains a list of items that can't be converted automatically to the database engine of your target database. If you select an action item from the list, AWS SCT highlights the item from your schema that the action item applies to.
The report also contains recommendations for how to manually convert the schema item. For more information about deciding how to handle manual conversions, see Handling manual conversions in AWS SCT.
Saving the assessment report
You can save a local copy of the database migration assessment report as either a PDF file or a comma-separated values (CSV) file. The CSV file contains only action item information. The PDF file contains both the summary and action item information, as shown in the following example.
Handling manual conversions in AWS SCT
The assessment report includes a list of items that can't be converted automatically to the database engine of your target database. For each item that can't be converted, there is an action item on the Action Items tab.
You can respond to the action items in the assessment report in the following ways:
-
Modify your source database schema.
-
Modify your target database schema.
Modifying your source schema
For some items, it might be easier to modify the database schema in your source database to schema that can be converted automatically. First, verify that the new changes are compatible with your application architecture, then update the schema in your source database. Finally, refresh your project with the updated schema information. You can then convert your updated schema, and generate a new database migration assessment report. The action items no longer appear for the items that changed in the source schema.
The advantage of this process is that your updated schema is always available when you refresh from your source database.
Modifying your target schema
For some items, it might be easier to apply the converted schema to your target database, and then add equivalent schema items manually to your target database for the items that couldn't be converted automatically. You can write all of the schema that can be converted automatically to your target database by applying the schema. For more information, see Saving and applying your converted schema in AWS SCT.
The schema that are written to your target database don't contain the items that can't be converted automatically. After applying the schema to your target database, you can then manually create schema in your target database that are equivalent to those in the source database. The action items in the database migration assessment report contain suggestions for how to create the equivalent schema.
Warning
If you manually create schema in your target database, save a copy of any manual work that you do. If you apply the converted schema from your project to your target database again, it overwrites the manual work you have done.
In some cases, you can't create equivalent schema in your target database. You might need to rearchitect a portion of your application and database to use the functionality that is available from the engine for your target database. In other cases, you can simply ignore the schema that can't be converted automatically.
Updating and refreshing your converted schema in AWS SCT
You can update both the source schema and the target schema in your AWS Schema Conversion Tool project.
-
Source – If you update the schema for your source database, AWS SCT replaces the schema in your project with the latest schema from your source database. Using this functionality, you can update your project if changes have been made to the schema of your source database.
-
Target – If you update the schema for your target database, AWS SCT replaces the schema in your project with the latest schema from your target database. If you haven't applied any schema to your target database, AWS SCT clears the converted schema from your project. You can then convert the schema from your source database for a clean target database.
You update the schema in your AWS SCT project by choosing Refresh from database.
Saving and applying your converted schema in AWS SCT
When the AWS Schema Conversion Tool generates converted schema (as shown in Converting your schema using AWS SCT), it doesn't immediately apply the converted schema to the target database. Instead, converted schema are stored locally in your project until you are ready to apply them to the target database. Using this functionality, you can work with schema items that can't be converted automatically to your target database engine. For more information on items that can't be converted automatically, see Using the assessment report in the AWS Schema Conversion Tool.
You can optionally have the tool save your converted schema to a file as a SQL script prior to applying the schema to your target database. You can also have the tool apply the converted schema directly to your target database.
Saving your converted schema to a file
You can save your converted schema as SQL scripts in a text file. By using this approach, you can modify the generated SQL scripts from AWS SCT to address items that the tool can't convert automatically. You can then run your updated scripts on your target DB instance to apply your converted schema to your target database.
To save your converted schema as SQL scripts
-
Choose your schema and open the context (right-click) menu.
-
Choose Save as SQL.
-
Enter the name of the file and choose Save.
-
Save your converted schema using one of the following options:
-
Single file
-
Single file per stage
-
Single file per statement
-
To choose the format of the SQL script
-
On the Settings menu, choose Project settings.
-
Choose Save scripts.
-
For Vendor, choose the database platform.
-
For Save SQL scripts to, choose how you want to save your database schema script.
-
Choose OK to save the settings.
Applying your converted schema
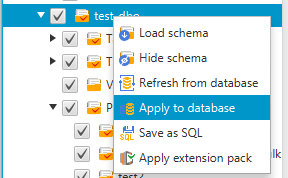
When you are ready to apply your converted schema to your target database, choose the schema element from the right panel of your project. Open the context (right-click) menu for the schema element, and then choose Apply to database, as shown following.
The extension pack schema
The first time that you apply your converted schema to your target DB instance, AWS SCT adds an additional schema to your target DB instance. This schema implements system functions of the source database that are required when writing your converted schema to your target DB instance. The schema is called the extension pack schema.
Don't modify the extension pack schema, or you might encounter unexpected results in the converted schema that is written to your target DB instance. When your schema is fully migrated to your target DB instance, and you no longer need AWS SCT, you can delete the extension pack schema.
The extension pack schema is named according to your source database as follows:
Greenplum:
aws_greenplum_extMicrosoft SQL Server:
aws_sqlserver_extNetezza:
aws_netezza_extOracle:
aws_oracle_extSnowflake:
aws_snowflake_extTeradata:
aws_teradata_extVertica:
aws_vertica_ext
For more information, see Using extension packs with AWS Schema Conversion Tool.
Python libraries
To create custom functions in Amazon Redshift, you use the Python language. Use the AWS SCT extension pack to install python libraries for your Amazon Redshift database. For more information, see Using extension packs with AWS Schema Conversion Tool.
