Tutorial: Create a REST API as an Amazon S3 proxy
As an example to showcase using a REST API in API Gateway to proxy Amazon S3, this section describes how to create and configure a REST API to expose the following Amazon S3 operations:
-
Expose GET on the API's root resource to list all of the Amazon S3 buckets of a caller.
-
Expose GET on a Folder resource to view a list of all of the objects in an Amazon S3 bucket.
-
Expose GET on a Folder/Item resource to view or download an object from an Amazon S3 bucket.
You might want to import the sample API as an Amazon S3 proxy, as shown in OpenAPI definitions of the sample API as an Amazon S3 proxy. This sample contains more exposed methods. For instructions on how to import an API using the OpenAPI definition, see Develop REST APIs using OpenAPI in API Gateway.
Note
To integrate your API Gateway API with Amazon S3, you must choose a region where both the API Gateway and Amazon S3 services are available. For region availability, see Amazon API Gateway Endpoints and Quotas.
Topics
Set up IAM permissions for the API to invoke Amazon S3 actions
To allow the API to invoke Amazon S3 actions, you must have the appropriate IAM policies attached to an IAM role. In this step, you create a new IAM role.
To create the AWS service proxy execution role
Sign in to the AWS Management Console and open the IAM console at https://console.aws.amazon.com/iam/
. -
Choose Roles.
-
Choose Create role.
-
Choose AWS service under Select type of trusted entity, and then select API Gateway and select Allows API Gateway to push logs to CloudWatch Logs.
-
Choose Next, and then choose Next.
-
For Role name, enter
APIGatewayS3ProxyPolicy, and then choose Create role. -
In the Roles list, choose the role you just created. You may need to scroll or use the search bar to find the role.
-
For the selected role, select the Add permissions tab.
-
Choose Attach policies from the dropdown list.
-
In the search bar, enter
AmazonS3FullAccessand choose Add permissions.Note
This tutorial uses a managed policy for simplicity. As a best practice, you should create your own IAM policy to grant the minimum permissions required.
-
Note the newly created Role ARN, you will use it later.
Create API resources to represent Amazon S3 resources
You use the API's root (/) resource as the container of an authenticated caller's Amazon S3
buckets. You also create a Folder and Item resources to represent a particular Amazon S3
bucket and a particular Amazon S3 object, respectively. The folder name and object key will be specified, in the form
of path parameters as part of a request URL, by the caller.
Note
When accessing objects whose object key includes / or any other special character, the
character needs to be URL encoded. For example, test/test.txt should be encoded to
test%2Ftest.txt.
To create an API resource that exposes the Amazon S3 service features
-
In the same AWS Region you created your Amazon S3 bucket, create an API named MyS3. This API's root resource (/) represents the Amazon S3 service. In this step, you create two additional resources /{folder} and /{item}.
-
Choose Create resource.
Keep Proxy resource turned off.
For Resource path, select
/.For Resource name, enter
{folder}.Keep CORS (Cross Origin Resource Sharing) unchecked.
Choose Create resource.
Select the /{folder} resource, and then choose Create resource.
Use the previous steps to create a child resource of /{folder} named
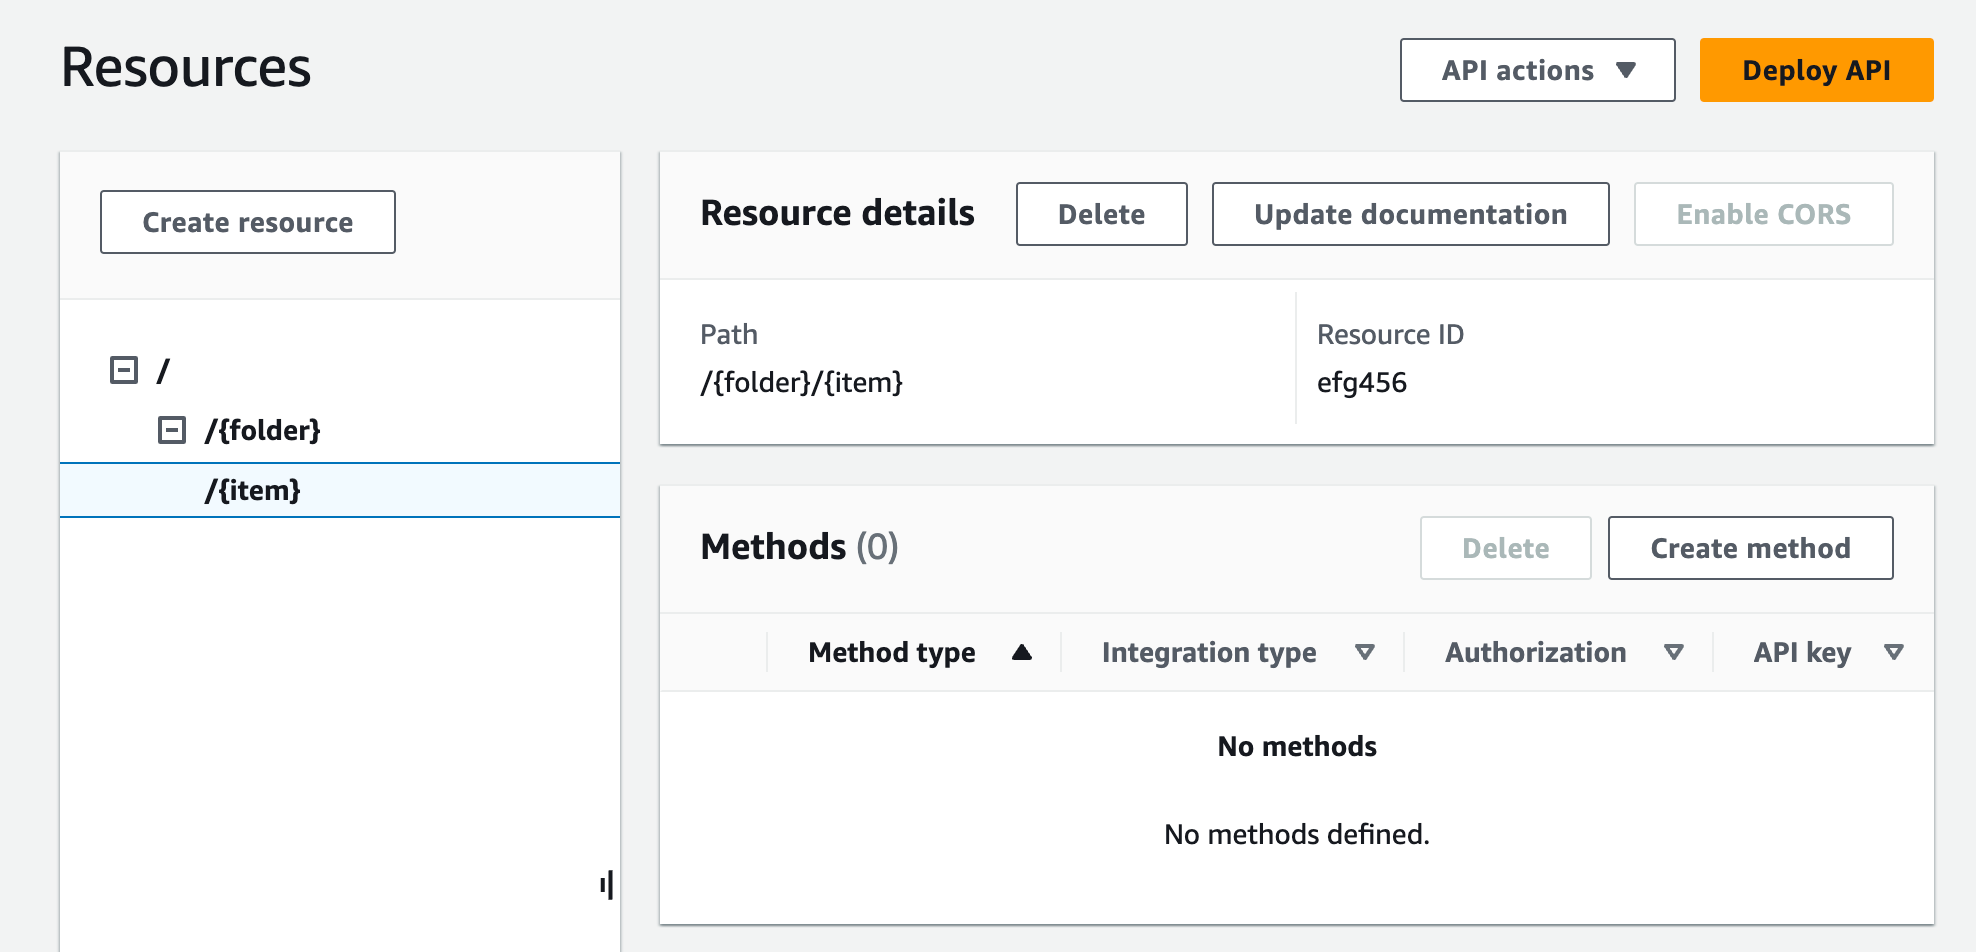
{item}.Your final API should look similar to the following:
Expose an API method to list the caller's Amazon S3 buckets
Getting the list of Amazon S3 buckets of the caller involves invoking the GET Service action on Amazon S3. On the API's root resource, (/), create the GET method. Configure the GET method to integrate with the Amazon S3, as follows.
To create and initialize the API's GET / method
-
Select the / resource, and then choose Create method.
For method type, select GET.
For Integration type, select AWS service.
For AWS Region, select the AWS Region where you created your Amazon S3 bucket.
For AWS service, select Amazon Simple Storage Service.
Keep AWS subdomain blank.
For HTTP method, select GET.
For Action type, select Use path override.
With path override, API Gateway forwards the client request to Amazon S3 as the corresponding Amazon S3 REST API path-style request, in which a Amazon S3 resource is expressed by the resource path of the
s3-host-name/bucket/keypattern. API Gateway sets thes3-host-nameand passes the client specifiedbucketandkeyfrom the client to Amazon S3.For Path override, enter /.
For Execution role, enter the role ARN for
APIGatewayS3ProxyPolicy.Choose Method request settings.
You use the method request settings to control who can call this method of your API.
-
For Authorization, from the dropdown menu, select
AWS_IAM.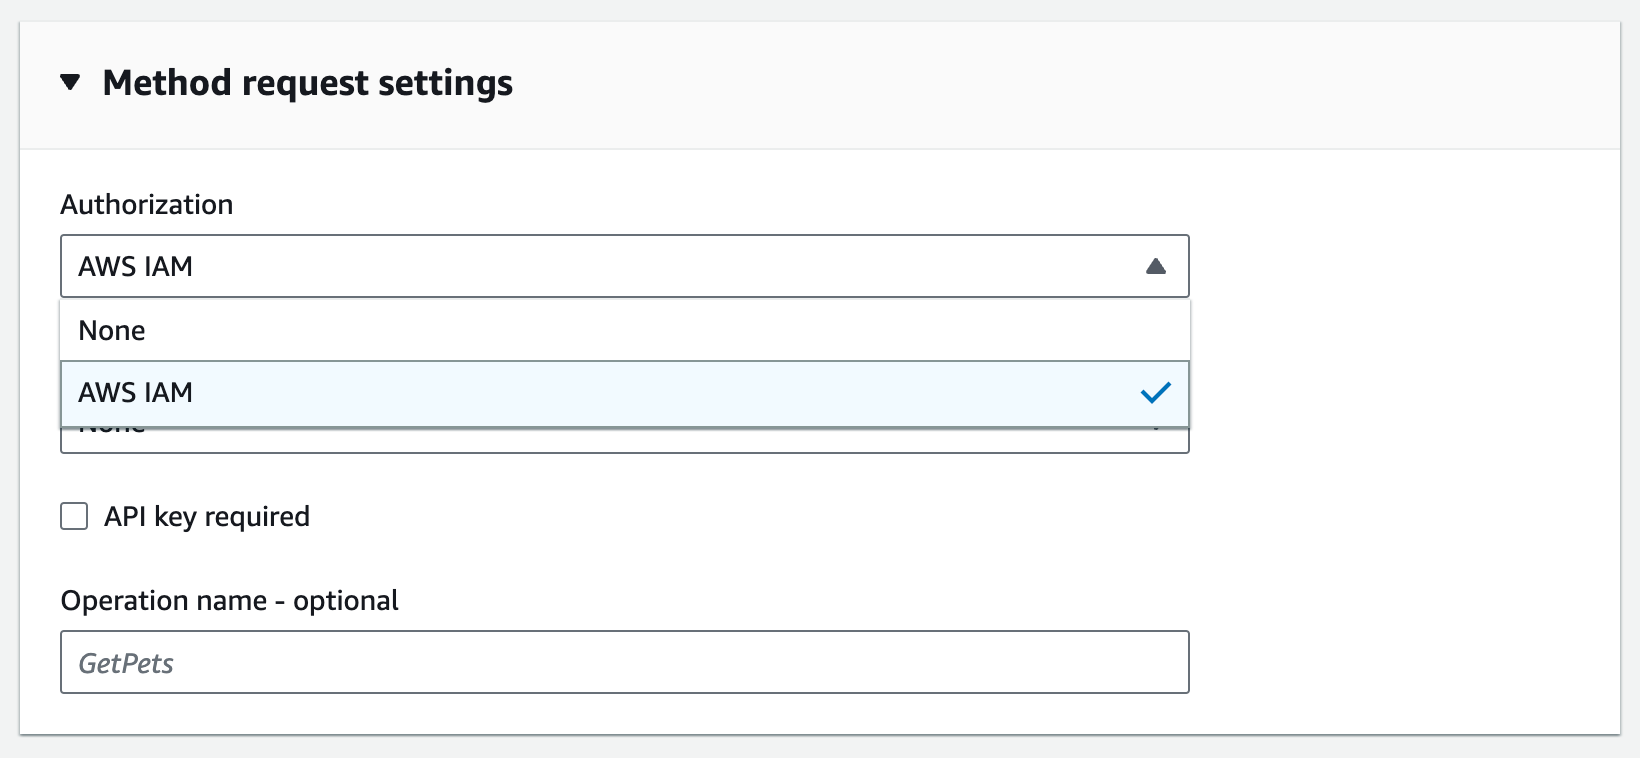
Choose Create method.
This setup integrates the frontend GET
https:// request with the
backend your-api-host/stage/GET https://.your-s3-host/
For your API to return successful responses and exceptions properly to the caller, you declare the 200, 400 and 500 responses in Method response. You use the default mapping for 200 responses so that backend responses of the status code not declared here will be returned to the caller as 200 ones.
To declare response types for the GET / method
-
On the Method response tab, under Response 200, choose Edit.
-
Choose Add header and do the following:
For Header name, enter
Content-Type.Choose Add header.
Repeat these steps to create a
Timestampheader and aContent-Lengthheader. Choose Save.
On the Method response tab, under Method responses, choose Create response.
For HTTP status code, enter 400.
You do not set any headers for this response.
Choose Save.
Repeat the following steps to create the 500 response.
You do not set any headers for this response.
Because the successful integration response from Amazon S3 returns the bucket list as an XML payload and the
default method response from API Gateway returns a JSON payload, you must map the backend Content-Type header parameter
value to the frontend counterpart. Otherwise, the client will receive application/json for the content type when the response body is actually an XML string. The following
procedure shows how to set this up. In addition, you also want to display to the client other header parameters,
such as Date and Content-Length.
To set up response header mappings for the GET / method
-
On the Integration response tab, under Default - Response, choose Edit.
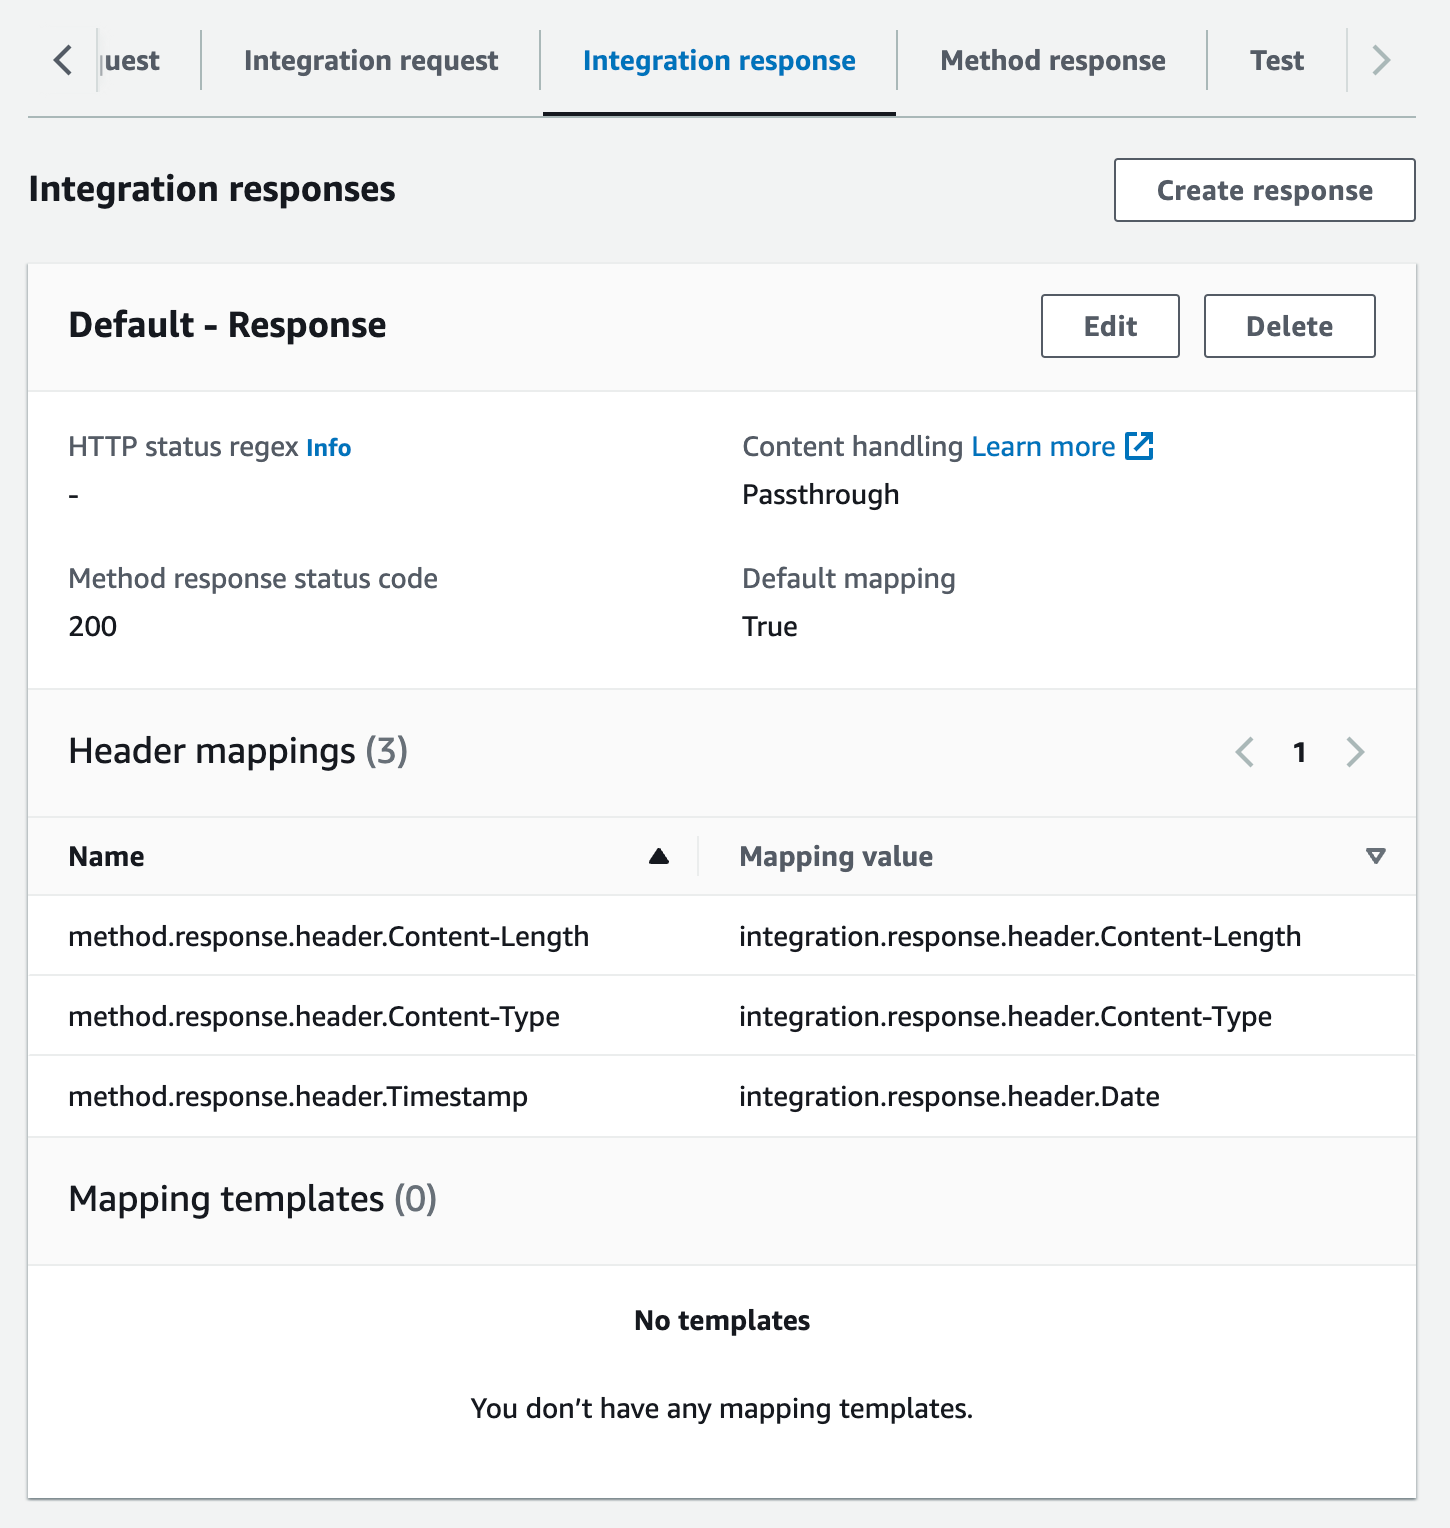
For the Content-Length header, enter
integration.response.header.Content-Lengthfor the mapping value.For the Content-Type header, enter
integration.response.header.Content-Typefor the mapping value.For the Timestamp header, enter
integration.response.header.Datefor the mapping value.Choose Save. The result should look similar to the following:
-
On the Integration response tab, under Integration responses, choose Create response.
For HTTP status regex, enter
4\d{2}. This maps all 4xx HTTP response status codes to the method response.For Method response status code, select
400.Choose Create.
Repeat the following steps to create an integration response for the 500 method response. For HTTP status regex, enter
5\d{2}.
As a good practice, you can test the API you have configured so far.
To test the GET / method
-
Choose the Test tab. You might need to choose the right arrow button to show the tab.
-
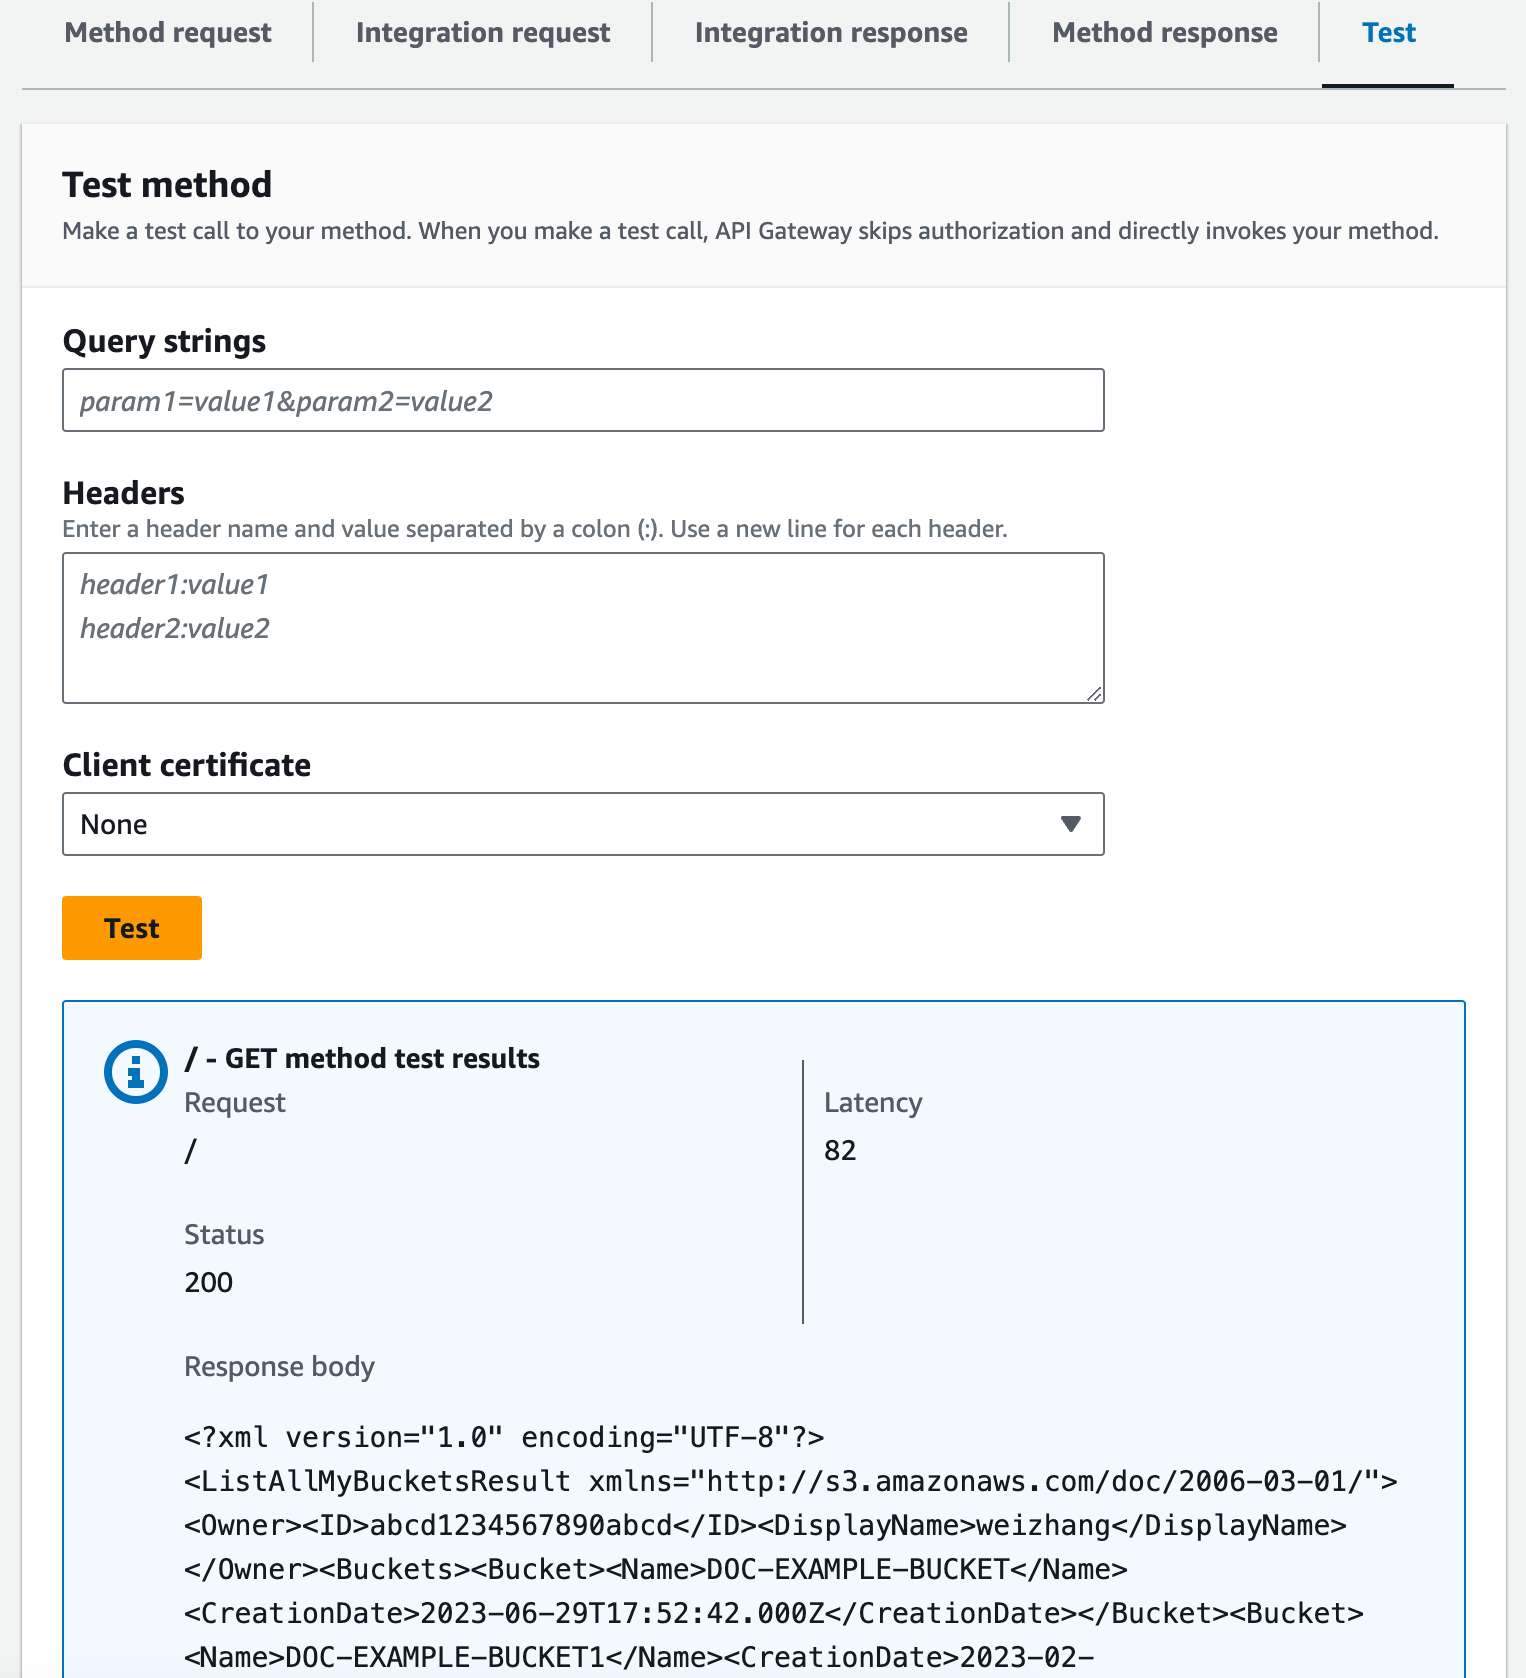
Choose Test. The result should look like the following image:
Expose API methods to access an Amazon S3 bucket
To work with an Amazon S3 bucket, you expose the GET method on the /{folder} resource to list
objects in a bucket. The instructions are similar to those
described in Expose an API method to list the caller's Amazon S3 buckets. For more methods, you can import the sample API here, OpenAPI definitions of the
sample API as an Amazon S3
proxy.
To expose the GET method on a folder resource
Select the /{folder} resource, and then choose Create method.
For method type, select GET.
For Integration type, select AWS service.
For AWS Region, select the AWS Region where you created your Amazon S3 bucket.
For AWS service, select Amazon Simple Storage Service.
Keep AWS subdomain blank.
For HTTP method, select GET.
For Action type, select Use path override.
For Path override, enter
{bucket}.For Execution role, enter the role ARN for
APIGatewayS3ProxyPolicy.Choose Create method.
You set the {folder} path parameter in the Amazon S3 endpoint URL. You need to map the {folder} path parameter of the
method request to the {bucket} path parameter of the integration
request.
To map {folder} to {bucket}
-
On the Integration request tab, under Integration request settings, choose Edit.
Choose URL path parameters, and then choose Add path parameter.
For Name, enter
bucket.-
For Mapped from, enter
method.request.path.folder. Choose Save.
Now, you test your API.
To test the /{folder} GET method.
-
Choose the Test tab. You might need to choose the right arrow button to show the tab.
-
Under Path, for folder, enter the name of your bucket.
-
Choose Test.
The test result will contain a list of object in your bucket.
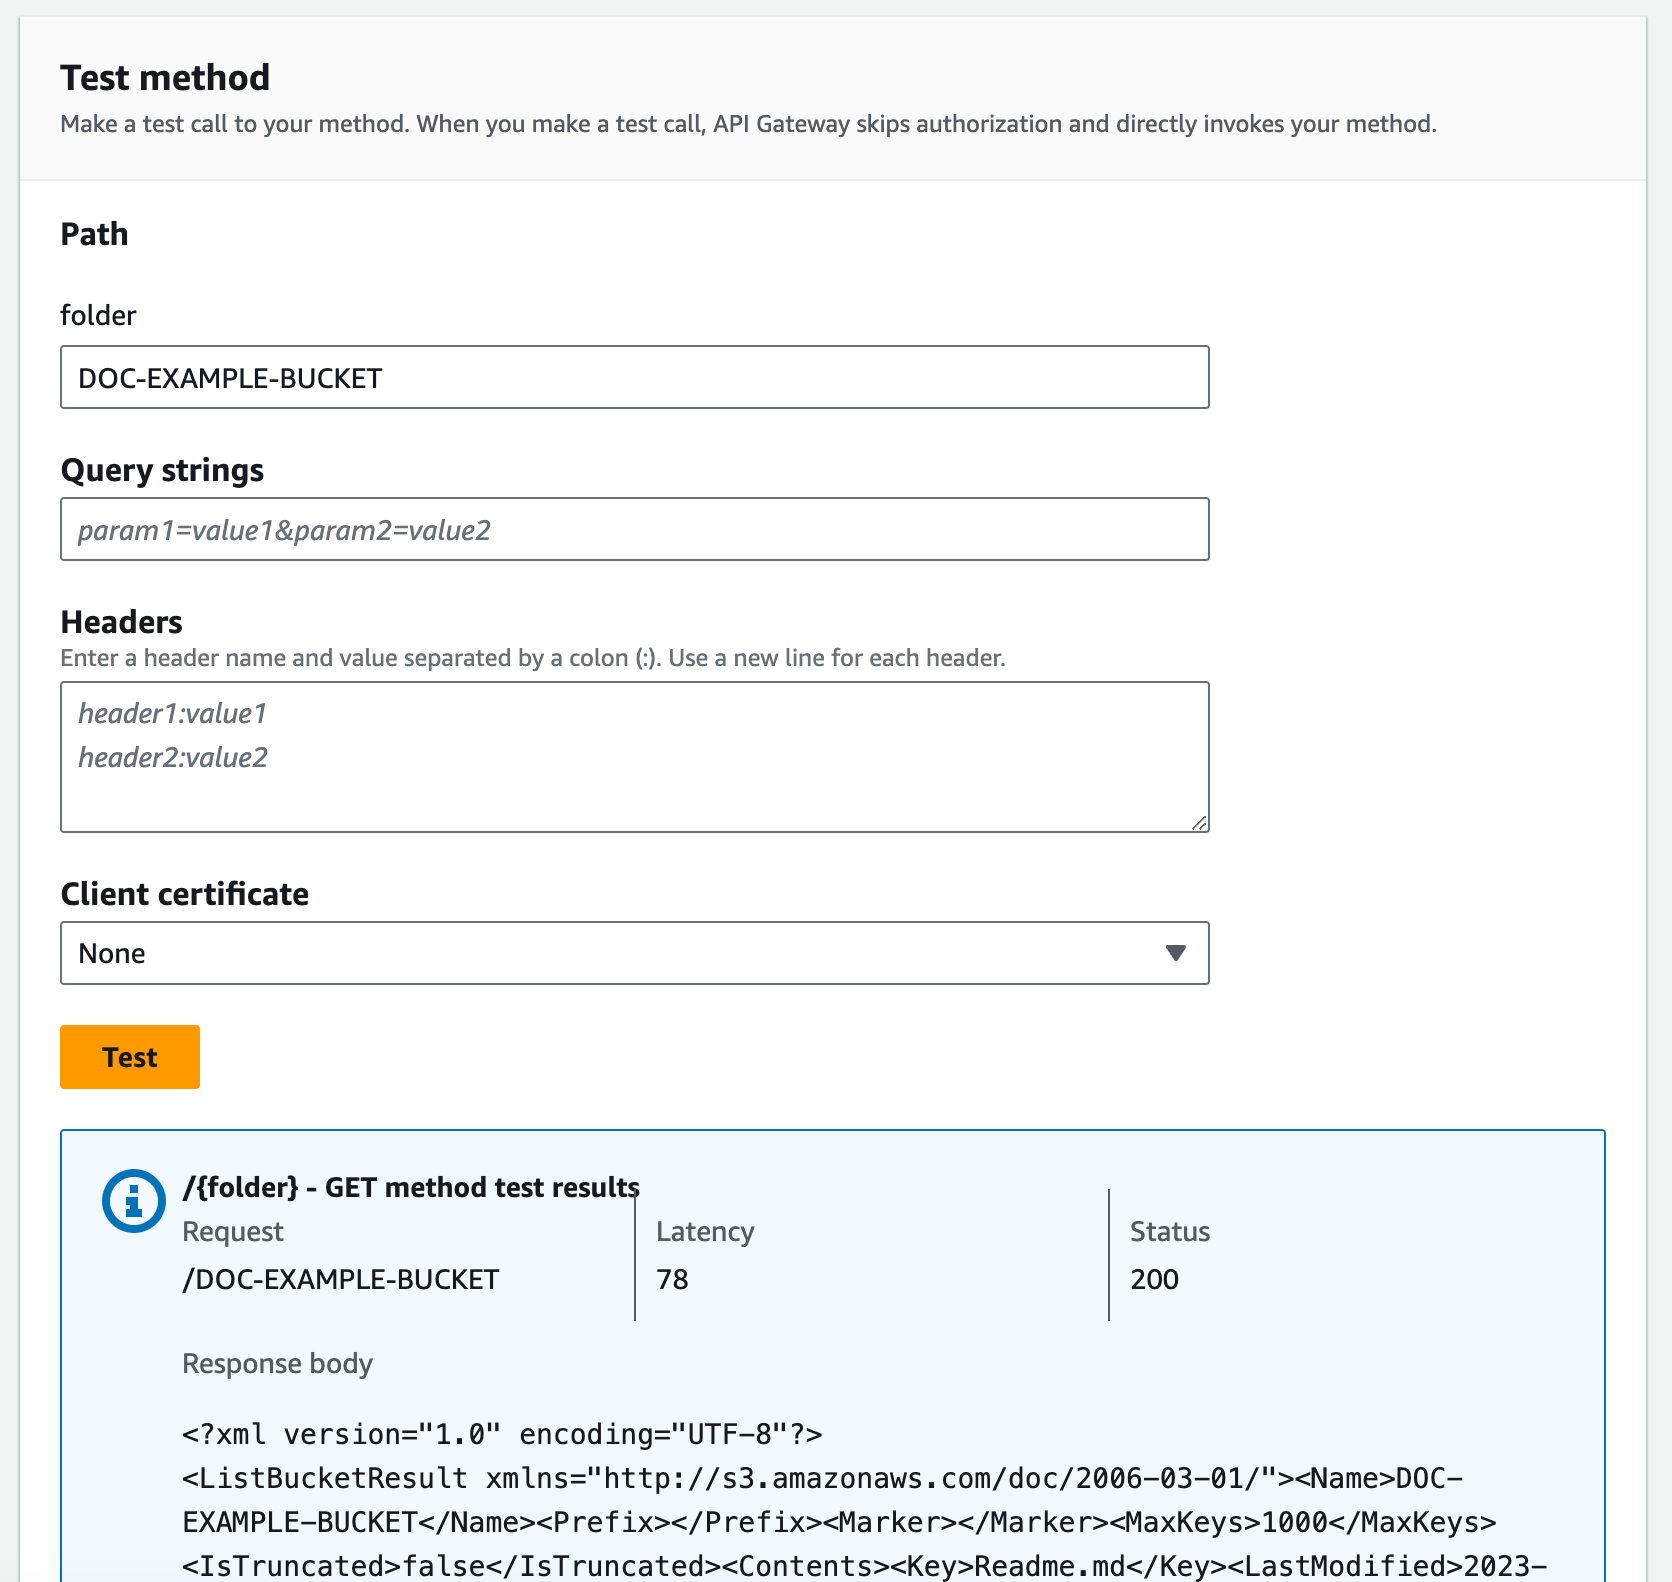
Expose API methods to access an Amazon S3 object in a bucket
Amazon S3 supports GET, DELETE, HEAD, OPTIONS, POST and PUT actions to access and manage objects in a given bucket.
In this tutorial, you expose a GET method on the {folder}/{item} resource to get an
image from a bucket. For more applications of the {folder}/{item} resource, see the sample API, OpenAPI definitions of the
sample API as an Amazon S3
proxy.
To expose the GET method on a item resource
-
Select the /{item} resource, and then choose Create method.
-
For method type, select GET.
-
For Integration type, select AWS service.
-
For AWS Region, select the AWS Region where you created your Amazon S3 bucket.
-
For AWS service, select Amazon Simple Storage Service.
-
Keep AWS subdomain blank.
-
For HTTP method, select GET.
-
For Action type, select Use path override.
-
For Path override, enter {bucket}/{object}.
-
For Execution role, enter the role ARN for
APIGatewayS3ProxyPolicy. -
Choose Create method.
You set the {folder} and {item} path parameters in the Amazon S3 endpoint
URL. You need to map the path parameter of the method request to the path parameter of the integration request.
In this step, you do the following:
-
Map the
{folder}path parameter of the method request to the{bucket}path parameter of the integration request. Map the
{item}path parameter of the method request to the{object}path parameter of the integration request.
To map {folder} to {bucket} and {item} to {object}
-
On the Integration request tab, under Integration request settings, choose Edit.
-
Choose URL path parameters.
-
Choose Add path parameter.
-
For Name, enter
bucket. -
For Mapped from, enter
method.request.path.folder. -
Choose Add path parameter.
-
For Name, enter
object. -
For Mapped from, enter
method.request.path.item. -
Choose Save.
To test the /{folder}/{object} GET method.
-
Choose the Test tab. You might need to choose the right arrow button to show the tab.
-
Under Path, for folder, enter the name of your bucket.
-
Under Path, for item, enter the name of an item.
-
Choose Test.
The response body will contain the contents of the item.
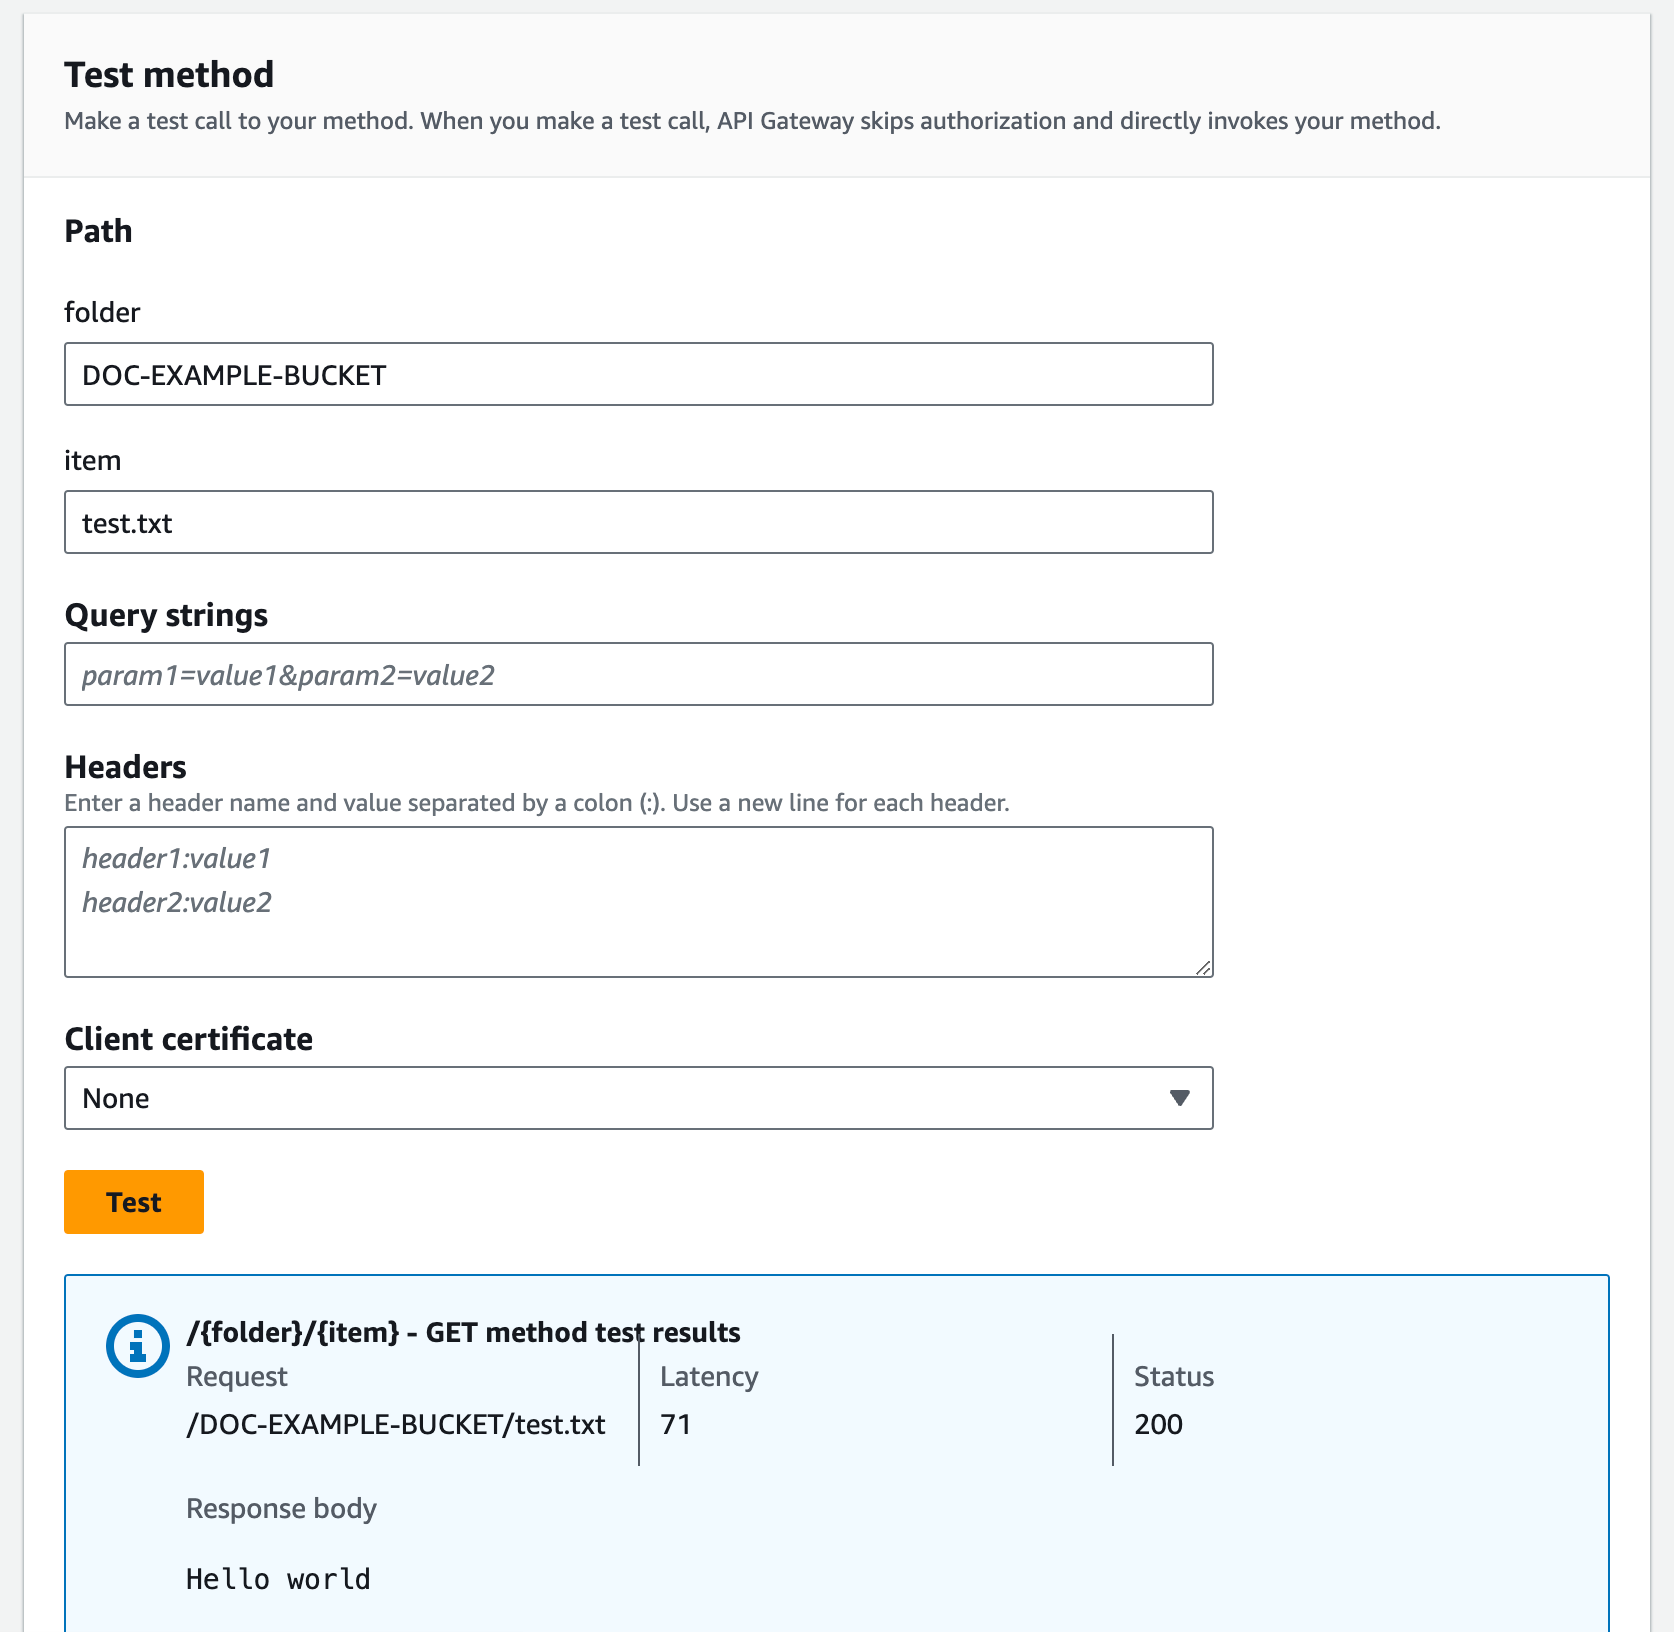
The request correctly returns the plain text of ("Hello world") as the content of the specified file (test.txt) in the given Amazon S3 bucket (amzn-s3-demo-bucket).
To download or upload binary files, which in API Gateway is considered any thing other than utf-8 encoded JSON content, additional API settings are necessary. This is outlined as follows:
To download or upload binary files from S3
-
Register the media types of the affected file to the API's binaryMediaTypes. You can do this in the console:
-
Choose API settings for the API.
-
Under Binary media types, choose Manage media types.
-
Choose Add binary media type, and then enter the required media type, for example,
image/png. -
Choose Save changes to save the setting.
-
-
Add the
Content-Type(for upload) and/orAccept(for download) header to the method request to require the client to specify the required binary media type and map them to the integration request. -
Set Content Handling to
Passthroughin the integration request (for upload) and in a integration response (for download). Make sure that no mapping template is defined for the affected content type. For more information, see Data transformations for REST APIs in API Gateway.
The payload size limit is 10 MB. See Quotas for configuring and running a REST API in API Gateway.
Make sure that files on Amazon S3 have the correct content types added as the files' metadata. For streamable media
content, Content-Disposition:inline may also need to be added to the metadata.
For more information about the binary support in API Gateway, see Content type conversions in API Gateway.