Tutorial: Configure federated access for Okta users to Athena using Lake Formation and JDBC
This tutorial shows you how to configure Okta, AWS Lake Formation, AWS Identity and Access Management permissions, and the Athena JDBC driver to enable SAML-based federated use of Athena. Lake Formation provides fine-grained access control over the data that is available in Athena to the SAML-based user. To set up this configuration, the tutorial uses the Okta developer console, the AWS IAM and Lake Formation consoles, and the SQL Workbench/J tool.
Prerequisites
This tutorial assumes that you have done the following:
-
Created an Amazon Web Services account. To create an account, visit the Amazon Web Services home page
. -
Set up a query results location for Athena in Amazon S3.
-
Registered an Amazon S3 data bucket location with Lake Formation.
-
Defined a database and tables on the AWS Glue Data Catalog that point to your data in Amazon S3.
-
If you have not yet defined a table, either run a AWS Glue crawler or use Athena to define a database and one or more tables for the data that you want to access.
-
This tutorial uses a table based on the NYC taxi trips dataset
available in the Registry of open data on AWS . The tutorial uses the database name tripdband the table namenyctaxi.
-
Tutorial Steps
Step 1: Create an Okta account
This tutorial uses Okta as a SAML-based identity provider. If you do not already have an Okta account, you can create a free one. An Okta account is required so that you can create an Okta application for SAML authentication.
To create an Okta account
-
To use Okta, navigate to the Okta developer sign up page
and create a free Okta trial account. The Developer Edition Service is free of charge up to the limits specified by Okta at developer.okta.com/pricing . -
When you receive the activation email, activate your account.
An Okta domain name will be assigned to you. Save the domain name for reference. Later, you use the domain name (
<okta-idp-domain>) in the JDBC string that connects to Athena.
Step 2: Add users and groups to Okta
In this step, you use the Okta console to perform the following tasks:
-
Create two Okta users.
-
Create two Okta groups.
-
Add one Okta user to each Okta group.
To add users to Okta
-
After you activate your Okta account, log in as administrative user to the assigned Okta domain.
-
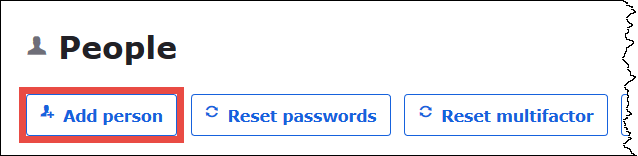
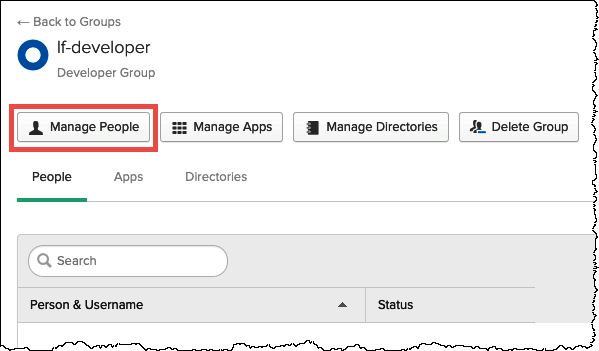
In the left navigation pane, choose Directory, and then choose People.
-
Choose Add Person to add a new user who will access Athena through the JDBC driver.
-
In the Add Person dialog box, enter the required information.
-
Enter values for First name and Last name. This tutorial uses
athena-okta-user. -
Enter a Username and Primary email. This tutorial uses
athena-okta-user@anycompany.com. -
For Password, choose Set by admin, and then provide a password. This tutorial clears the option for User must change password on first login; your security requirements may vary.

-
-
Choose Save and Add Another.
-
Enter the information for another user. This example adds the business analyst user
athena-ba-user@anycompany.com.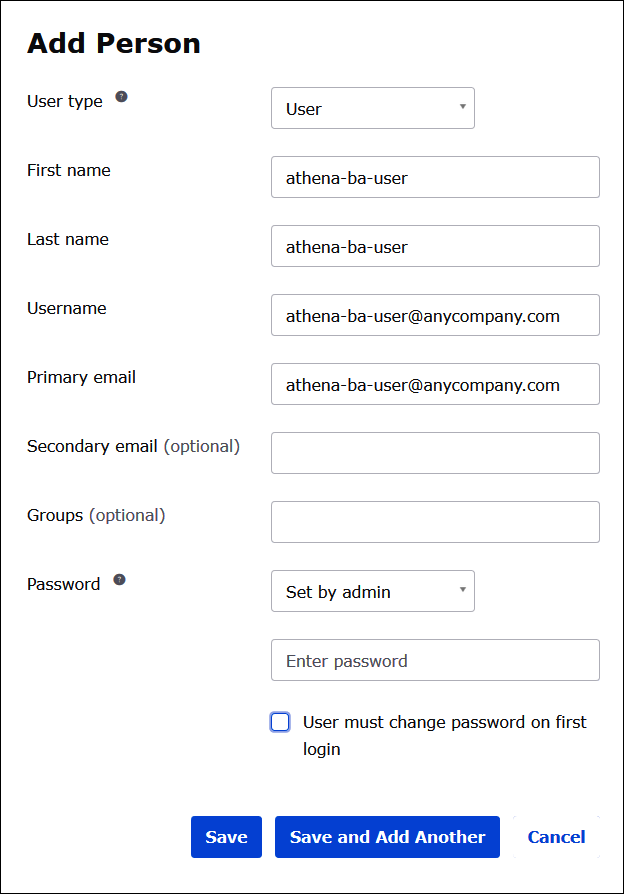
-
Choose Save.
In the following procedure, you provide access for two Okta groups through the Athena JDBC driver by adding a "Business Analysts" group and a "Developer" group.
To add Okta groups
-
In the Okta navigation pane, choose Directory, and then choose Groups.
-
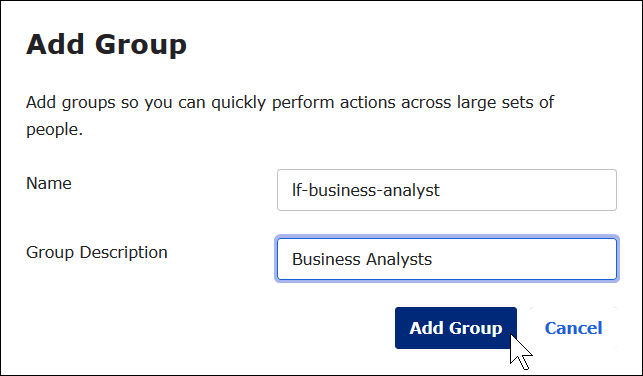
On the Groups page, choose Add Group.

-
In the Add Group dialog box, enter the required information.
-
For Name, enter
lf-business-analyst. -
For Group Description, enter
Business Analysts.
-
-
Choose Add Group.
-
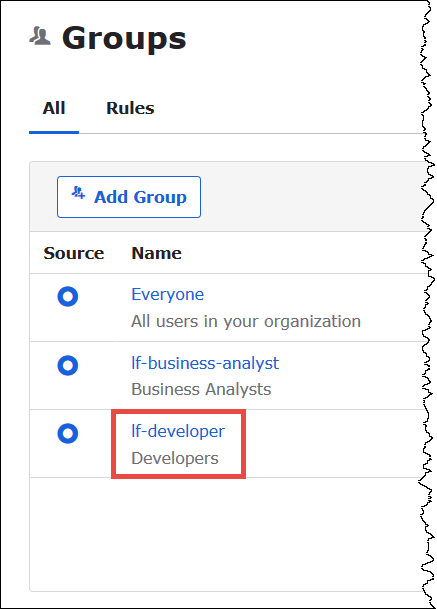
On the Groups page, choose Add Group again. This time you will enter information for the Developer group.
-
Enter the required information.
-
For Name, enter
lf-developer. -
For Group Description, enter
Developers.
-
-
Choose Add Group.
Now that you have two users and two groups, you are ready to add a user to each group.
To add users to groups
-
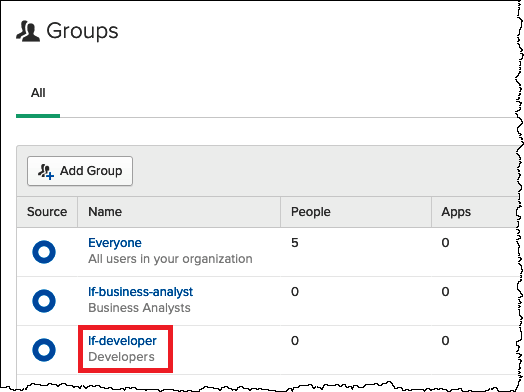
On the Groups page, choose the lf-developer group that you just created. You will add one of the Okta users that you created as a developer to this group.
-
Choose Manage People.
-
From the Not Members list, choose athena-okta-user.
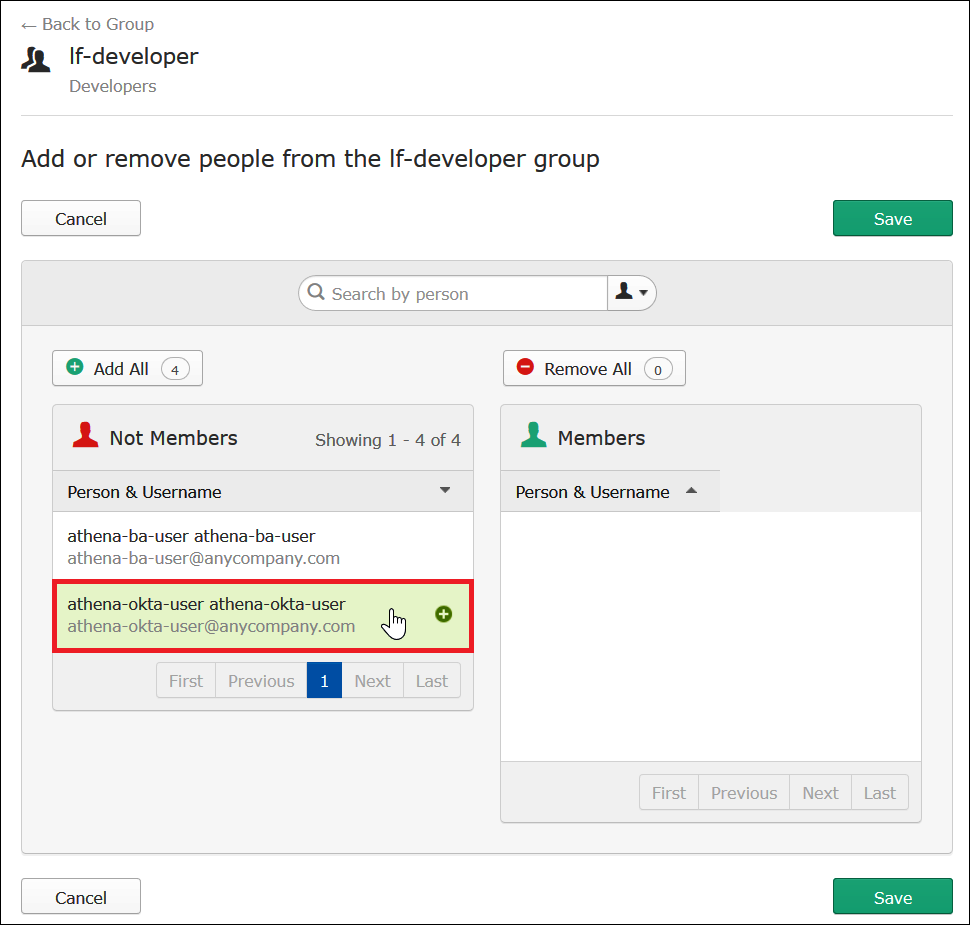
The entry for the user moves from the Not Members list on the left to the Members list on the right.
-
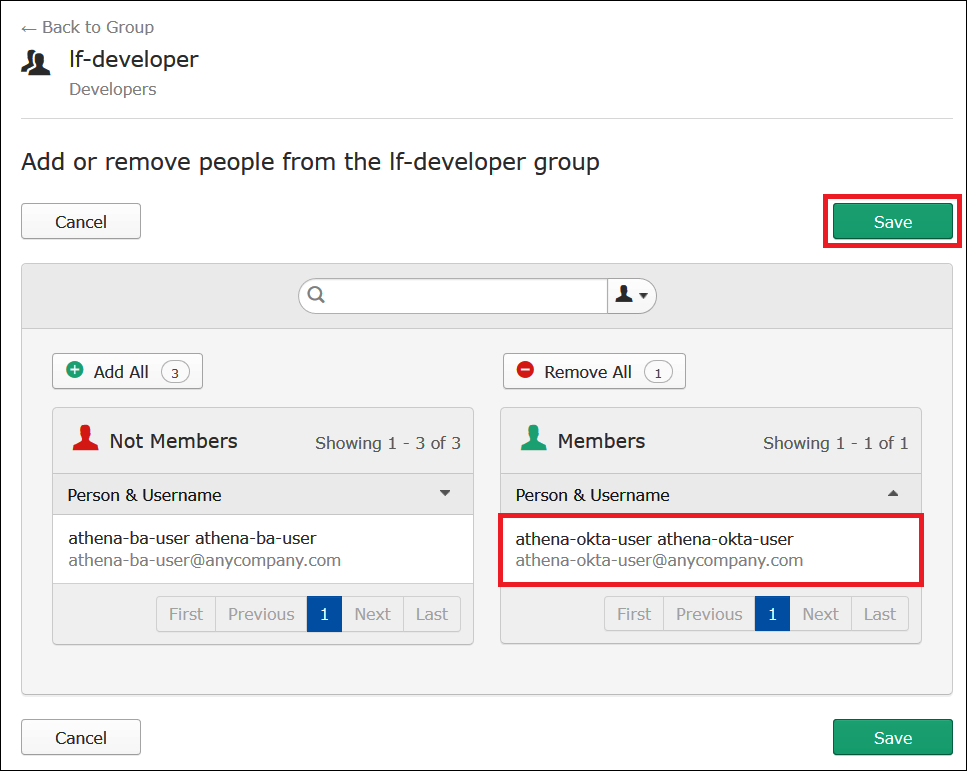
Choose Save.
-
Choose Back to Group, or choose Directory, and then choose Groups.
-
Choose the lf-business-analyst group.
-
Choose Manage People.
-
Add the athena-ba-user to the Members list of the lf-business-analyst group, and then choose Save.
-
Choose Back to Group, or choose Directory, Groups.
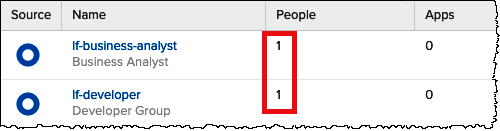
The Groups page now shows that each group has one Okta user.
Step 3: Set up an Okta application for SAML authentication
In this step, you use the Okta developer console to perform the following tasks:
-
Add a SAML application for use with AWS.
-
Assign the application to the Okta user.
-
Assign the application to an Okta group.
-
Download the resulting identity provider metadata for later use with AWS.
To add an application for SAML authentication
-
In the Okta navigation pane, choose Applications, Applications so that you can configure an Okta application for SAML authentication to Athena.
-
Click Browse App Catalog.
-
In the search box, enter
Redshift. -
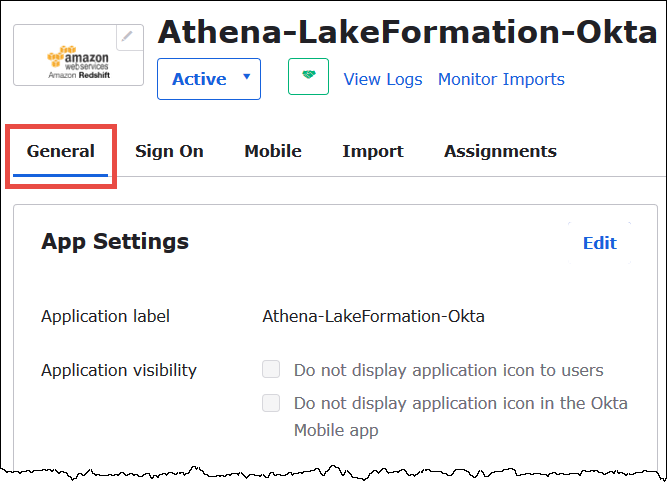
Choose Amazon Web Services Redshift. The Okta application in this tutorial uses the existing SAML integration for Amazon Redshift.

-
On the Amazon Web Services Redshift page, choose Add to create a SAML-based application for Amazon Redshift.

-
For Application label, enter
Athena-LakeFormation-Okta, and then choose Done.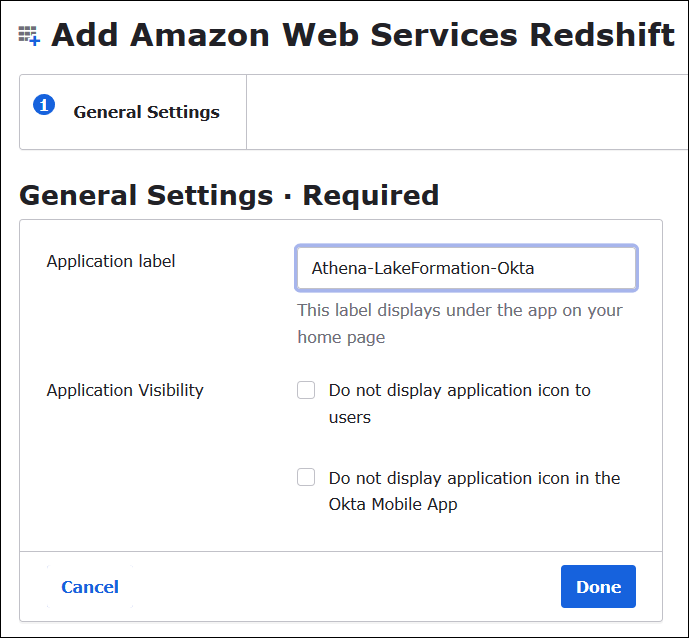
Now that you have created an Okta application, you can assign it to the users and groups that you created.
To assign the application to users and groups
-
On the Applications page, choose the Athena-LakeFormation-Okta application.
-
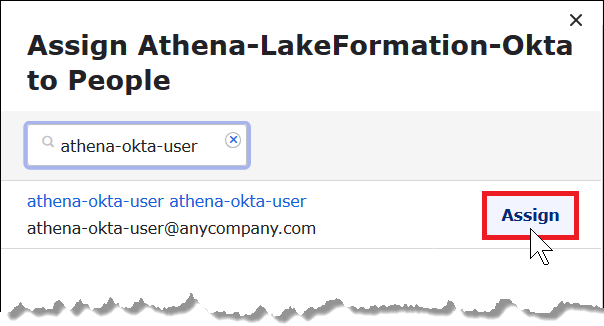
On the Assignments tab, choose Assign, Assign to People.

-
In the Assign Athena-LakeFormation-Okta to People dialog box, find the athena-okta-user user that you created previously.
-
Choose Assign to assign the user to the application.
-
Choose Save and Go Back.
-
Choose Done.
-
On the Assignments tab for the Athena-LakeFormation-Okta application, choose Assign, Assign to Groups.
-
For lf-business-analyst, choose Assign to assign the Athena-LakeFormation-Okta application to the lf-business-analyst group, and then choose Done.
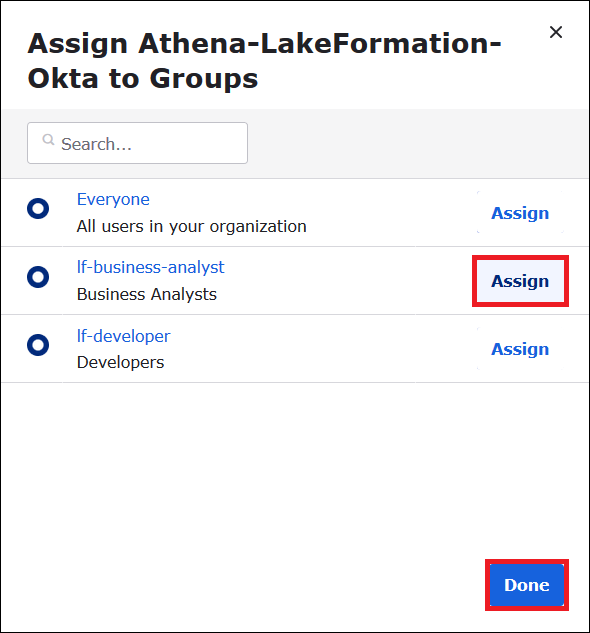
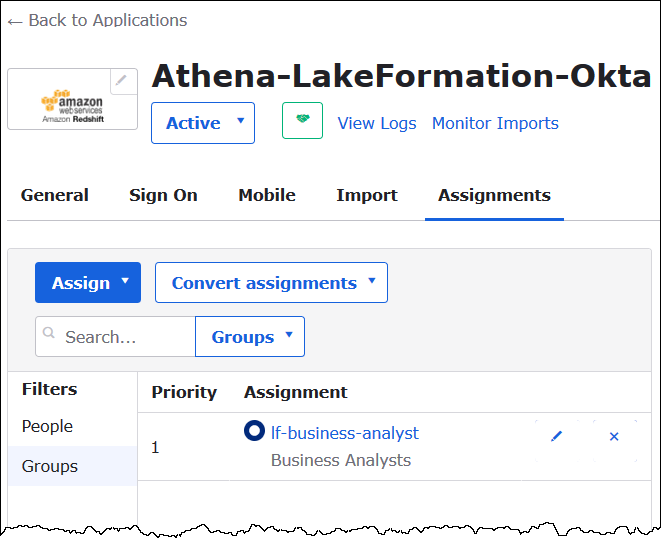
The group appears in the list of groups for the application.
Now you are ready to download the identity provider application metadata for use with AWS.
To download the application metadata
-
Choose the Okta application Sign On tab, and then right-click Identity Provider metadata.
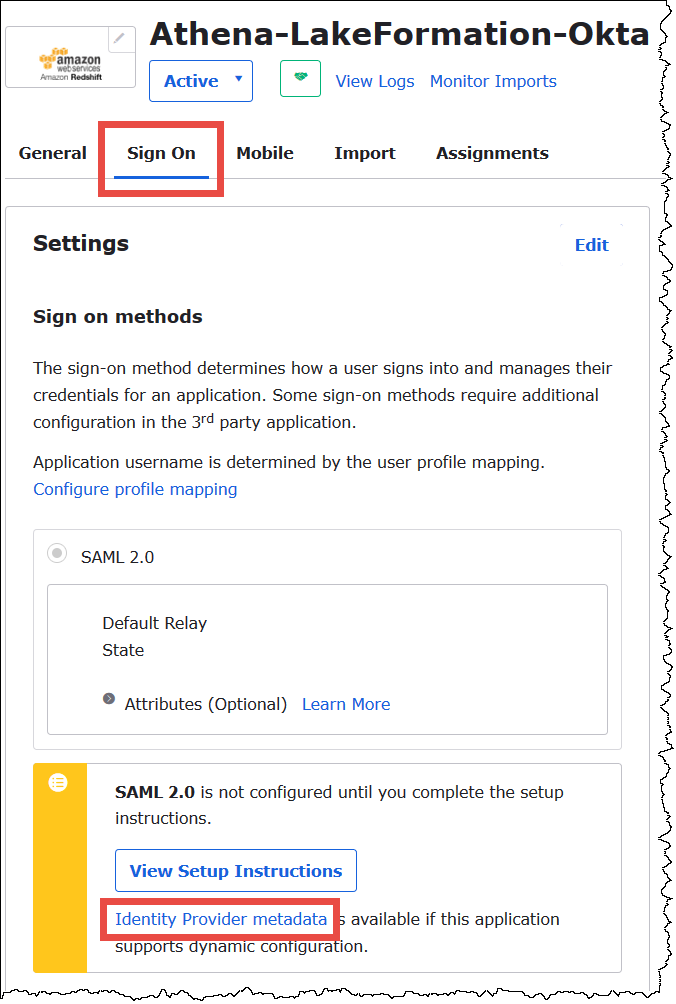
-
Choose Save Link As to save the identity provider metadata, which is in XML format, to a file. Give it a name that you recognize (for example,
Athena-LakeFormation-idp-metadata.xml).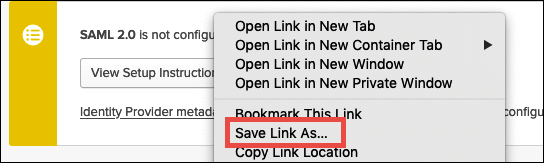
Step 4: Create an AWS SAML Identity Provider and Lake Formation access IAM role
In this step, you use the AWS Identity and Access Management (IAM) console to perform the following tasks:
-
Create an identity provider for AWS.
-
Create an IAM role for Lake Formation access.
-
Add the AmazonAthenaFullAccess managed policy to the role.
-
Add a policy for Lake Formation and AWS Glue to the role.
-
Add a policy for Athena query results to the role.
To create an AWS SAML identity provider
-
Sign in to the Amazon Web Services account console as Amazon Web Services account administrator and navigate to the IAM console (https://console.aws.amazon.com/iam/
). -
In the navigation pane, choose Identity providers, and then click Add provider.
-
On the Configure provider screen, enter the following information:
-
For Provider type, choose SAML.
-
For Provider name, enter
AthenaLakeFormationOkta. -
For Metadata document, use the Choose file option to upload the identity provider (IdP) metadata XML file that you downloaded.
-
-
Choose Add provider.
Next, you create an IAM role for AWS Lake Formation access. You add two inline policies to the role. One policy provides permissions to access Lake Formation and the AWS Glue APIs. The other policy provides access to Athena and the Athena query results location in Amazon S3.
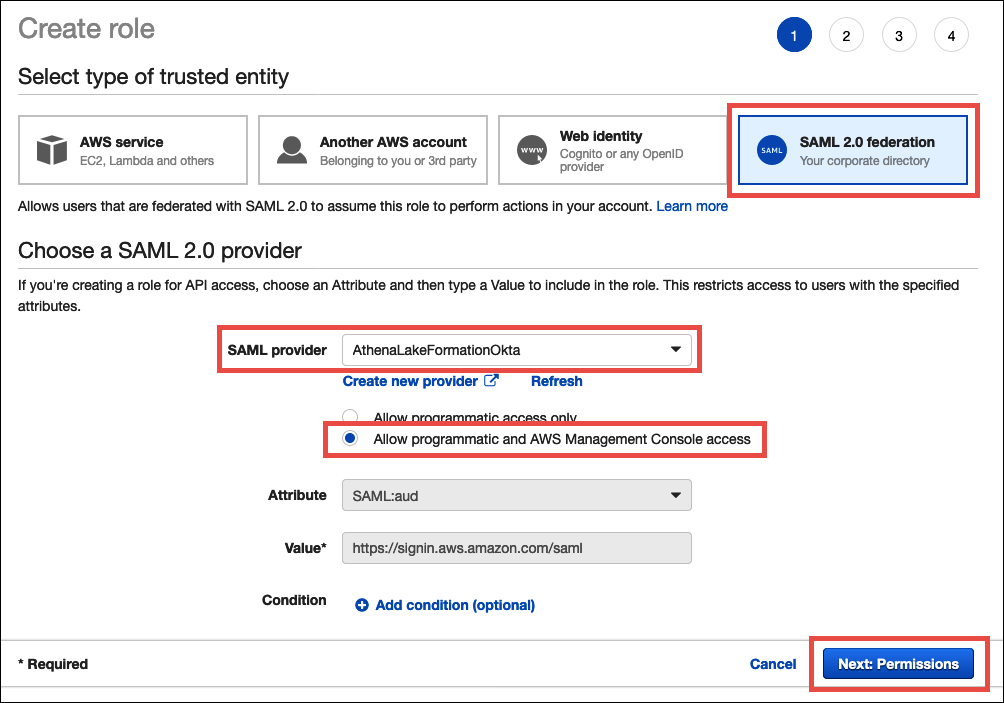
To create an IAM role for AWS Lake Formation access
-
In the IAM console navigation pane, choose Roles, and then choose Create role.
-
On the Create role page, perform the following steps:
-
For Select type of trusted entity, choose SAML 2.0 Federation.
-
For SAML provider, select AthenaLakeFormationOkta.
-
For SAML provider, select the option Allow programmatic and AWS Management Console access.
-
Choose Next: Permissions.
-
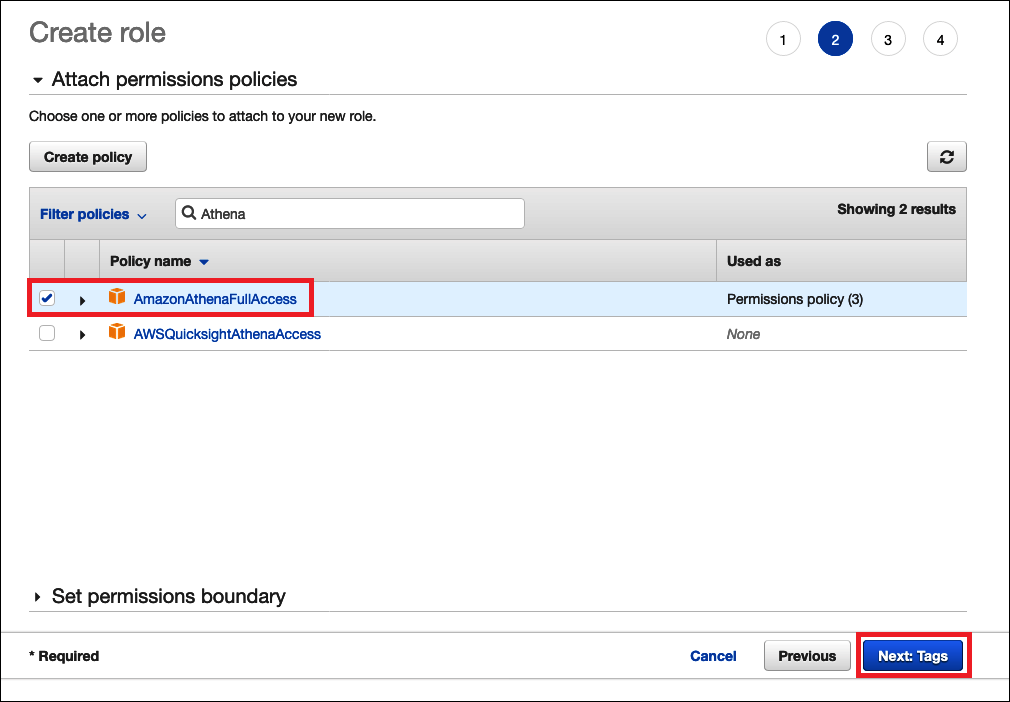
-
On the Attach Permissions policies page, for Filter policies, enter
Athena. -
Select the AmazonAthenaFullAccess managed policy, and then choose Next: Tags.
-
On the Add tags page, choose Next: Review.
-
On the Review page, for Role name, enter a name for the role (for example,
Athena-LakeFormation-OktaRole), and then choose Create role.
Next, you add inline policies that allow access to Lake Formation, AWS Glue APIs, and Athena query results in Amazon S3.
Whenever you use IAM policies, make sure that you follow IAM best practices. For more information, see Security best practices in IAM in the IAM User Guide.
To add an inline policy to the role for Lake Formation and AWS Glue
-
From the list of roles in the IAM console, choose the newly created
Athena-LakeFormation-OktaRole. -
On the Summary page for the role, on the Permissions tab, choose Add inline policy.
-
On the Create policy page, choose JSON.
-
Add an inline policy like the following that provides access to Lake Formation and the AWS Glue APIs.
-
Choose Review policy.
-
For Name, enter a name for the policy (for example,
LakeFormationGlueInlinePolicy). -
Choose Create policy.
To add an inline policy to the role for the Athena query results location
-
On the Summary page for the
Athena-LakeFormation-OktaRolerole, on the Permissions tab, choose Add inline policy. -
On the Create policy page, choose JSON.
-
Add an inline policy like the following that allows the role access to the Athena query results location. Replace the
<athena-query-results-bucket>placeholders in the example with the name of your Amazon S3 bucket. -
Choose Review policy.
-
For Name, enter a name for the policy (for example,
AthenaQueryResultsInlinePolicy). -
Choose Create policy.
Next, you copy the ARN of the Lake Formation access role and the ARN of the SAML provider that you created. These are required when you configure the Okta SAML application in the next section of the tutorial.
To copy the role ARN and SAML identity provider ARN
-
In the IAM console, on the Summary page for the
Athena-LakeFormation-OktaRolerole, choose the Copy to clipboard icon next to Role ARN. The ARN has the following format:arn:aws:iam::<account-id>:role/Athena-LakeFormation-OktaRole -
Save the full ARN securely for later reference.
-
In the IAM console navigation pane, choose Identity providers.
-
Choose the AthenaLakeFormationOkta provider.
-
On the Summary page, choose the Copy to clipboard icon next to Provider ARN. The ARN should look like the following:
arn:aws:iam::<account-id>:saml-provider/AthenaLakeFormationOkta -
Save the full ARN securely for later reference.
Step 5: Add the IAM role and SAML Identity Provider to the Okta application
In this step, you return to the Okta developer console and perform the following tasks:
-
Add user and group Lake Formation URL attributes to the Okta application.
-
Add the ARN for the identity provider and the ARN for the IAM role to the Okta application.
-
Copy the Okta application ID. The Okta application ID is required in the JDBC profile that connects to Athena.
To add user and group Lake Formation URL attributes to the Okta application
-
Sign into the Okta developer console.
-
Choose the Applications tab, and then choose the
Athena-LakeFormation-Oktaapplication. -
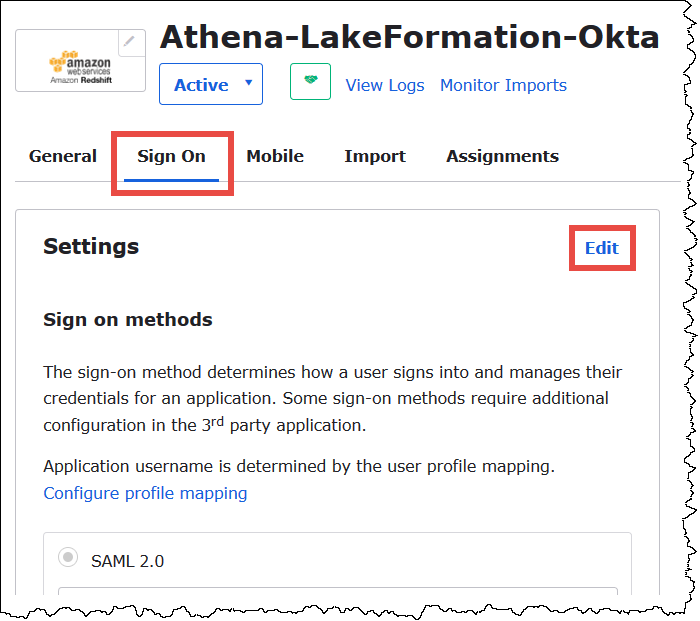
Choose on the Sign On tab for the application, and then choose Edit.
-
Choose Attributes (optional) to expand it.
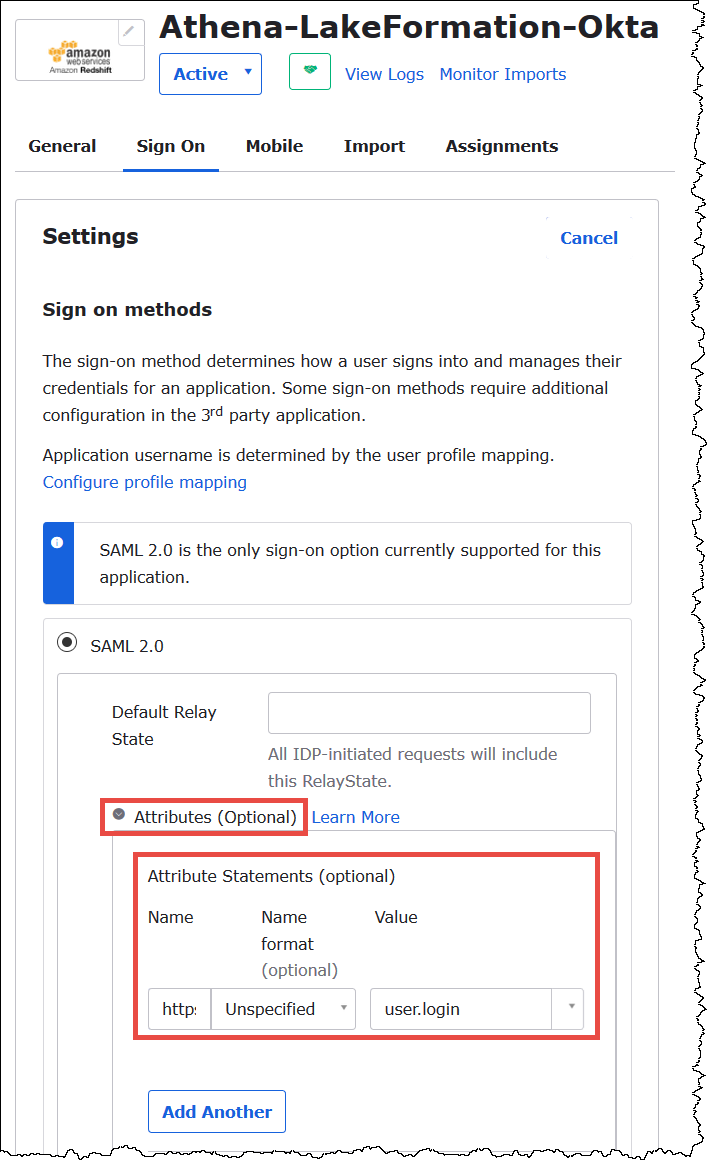
-
For Attribute Statements (optional), add the following attribute:
-
For Name, enter
https://lakeformation.amazon.com/SAML/Attributes/Username. -
For Value, enter
user.login
-
-
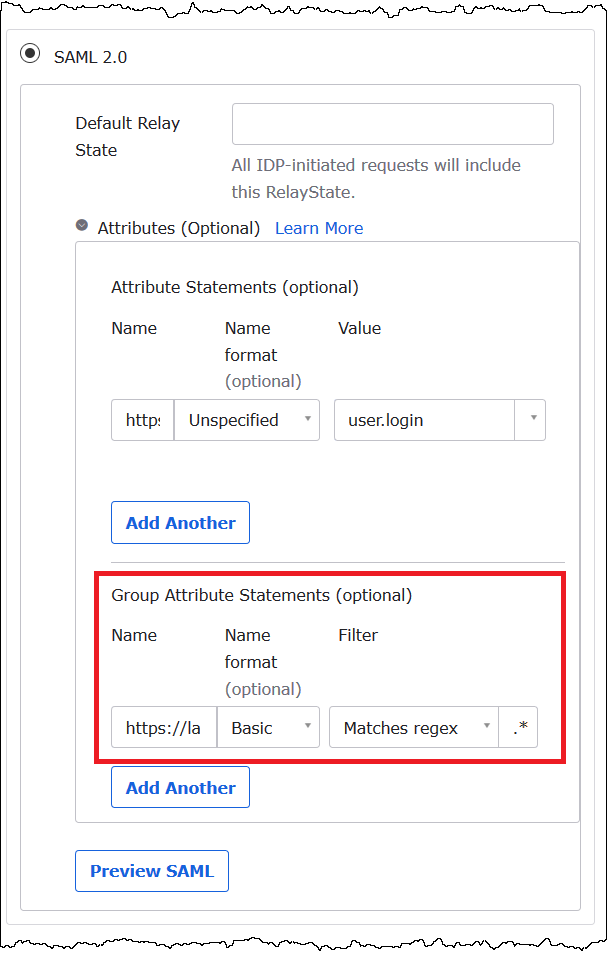
Under Group Attribute Statements (optional), add the following attribute:
-
For Name, enter
https://lakeformation.amazon.com/SAML/Attributes/Groups. -
For Name format, enter
Basic -
For Filter, choose Matches regex, and then enter
.*in the filter box.
-
-
Scroll down to the Advanced Sign-On Settings section, where you will add the identity provider and IAM Role ARNs to the Okta application.
To add the ARNs for the identity provider and IAM role to the Okta application
-
For Idp ARN and Role ARN, enter the AWS identity provider ARN and role ARN as comma separated values in the format
<saml-arn>,<role-arn>. The combined string should look like the following:arn:aws:iam::<account-id>:saml-provider/AthenaLakeFormationOkta,arn:aws:iam::<account-id>:role/Athena-LakeFormation-OktaRole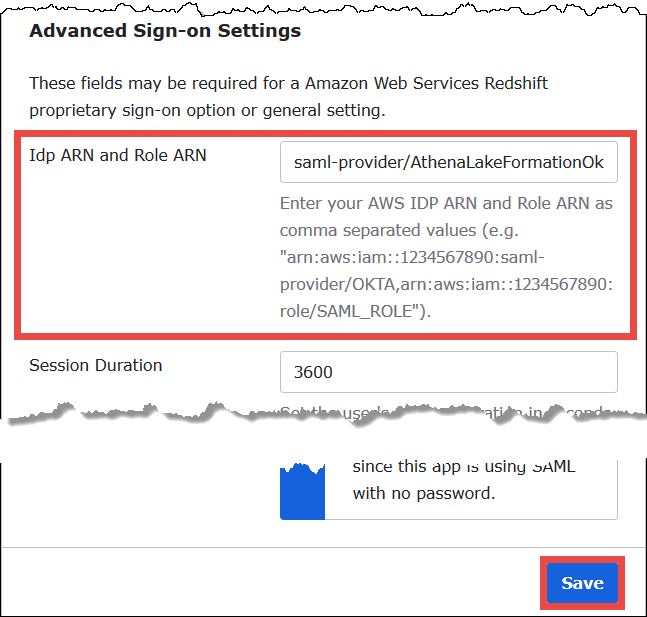
-
Choose Save.
Next, you copy the Okta application ID. You will require this later for the JDBC string that connects to Athena.
To find and copy the Okta application ID
-
Choose the General tab of the Okta application.
-
Scroll down to the App Embed Link section.
-
From Embed Link, copy and securely save the Okta application ID portion of the URL. The Okta application ID is the part of the URL after
amazon_aws_redshift/but before the next forward slash. For example, if the URL containsamazon_aws_redshift/aaa/bbb, the application ID isaaa.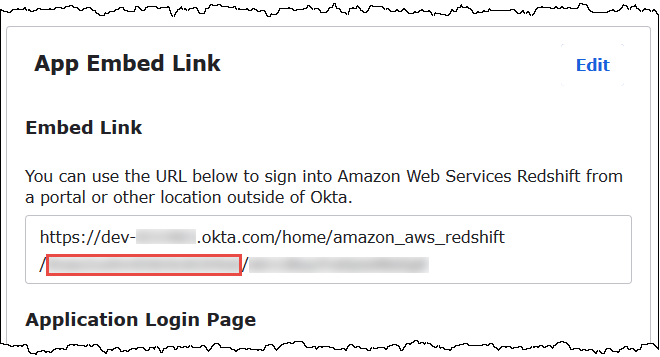
Note
The embed link cannot be used to log directly into the Athena console to view databases. The Lake Formation permissions for SAML users and groups are recognized only when you use the JDBC or ODBC driver to submit queries to Athena. To view the databases, you can use the SQL Workbench/J tool, which uses the JDBC driver to connect to Athena. The SQL Workbench/J tool is covered in Step 7: Verify access through the Athena JDBC client.
Step 6: Grant user and group permissions through AWS Lake Formation
In this step, you use the Lake Formation console to grant permissions on a table to the SAML user and group. You perform the following tasks:
-
Specify the ARN of the Okta SAML user and associated user permissions on the table.
-
Specify the ARN of the Okta SAML group and associated group permissions on the table.
-
Verify the permissions that you granted.
To grant permissions in Lake Formation for the Okta user
-
Sign in as data lake administrator to the AWS Management Console.
Open the Lake Formation console at https://console.aws.amazon.com/lakeformation/
. -
From the navigation pane, choose Tables, and then select the table that you want to grant permissions for. This tutorial uses the
nyctaxitable from thetripdbdatabase.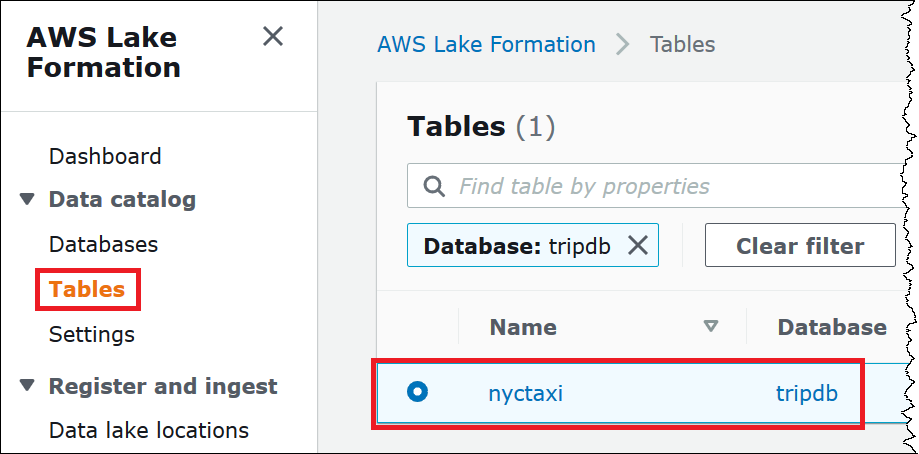
-
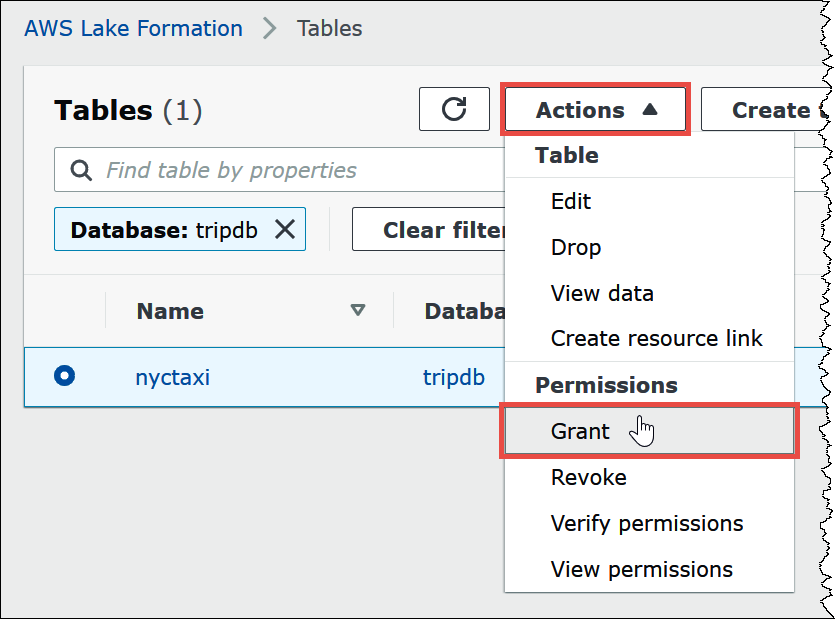
From Actions, choose Grant.
-
In the Grant permissions dialog, enter the following information:
-
Under SAML and Amazon QuickSight users and groups, enter the Okta SAML user ARN in the following format:
arn:aws:iam::<account-id>:saml-provider/AthenaLakeFormationOkta:user/<athena-okta-user>@<anycompany.com> -
For Columns, for Choose filter type, and optionally choose Include columns or Exclude columns.
-
Use the Choose one or more columns dropdown under the filter to specify the columns that you want to include or exclude for or from the user.
-
For Table permissions, choose Select. This tutorial grants only the
SELECTpermission; your requirements may vary.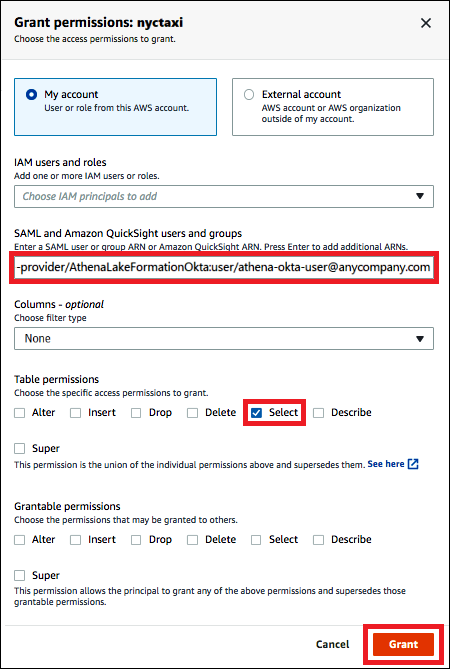
-
-
Choose Grant.
Now you perform similar steps for the Okta group.
To grant permissions in Lake Formation for the Okta group
-
On the Tables page of the Lake Formation console, make sure that the nyctaxi table is still selected.
-
From Actions, choose Grant.
-
In the Grant permissions dialog, enter the following information:
-
Under SAML and Amazon QuickSight users and groups, enter the Okta SAML group ARN in the following format:
arn:aws:iam::<account-id>:saml-provider/AthenaLakeFormationOkta:group/lf-business-analyst -
For Columns, Choose filter type, choose Include columns.
-
For Choose one or more columns, choose the first three columns of the table.
-
For Table permissions, choose the specific access permissions to grant. This tutorial grants only the
SELECTpermission; your requirements may vary.
-
-
Choose Grant.
-
To verify the permissions that you granted, choose Actions, View permissions.
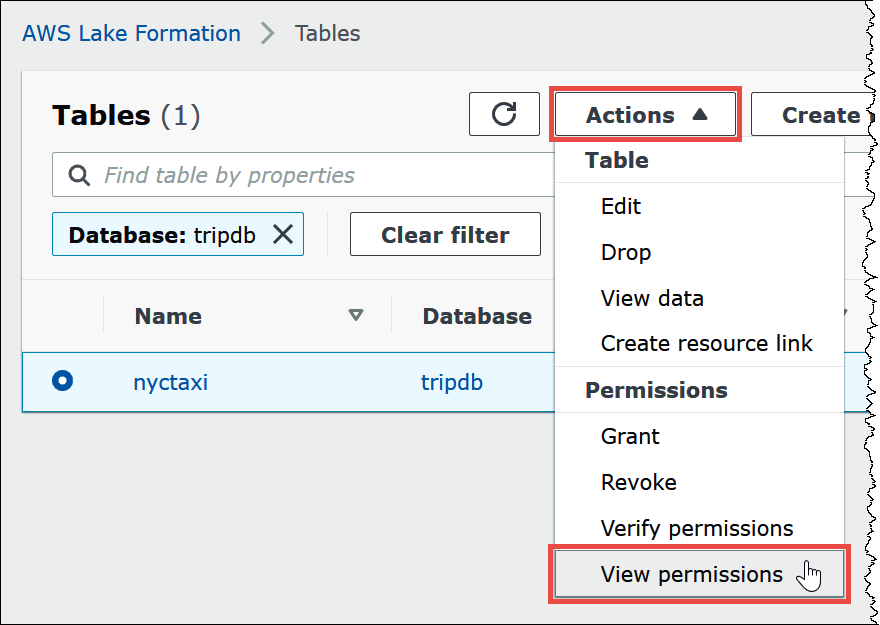
The Data permissions page for the
nyctaxitable shows the permissions for athena-okta-user and the lf-business-analyst group.
Step 7: Verify access through the Athena JDBC client
Now you are ready to use a JDBC client to perform a test connection to Athena as the Okta SAML user.
In this section, you perform the following tasks:
-
Prepare the test client – Download the Athena JDBC driver, install SQL Workbench, and add the driver to Workbench. This tutorial uses SQL Workbench to access Athena through Okta authentication and to verify Lake Formation permissions.
-
In SQL Workbench:
-
Create a connection for the Athena Okta user.
-
Run test queries as the Athena Okta user.
-
Create and test a connection for the business analyst user.
-
-
In the Okta console, add the business analyst user to the developer group.
-
In the Lake Formation console, configure table permissions for the developer group.
-
In SQL Workbench, run test queries as the business analyst user and verify how the change in permissions affects the results.
To prepare the test client
-
Download and extract the Lake Formation compatible Athena JDBC driver (2.0.14 or later version) from Connect to Amazon Athena with JDBC.
-
Download and install the free SQL Workbench/J
SQL query tool, available under a modified Apache 2.0 license. -
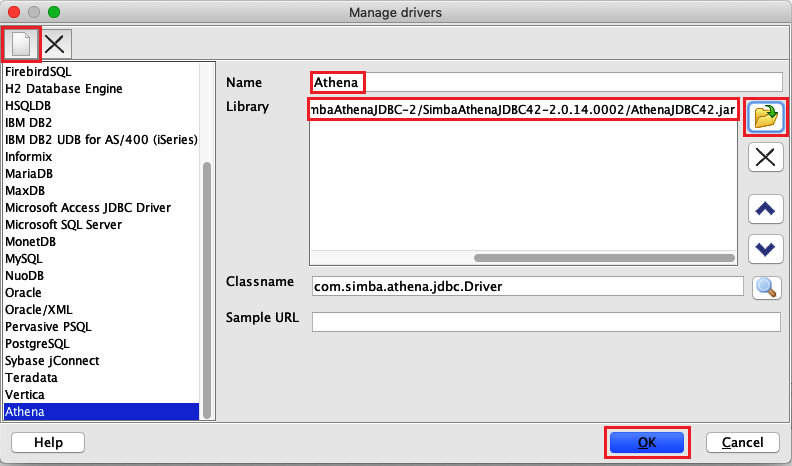
In SQL Workbench, choose File, and then choose Manage Drivers.

-
In the Manage Drivers dialog box, perform the following steps:
-
Choose the new driver icon.
-
For Name, enter
Athena. -
For Library, browse to and choose the Simba Athena JDBC
.jarfile that you just downloaded. -
Choose OK.
-
You are now ready to create and test a connection for the Athena Okta user.
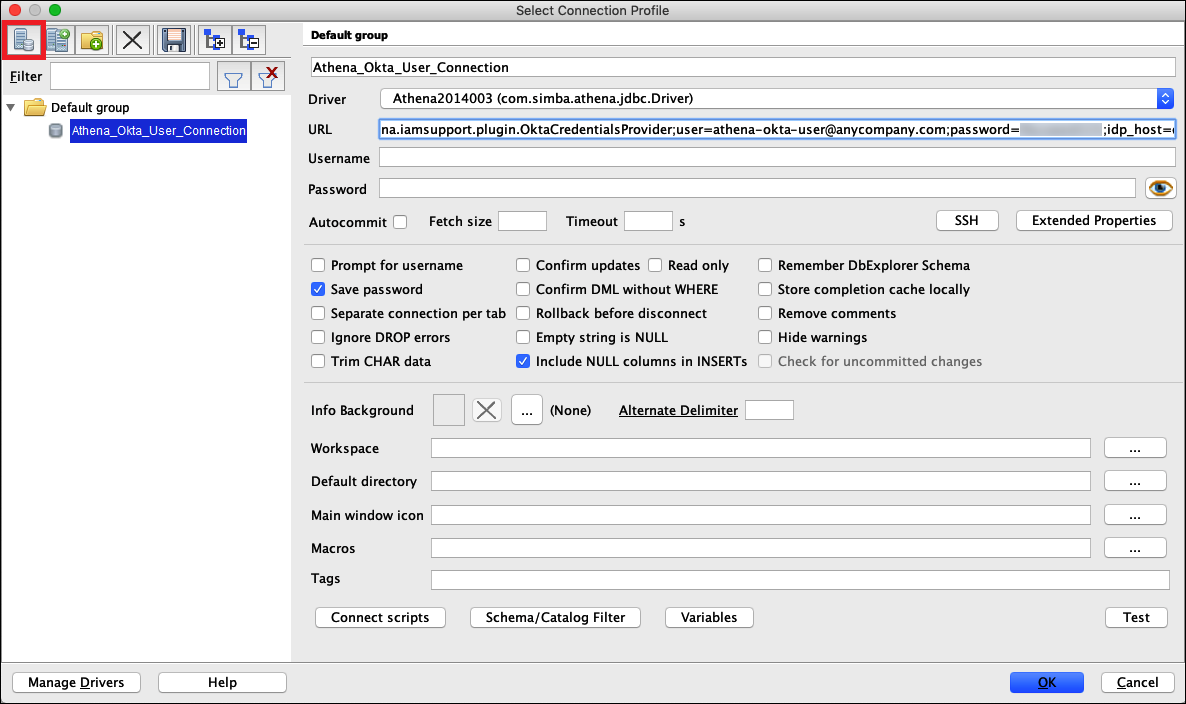
To create a connection for the Okta user
-
Choose File, Connect window.

-
In the Connection profile dialog box, create a connection by entering the following information:
-
In the name box, enter
Athena_Okta_User_Connection. -
For Driver, choose the Simba Athena JDBC Driver.
-
For URL, do one of the following:
-
To use a connection URL, enter a single-line connection string. The following example adds line breaks for readability.
jdbc:awsathena://AwsRegion=region-id; S3OutputLocation=s3://amzn-s3-demo-bucket/athena_results; AwsCredentialsProviderClass=com.simba.athena.iamsupport.plugin.OktaCredentialsProvider; user=athena-okta-user@anycompany.com; password=password; idp_host=okta-idp-domain; App_ID=okta-app-id; SSL_Insecure=true; LakeFormationEnabled=true; -
To use an AWS profile-based URL, perform the following steps:
-
Configure an AWS profile that has an AWS credentials file like the following example.
[athena_lf_dev] plugin_name=com.simba.athena.iamsupport.plugin.OktaCredentialsProvider idp_host=okta-idp-domainapp_id=okta-app-iduid=athena-okta-user@anycompany.compwd=password -
For URL, enter a single-line connection string like the following example. The example adds line breaks for readability.
jdbc:awsathena://AwsRegion=region-id;
S3OutputLocation=s3://amzn-s3-demo-bucket/athena_results;
profile=athena_lf_dev;
SSL_Insecure=true;
LakeFormationEnabled=true;
-
Note that these examples are basic representations of the URL needed to connect to Athena. For the full list of parameters supported in the URL, refer to the JDBC documentation.
-
The following image shows a SQL Workbench connection profile that uses a connection URL.
-
Now that you have established a connection for the Okta user, you can test it by retrieving some data.
To test the connection for the Okta user
-
Choose Test, and then verify that the connection succeeds.
-
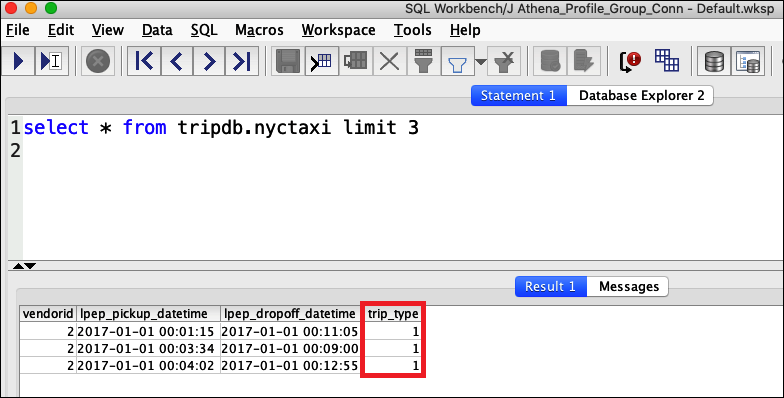
From the SQL Workbench Statement window, run the following SQL
DESCRIBEcommand. Verify that all columns are displayed.DESCRIBE "tripdb"."nyctaxi"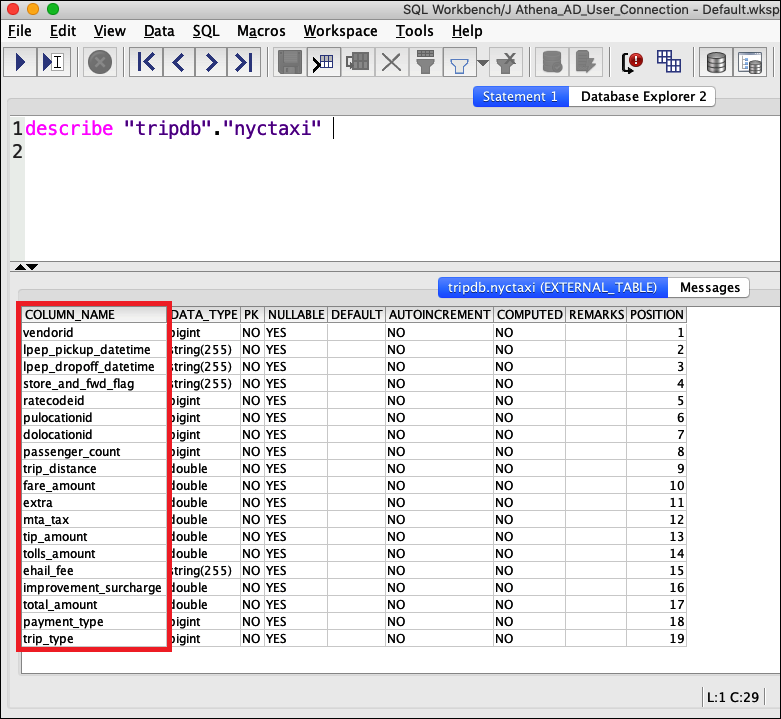
-
From the SQL Workbench Statement window, run the following SQL
SELECTcommand. Verify that all columns are displayed.SELECT * FROM tripdb.nyctaxi LIMIT 5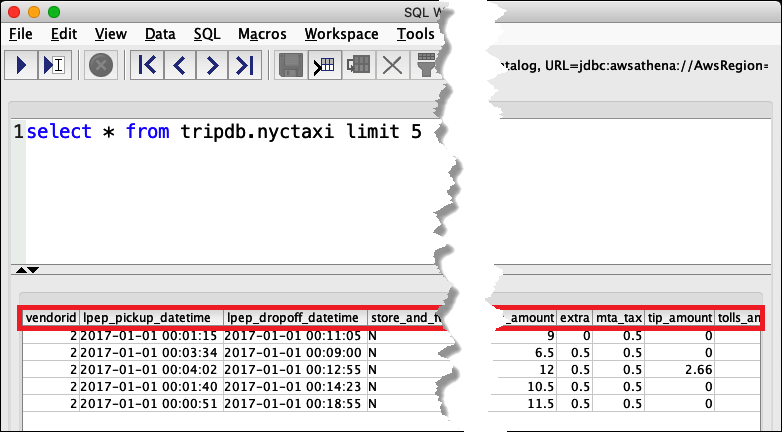
Next, you verify that the athena-ba-user, as a member of the lf-business-analyst group, has access to only the first three columns of the table that you specified earlier in Lake Formation.
To verify access for the athena-ba-user
-
In SQL Workbench, in the Connection profile dialog box, create another connection profile.
-
For the connection profile name, enter
Athena_Okta_Group_Connection. -
For Driver, choose the Simba Athena JDBC driver.
-
For URL, do one of the following:
-
To use a connection URL, enter a single-line connection string. The following example adds line breaks for readability.
jdbc:awsathena://AwsRegion=region-id; S3OutputLocation=s3://amzn-s3-demo-bucket/athena_results; AwsCredentialsProviderClass=com.simba.athena.iamsupport.plugin.OktaCredentialsProvider; user=athena-ba-user@anycompany.com; password=password; idp_host=okta-idp-domain; App_ID=okta-application-id; SSL_Insecure=true; LakeFormationEnabled=true; -
To use an AWS profile-based URL, perform the following steps:
-
Configure an AWS profile that has a credentials file like the following example.
[athena_lf_ba] plugin_name=com.simba.athena.iamsupport.plugin.OktaCredentialsProvider idp_host=okta-idp-domainapp_id=okta-application-iduid=athena-ba-user@anycompany.compwd=password -
For URL, enter a single-line connection string like the following. The example adds line breaks for readability.
jdbc:awsathena://AwsRegion=region-id;
S3OutputLocation=s3://amzn-s3-demo-bucket/athena_results;
profile=athena_lf_ba;
SSL_Insecure=true;
LakeFormationEnabled=true;
-
-
-
-
Choose Test to confirm that the connection is successful.
-
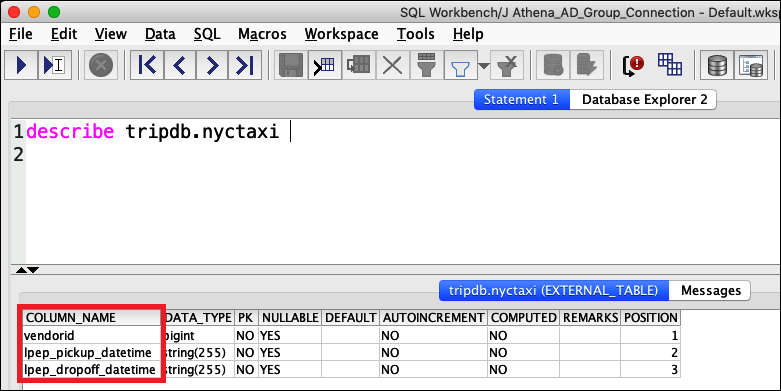
From the SQL Statement window, run the same
DESCRIBEandSELECTSQL commands that you did before and examine the results.Because athena-ba-user is a member of the lf-business-analyst group, only the first three columns that you specified in the Lake Formation console are returned.
Next, you return to the Okta console to add the athena-ba-user to the
lf-developer Okta group.
To add the athena-ba-user to the lf-developer group
-
Sign in to the Okta console as an administrative user of the assigned Okta domain.
-
Choose Directory, and then choose Groups.
-
On the Groups page, choose the lf-developer group.
-
Choose Manage People.
-
From the Not Members list, choose the athena-ba-user to add it to the lf-developer group.
-
Choose Save.
Now you return to the Lake Formation console to configure table permissions for the lf-developer group.
To configure table permissions for the lf-developer-group
-
Log into the Lake Formation console as Data Lake administrator.
-
In the navigation pane, choose Tables.
-
Select the nyctaxi table.
-
Choose Actions, Grant.
-
In the Grant Permissions dialog, enter the following information:
-
For SAML and Amazon QuickSight users and groups, enter the Okta SAML lf-developer group ARN in the following format:
-
For Columns, Choose filter type, choose Include columns.
-
Choose the trip_type column.
-
For Table permissions, choose SELECT.
-
-
Choose Grant.
Now you can use SQL Workbench to verify the change in permissions for the lf-developer group. The change should be reflected in the data available to athena-ba-user, who is now a member of the lf-developer group.
To verify the change in permissions for athena-ba-user
-
Close the SQL Workbench program, and then re-open it.
-
Connect to the profile for athena-ba-user.
-
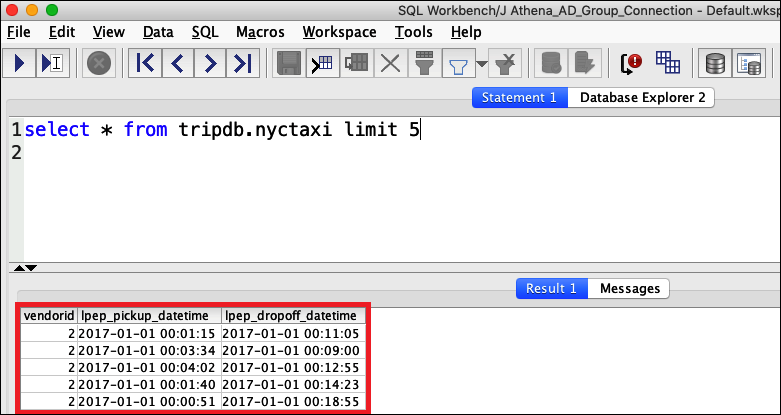
From the Statement window, issue the same SQL statements that you ran previously:
This time, the trip_type column is displayed.

Because athena-ba-user is now a member of both the lf-developer and lf-business-analyst groups, the combination of Lake Formation permissions for those groups determines the columns that are returned.
Conclusion
In this tutorial you configured Athena integration with AWS Lake Formation using Okta as the SAML provider. You used Lake Formation and IAM to control the resources that are available to the SAML user in your data lake AWS Glue Data Catalog.
Related resources
For related information, see the following resources.
-
Granting and revoking Data Catalog permissions in the AWS Lake Formation Developer Guide.
-
Identity providers and federation in the IAM User Guide.
-
Creating IAM SAML identity providers in the IAM User Guide.
-
Enabling federation to AWS using Windows Active Directory, ADFS, and SAML 2.0
on the AWS Security Blog.
