AWS Cloud9 is no longer available to new customers. Existing customers of
AWS Cloud9 can continue to use the service as normal.
Learn more
Accessing no-ingress EC2 instances with AWS Systems Manager
A "no-ingress EC2 instance" that's created for an EC2 environment enables AWS Cloud9 to connect to its Amazon EC2 instance without the need to open any inbound ports on that instance. You can select the no-ingress option when creating an EC2 environment using the console, the command line interface, or a CloudFormation stack. For more information about how to create an environment using the console or command line interface, see Step 1: Create an environment.
Important
There are no additional charges for using Systems Manager Session Manager to manage connections to your EC2 instance.
When selecting an environment type in the Create environment page of the console, you can choose a new EC2 instance that requires inbound connectivity or a new no-ingress EC2 instance that doesn't require the following:
-
New EC2 instance – With this setup, the security group for the instance has a rule to allow incoming networking traffic. Incoming network traffic is restricted to IP addresses approved for AWS Cloud9 connections. An open inbound port enables AWS Cloud9 to connect over SSH to its instance. If you use AWS Systems Manager Session Manager, you can access your Amazon EC2 instance through SSM without opening inbound ports (no ingress). This method is only applicable for new Amazon EC2 instances. For more information, see Benefits of using Systems Manager for EC2 environments.
-
Existing compute – With this setup, an existing Amazon EC2 instance is accessed that requires SSH login details that the instance must have an inbound security group rule for. If you select this option, a service role is automatically created. You can view the name of the service role in a note at the bottom of the setup screen.
If creating an environment using the AWS CLI, you can configure a no-ingress EC2 instance by setting the
--connection-type CONNECT_SSM option when calling the
create-environment-ec2 command. For more information about creating the
required service role and instance profile, see Managing instance profiles for Systems Manager with the AWS CLI.
After you complete creating an environment that uses a no-ingress EC2 instance, confirm the following:
-
Systems Manager Session Manager has permissions to perform actions on the EC2 instance on your behalf. For more information, see Managing Systems Manager permissions.
-
AWS Cloud9 users can access the instance managed by Session Manager. For more information, see Giving users access to instances managed by Session Manager.
Benefits of using Systems Manager for EC2 environments
Allowing Session Manager to handle the secure connection between AWS Cloud9 and its EC2 instance offers two key benefits:
-
No requirement to open inbound ports for the instance
-
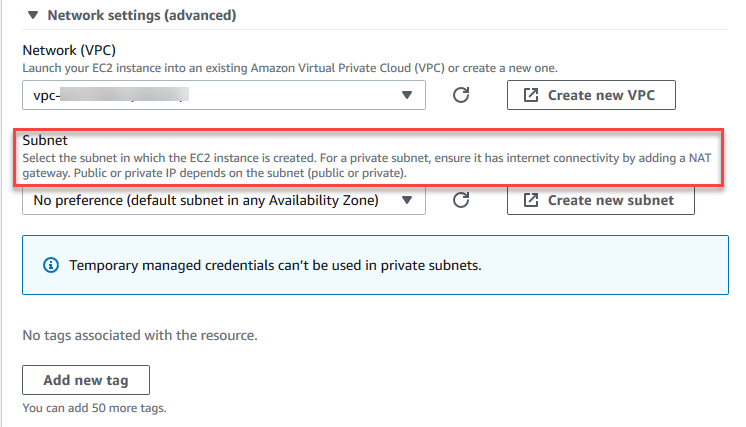
Option to launch the instance into a public or private subnet
Managing Systems Manager permissions
By default, Systems Manager doesn't have permission to perform actions on EC2 instances. Access is provided through an AWS Identity and Access Management (IAM) instance profile. (An instance profile is a container that passes IAM role information to an EC2 instance at launch.)
When you create the no-ingress EC2 instance using the AWS Cloud9 console, both the service
role (AWSCloud9SSMAccessRole) and the IAM instance profile
(AWSCloud9SSMInstanceProfile) are created automatically for you. (You
can view AWSCloud9SSMAccessRole in the IAM Management console. Instance
profiles aren't displayed in the IAM console.)
Important
If you create a no-ingress EC2 environment for the first time with AWS CLI, you must explicitly define the required service role and instance profile. For more information, see Managing instance profiles for Systems Manager with the AWS CLI.
Important
If you are creating a AWS Cloud9 environment and are using Amazon EC2 Systems Manager with either the AWSCloud9Administrator or
AWSCloud9User policies attached, you must also attach a custom policy that has specific IAM permissions, see Custom IAM policy for SSM environment creation.
This is due to a permissions issue with the AWSCloud9Administrator and AWSCloud9User policies.
For additional security protection, the AWS Cloud9 service-linked role,
AWSServiceRoleforAWSCloud9, features a PassRole
restriction in its AWSCloud9ServiceRolePolicy policy. When you pass an IAM role to a service, it allows that service to
assume the role and perform actions on your behalf. In this case, the
PassRole permission ensures that AWS Cloud9 can pass only the
AWSCloud9SSMAccessRole role (and its permission) to an EC2 instance.
This restricts the actions that can be performed on the EC2 instance to only those
required by AWS Cloud9.
Note
If you no longer need to use Systems Manager to access an instance, you can delete the
AWSCloud9SSMAccessRole service role. For more information, see
Deleting roles or
instance profiles in the IAM User Guide.
Managing instance profiles for Systems Manager with the AWS CLI
You can also create a no-ingress EC2 environment with the AWS CLI. When you call
create-environment-ec2, set the --connection-type
option to CONNECT_SSM.
If you use this option, the AWSCloud9SSMAccessRole service role and
AWSCloud9SSMInstanceProfile aren't automatically created. So, to
create the required service profile and instance profile, do one of the following:
-
Create an EC2 environment using the console once have the
AWSCloud9SSMAccessRoleservice role andAWSCloud9SSMInstanceProfilecreated automatically afterward. After they're created, the service role and instance profile are available for any additional EC2 Environments created using the AWS CLI. -
Run the following AWS CLI commands to create the service role and instance profile.
aws iam create-role --role-name AWSCloud9SSMAccessRole --path /service-role/ --assume-role-policy-document '{"Version": "2012-10-17","Statement": [{"Effect": "Allow","Principal": {"Service": ["ec2.amazonaws.com","cloud9.amazonaws.com"]      },"Action": "sts:AssumeRole"}]}'
aws iam attach-role-policy --role-name AWSCloud9SSMAccessRole --policy-arn arn:aws:iam::aws:policy/AWSCloud9SSMInstanceProfile
aws iam create-instance-profile --instance-profile-name AWSCloud9SSMInstanceProfile --path /cloud9/
aws iam add-role-to-instance-profile --instance-profile-name AWSCloud9SSMInstanceProfile --role-name AWSCloud9SSMAccessRole
Giving users access to instances managed by Session Manager
To open an AWS Cloud9 environment that's connected to an EC2 instance through Systems Manager, a user
must have permission for the API operation, StartSession. This operation
initiates a connection to the managed EC2 instance for a Session Manager session. You can give
users access by using an AWS Cloud9 specific managed policy (recommended) or by editing an
IAM policy and adding the necessary permissions.
| Method | Description |
|---|---|
|
Use AWS Cloud9-specific managed policy |
We recommend using AWS managed policies to allow users to access EC2 instances managed by Systems Manager. Managed policies provide a set of permissions for standard AWS Cloud9 use cases and can be easily attached to an IAM entity. All the managed policies also include the permissions to run the
ImportantIf you are creating a AWS Cloud9 environment and are using Amazon EC2 Systems Manager with either the For more information, see AWS managed policies for AWS Cloud9. |
|
Edit an IAM policy and add required policy statements |
To edit an existing policy, you can add permissions for the
When editing the policy, add the policy statement (see the following) that allows the
|
You can use the following
permissions to run the StartSession API operation. The
ssm:resourceTag condition key specifies that a Session Manager session can be
started for any instance (Resource: arn:aws:ec2:*:*:instance/*) on the
condition that the instance is an AWS Cloud9 EC2 development environment
(aws:cloud9:environment).
Note
The following managed policies also include these policy statements:
AWSCloud9Administrator, AWSCloud9User,
and AWSCloud9EnvironmentMember.
{
            "Effect": "Allow",
            "Action": "ssm:StartSession",
            "Resource": "arn:aws:ec2:*:*:instance/*",
            "Condition": {
                "StringLike": {
                    "ssm:resourceTag/aws:cloud9:environment": "*"
                },
                "StringEquals": {
                    "aws:CalledViaFirst": "cloud9.amazonaws.com"
                }
            }
        },
        {
            "Effect": "Allow",
            "Action": [
                "ssm:StartSession"
            ],
            "Resource": [
                "arn:aws:ssm:*:*:document/*"
            ]
        }
Using CloudFormation to create no-ingress EC2 environments
When using an CloudFormation template to define a no-ingress Amazon EC2 development environment, do the following before creating the stack:
-
Create the
AWSCloud9SSMAccessRoleservice role andAWSCloud9SSMInstanceProfileinstance profile. For more information, see Creating service role and instance profile with an CloudFormation template. -
Update the policy for the IAM entity calling CloudFormation. This way, the entity can start a Session Manager session that connects to the EC2 instance. For more information, see Adding Systems Manager permissions to an IAM policy.
Creating service role and instance profile with an CloudFormation template
You need to create the service role AWSCloud9SSMAccessRole and the
instance profile AWSCloud9SSMInstanceProfile to enable Systems Manager to manage
the EC2 instance that backs your development environment.
If you previously created AWSCloud9SSMAccessRole and
AWSCloud9SSMInstanceProfile by creating a no-ingress EC2 environment with the console or running AWS CLI commands, the service
role and instance profile are already available for use.
Note
Suppose that you attempt to create an CloudFormation stack for a no-ingress EC2 environment but you didn't first create the required service role and instance profile. Then, the stack isn't created and the following error message is displayed:
Instance profile AWSCloud9SSMInstanceProfile does not exist in
                        account.
When creating a no-ingress EC2 environment for the first time using CloudFormation, you can define
the AWSCloud9SSMAccessRole and AWSCloud9SSMInstanceProfile
as IAM resources in the template.
This excerpt from a sample template shows how to define these resources. The
AssumeRole action returns security credentials that provide access
to both the AWS Cloud9 environment and its EC2 instance.
AWSTemplateFormatVersion: 2010-09-09
Resources:
  AWSCloud9SSMAccessRole:
    Type: AWS::IAM::Role
    Properties:
      AssumeRolePolicyDocument:
        Version: 2012-10-17
        Statement:
          - Effect: Allow
            Principal:
              Service:
              - cloud9.amazonaws.com
              - ec2.amazonaws.com
            Action:
              - 'sts:AssumeRole'
      Description: 'Service linked role for AWS Cloud9'
      Path: '/service-role/'
      ManagedPolicyArns:
        - arn:aws:iam::aws:policy/AWSCloud9SSMInstanceProfile
      RoleName: 'AWSCloud9SSMAccessRole'

  AWSCloud9SSMInstanceProfile:
    Type: "AWS::IAM::InstanceProfile"
    Properties:
      InstanceProfileName: AWSCloud9SSMInstanceProfile
      Path: "/cloud9/"
      Roles:
        -
          Ref: AWSCloud9SSMAccessRole
Adding Systems Manager permissions to an IAM policy
After defining a service role and instance profile in the CloudFormation template, ensure that the IAM entity creating the stack has permission to start a Session Manager session. A session is a connection made to the EC2 instance using Session Manager.
Note
If you don't add permissions to start a Session Manager session before creating a stack
for a no-ingress EC2 environment, an AccessDeniedException error is
returned.
Add the following permissions to the policy for the IAM entity by calling CloudFormation.
{
            "Effect": "Allow",
            "Action": "ssm:StartSession",
            "Resource": "arn:aws:ec2:*:*:instance/*",
            "Condition": {
                "StringLike": {
                    "ssm:resourceTag/aws:cloud9:environment": "*"
                },
                "StringEquals": {
                    "aws:CalledViaFirst": "cloudformation.amazonaws.com"
                }
            }
        },
        {
            "Effect": "Allow",
            "Action": [
                "ssm:StartSession"
            ],
            "Resource": [
                "arn:aws:ssm:*:*:document/*"
            ]
        }
Configuring VPC endpoints for Amazon S3 to download dependencies
If your AWS Cloud9 environment’s EC2 instance doesn't have access to the internet, create a VPC endpoint for a specified Amazon S3 bucket. This bucket contains the dependencies that are required to keep your IDE up-to-date.
Setting up a VPC endpoint for Amazon S3 also involves customizing the access policy. You want the access policy to allow access to only the trusted S3 bucket that contains the dependencies to be downloaded.
Note
You can create and configure VPC endpoints using the AWS Management Console, AWS CLI, or Amazon VPC API. The following procedure shows how to create a VPC endpoint by using the console interface.
Create and configure a VPC endpoint for Amazon S3
-
In the AWS Management Console, go to the console page for Amazon VPC.
-
Choose Endpoints in the navigation bar.
-
In the Endpoints page, choose Create Endpoint.
-
In the Create Endpoint page, enter "s3" in the search field and press Return to list available endpoints for Amazon S3 in the current AWS Region.
-
From the list of returned Amazon S3 endpoints, select the Gateway type.
-
Next, choose the VPC that contains your environment's EC2 instance.
-
Now choose the VPC's route table. This way, the associated subnets can access the endpoint. Your environment's EC2 instance is in one of these subnets.
-
In the Policy section, choose the Custom option, and replace the standard policy with the following.
For the
Resourceelement, replace{bucket_name}with the actual name of the bucket that's available in your AWS Region. For example, if you're using AWS Cloud9 in the Europe (Ireland) Region, you specify the following:"Resource": "arn:aws:s3:::static-eu-west-1-prod-static-hld3vzaf7c4h/content/dependencies/.The following table lists the bucket names for the AWS Regions where AWS Cloud9 is available.
Amazon S3 buckets in AWS Cloud9 Regions AWS Region Bucket name US East (Ohio)
static-us-east-2-prod-static-1c3sfcvf9hy4mUS East (N. Virginia)
static-us-east-1-prod-static-mft1klnkc4hlUS West (Oregon)
static-us-west-2-prod-static-p21mksqx9zlrUS West (N. California)
static-us-west-1-prod-static-16d59zrrp01z0Africa (Cape Town)
static-af-south-1-prod-static-v6v7i5ypdppvAsia Pacific (Hong Kong)
static-ap-east-1-prod-static-171xhpfkrorh6Asia Pacific (Mumbai) static-ap-south-1-prod-static-ykocre202i9dAsia Pacific (Osaka) static-ap-northeast-3-prod-static-ivmxqzrx2ioiAsia Pacific (Seoul) static-ap-northeast-2-prod-static-1wxyctlhwiajmAsia Pacific (Singapore) static-ap-southeast-1-prod-static-13ibpyrx4vk6dAsia Pacific (Sydney)
static-ap-southeast-2-prod-static-1cjsl8bx27rfuAsia Pacific (Tokyo)
static-ap-northeast-1-prod-static-4fwvbdisquj8Canada (Central)
static-ca-central-1-prod-static-g80lpejy486cEurope (Frankfurt)
static-eu-central-1-prod-static-14lbgls2vrkhEurope (Ireland)
static-eu-west-1-prod-static-hld3vzaf7c4hEurope (London)
static-eu-west-2-prod-static-36lbg202837xEurope (Milan)
static-eu-south-1-prod-static-1379tzkd3ni7dEurope (Paris)
static-eu-west-3-prod-static-1rwpkf766ke58Europe (Stockholm)
static-eu-north-1-prod-static-1qzw982y7yu7eMiddle East (Bahrain)
static-me-south-1-prod-static-gmljex38qtqxSouth America (São Paulo)
static-sa-east-1-prod-static-1cl8k0y7opidtIsrael (Tel Aviv)
static-il-central-1-prod-static-k02vrnhcesue -
Choose Create Endpoint.
If you provided the correct configuration information, a message displays the ID of the endpoint that's created.
-
To check that your IDE can access the Amazon S3 bucket, start a terminal session by choosing Window, New Terminal on the menu bar. Then run the following command, replacing
{bucket_name}with the actual name of the bucket for your Region.ping {bucket_name}.s3.{region}.amazonaws.com.For example, if you created an endpoint for an S3 bucket in the US East (N. Virginia) Region, run the following command.
ping static-us-east-1-prod-static-mft1klnkc4hl.s3.us-east-1.amazonaws.comIf the ping gets a response, this confirms that your IDE can access the bucket and its dependencies.
For more information about this feature, see Endpoints for Amazon S3 in the AWS PrivateLink Guide.
Configuring VPC endpoints for private connectivity
When you launch an instance into a subnet with the access using Systems Manager option, its security group doesn't have an inbound rule to allow incoming network traffic. But, the security group has an outbound rule that permits outbound traffic from the instance. This is required to download packages and libraries required to keep the AWS Cloud9 IDE up to date.
To prevent outbound and inbound traffic for the instance, create and configure Amazon VPC
endpoints for Systems Manager. With an interface VPC endpoint (interface endpoint), you can
connect to services powered by AWS PrivateLink. AWS PrivateLink is a technology that can be used to privately
access Amazon EC2 and Systems Manager APIs by using private IP addresses. To configure VPC endpoints to
use Systems Manager, follow the instructions provided by this Knowledge Center resource
Warning
Assume that you configure a security group that doesn't permit inbound or outbound networking traffic. Then, the EC2 instance that supports your AWS Cloud9 IDE doesn't have internet access. You need to create an Amazon S3 endpoint for your VPC to allow access to the dependencies that are contained in a trusted S3 bucket. In addition, some AWS services, such as AWS Lambda, might not work as intended without internet access.
With AWS PrivateLink, there are data processing charges for each gigabyte processed
through the VPC endpoint. This is regardless of the traffic’s source or destination.
For more information, see AWS PrivateLink pricing
