AWS Cloud9 is no longer available to new customers. Existing customers of
AWS Cloud9 can continue to use the service as normal.
Learn more
Enterprise setup for AWS Cloud9
This topic explains how to use AWS IAM Identity Center
Warning
To avoid security risks, don't use IAM users for authentication when developing purpose-built software or working with real data. Instead, use federation with an identity provider such as AWS IAM Identity Center.
These instructions assume that you have or will have administrative access to the organization in AWS Organizations. If you don't already have administrative access to the organization in AWS Organizations, see your AWS account administrator. For more information, see the following resources:
-
Managing access permissions for your AWS Organization in the AWS Organizations User Guide (IAM Identity Center requires the use of AWS Organizations)
-
Overview of managing access permissions to your IAM Identity Center Resources in the AWS IAM Identity Center User Guide
-
Using AWS Control Tower, which is a service that you can use to set up and govern an AWS multi-account environment. AWS Control Tower engages the capabilities of other AWS services, including AWS Organizations, AWS Service Catalog and AWS IAM Identity Center, to build a landing zone in less than an hour.
For introductory information that's related to this topic, see the following resources:
-
What is AWS Organizations in the AWS Organizations User Guide (IAM Identity Center requires the use of AWS Organizations)
-
What is AWS IAM Identity Center in the AWS IAM Identity Center User Guide
-
Getting started with AWS Control Tower in the AWS Control Tower User Guide
-
The 4-minute video AWS Knowledge Center Videos: How do I get started with AWS Organizations
on YouTube -
The 7-minute video Manage user access to multiple AWS accounts using AWS IAM Identity Center
on YouTube -
The 9-minute video How to set up AWS Single Sign On for your on-premise Active Directory users
on YouTube
The following conceptual diagram shows what you end up with.
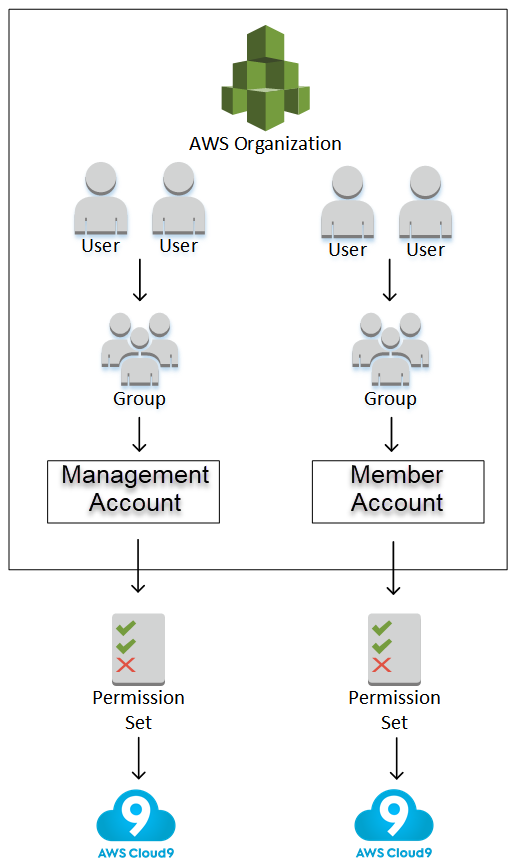
To enable one or more AWS account to start using AWS Cloud9 within an enterprise, follow the steps according to the AWS resources that you already have.
| Do you have an AWS account that can or does serve as the management account for the organization in AWS Organizations? | Do you have an organization in AWS Organizations for that management account? | Are all of the wanted AWS accounts members of that organization? | Is that organization set up to use IAM Identity Center? | Is that organization set up with all of the wanted groups and users who want to use AWS Cloud9? | Start with this step |
|---|---|---|---|---|---|
|
No |
— |
— |
— |
— |
|
|
Yes |
No |
— |
— |
— |
|
|
Yes |
Yes |
No |
— |
— |
|
|
Yes |
Yes |
Yes |
No |
— |
|
|
Yes |
Yes |
Yes |
Yes |
No |
|
|
Yes |
Yes |
Yes |
Yes |
Yes |
Step 6. Enable groups and users within the organization to use AWS Cloud9 |
Step 1: Create a management account for the organization
Note
Your enterprise might already have a management account set up for you. If your enterprise has an AWS account administrator, check with that person before starting the following procedure. If you already have a management account, skip ahead to Step 2: Create an Organization for the management account.
To use AWS IAM Identity Center (IAM Identity Center), you must have an AWS account. Your AWS account serves as the management account for an organization in AWS Organizations. For more information, see the discussion about management accounts in AWS Organizations terminology and concepts in the AWS Organizations User Guide.
To watch a 4-minute video that's related to the following procedure, see Creating an Amazon Web Services
account
To create a management account:
-
Go to https://aws.amazon.com/
. -
Choose Sign In to the Console.
-
Choose Create a new AWS account.
-
Complete the process by following the on-screen directions. This includes giving AWS your email address and credit card information. You must also use your phone to enter a code that AWS gives you.
After you finish creating the account, AWS will send you a confirmation email. Do not go to the next step until you get this confirmation.
Step 2: Create an organization for the management account
Note
Your enterprise might already have AWS Organizations set up to use the management account. If your enterprise has an AWS account administrator, check with that person before starting the following procedure. If you already have AWS Organizations set up to use the management account, skip ahead to Step 3: Add member accounts to the organization.
To use IAM Identity Center, you must have an organization in AWS Organizations that uses the management account. For more information, see the discussion about organizations in AWS Organizations terminology and concepts in the AWS Organizations User Guide.
To create an organization in AWS Organizations for the management AWS account, follow these instructions in the AWS Organizations User Guide:
To watch a 4-minute video related to these procedures, see AWS Knowledge Center Videos: How do
I get started with AWS Organizations
Step 3: Add member accounts to the organization
Note
Your enterprise might already have AWS Organizations set up with the wanted member accounts. If your enterprise has an AWS account administrator, check with that person before starting the following procedure. If you already have AWS Organizations set up with the wanted member accounts, skip ahead to Step 4: Enable IAM Identity Center across the organization.
In this step, you add any AWS accounts that will serve as member accounts for the organization in AWS Organizations. For more information, see the discussion about member accounts in AWS Organizations terminology and concepts in the AWS Organizations User Guide.
Note
You don't have to add any member accounts to the organization. You can use IAM Identity Center with just the single management account in the organization. Later, you can add member accounts to the organization, if you want. If you don't want to add any member accounts now, skip ahead to Step 4: Enable IAM Identity Center across the organization.
To add member accounts to the organization in AWS Organizations, follow one or both of the following sets of instructions in the AWS Organizations User Guide. Repeat these instructions as many times as needed until you have all of the AWS accounts that you want as members of the organization:
Step 4: Enable IAM Identity Center across the organization
Note
Your enterprise might already have AWS Organizations set up to use IAM Identity Center. If your enterprise has an AWS account administrator, check with that person before starting the following procedure. If you already have AWS Organizations set up to use IAM Identity Center, skip ahead to Step 5. Set up groups and users within the organization.
In this step, you enable the organization in AWS Organizations to use IAM Identity Center. To do this, follow these sets of instructions in the AWS IAM Identity Center User Guide:
Step 5. Set up groups and users within the organization
Note
Your enterprise might already have AWS Organizations set up with groups and users from either an IAM Identity Center directory or an AWS Managed Microsoft AD or AD Connector directory that's managed in AWS Directory Service. If your enterprise has an AWS account administrator, check with that person before starting the following procedure. If you already have AWS Organizations set up with groups and users from either an IAM Identity Center directory or AWS Directory Service, skip ahead to Step 6. Enable groups and users within the organization to use AWS Cloud9.
In this step, either you create groups and users in an IAM Identity Center directory for the organization. Or, you connect to an AWS Managed Microsoft AD or AD Connector directory that's managed in AWS Directory Service for the organization. In a later step, you give groups the necessary access permissions to use AWS Cloud9.
-
If you're using an IAM Identity Center directory for the organization, follow these sets of instructions in the AWS IAM Identity Center User Guide. Repeat these steps as many times as needed until you have all of the groups and users that you want:
-
Add groups. We recommend creating at least one group for any AWS Cloud9 administrators across the organization. Then, repeat this step to create another group for all AWS Cloud9 users across the organization. Optionally, you might also repeat this step to create a third group for all users across the organization that you want to share existing AWS Cloud9 development environments with. But, don't allow them to create environments on their own. For ease of use, we recommend naming these groups
AWSCloud9Administrators,AWSCloud9Users, andAWSCloud9EnvironmentMembers, respectively. For more information, see AWS managed (predefined) policies for AWS Cloud9. -
Add users to groups. Add any AWS Cloud9 administrators to the
AWSCloud9Administratorsgroup, repeat this step to add AWS Cloud9 users to theAWSCloud9Usersgroup. Optionally, also repeat this step to add any remaining users to theAWSCloud9EnvironmentMembersgroup. Adding users to groups is an AWS security best practice that can help you better control, track, and troubleshoot issues with AWS resource access.
-
-
If you're using an AWS Managed Microsoft AD or AD Connector directory that you manage in AWS Directory Service for the organization, see Connect to your Microsoft AD directory in the AWS IAM Identity Center User Guide.
Step 6. Enable groups and users within the organization to use AWS Cloud9
By default, most users and groups in an organization in AWS Organizations don't have access to any AWS services, including AWS Cloud9. In this step, you use IAM Identity Center to allow groups and users across an organization in AWS Organizations to use AWS Cloud9 within any combination of participating accounts.
-
In the IAM Identity Center console
, choose AWS accounts in the service navigation pane. -
Choose the Permission sets tab.
-
Choose Create permission set set.
-
Select Create a custom permission set.
-
Enter a Name for this permission set. We recommend creating at least one permission set for any AWS Cloud9 administrators across the organization. Then, repeat steps 3 through 10 in this procedure to create another permission set for all AWS Cloud9 users across the organization. Optionally, you might also repeat steps 3 through 10 in this procedure to create a third permission set for all users across the organization that you want to share existing AWS Cloud9 development environments with. But, don't allow them to create environments on their own. For ease of use, we recommend naming these permission sets
AWSCloud9AdministratorsPerms,AWSCloud9UsersPerms, andAWSCloud9EnvironmentMembersPerms, respectively. For more information, see AWS managed (predefined) policies for AWS Cloud9. -
Enter an optional Description for the permission set.
-
Choose a Session duration for the permission set, or leave the default session duration of 1 hour.
-
Select Attach AWS managed policies.
-
In the list of policies, select one of the following boxes next to the correct Policy name entry. (Don't choose the policy name itself. If you don't see a policy name in the list, enter the policy name in the Search box to display it.)
-
For the
AWSCloud9AdministratorsPermspermission set, select AWSCloud9Administrator. -
For the
AWSCloud9UsersPermspermission set, select AWSCloud9User. -
Optionally, for the
AWSCloud9EnvironmentMembersPermspermission set, select AWSCloud9EnvironmentMember.
Note
To learn about policies that you can add in addition to the policies that are required by AWS Cloud9, see Managed policies and inline policies and Understanding permissions granted by a policy in the IAM User Guide.
-
-
Choose Create.
-
After you finish creating all of the permission sets that you want, on the AWS organization tab, choose the AWS account that you want to assign AWS Cloud9 access permissions to. If the AWS organization tab isn't visible, then in the service navigation pane, choose AWS accounts. This displays the AWS organization tab.
-
Choose Assign users.
-
On the Groups tab, select the box that's next to the name of the group that you want to assign AWS Cloud9 access permissions to. Don't choose the group name itself.
-
If you're using an IAM Identity Center directory for the organization, you might have a created a group that's named AWSCloud9Administrators for AWS Cloud9 administrators.
-
If you're using an AWS Managed Microsoft AD or AD Connector directory that you manage in AWS Directory Service for the organization, choose the directory's ID. Next, enter part or all of the group's name and choose Search connected directory. Last, select the box next to the name of the group that you want to assign AWS Cloud9 access permissions to.
Note
We recommend assigning AWS Cloud9 access permissions to groups instead of to individual users. This AWS security best practice can help you better control, track, and troubleshoot issues with AWS resource access.
-
-
Choose Next: Permission sets.
-
Select the box next to the name of the permission set that you want to assign to this group (for example, AWSCloud9AdministratorsPerms for a group of AWS Cloud9 administrators). Don't choose the permission set name itself.
-
Choose Finish.
-
Choose Proceed to AWS accounts.
-
Repeat steps 11 through 17 in this procedure for any additional AWS Cloud9 access permissions that you want to assign to AWS accounts across the organization.
Step 7: Start using AWS Cloud9
After you complete the previous steps in this topic, you and your users are ready to sign in to IAM Identity Center and start using AWS Cloud9.
-
If you are already signed in to an AWS account or to IAM Identity Center, sign out. To do this, see How do I sign out of my AWS account
on the AWS Support website or How to sign out of the user portal in the AWS IAM Identity Center User Guide. -
To sign in to IAM Identity Center, follow the instructions in How to accept the invitation to join IAM Identity Center in the AWS IAM Identity Center User Guide. This includes going to a unique sign-in URL and signing in with unique sign-in credentials. Your AWS account administrator will either email you this information or otherwise provide it to you.
Note
Make sure to bookmark the unique sign-in URL that you were provided. This way, you can easily return to it later. Also, make sure to store the unique sign-in credentials for this URL in a secure location.
This combination of URL, user name, and password might change depending on different levels of AWS Cloud9 access permissions that your AWS account administrator gives you. For example, you might use one URL, user name, and password to get AWS Cloud9 administrator access to one account. You might use a different URL, user name, and password that allows only AWS Cloud9 user access to a different account.
-
After you sign in to IAM Identity Center, choose the AWS account tile.
-
Choose your user's display name from the drop-down list that's displayed. If more than one name is displayed, choose the name that you want to start using AWS Cloud9. If you're not sure which of these names to choose, see your AWS account administrator.
-
Choose the Management console link next to your user's display name. If more than one Management console link is displayed, choose the link that's next to the correct permission set. If you're not sure which of these links to choose, see your AWS account administrator.
-
From the AWS Management Console, do one of the following:
-
Choose Cloud9, if it's already displayed.
-
Expand All services, and then choose Cloud9.
-
In the Find services box, type Cloud9, and then press
Enter. -
In the AWS navigation bar, choose Services, and then choose Cloud9.
-
The AWS Cloud9 console is displayed, and you can begin using AWS Cloud9.
Next steps
| Task | See this topic |
|---|---|
|
Create an AWS Cloud9 development environment, and then use the AWS Cloud9 IDE to work with code in your new environment. |
|
|
Learn how to use the AWS Cloud9 IDE. |
|
|
Invite others to use your new environment along with you in real time and with text chat support. |
