Tutorial: Create a pipeline that uses Amazon S3 as a deployment provider
In this tutorial, you configure a pipeline that continuously delivers files using Amazon S3 as the deployment action provider in your deployment stage. The completed pipeline detects changes when you make a change to the source files in your source repository. The pipeline then uses Amazon S3 to deploy the files to your bucket. Each time you modify or add your website files in your source location, the deployment creates the website with your latest files.
Important
As part of creating a pipeline, an S3 artifact bucket provided by the customer will be used by CodePipeline for artifacts. (This is different from the bucket used for an S3 source action.) If the S3 artifact bucket is in a different account from the account for your pipeline, make sure that the S3 artifact bucket is owned by AWS accounts that are safe and will be dependable.
Note
Even if you delete files from the source repository, the S3 deploy action does not delete S3 objects corresponding to deleted files.
This tutorial provides two options:
-
Create a pipeline that deploys a static website to your S3 public bucket. This example creates a pipeline with an AWS CodeCommit source action and an Amazon S3 deployment action. See Option 1: Deploy static website files to Amazon S3.
-
Create a pipeline that compiles sample TypeScript code into JavaScript and deploys the CodeBuild output artifact to your S3 bucket for archive. This example creates a pipeline with an Amazon S3 source action, a CodeBuild build action, and an Amazon S3 deployment action. See Option 2: Deploy built archive files to Amazon S3 from an S3 source bucket.
Important
Many of the actions you add to your pipeline in this procedure involve AWS resources that you need to create before you create the pipeline. AWS resources for your source actions must always be created in the same AWS Region where you create your pipeline. For example, if you create your pipeline in the US East (Ohio) Region, your CodeCommit repository must be in the US East (Ohio) Region.
You can add cross-region actions when you create your pipeline. AWS resources for cross-region actions must be in the same AWS Region where you plan to execute the action. For more information, see Add a cross-Region action in CodePipeline.
Option 1: Deploy static website files to Amazon S3
In this example, you download the sample static website template file, upload the files to your AWS CodeCommit repository, create your bucket, and configure it for hosting. Next, you use the AWS CodePipeline console to create your pipeline and specify an Amazon S3 deployment configuration.
Prerequisites
You must already have the following:
-
A CodeCommit repository. You can use the AWS CodeCommit repository you created in Tutorial: Create a simple pipeline (CodeCommit repository).
-
Source files for your static website. Use this link to download a sample static website. The sample-website.zip download produces the following files:
-
An
index.htmlfile -
A
main.cssfile -
A
graphic.jpgfile
-
-
An S3 bucket configured for website hosting. See Hosting a static website on Amazon S3. Make sure you create your bucket in the same Region as the pipeline.
Note
To host a website, your bucket must have public read access, which gives everyone read access. With the exception of website hosting, you should keep the default access settings that block public access to S3 buckets.
Step 1: Push source files to your CodeCommit repository
In this section, push your source files to the repository that the pipeline uses for your source stage.
To push files to your CodeCommit repository
-
Extract the downloaded sample files. Do not upload the ZIP file to your repository.
-
Push or upload the files to your CodeCommit repository. These files are the source artifact created by the Create Pipeline wizard for your deployment action in CodePipeline. Your files should look like this in your local directory:
index.html main.css graphic.jpg -
You can use Git or the CodeCommit console to upload your files:
-
To use the Git command line from a cloned repository on your local computer:
-
Run the following command to stage all of your files at once:
git add -A -
Run the following command to commit the files with a commit message:
git commit -m "Added static website files" -
Run the following command to push the files from your local repo to your CodeCommit repository:
git push
-
-
To use the CodeCommit console to upload your files:
-
Open the CodeCommit console, and choose your repository from the Repositories list.
-
Choose Add file, and then choose Upload file.
-
Select Choose file, and then browse for your file. Commit the change by entering your user name and email address. Choose Commit changes.
-
Repeat this step for each file you want to upload.
-
-
Step 2: Create your pipeline
In this section, you create a pipeline with the following actions:
-
A source stage with a CodeCommit action where the source artifacts are the files for your website.
-
A deployment stage with an Amazon S3 deployment action.
To create a pipeline with the wizard
Sign in to the AWS Management Console and open the CodePipeline console at http://console.aws.amazon.com/codesuite/codepipeline/home
. -
On the Welcome page, Getting started page, or Pipelines page, choose Create pipeline.
-
On the Step 1: Choose creation option page, under Creation options, choose the Build custom pipeline option. Choose Next.
-
In Step 2: Choose pipeline settings, in Pipeline name, enter
MyS3DeployPipeline. -
In Pipeline type, choose V2. For more information, see Pipeline types. Choose Next.
-
In Service role, choose New service role to allow CodePipeline to create a service role in IAM.
-
Leave the settings under Advanced settings at their defaults, and then choose Next.
-
In Step 3: Add source stage, in Source provider, choose AWS CodeCommit. In Repository name, choose the name of the CodeCommit repository you created in Step 1: Create a CodeCommit repository. In Branch name, choose the name of the branch that contains your latest code update. Unless you created a different branch on your own, only
mainis available.After you select the repository name and branch, the Amazon CloudWatch Events rule to be created for this pipeline is displayed.
Choose Next.
-
In Step 4: Add build stage, choose Skip build stage, and then accept the warning message by choosing Skip again.
Choose Next.
-
In Step 5: Add test stage, choose Skip test stage, and then accept the warning message by choosing Skip again.
Choose Next.
-
In Step 6: Add deploy stage:
-
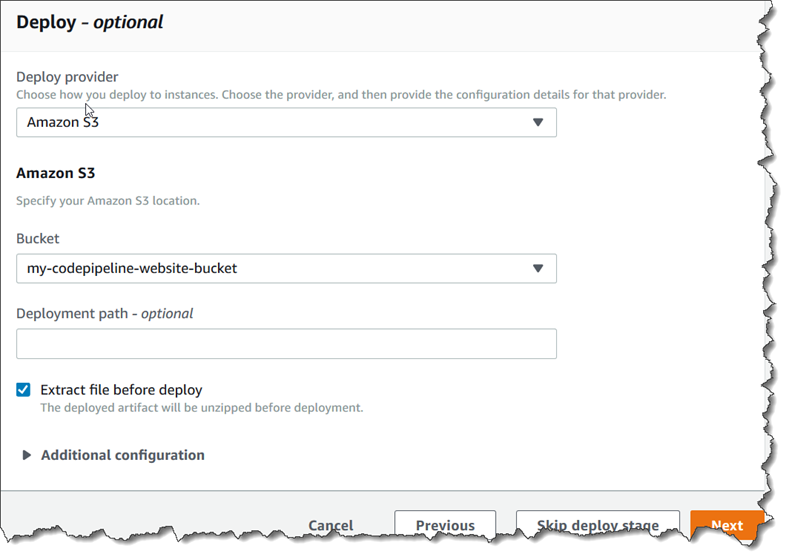
In Deploy provider, choose Amazon S3.
-
In Bucket, enter the name of your public bucket.
-
Select Extract file before deploy.
Note
The deployment fails if you do not select Extract file before deploy. This is because the AWS CodeCommit action in your pipeline zips source artifacts and your file is a ZIP file.
When Extract file before deploy is selected, Deployment path is displayed. Enter the name of the path you want to use. This creates a folder structure in Amazon S3 to which the files are extracted. For this tutorial, leave this field blank.

-
(Optional) In Canned ACL, you can apply a set of predefined grants, known as a canned ACL, to the uploaded artifacts.
-
(Optional) In Cache control, enter the caching parameters. You can set this to control caching behavior for requests/responses. For valid values, see the
Cache-Controlheader field for HTTP operations. -
Choose Next.
-
-
In Step 7: Review, review the information, and then choose Create pipeline.
-
After your pipeline runs successfully, open the Amazon S3 console and verify that your files appear in your public bucket as shown:
index.html main.css graphic.jpg -
Access your endpoint to test the website. Your endpoint follows this format:
http://.bucket-name.s3-website-region.amazonaws.com/Example endpoint:
http://my-bucket.s3-website-us-west-2.amazonaws.com/.The sample web page appears.
Step 3: Make a change to any source file and verify deployment
Make a change to your source files and then push the change to your repository. This triggers your pipeline to run. Verify that your website is updated.
Option 2: Deploy built archive files to Amazon S3 from an S3 source bucket
In this option, the build commands in your build stage compile TypeScript code into JavaScript code and deploy the output to your S3 target bucket under a separate timestamped folder. First, you create TypeScript code and a buildspec.yml file. After you combine the source files in a ZIP file, you upload the source ZIP file to your S3 source bucket, and use a CodeBuild stage to deploy a built application ZIP file to your S3 target bucket. The compiled code is retained as an archive in your target bucket.
Prerequisites
You must already have the following:
-
An S3 source bucket. You can use the bucket you created in Tutorial: Create a simple pipeline (S3 bucket).
-
An S3 target bucket. See Hosting a static website on Amazon S3. Make sure you create your bucket in the same AWS Region as the pipeline you want to create.
Note
This example demonstrates deploying files to a private bucket. Do not enable your target bucket for website hosting or attach any policies that make the bucket public.
Step 1: Create and upload source files to your S3 source bucket
In this section, you create and upload your source files to the bucket that the pipeline uses for your source stage. This section provides instructions for creating the following source files:
-
A
buildspec.ymlfile, which is used for CodeBuild build projects. -
An
index.tsfile.
To create a buildspec.yml file
-
Create a file named
buildspec.ymlwith the following contents. These build commands install TypeScript and use the TypeScript compiler to rewrite the code inindex.tsto JavaScript code.version: 0.2 phases: install: commands: - npm install -g typescript build: commands: - tsc index.ts artifacts: files: - index.js
To create an index.ts file
-
Create a file named
index.tswith the following contents.interface Greeting { message: string; } class HelloGreeting implements Greeting { message = "Hello!"; } function greet(greeting: Greeting) { console.log(greeting.message); } let greeting = new HelloGreeting(); greet(greeting);
To upload files to your S3 source bucket
-
Your files should look like this in your local directory:
buildspec.yml
index.ts
Zip the files and name the file
source.zip. -
In the Amazon S3 console, for your source bucket, choose Upload. Choose Add files, and then browse for the ZIP file you created.
-
Choose Upload. These files are the source artifact created by the Create Pipeline wizard for your deployment action in CodePipeline. Your file should look like this in your bucket:
source.zip
Step 2: Create your pipeline
In this section, you create a pipeline with the following actions:
-
A source stage with an Amazon S3 action where the source artifacts are the files for your downloadable application.
-
A deployment stage with an Amazon S3 deployment action.
To create a pipeline with the wizard
Sign in to the AWS Management Console and open the CodePipeline console at http://console.aws.amazon.com/codesuite/codepipeline/home
. -
On the Welcome page, Getting started page, or Pipelines page, choose Create pipeline.
-
On the Step 1: Choose creation option page, under Creation options, choose the Build custom pipeline option. Choose Next.
-
In Step 2: Choose pipeline settings, in Pipeline name, enter
MyS3DeployPipeline. -
In Service role, choose New service role to allow CodePipeline to create a service role in IAM.
-
Leave the settings under Advanced settings at their defaults, and then choose Next.
-
In Step 3: Add source stage, in Source provider, choose Amazon S3. In Bucket, choose the name of your source bucket. In S3 object key, enter the name of your source ZIP file. Make sure you include the .zip file extension.
Choose Next.
-
In Step 4: Add build stage:
-
In Build provider, choose CodeBuild.
-
Choose Create build project. On the Create project page:
-
In Project name, enter a name for this build project.
-
In Environment, choose Managed image. For Operating system, choose Ubuntu.
-
For Runtime, choose Standard. For Runtime version, choose aws/codebuild/standard:1.0.
-
In Image version, choose Always use the latest image for this runtime version.
-
For Service role, choose your CodeBuild service role, or create one.
-
For Build specifications, choose Use a buildspec file.
-
Choose Continue to CodePipeline. A message is displayed if the project was created successfully.
-
Choose Next.
-
-
In Step 5: Add deploy stage:
-
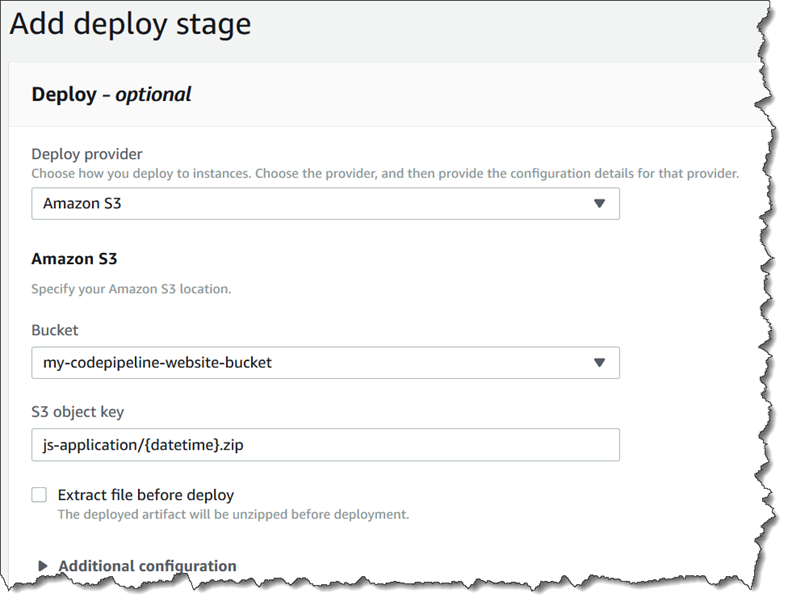
In Deploy provider, choose Amazon S3.
-
In Bucket, enter the name of your S3 target bucket.
-
Make sure that Extract file before deploy is cleared.
When Extract file before deploy is cleared, S3 object key is displayed. Enter the name of the path you want to use:
js-application/{datetime}.zip.This creates a
js-applicationfolder in Amazon S3 to which the files are extracted. In this folder, the{datetime}variable creates a timestamp on each output file when your pipeline runs.
-
(Optional) In Canned ACL, you can apply a set of predefined grants, known as a canned ACL, to the uploaded artifacts.
-
(Optional) In Cache control, enter the caching parameters. You can set this to control caching behavior for requests/responses. For valid values, see the
Cache-Controlheader field for HTTP operations. -
Choose Next.
-
-
In Step 6: Review, review the information, and then choose Create pipeline.
-
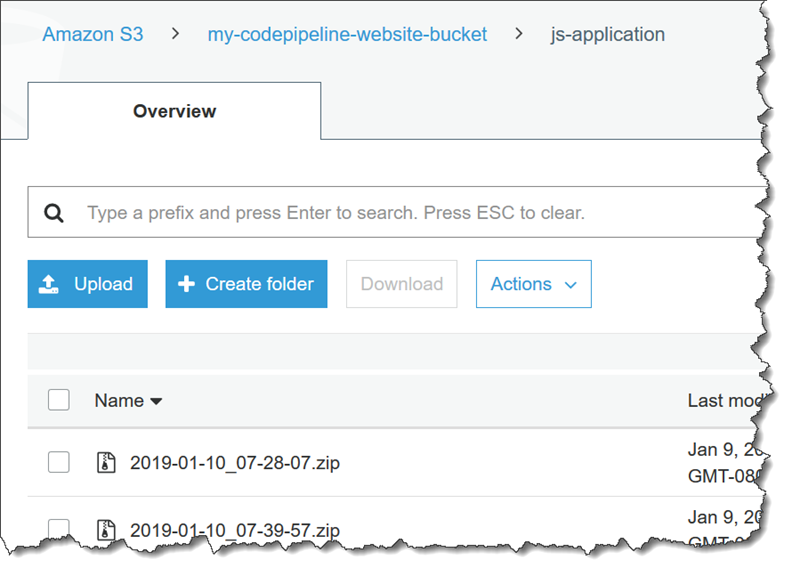
After your pipeline runs successfully, view your bucket in the Amazon S3 console. Verify that your deployed ZIP file is displayed in your target bucket under the
js-applicationfolder. The JavaScript file contained in the ZIP file should beindex.js. Theindex.jsfile contains the following output:var HelloGreeting = /** @class */ (function () { function HelloGreeting() { this.message = "Hello!"; } return HelloGreeting; }()); function greet(greeting) { console.log(greeting.message); } var greeting = new HelloGreeting(); greet(greeting);
Step 3: Make a change to any source file and verify deployment
Make a change to your source files and then upload them to your source bucket.
This triggers your pipeline to run. View your target bucket and verify that the
deployed output files are available in the js-application folder as
shown:
