Tutorial: Create a simple pipeline (CodeCommit repository)
In this tutorial, you use CodePipeline to deploy code maintained in a CodeCommit repository to a single Amazon EC2 instance. Your pipeline is triggered when you push a change to the CodeCommit repository. The pipeline deploys your changes to an Amazon EC2 instance using CodeDeploy as the deployment service.
Important
As part of creating a pipeline, an S3 artifact bucket provided by the customer will be used by CodePipeline for artifacts. (This is different from the bucket used for an S3 source action.) If the S3 artifact bucket is in a different account from the account for your pipeline, make sure that the S3 artifact bucket is owned by AWS accounts that are safe and will be dependable.
The pipeline has two stages:
-
A source stage (Source) for your CodeCommit source action.
-
A deployment stage (Deploy) for your CodeDeploy deployment action.
The easiest way to get started with AWS CodePipeline is to use the Create Pipeline wizard in the CodePipeline console.
Note
Before you begin, make sure you've set up your Git client to work with CodeCommit. For instructions, see Setting up for CodeCommit.
Step 1: Create a CodeCommit repository
First, you create a repository in CodeCommit. Your pipeline gets source code from this repository when it runs. You also create a local repository where you maintain and update code before you push it to the CodeCommit repository.
To create a CodeCommit repository
-
Open the CodeCommit console at https://console.aws.amazon.com/codecommit/
. -
In the Region selector, choose the AWS Region where you want to create the repository and pipeline. For more information, see AWS Regions and Endpoints.
-
On the Repositories page, choose Create repository.
-
On the Create repository page, in Repository name, enter a name for your repository (for example,
MyDemoRepo). -
Choose Create.
Note
The remaining steps in this tutorial use MyDemoRepo for the name
of your CodeCommit repository. If you choose a different name, be sure to use it throughout this
tutorial.
To set up a local repository
In this step, you set up a local repository to connect to your remote CodeCommit repository.
Note
You are not required to set up a local repository. You can also use the console to upload files as described in Step 2: Add sample code to your CodeCommit repository.
-
With your new repository open in the console, choose Clone URL on the top right of the page, and then choose Clone SSH. The address to clone your Git repository is copied to your clipboard.
-
In your terminal or command line, navigate to a local directory where you'd like your local repository to be stored. In this tutorial, we use
/tmp. -
Run the following command to clone the repository, replacing the SSH address with the one you copied in the previous step. This command creates a directory called
MyDemoRepo. You copy a sample application to this directory.git clone ssh://git-codecommit.us-west-2.amazonaws.com/v1/repos/MyDemoRepo
Step 2: Add sample code to your CodeCommit repository
In this step, you download code for a sample application that was created for a CodeDeploy sample walkthrough, and add it to your CodeCommit repository.
-
Next, download a sample and save it into a folder or directory on your local computer.
-
Choose one of the following. Choose
SampleApp_Linux.zipif you want to follow the steps in this tutorial for Linux instances.-
If you want to deploy to Amazon Linux instances using CodeDeploy, download the sample application here: SampleApp_Linux.zip.
-
If you want to deploy to Windows Server instances using CodeDeploy, download the sample application here: SampleApp_Windows.zip.
The sample application contains the following files for deploying with CodeDeploy:
-
appspec.yml– The application specification file (AppSpec file) is a YAML-formatted file used by CodeDeploy to manage a deployment. For more information about the AppSpec file, see CodeDeploy AppSpec File reference in the AWS CodeDeploy User Guide. -
index.html– The index file contains the home page for the deployed sample application. -
LICENSE.txt– The license file contains license information for the sample application. -
Files for scripts – The sample application uses scripts to write text files to a location on your instance. One file is written for each of several CodeDeploy deployment lifecycle events as follows:
-
(Linux sample only)
scriptsfolder – The folder contains the following shell scripts to install dependencies and start and stop the sample application for the automated deployment:install_dependencies,start_server, andstop_server. -
(Windows sample only)
before-install.bat– This is a batch script for theBeforeInstalldeployment lifecycle event, which will run to remove old files written during previous deployments of this sample and create a location on your instance to which to write the new files.
-
-
-
Download the compressed (zipped) file.
-
-
Unzip the files from SampleApp_Linux.zip into the local directory you created earlier (for example,
/tmp/MyDemoRepoorc:\temp\MyDemoRepo).Be sure to place the files directly into your local repository. Do not include a
SampleApp_Linuxfolder. On your local Linux, macOS, or Unix machine, for example, your directory and file hierarchy should look like this:/tmp └-- MyDemoRepo │-- appspec.yml │-- index.html │-- LICENSE.txt └-- scripts │-- install_dependencies │-- start_server └-- stop_server -
To upload files to your repository, use one of the following methods.
-
To use the CodeCommit console to upload your files:
-
Open the CodeCommit console, and choose your repository from the Repositories list.
-
Choose Add file, and then choose Upload file.
-
Select Choose file, and then browse for your file. To add a file under a folder, choose Create file and then enter the folder name with the file name, such as
scripts/install_dependencies. Paste the file contents into the new file.Commit the change by entering your user name and email address.
Choose Commit changes.
-
Repeat this step for each file.
Your repository contents should look like this:
       │-- appspec.yml
       │-- index.html
       │-- LICENSE.txt
       └-- scripts
           │-- install_dependencies
           │-- start_server
           └-- stop_server
-
-
To use git commands to upload your files:
-
Change directories to your local repo:
(For Linux, macOS, or Unix)cd /tmp/MyDemoRepo(For Windows)cd c:\temp\MyDemoRepo -
Run the following command to stage all of your files at once:
git add -A -
Run the following command to commit the files with a commit message:
git commit -m "Add sample application files" -
Run the following command to push the files from your local repo to your CodeCommit repository:
git push
-
-
-
The files you downloaded and added to your local repo have now been added to the
mainbranch in your CodeCommitMyDemoReporepository and are ready to be included in a pipeline.
Step 3: Create an Amazon EC2 Linux instance and install the CodeDeploy agent
In this step, you create the Amazon EC2 instance where you deploy a sample application. As part of this process, create an instance role that allows install and management of the CodeDeploy agent on the instance. The CodeDeploy agent is a software package that enables an instance to be used in CodeDeploy deployments. You also attach policies that allow the instance to fetch files that the CodeDeploy agent uses to deploy your application and to allow the instance to be managed by SSM.
To create an instance role
-
Open the IAM console at https://console.aws.amazon.com/iam/
). -
From the console dashboard, choose Roles.
-
Choose Create role.
-
Under Select type of trusted entity, select AWS service. Under Choose a use case, select EC2. Under Select your use case, choose EC2. Choose Next: Permissions.
-
Search for and select the policy named
AmazonEC2RoleforAWSCodeDeploy. -
Search for and select the policy named
AmazonSSMManagedInstanceCore. Choose Next: Tags. -
Choose Next: Review. Enter a name for the role (for example,
EC2InstanceRole).Note
Make a note of your role name for the next step. You choose this role when you are creating your instance.
Choose Create role.
To launch an instance
Open the Amazon EC2 console at https://console.aws.amazon.com/ec2/
. -
From the side navigation, choose Instances, and select Launch instances from the top of the page.
-
In Name, enter
MyCodePipelineDemo. This assigns the instance a tag Key ofNameand a tag Value ofMyCodePipelineDemo. Later, you create a CodeDeploy application that deploys the sample application to this instance. CodeDeploy selects instances to deploy based on the tags. -
Under Application and OS Images (Amazon Machine Image), locate the Amazon Linux AMI option with the AWS logo, and make sure it is selected. (This AMI is described as the Amazon Linux 2 AMI (HVM) and is labeled "Free tier eligible".)
-
Under Instance type, choose the free tier eligible
t2.microtype as the hardware configuration for your instance. -
Under Key pair (login), choose a key pair or create one.
You can also choose Proceed without a key pair.
Note
For the purposes of this tutorial, you can proceed without a key pair. To use SSH to connect to your instances, create or use a key pair.
-
Under Network settings, do the following.
In Auto-assign Public IP, make sure the status is Enable.
For the created security group, choose HTTP, and then under Source type, choose My IP.
-
Expand Advanced details. In IAM instance profile, choose the IAM role you created in the previous procedure (for example,
EC2InstanceRole). -
Under Summary, under Number of instances, enter
1.. -
Choose Launch instance.
-
You can view the status of the launch on the Instances page. When you launch an instance, its initial state is
pending. After the instance starts, its state changes torunning, and it receives a public DNS name. (If the Public DNS column is not displayed, choose the Show/Hide icon, and then select Public DNS.)
Step 4: Create an application in CodeDeploy
In CodeDeploy, an application is a resource that contains the software application you want to deploy. Later, you use this application with CodePipeline to automate deployments of the sample application to your Amazon EC2 instance.
First, you create a role that allows CodeDeploy to perform deployments. Then, you create a CodeDeploy application.
To create a CodeDeploy service role
-
Open the IAM console at https://console.aws.amazon.com/iam/
). -
From the console dashboard, choose Roles.
-
Choose Create role.
-
Under Select trusted entity, choose AWS service. Under Use case, choose CodeDeploy. Choose CodeDeploy from the options listed. Choose Next. The
AWSCodeDeployRolemanaged policy is already attached to the role. -
Choose Next.
-
Enter a name for the role (for example,
CodeDeployRole), and then choose Create role.
To create an application in CodeDeploy
-
Open the CodeDeploy console at https://console.aws.amazon.com/codedeploy
. -
If the Applications page does not appear, on the menu, choose Applications.
-
Choose Create application.
-
In Application name, enter
MyDemoApplication. -
In Compute Platform, choose EC2/On-premises.
-
Choose Create application.
To create a deployment group in CodeDeploy
A deployment group is a resource that defines deployment-related settings like which instances to deploy to and how fast to deploy them.
-
On the page that displays your application, choose Create deployment group.
-
In Deployment group name, enter
MyDemoDeploymentGroup. -
In Service role, choose the ARN of the service role you created earlier (for example,
arn:aws:iam::account_ID:role/CodeDeployRole -
Under Deployment type, choose In-place.
-
Under Environment configuration, choose Amazon EC2 Instances. In the Key field, enter
Name. In the Value field, enter the name you used to tag the instance (for example,MyCodePipelineDemo). -
Under Agent configuration with AWS Systems Manager, choose Now and schedule updates. This installs the agent on the instance. The Linux instance is already configured with the SSM agent and will now be updated with the CodeDeploy agent.
-
Under Deployment configuration, choose
CodeDeployDefault.OneAtaTime. -
Under Load Balancer, make sure Enable load balancing is not selected. You do not need to set up a load balancer or choose a target group for this example.
-
Choose Create deployment group.
Step 5: Create your first pipeline in CodePipeline
You're now ready to create and run your first pipeline. In this step, you create a pipeline that runs automatically when code is pushed to your CodeCommit repository.
To create a CodePipeline pipeline
Sign in to the AWS Management Console and open the CodePipeline console at http://console.aws.amazon.com/codesuite/codepipeline/home
. Open the CodePipeline console at https://console.aws.amazon.com/codepipeline/
. -
On the Welcome page, Getting started page, or the Pipelines page, choose Create pipeline.
-
On the Step 1: Choose creation option page, under Creation options, choose the Build custom pipeline option. Choose Next.
-
In Step 2: Choose pipeline settings, in Pipeline name, enter
MyFirstPipeline. -
CodePipeline provides V1 and V2 type pipelines, which differ in characteristics and price. The V2 type is the only type you can choose in the console. For more information, see pipeline types. For information about pricing for CodePipeline, see Pricing
. -
In Service role, choose New service role to allow CodePipeline to create a service role in IAM.
-
Leave the settings under Advanced settings at their defaults, and then choose Next.
-
In Step 3: Add source stage, in Source provider, choose CodeCommit. In Repository name, choose the name of the CodeCommit repository you created in Step 1: Create a CodeCommit repository. In Branch name, choose
main, and then choose Next step.After you select the repository name and branch, a message displays the Amazon CloudWatch Events rule to be created for this pipeline.
Under Change detection options, leave the defaults. This allows CodePipeline to use Amazon CloudWatch Events to detect changes in your source repository.
Choose Next.
-
In Step 4: Add build stage, choose Skip build stage, and then accept the warning message by choosing Skip again. Choose Next.
Note
In this tutorial, you are deploying code that requires no build service, so you can skip this step. However, if your source code needs to be built before it is deployed to instances, you can configure CodeBuild
in this step. -
In Step 5: Add test stage, choose Skip test stage, and then accept the warning message by choosing Skip again.
Choose Next.
-
In Step 6: Add deploy stage, in Deploy provider, choose CodeDeploy. In Application name, choose
MyDemoApplication. In Deployment group, chooseMyDemoDeploymentGroup, and then choose Next step. -
In Step 7: Review, review the information, and then choose Create pipeline.
-
The pipeline starts running after it is created. It downloads the code from your CodeCommit repository and creates a CodeDeploy deployment to your EC2 instance. You can view progress and success and failure messages as the CodePipeline sample deploys the webpage to the Amazon EC2 instance in the CodeDeploy deployment.
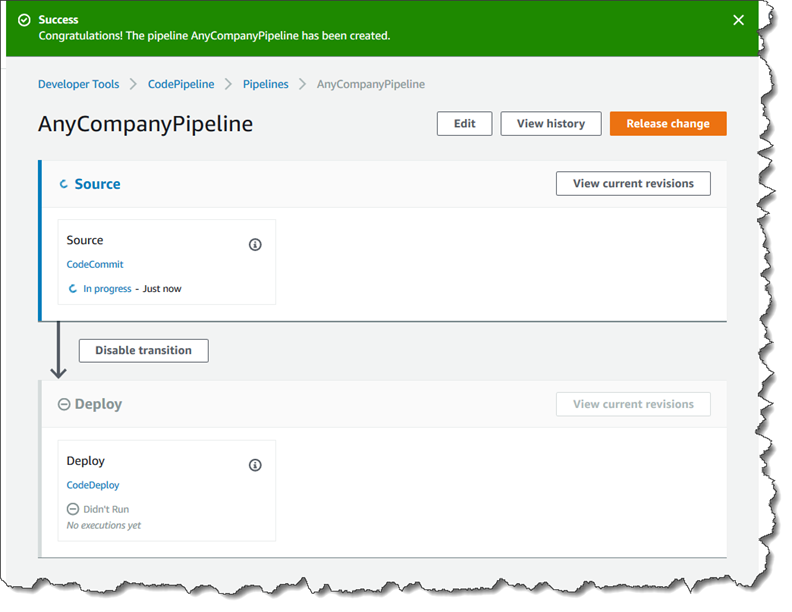
Congratulations! You just created a simple pipeline in CodePipeline.
Next, you verify the results.
To verify that your pipeline ran successfully
-
View the initial progress of the pipeline. The status of each stage changes from No executions yet to In Progress, and then to either Succeeded or Failed. The pipeline should complete the first run within a few minutes.
-
After Succeeded is displayed for the pipeline status, in the status area for the Deploy stage, choose CodeDeploy. This opens the CodeDeploy console. If Succeeded is not displayed see Troubleshooting CodePipeline.
-
On the Deployments tab, choose the deployment ID. On the page for the deployment, under Deployment lifecycle events, choose the instance ID. This opens the EC2 console.
-
On the Description tab, in Public DNS, copy the address (for example,
ec2-192-0-2-1.us-west-2.compute.amazonaws.com), and then paste it into the address bar of your web browser.The web page displays for the sample application you downloaded and pushed to your CodeCommit repository.
For more information about stages, actions, and how pipelines work, see CodePipeline concepts.
Step 6: Modify code in your CodeCommit repository
Your pipeline is configured to run whenever code changes are made to your CodeCommit repository. In this step, you make changes to the HTML file that is part of the sample CodeDeploy application in the CodeCommit repository. When you push these changes, your pipeline runs again, and the changes you make are visible at the web address you accessed earlier.
-
Change directories to your local repo:
(For Linux, macOS, or Unix)cd /tmp/MyDemoRepo(For Windows)cd c:\temp\MyDemoRepo -
Use a text editor to modify the
index.htmlfile:(For Linux or Unix)gedit index.html(For OS X)open –e index.html(For Windows)notepad index.html -
Revise the contents of the
index.htmlfile to change the background color and some of the text on the webpage, and then save the file.<!DOCTYPE html> <html> <head> <title>Updated Sample Deployment</title> <style> body { color: #000000; background-color: #CCFFCC; font-family: Arial, sans-serif; font-size:14px; } h1 { font-size: 250%; font-weight: normal; margin-bottom: 0; } h2 { font-size: 175%; font-weight: normal; margin-bottom: 0; } </style> </head> <body> <div align="center"><h1>Updated Sample Deployment</h1></div> <div align="center"><h2>This application was updated using CodePipeline, CodeCommit, and CodeDeploy.</h2></div> <div align="center"> <p>Learn more:</p> <p><a href="https://docs.aws.amazon.com/codepipeline/latest/userguide/">CodePipeline User Guide</a></p> <p><a href="https://docs.aws.amazon.com/codecommit/latest/userguide/">CodeCommit User Guide</a></p> <p><a href="https://docs.aws.amazon.com/codedeploy/latest/userguide/">CodeDeploy User Guide</a></p> </div> </body> </html> -
Commit and push your changes to your CodeCommit repository by running the following commands, one at a time:
git commit -am "Updated sample application files"git push
To verify your pipeline ran successfully
-
View the initial progress of the pipeline. The status of each stage changes from No executions yet to In Progress, and then to either Succeeded or Failed. The running of the pipeline should be complete within a few minutes.
-
After Succeeded is displayed for the action status, refresh the demo page you accessed earlier in your browser.
The updated webpage is displayed.
Step 7: Clean up resources
You can use some of the resources you created in this tutorial for other tutorials in this guide. For example, you can reuse the CodeDeploy application and deployment. However, after you complete this and any other tutorials, you should delete the pipeline and the resources it uses so that you are not charged for the continued use of those resources. First, delete the pipeline, then the CodeDeploy application and its associated Amazon EC2 instance, and finally, the CodeCommit repository.
To clean up the resources used in this tutorial
-
To clean up your CodePipeline resources, follow the instructions in Delete a pipeline in AWS CodePipeline.
-
To clean up your CodeDeploy resources, follow the instructions in Clean Up Deployment Walkthrough Resources.
-
To delete the CodeCommit repository, follow the instructions in Delete a CodeCommit repository.
Step 8: Further reading
Learn more about how CodePipeline works:
-
For more information about stages, actions, and how pipelines work, see CodePipeline concepts.
-
For information about the actions you can perform using CodePipeline, see Integrations with CodePipeline action types.
-
Try this more advanced tutorial, Tutorial: Create a four-stage pipeline. It creates a multi-stage pipeline that includes a step that builds code before it's deployed.
