Model versioning with Amazon Comprehend
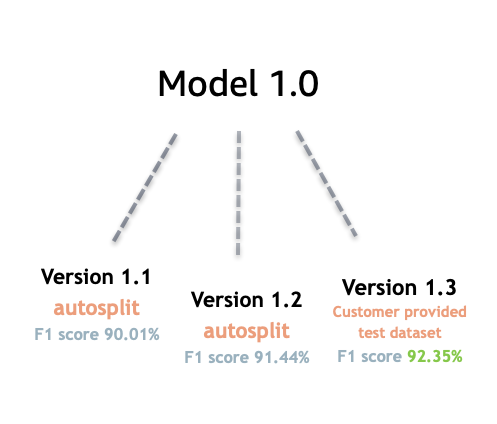
Artificial intelligence and machine learning (AI/ML) is all about rapid experimentation. With Amazon Comprehend, you train and build out models which you use to gain insight on your data. With model versioning you can keep track of your modeling history and scores associated with running results of your models as you provide more or different sets of data. You can use versioning with your custom classification models or your custom entity recognition models. Taking a look at your different versions over time you can gain insight on how successful they've performed and gain insight on what parameters you used to get to your state of success.
When you train a new version of an existing custom classifier model or entity recognition model, all you need to do is create a new version from the model details page and all the details populate for you. The new version will have the same name as your earlier model — what we call the versionID — although you will give it a unique version name during creation. As you add new versions to a model, you can see all the previous versions and their details in one view from the model details page. With versioning, you can see how model performance changes as you make changes to your training dataset.
Create a new Custom classifier version (console)
-
Sign in to the AWS Management Console and open the Amazon Comprehend console at https://console.aws.amazon.com/comprehend/
-
From the left menu, choose Customization and then choose Custom classification.
-
From the Classifiers list, choose the name of the custom model from which you want to create a new version. The custom model details page is displayed.
-
On the top right, select Create new model. A screen opens with prepopulated details from the parent custom classification model.
-
Under Version name add a unique name to the new version.
-
Under version details, you can change the language and number of labels associated with your new model.
-
Under the Data specifications section configure how you want to provide the data to your new version— make sure to provide full data, which includes documents from your previous model and your new documents. You can change the Classifier mode (single-label, or multi-label), Data format (CSV file, Augmented manifest), your Training dataset, and your Test dataset (autosplit, or your custom test data configuration).
-
(Optional) update the S3 location for your output data
-
Under Access permissions, create or use an existing IAM role.
-
(Optional) Update your VPC settings
-
(Optional) Add tags to your new version to help keep track of the details.
For more information about creating custom classifiers, see Create a Custom Classifier
Create a new Custom entity recognizer version (console)
-
Sign in to the AWS Management Console and open the Amazon Comprehend console at https://console.aws.amazon.com/comprehend/
-
From the left menu, choose Customization and then choose Custom entity recognition.
-
From the Recognizer model list, choose the name of the recognizer from which you want to create a new version. The details page is displayed.
-
On the top right, select Train new version. A screen opens with prepopulated details from the parent entity recognizer.
-
Under Version name add a unique name to the new version.
-
Under Custom entity type, add the custom labels or label you want the recognizer to identify in your dataset and select Add type. Choose a custom entity type from the annotations or entity list you've provided. The recognizer will then use all of the included entity types to identify entities in the data set when running your job. Each entity type must be upper-case and separated by and underscore if it uses multiple words. A maximum of 25 types are allowed.
-
(Optional) Select Recognizer encryption to encrypt the data in the storage volume while your job is being processed.
-
Under the Training data section, specify the Annotation and data format details (CSV file, Augmented manifest)single-label, or multi-label), Data format (CSV, Augmented manifest), your Training dataset, and your Test dataset (autosplit, or your custom test data configuration).
-
(Optional) update the S3 location for your output data
-
Under Access permissions, create or use an existing IAM role.
-
(Optional) Update your VPC settings
-
(Optional) Add tags to your new version to help keep track of the details.
To learn more about custom entity recognizers, see Custom Entity Recognition and Creating a Custom Entity Recognizer Using the Console.
