Tagging a new resource
You can add tags to an Analysis job, a Custom classification model, a Custom entity recognition model, or endpoints.
-
Sign in to the AWS Management Console and open the Amazon Comprehend console at https://console.aws.amazon.com/comprehend/
-
Select the resource (Analysis job, Custom classification, or Custom entity recognition) you want to create from the left navigation pane.
-
Click Create job (or Create new model). This takes you to the main 'create' page for your resource. At the bottom of this page, you'll see a 'Tags - optional' panel.
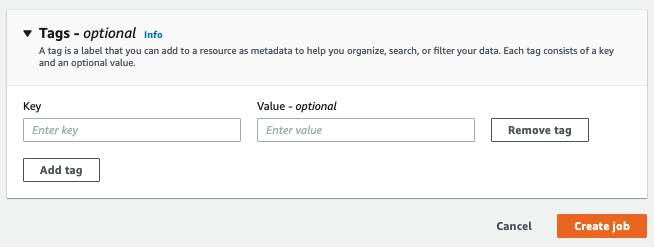
Enter a tag key and, optionally, a tag value. Choose Add tag to add another tag to the resource. Repeat this process until all your tags are added. Note that tag keys must be unique per resource.
-
Select the Create or Create job button to continue creating your resource.
You can also add tags using the AWS CLI. This example shows how to add tags with the start-entities-detection-job command.
aws comprehend start-entities-detection-job \ --language-code "en" \ --input-data-config "{\"S3Uri\": \"s3://test-input/TEST.csv\"}" \ --output-data-config "{\"S3Uri\": \"s3://test-output\"}" \ --data-access-role-arn arn:aws:iam::123456789012:role/test\ --tags "[{\"Key\": \"color\",\"Value\": \"orange\"}]"
