Use attributes in Amazon Connect to route based on number of contacts in a queue
Amazon Connect includes queue attributes that can help you define routing conditions in your flows based on real-time metrics about the queues and agents in your contact center. For example, here are some common usage scenarios:
-
Check the number of contacts or available agents in a queue, and how long the oldest contact has been in a queue, then route accordingly.
-
To route to the queue with the fewest contacts in it:
-
Get metrics for multiple queues.
-
Use a Set contact attributes block to store the metric attributes for each queue.
-
compare queue metric attributes using a Check contact attributes block, and route the contact to the queue with the fewest calls in it, or to a callback if all queues are busy.
-
Using a Check contact attributes block to route a contact to a queue
-
In Amazon Connect, choose Routing, Contact flows.
-
Open an existing flow or create a new one.
-
Optionally, under Interact, add a Play prompt block to the designer to play a greeting to your customers. Add a connector between the Entry point block and the Play prompt block.
-
Under Set, drag a Get queue metrics block to the designer, and connect the Okay branch of the Play prompt block to it.
-
Choose the title of the Get queue metrics block to open the properties for the block. By default, the block retrieves metrics for the current working queue. To retrieve metrics for a different queue, choose Set queue.
-
Choose Select a queue, then select the queue to retrieve metrics for from the drop-down, then choose Save.
You can also determine which queue to retrieve metrics for using contact attributes.
-
Under Check, drag a Check contact attributes block to the designer.
-
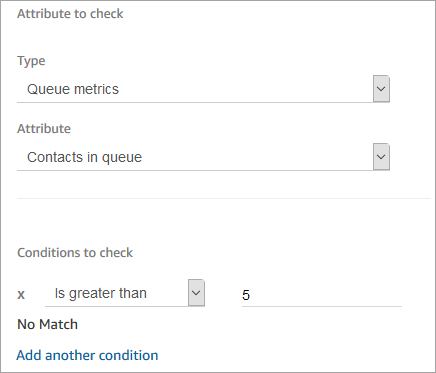
Choose the title of the block to display the settings for the block. Then, under Attribute to check, select Queue metrics in the Type drop-down menu.
-
Under Attribute, choose Contacts in queue.
-
To use conditions to route the contact, choose Add another condition.
By default, the Check contact attributes block includes a single condition, No match. The No match branch is followed when there are no matches for any of the conditions you define in the block.
-
Under Conditions to check, select Is less than as the operator for the condition in the drop-down menu, then in the value field enter 5.
-
Choose Add another condition, then choose Is greater or equal from the drop-down menu, and enter 5 in the value field.
-
Choose Save.
You now see two new output branches for the Check contact attributes block.
You can now add additional blocks to the flow to route the contact as desired. For example, connect the < 5 branch to a Transfer to queue block to transfer calls to the queue when there are fewer than five calls currently in the queue. Connect the > 5 branch to a Set customer callback number block and then transfer the call to a callback queue using a Transfer to queue block so the customer doesn't have to stay on hold.
Route contacts based on queue metrics
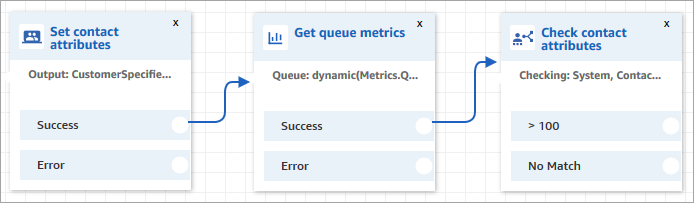
Many contact centers route customers based on the number of contacts waiting in a queue. This topic explains how to configure a flow that looks similar to the following image. It shows the following three flow blocks connected by Success branches: Set contact attributes, Get queue metrics, and Check contact attributes.
-
Add a Set contact attributes block to your flow.
-
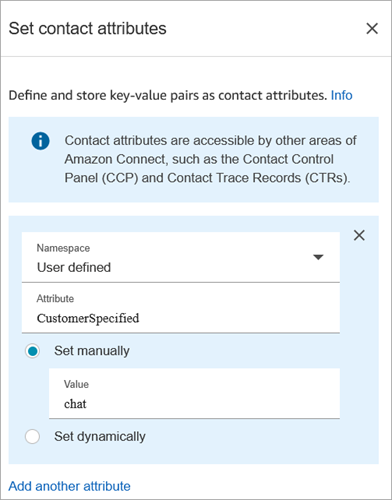
In the Set contact attributes, specify the channel. If you set a channel dynamically using text, for the attribute value enter Voice or Chat, as shown in the following image. This value is not case-sensitive.
-
Add a Get queue metrics block to your flow.
In the Get queue metrics block, dynamic attributes can only return metrics for one channel
Add a Check contact attributes block after the Get queue metrics block
After a Get queue metrics block, add a Check contact attributes block to branch based on the returned metrics. Use the following steps:
-
After Get queue metrics, add a Check contact attributes block.
-
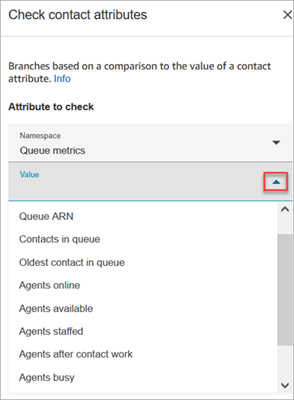
In the Check contact attributes block, set Attribute to check to Queue metrics.
-
In the Attributes to check dropdown box, you'll see that the following queue metrics are returned by the Get queue metrics block. Choose the metric that you want to use for the routing decision.
-
Choose Add a condition to enter the comparison for your routing decision. The following image shows the block configured to check whether contacts in queue is greater than 5.