Flow block in Connect Customer: Cases
Tip
Be sure to enable Connect Customer Cases before using this block. Otherwise, you can't configure its properties.
This topic defines the flow block for updating and creating cases.
Description
-
Gets, updates, and creates cases.
-
Searches for case linked to a contact.
-
You can link a contact to a case, and then the contact will be recorded in the Activity feed of the case. When the agent accepts a contact that is linked to a case, the case automatically opens as a new tab in the agent application.
-
While you can link contacts to multiple cases, there is a limit of five new case tabs automatically opening in the agent application. These will be the five most recently updated cases.
-
For more information about cases, see Connect Customer Cases.
Supported channels
The following table lists how this block routes a contact who is using the specified channel.
| Channel | Supported? |
|---|---|
Voice |
Yes |
Chat |
Yes |
Task |
Yes |
Yes |
Flow types
You can use this block in the following flow types:
-
All flows
Properties: Get case
Tip
The following screenshots refer to the legacy flow designer.
When configuring properties to get a case:
-
You can specify to Link contact to case (Yes/No). If "Yes," then you can choose from the following options:
-
Current contact is the contact on which the current flow is being executed.
-
Related contact is the contact that is related to this contact.
-
-
You must provide at least one search criteria. Otherwise this block will take the Error branch.
You can either use attribute in the Cases namespace or set manually. If you set manually, see to the syntax in How to persist fields throughout the flow.
-
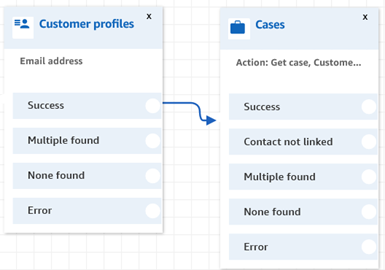
To get cases for a given customer, add a Customer profiles block to the flow before creating the case. The following image shows the flow designer with a Customer profiles block linked from the Success branch to a Cases block.
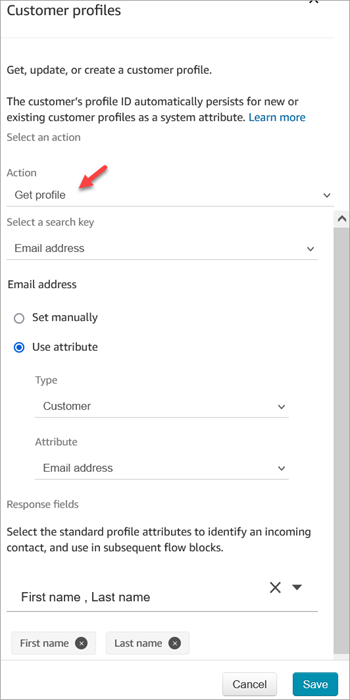
Configure the Customer profiles block to get the customer profile. The following image shows an example of the Customer profiles properties page when it is configured. The Action box is set to Get profile. The Select a search key box is set to Email address. The Use attribute option is selected. The Type box is set to Customer. The Attribute box is set to Email address. The Response fields are set to First name, Last name.
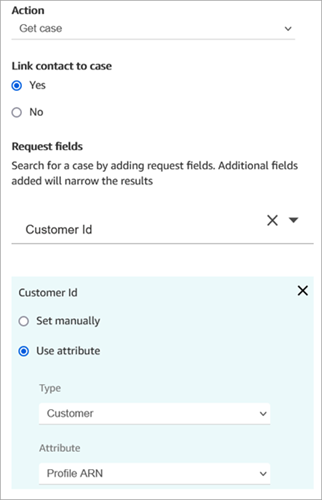
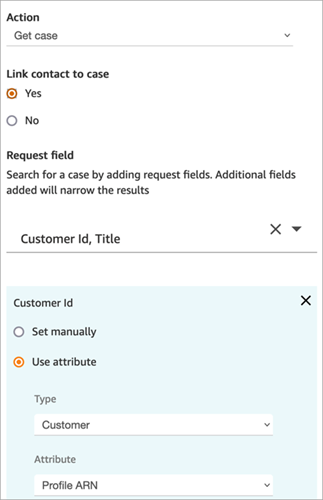
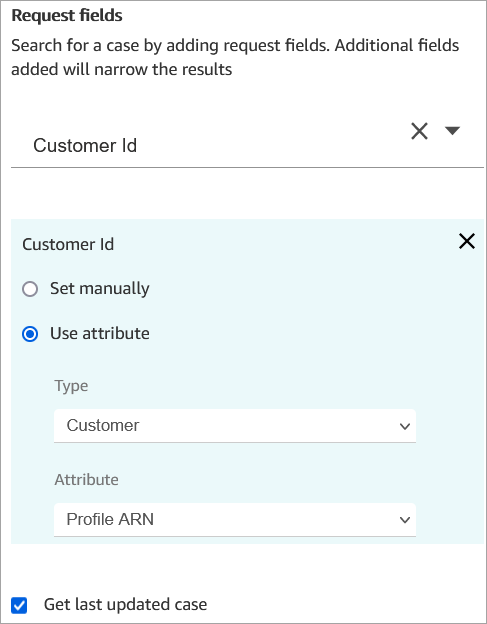
In the Cases block, on the Properties page configure the Customer ID section as shown in the following image. The Link contact to case option is set to Yes. The Request fields box is set to Customer Id. In the Customer Id section, the Use attribute option is selected. The Type box is set to Customer. The Attribute box is set to Profile ARN.
-
You can specify to get only the last updated case for any search criteria. This can be achieved by selecting Get last updated case.
-
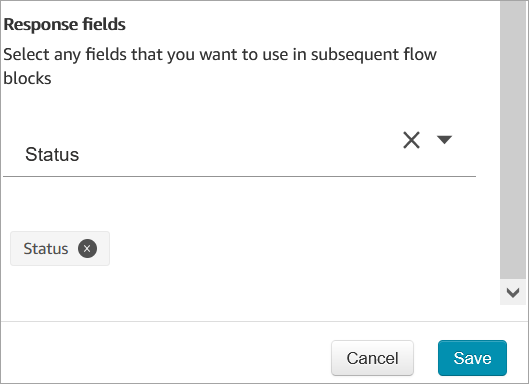
You can persist case fields in the case namespace to make use of them in blocks that are in your flow after the Cases block that is configured to Get case. This can be achieved by making use of the Response fields section and selecting fields that you want to use in the other blocks.
You can either use attribute in the Cases namespace or set manually. If you set manually, see to the syntax in How to persist fields throughout the flow.
-
The Get case properties show the options for the single-select field type.
-
The Get case properties use the Contains function for text field type.
-
The Get case properties use the EqualTo function for fields of type: number, boolean.
-
The Get case properties use greater than or equal to for any date field search.
-
Contacts can be routed down the following branches:
-
Success: The case was found.
-
Contact not linked: If you specify to link the contact to case, then this error branch will appear. It might be that the contact was not linked after the case is retrieved (partial success/partial failure). If this happens, then the flow will follow this branch.
-
Multiple found: Multiple cases are found with the search criteria.
-
None found: No cases are found with the search criteria.
-
Error: An error was encountered while trying to find the case. This may be due to a system error or how Get case is configured.
-
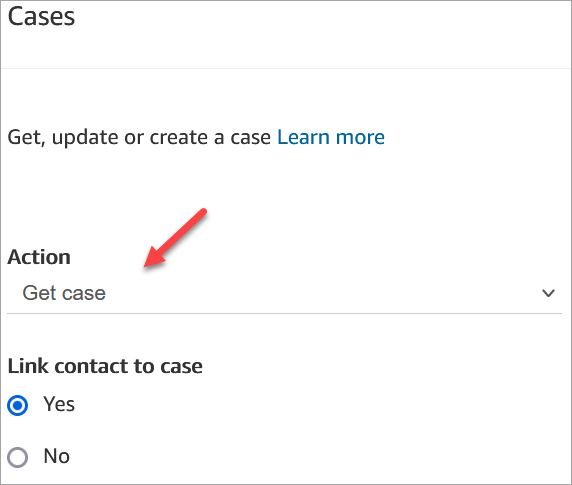
The following images show an example of a Cases Properties page that is configured for the Get case action.
The first image shows the Properties page configured to search for a case by Customer Id and Title. The Customer Id is being pulled in from the Profile ARN of the customer. In this image, the Link contact to case option is set to Yes. The Request field is set to Customer Id, Title. In the Customer Id section, the Use attribute option is selected. The Type box is set to Customer. The Attribute box is set to Profile ARN.
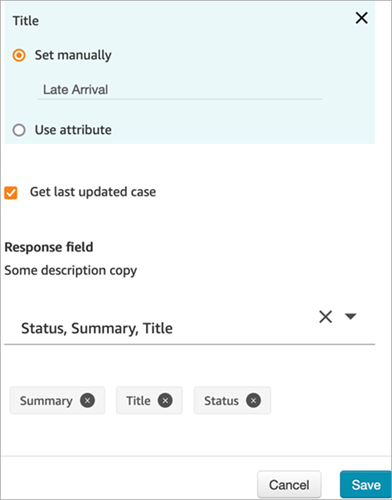
This next image shows the block configured to search by Late Arrival. Under Title, the Set manually option is set to Late Arrival. The Get last updated cases option is selected. The Response field option shows the three fields that will be shown to the agent: Status, Summary, and Title.
Properties: Get case id
When configuring properties to get a case id:
-
You can specify to Link contact to case (Yes/No). If "Yes," then you can choose from the following options:
-
Current contact is the contact on which the current flow is being executed.
-
Related contact is the contact that is related to this contact.
-
-
If you link the contact to the case, then the contact and a link to contact details appear on the case that the agent sees in the agent application.
-
You can specify the Contact to search to fetch a case linked to another contact in the current contact's contact chain. This enables you to link follow-up contacts such as email replies, call transfers, persistent chats, and queued callbacks to the same case more easily.
-
Current contact
-
Initial contact
-
Task contact
-
Previous contact
-
Related contact
-
-
If a case is found, for the Contact to search, the case ID for that case will be persisted in the case namespace. It can be used in other blocks by accessing the case namespace case ID attribute value.
-
Contacts can be routed down the following branches:
-
Success: The case was found. If you specify to link the contact to case, the contact was also successfully linked.
-
Contact not linked: If you specify to link the contact to case, then this error branch will appear. It might be that the contact was not linked after the case is retrieved (partial success/partial failure). If this happens, then the flow will follow this branch.
-
Multiple found: Multiple cases are found with the search criteria.
-
None found: No cases are found with the search criteria.
-
Error: An error was encountered while trying to find the case. This may be due to a system error or how Get case id is configured.
-
Properties: Update case
When configuring properties to update a case:
-
You can specify to Link contact to case (Yes/No). If "Yes," then you can choose from the following options:
-
Current contact is the contact on which the current flow is being executed.
-
Related contact is the contact that is related to this contact.
-
-
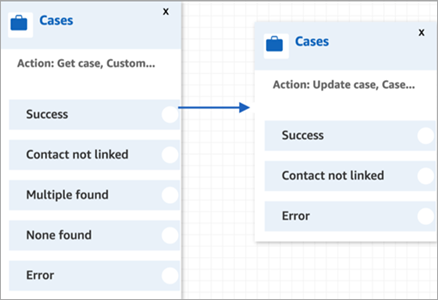
Add a Get case block before an Update case, as shown in the following image. Use the Get case block to find the case you want to update.
-
You must provide an update to at least one Request field. Otherwise, this block takes the Error branch.
You can either use an attribute in the Cases namespace, or set the Request field manually. If you set manually, see the syntax in How to persist fields throughout the flow.
-
Contacts can be routed down the following branches:
-
Success: The case was updated, and the contact was linked to the case.
-
Contact not linked: If you specify to link the contact to case, then this error branch will appear. It might be that the case was updated, but the contact was not linked to the case (partial success/partial failure). If this happens, then the flow will follow this branch.
-
Error: The case was not updated. The contact was not linked to the case, as the case was not updated.
-
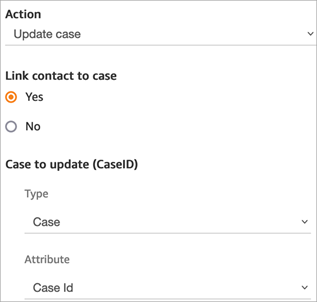
The following images show an example of an Update case configuration. The first image shows that as part of the update the contact is going to be linked to the case. To identify which case to update, the Case Id is specified. (Case Id is the unique identifier of the case and the only field you can provide here. Other fields will not work and produce errors.)
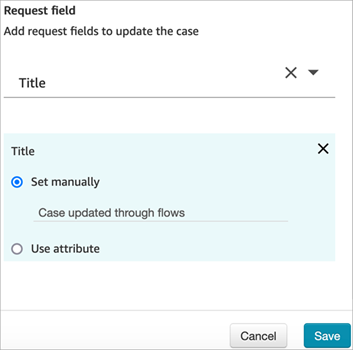
The following image shows the Request field, where you specify the fields to update the case.
Properties: Create case
When configuring properties to create a case:
-
You can specify to Link contact to case (Yes/No). If "Yes," then you can choose from the following options:
-
Current contact is the contact on which the current flow is being executed.
-
Related contact is the contact that is related to this contact.
-
-
You must provide a case template. For more information, see Create case templates to document customer issues in Connect Customer Cases.
-
Fields that are required appear in the Required fields section. You must assign values to them to create a case.
-
You must specify the customer to create a case.
-
We recommend adding a Customer profiles block to the flow before the Cases block. Use the Customer profiles block to get a customer profile with some prefetched data, or create a new customer profile and then use that to create a case.
-
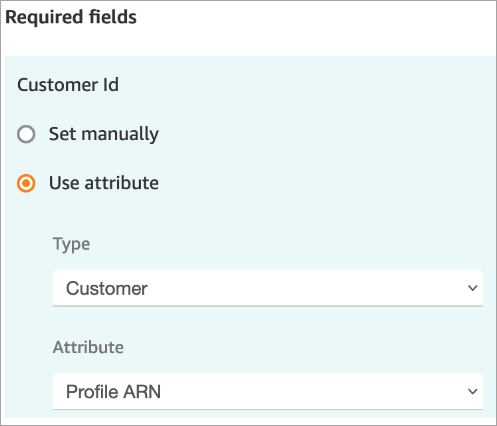
To provide a value for Customer Id in the Cases block, configure the fields as shown in the following image, where Use attribute is selected, Type is set to Customer, and Attribute is set to Profile ARN.
If you are setting the value manually, you must provide the full customer profile ARN in this format:
arn:aws:profile:your AWS
                                        Region:your AWS account
                                        ID:domains/profiles domain
                                        name/profiles/profile
                                        ID
-
-
You can specify values for fields other than the required ones in the Request fields section.
You can either use attribute in the Cases namespace or set manually. If you set manually, see to the syntax in How to persist fields throughout the flow.
-
You can specify that a contact should be linked to case. If you link the contact to the case, then the contact and a link to contact details appear on the case that the agent sees in the agent application.
-
After creating a case, the case ID that is created will be persisted in the case namespace. It can be used in other blocks by accessing the case namespace case ID attribute value.
-
Contacts can be routed down the following branches:
-
Success: The case was created, and the contact was linked to the case.
-
Contact not linked: If you specify to link the contact to case, then this error branch will appear. This is because it is possible that the case was created, but the contact was not linked to the case (partial success/partial failure). If this happens, then the flow will follow this branch.
-
Error: The case was not created. The contact was not linked to the case, as the case was not created.
-
The following images show an example of a Create case configuration. The first image shows the new case will be created using the General inquiry template:

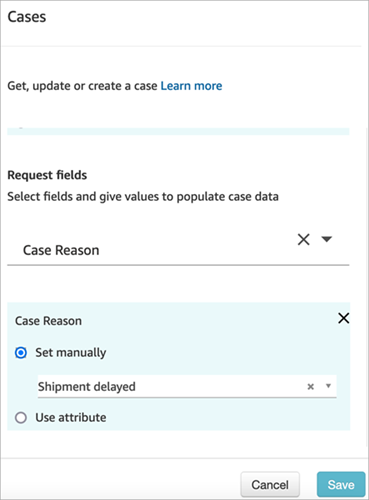
The next image shows the reason for the case will be set to Shipment delayed.
How to persist fields throughout the flow
Let's say you want customers to be able to call into your contact center and get the status of their case without ever talking to an agent. You want the IVR to read the status to the customer. You can get the status from a system field, or you might have a custom status field, for example, named Detailed status.
Here's how to configure your flow to get and read the status to the customer:
-
Add a Cases block to your flow. Configure it to Get case to find the case.
-
In the Request fields section, search for the case by the customer Profile ARN:
-
In the Response fields section, add the field that you want passed throughout the flow. For our example, choose Status.
-
Add a Play prompt block to your flow.
-
Configure Play prompt to set the attribute manually:

Use the following syntax for reading the status of the case to the customer:
-
For system fields, you can read the syntax and understand which field it refers to. For example:
$.Case.statusrefers to the case status. For a list of system field IDs, see the Field ID column in the System case fields topic. -
For custom fields, the syntax uses a UUID (unique ID) to represent the field. For example, in the following image, the ID for the custom field named Detailed status is
12345678-aaaa-bbbb-cccc-123456789012.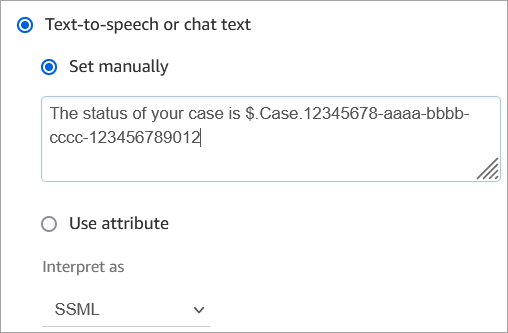
-
Find the custom field ID
To find the UUID of a custom field:
-
In Connect Customer, on the navigation menu choose Agent applications, Custom fields, and then choose the custom field that you want.
-
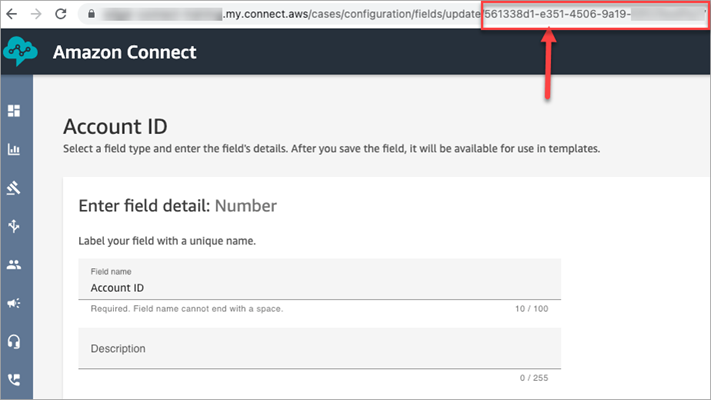
While on the details page for the custom field, look at the URL of the page. The UUID is the last portion of the URL. For example, in the following URL:
https://instance
                            alias.my.connect.aws/cases/configuration/fields/update/12345678-aaaa-bbbb-cccc-123456789012
The UUID is
12345678-aaaa-bbbb-cccc-123456789012.
The following image shows where you find the custom field ID at the end of a URL:
Configuration tips
-
Be sure to check the Cases service quotas, and request increases. The quotas apply when this block creates cases.
-
You can specify up to 10 Response fields on a Cases block. If you specify more than 10 and then publish the flow, the following error is displayed:
Invalid or missing parameter dataOne or more parameters are invalid or missing. Click on the block header to edit the block and fix the problematic parameters before publishing.
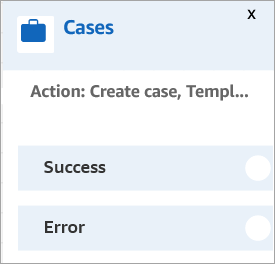
Configured block
The following image shows an example of what this block looks like when it is configured. It shows this block is configured to create cases, and it has Success and Error branches.