Configure an out-of-the-box communication widget in Amazon Connect
Use this option to create communication widgets for desktop and mobile browsers. At the end of this procedure, Amazon Connect generates a custom HTML code snippet that you copy into your website's source code.
-
Log in to Amazon Connect admin website using an Admin account or a user account that has Channels and flows, Communication widget - Create permission in its security profile.
-
In Amazon Connect, on the left navigation menu, choose Channels, Communication widgets.
-
The wizard guides you through the next three steps.
Step 1: Select communication channels
-
On the Communication widgets page, enter a Name and Description for the communications widget.
Note
The Name must be unique for each communications widget created in an Amazon Connect instance.
-
In the Communications options section, choose how your customers can engage with your widget. The following image shows options to allow web calling, video, and screen sharing for customers.

-
In the Web calling section, choose whether to enable video and screen sharing experiences for your customers. The previous image shows options that customers can see agent video, turn on their video, and allow agents and customers to share their screens. For information about setting restrictions on screen sharing, see Enable URL restriction for screen sharing.
-
Choose Save and continue.
Step 2: Customize widget
As you choose these options, the widget preview updates automatically so that you can see what the experience will look like for your customers.

Define widget access button styles
-
Choose the colors for the button background by entering hex values (HTML color codes
). -
Choose White or Black for the icon color. The icon color can't be customized.
Customize display names and styles
-
Provide values for header message and color, and widget background color.
-
Logo URL: Insert a URL to your logo banner from an Amazon S3 bucket or another online source.
Note
The communications widget preview in the customization page will not display the logo if it's from an online source other than an Amazon S3 bucket. However, the logo will be displayed when the customized communications widget is implemented to your page.
The banner must be in .svg, .jpg or .png format. The image can be 280px (width) by 60px (height). Any image larger than those dimensions will be scaled to fit the 280x60 logo component space.
-
For instructions about how to upload a file such as your logo banner to S3, see Uploading objects in the Amazon Simple Storage Service User Guide.
-
Make sure that the image permissions are properly set so that the communications widget has permissions to access the image. For information about how to make a S3 object publicly accessible, see Step 2: Add a bucket policy in the Setting permissions for website access topic.
-
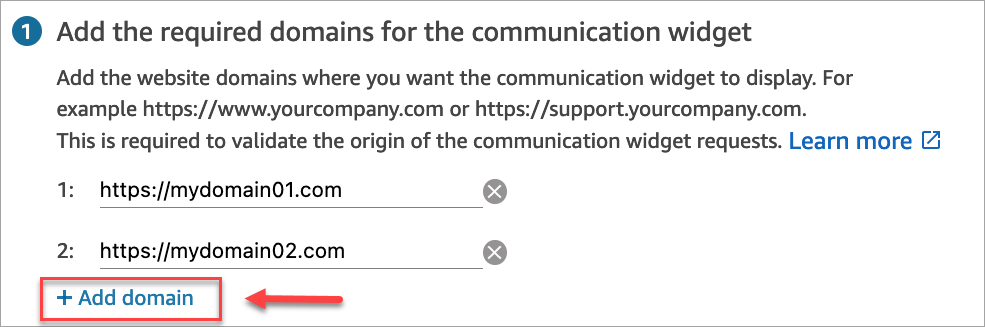
Step 3: Add your domain for the widget
This step enables you to secure the communications widget so that it can be launched only from your website.
-
Enter the website domains where you want to place the communications widget. The communications widget loads only on websites that you select in this step.
Choose Add domain to add up to 50 domains.
Important
-
Double-check that your website URLs are valid and does not contain errors. Include the full URL starting with https://.
-
We recommend using https:// for your production websites and applications.
-
-
Under Add security for your communications widget requests, for the fastest setup experience choose No - I will skip.
We recommend choosing Yes for the ability to verify the user is authenticated. For more information, see Personalize the customer experience for in-app, web, and video calling in Amazon Connect.
-
Choose Save and continue.
Success! Your widget has been created. Copy the generated code and paste it on each page of your website where you want the communications widget to appear.
Enable your agents for in-app, web, and video-calling, and screen sharing
To enable agents to use video calling and screen sharing, assign the Contact Control Panel (CCP), Video calls - Access permissions to their security profile.
The Amazon Connect agent workspace supports Amazon Connect in-app, web, and video calling, and screen sharing. You can use the same configuration, routing, analytics, and agent application as with telephone calls and chats. To get started, the only step is to enable your agent's security profiles with the permissions to have video calls and screen sharing.
For custom agent desktops, there are no changes required for the Amazon Connect in-app and web calling. Enable your agent's security profiles with the permissions to have video calls and screen sharing, and follow the guide below on how to integrate video calling into your agent desktop.
How a client device initiates an in-app or web call
The following diagram shows the sequence of events for a client device (mobile application or browser) to initiate an in-app or web call.

-
(Optional) You can pass attributes captured in the website and validate them with JSON web token (JWT).
-
The customer clicks on the communications widget in your website or mobile app.
-
The communications widget starts the web call to Amazon Connect by passing attributes contained in the JWT.
-
The contact reaches the flow, is routed, and placed in queue.
-
The agent accepts the contact.
-
(Optional) If video is enabled for customer and the agent, they are able to start their video.
More information
For additional information about requirements for in-app, web, and video calling capabilities, see the following topics:
