Set up granular billing for a detailed view of your Amazon Connect usage
By default bills for Amazon Connect channels (voice calls, chat, tasks, and emails) are summarized at the AWS account level by usage type. For example:
-
Voice calls - by outbound (telephony) / inbound (telephony) / service minutes
-
Chat – by messages
-
Task - by units
-
Email - by messages
To obtain a more detailed view of your bill and usage, you can add cost allocation tags (key:value pairs) to contacts, and then use the tags to aggregate and analyze the data in the AWS Billing and Cost Management console.
-
Amazon Connect automatically adds the following system-defined tags to each contact:
-
aws:connect:instanceId: This represents the ID of the Amazon Connectinstance. If you have multiple instances under multiple AWS accounts for each line-of-business, you can view usage bills aggregated against different instances.
-
(aws:connect:systemEndpoint): This represents the your contact center number (the endpoint) that the customer reaches (inbound) or is reached from (outbound).
This AWS generated tag helps if you have multiple phone numbers used within your contact center. It enables you to group the costs associated against different phone numbers. For example, group inbound phone numbers for incoming calls, and group outbound numbers that are used for making outbound calls.
-
aws:connect:transferredFromEndpoint: This represents the outbound caller ID that the call was transferred from. You can see the third-party transfer call's usage bills aggregated against the telephone numbers that the calls were transferred from. Currently, this AWS generated tag is only added to contacts for third-party external transfer calls.
-
-
You can add up to 6 user-defined tags. For example, department, cost center, or business unit. Use these tags to organize your AWS bill to reflect your own cost structure.
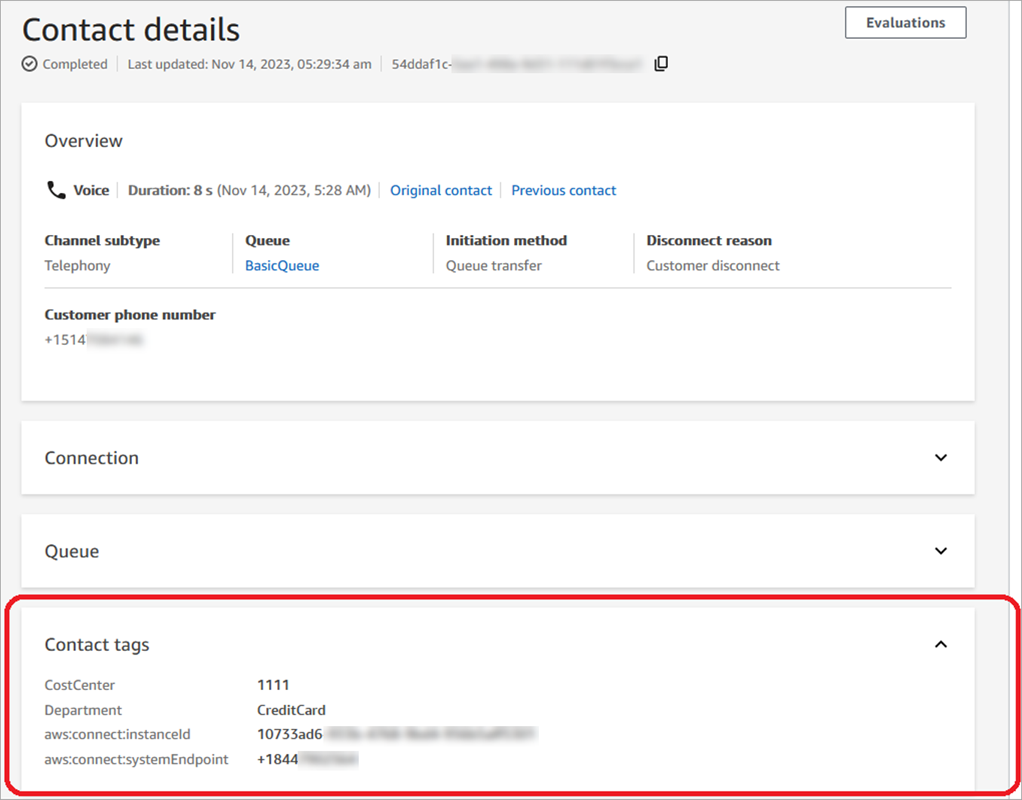
The following image shows two user-defined tags on the Contact details page: CostCenter and Department. It also shows two system-defined tags: instance ID and the contact center phone number (aws:connect:systemEndpoint).
This topic explains how to add tags to contacts, activate the cost allocation tags, and view them in the AWS Billing dashboard.
Contents
Things to know about user-defined tags
-
Amazon Connect automatically applies user-defined tags to new contact segments for scenarios like transfers or contact re-hydration (for example, persistent chat, and tasks related to contacts).
-
Use the DescribeContact API to list the tags on a contact.
-
You can remove and/or overwrite the tags by using the Contact tags block or the TagContact and UntagContactAPIs.
-
By using the TagContact and UntagContact APIs, you can update user-defined tags for a contact up to 3 hours after the contact was disconnected. However, any future updates on the contact tags are not reflected in the billing system. For example, you make a change to the value of a tag within 3 hours after the contact was disconnected. The AWS Billing console will show the old value of the tag, but the S3 bucket and contact record have the new value.
-
After you add tags to Amazon Connect, they are available across all contact interfaces: contact records, contact events, and the Contact details page. You can also access them by using the
$.TagsJSONPath Reference, and by using Amazon Connect Streams. -
You cannot use tags as filters on the Contact search page. In addition, they cannot be included in any of the analytics or reporting pages.
-
Contact tags only function as cost allocations tags. You cannot use them for tag-based access controls on contacts.
-
Tags are available in the Amazon Connect analytics data lake Contact record table under tags_references_items.
Step 1: Add user-defined tags to contacts
To add user-defined tags like Department and Cost Center to contacts, you have two options:
-
Use the TagContact API.
-
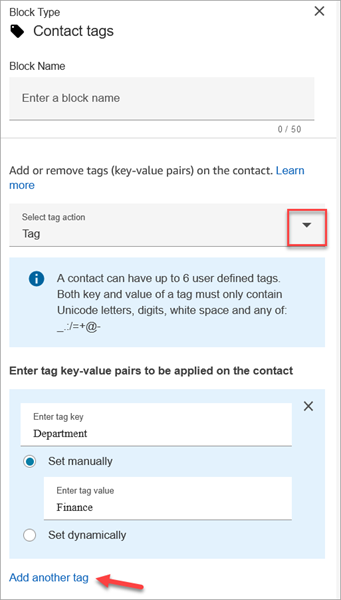
Add a Contact tags block to your flow.
The following image shows an example of a Properties page of a Contact tags block that is configured with a tag named Department. Its value is set manually to Finance.
Important
Do not store personally identifiable information (PII) or other confidential or sensitive information in tags. We use contact tags to provide you with billing services. Tags are not intended to be used for private or sensitive data.
Step 2: Activate cost allocation tags in the AWS Billing console
Tip
It takes up to 24 hours for the tags to activate.
To enable AWS billing applications to organize your billing information according to resources with the same tag key values (either for system-defined and user-defined contact tags), you must activate the tags. Perform the following steps.
-
Open the AWS Billing and Cost Management console at https://console.aws.amazon.com/costmanagement/
. -
In the left navigation menu, choose Cost Allocation Tags.
-
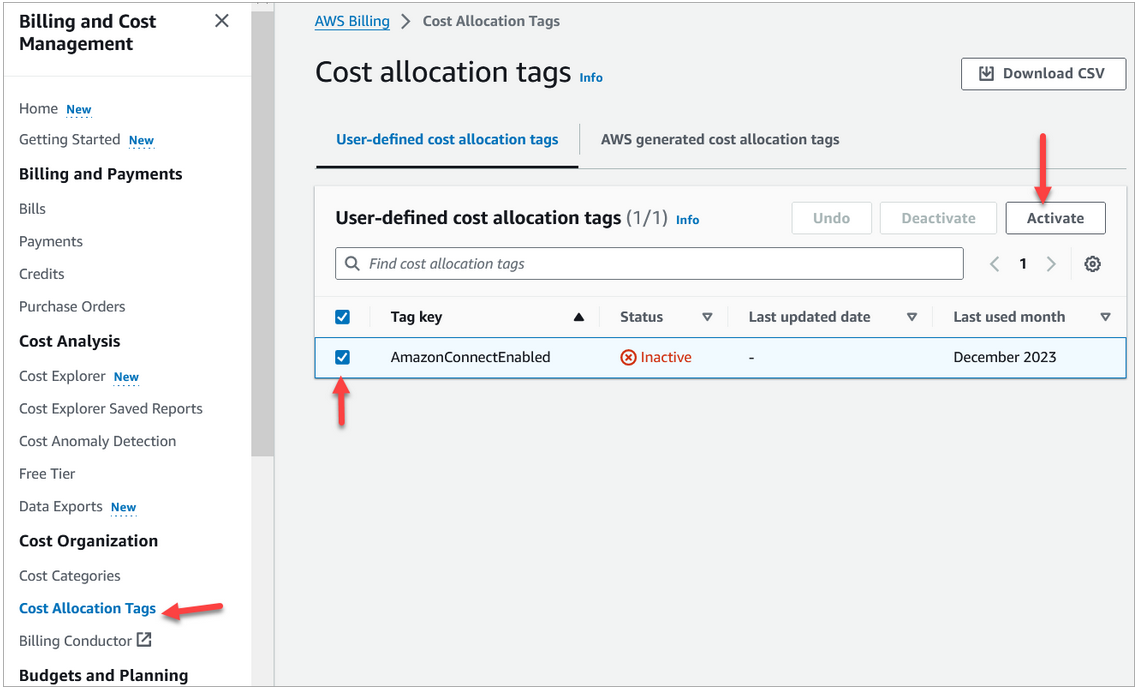
Select the system-defined and user-defined tags, and then choose Activate. It can take up to 24 hours for tags to activate.
The following image shows an example tag on the Cost allocation tags page.
Step 3: View cost and usage trends using cost allocation tags
You can view the month-over-month trends at the granular level by using cost allocation tags.
Open the AWS Billing and Cost Management console at https://console.aws.amazon.com/costmanagement/
. -
In the left navigation, choose AWS Cost Explorer.
-
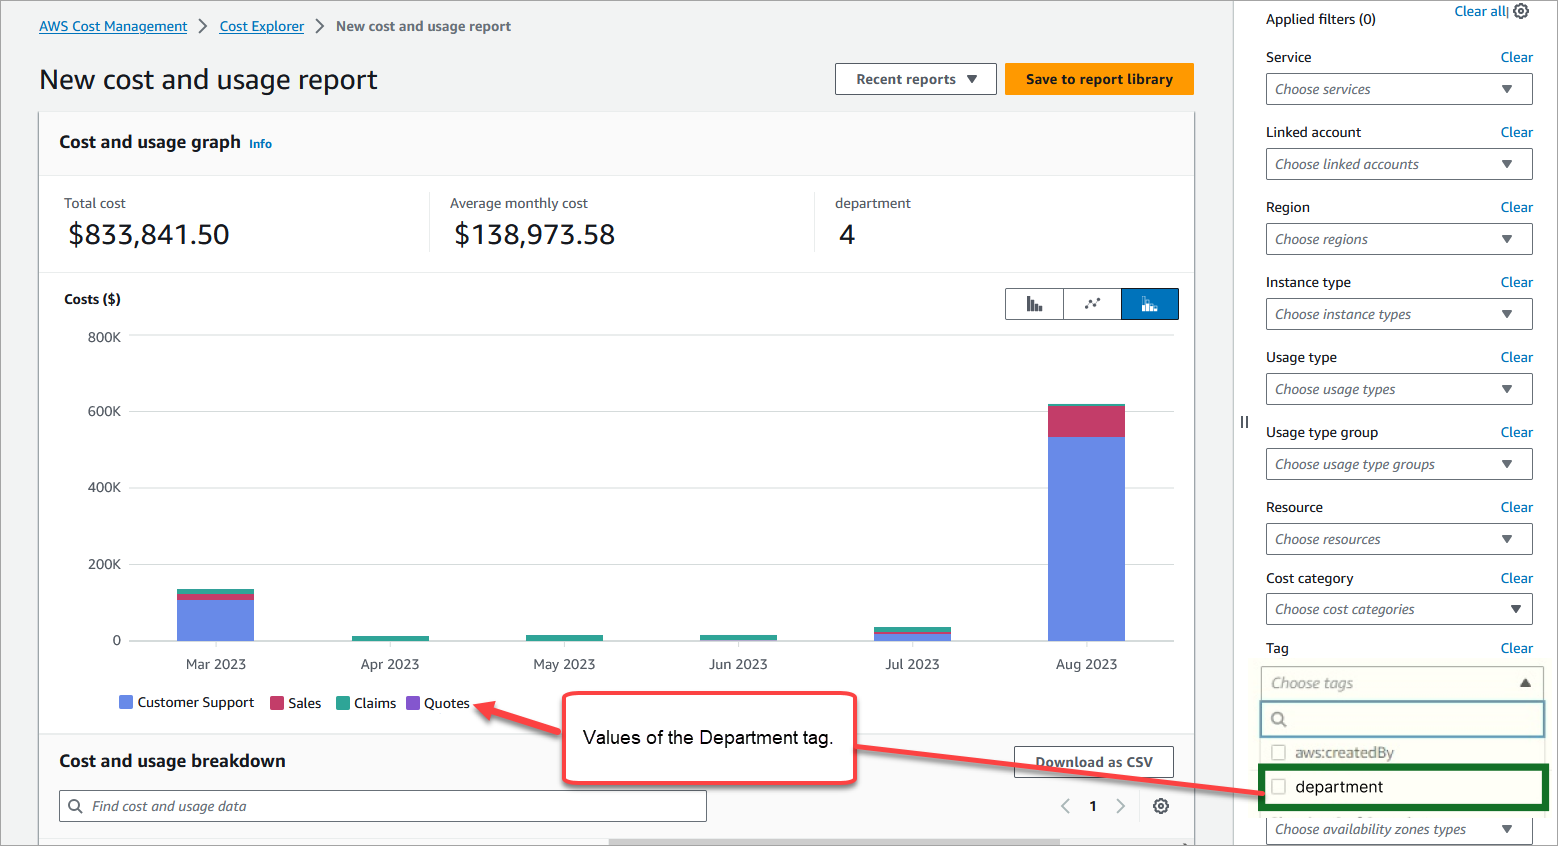
On the Cost Explorer page, choose Tags, and then select the tags you want to view, for example, department or inbound telephone number.
The following image of AWS Cost Explorer shows a sample report where department is a filtered cost allocation tag.
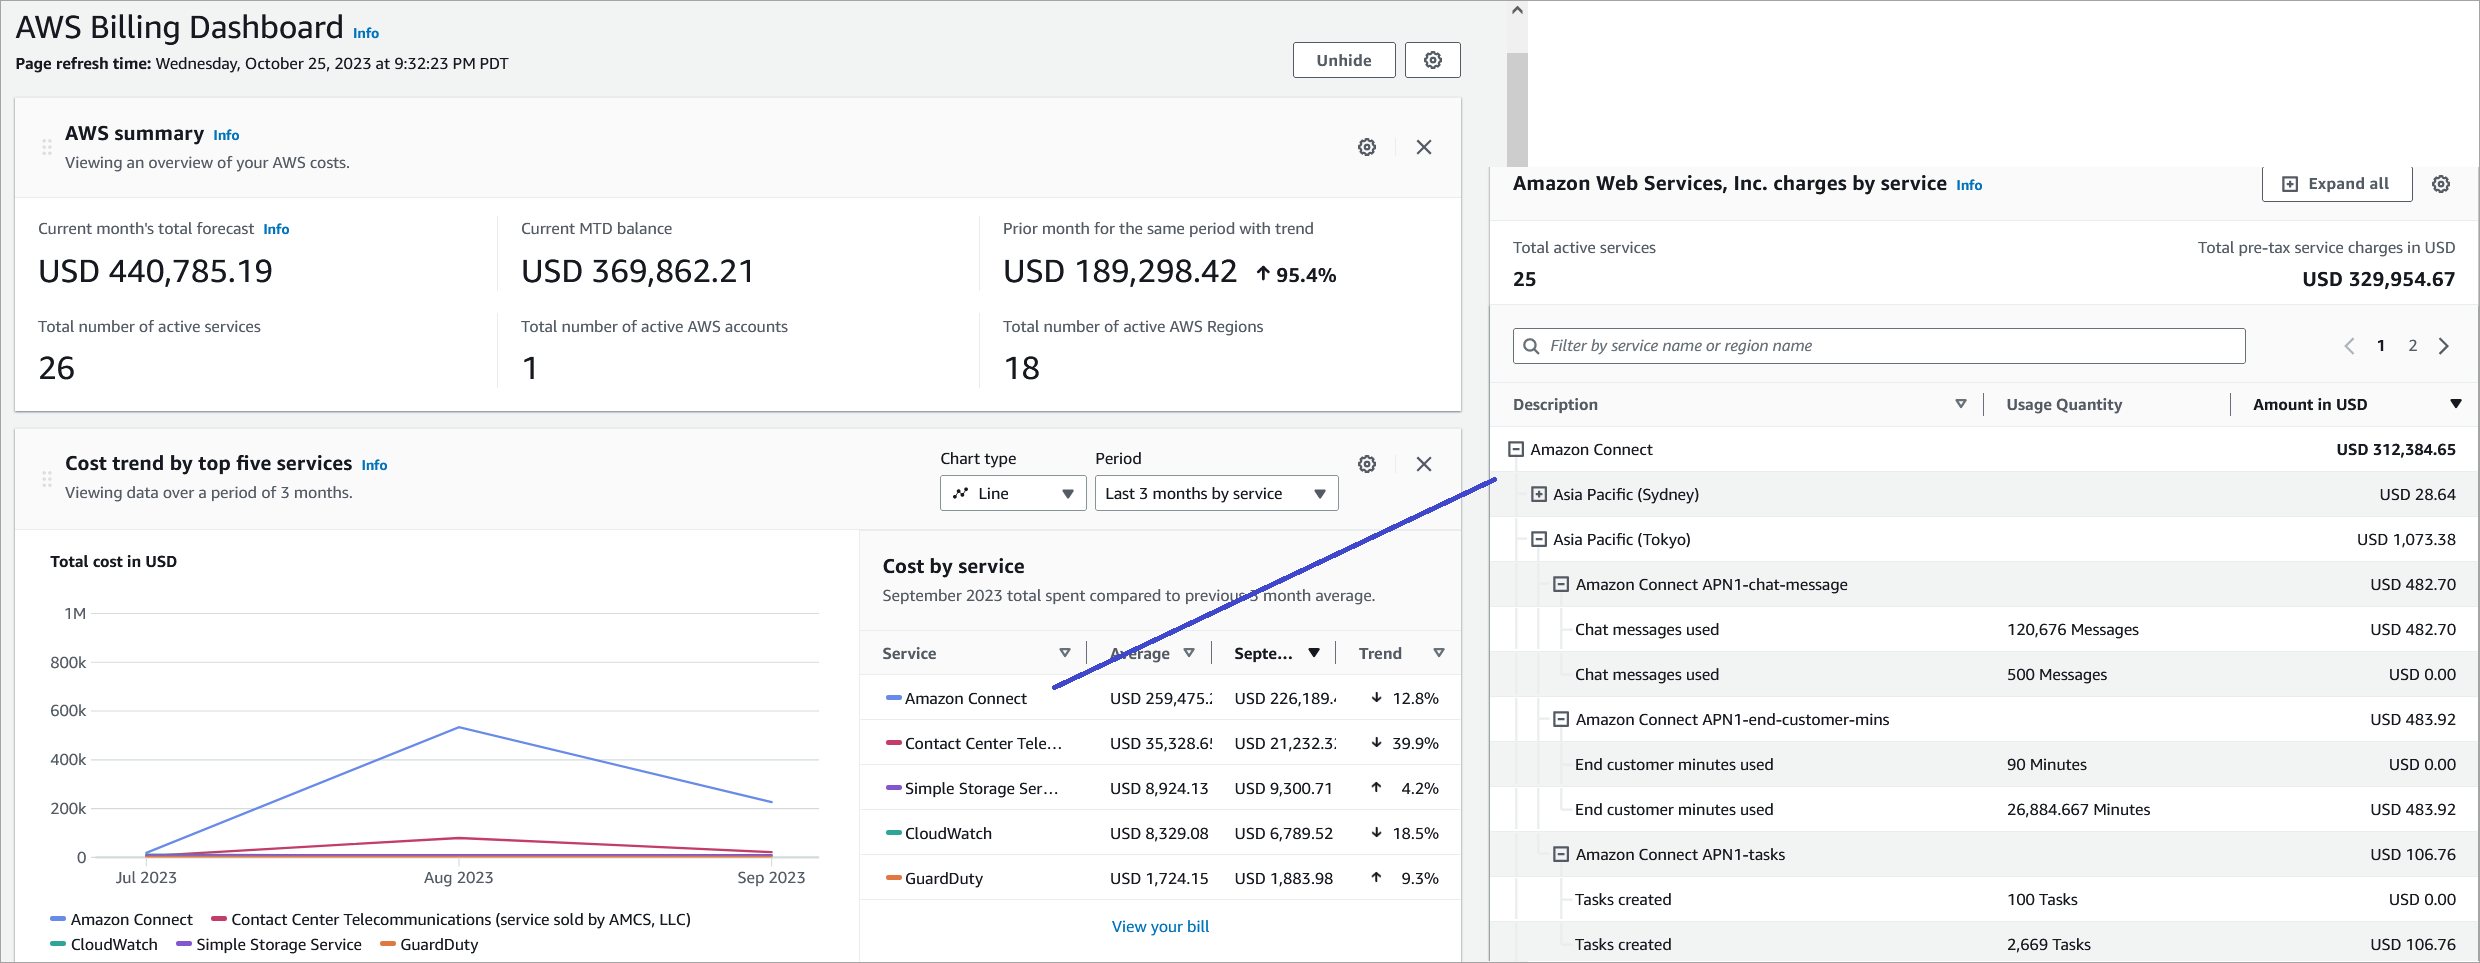
If you use the AWS account level bill summary to view the service level cost breakdown in the AWS Billing dashboard, you won't see any changes on the dashboard after implementing contact tags. The following image shows an example AWS Billing dashboard.
For more information about using AWS Cost Explorer, see Analyzing your costs with AWS Cost Explorer in the AWS Cost Management User Guide.
(Optional) Step 4: Enable Cost and Usage reports in the AWS Billing and Cost Management console
You can enable AWS Cost and Usage reports on the AWS Billing and Cost Management console, and configure your S3 bucket to export data to along with time granularity for reports (hourly, daily, monthly). After you set this up, you will receive reports with tags in additional columns. By default reports are aggregated by usage-type and tags.
For instructions, see Creating Cost and Usage Reports in the AWS Data Exports User Guide.
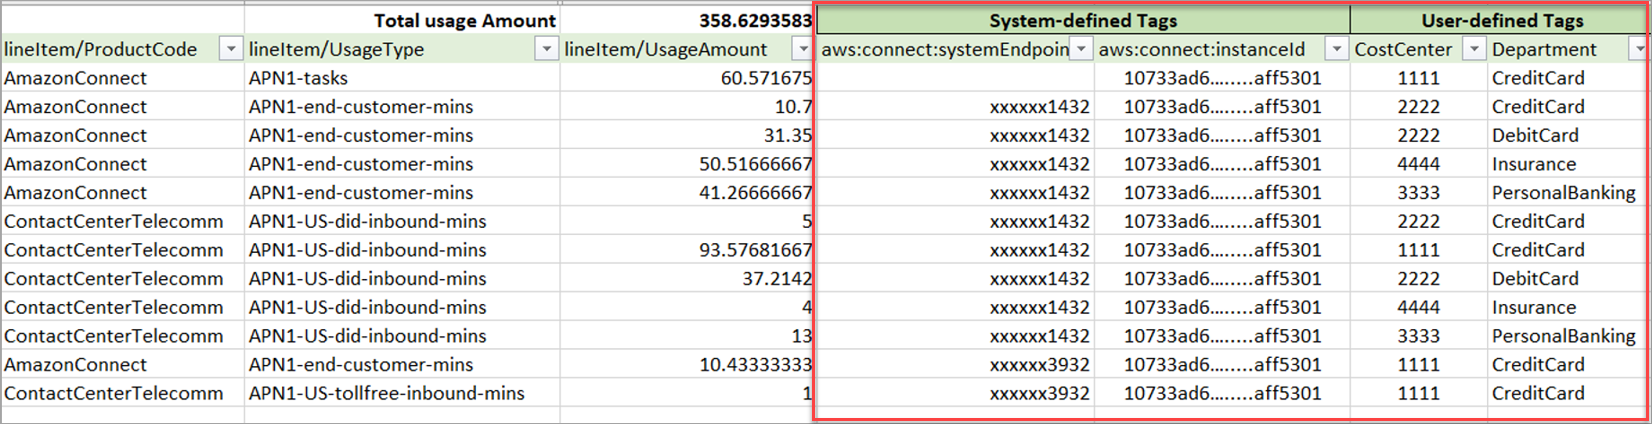
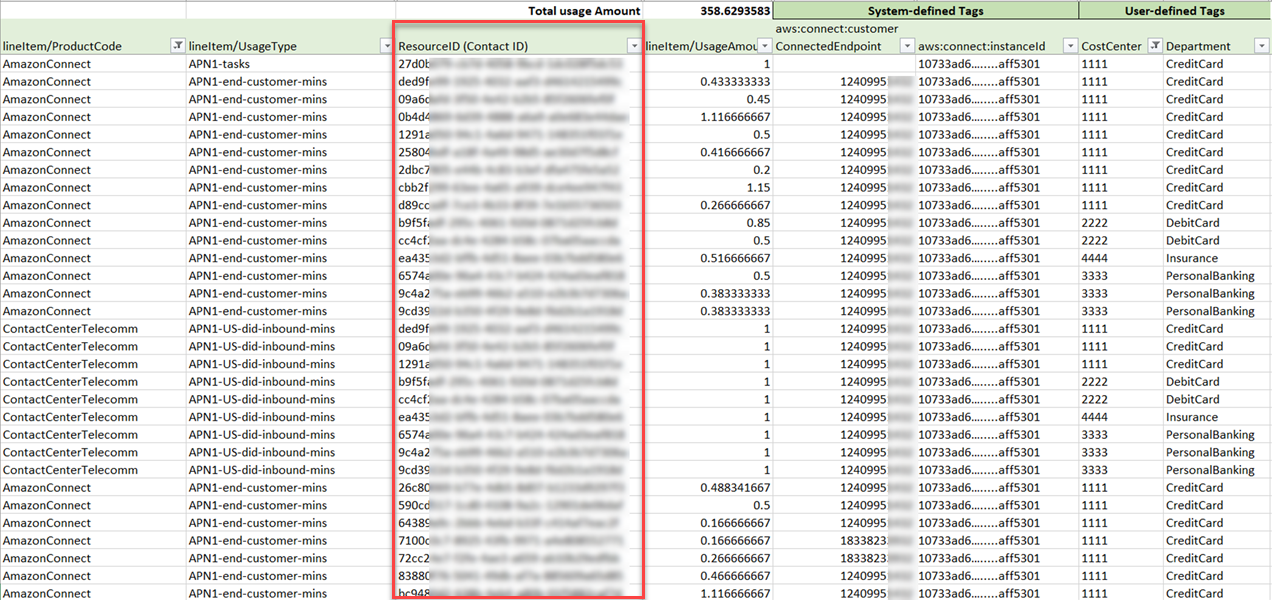
The following image shows what a Cost and Usage report looks like with columns for system and user-defined tags.
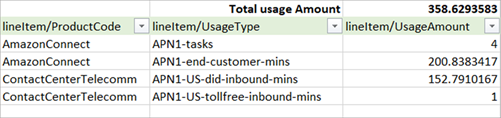
The following image shows what a cost and usage report looks likes without system or user-defined tags.
More reporting options
Another option is to view usage data for each contact. You can enable contact resource IDs to appear on your cost and usage reports in the AWS Billing and Cost Management console. After choosing this option, you will receive detailed reports in your S3 buckets, and the data will be categorized by each contact resource ID. You can use the reports for analysis by third-party applications.
Note
Including resource IDs creates individual line items for each of your resources. This might increase the size of your Cost and Usage Reports files significantly, based on your AWS usage.
The following image shows where you enable Include resource IDs on the AWS Billing console.
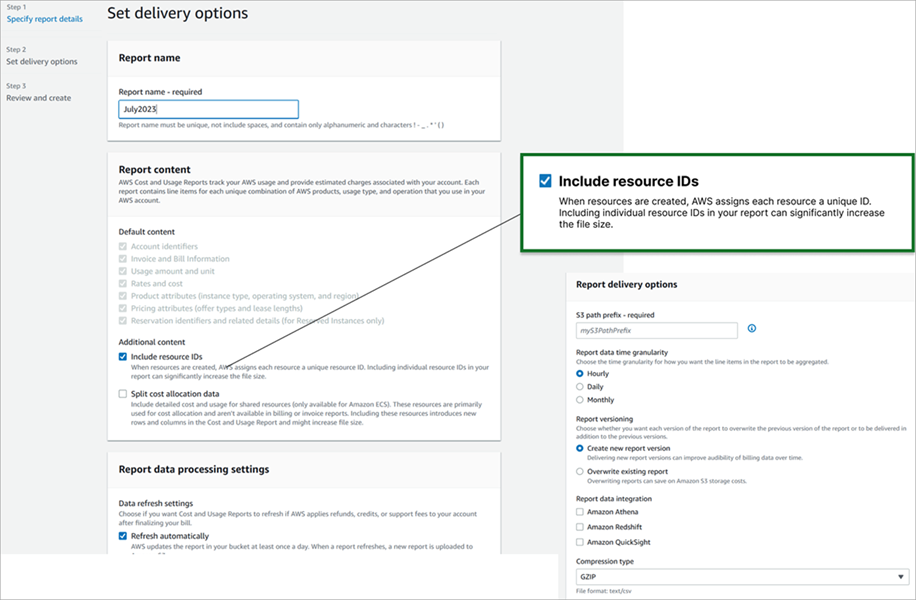
The following image shows a sample cost and usage report when Include resource IDs is enabled.
For instructions for this option, see Creating Cost and Usage Reports in the AWS Data Exports User Guide.
