Full load Oracle database migration
The full load phase populates the target database with a copy of the source. This chapter describes the following methods to help you choose the one that best matches your migration scenario.
-
Oracle Export/Import.
-
Oracle Data Pump.
-
Database link.
-
Oracle SQL Developer database copy.
-
Oracle materialized views.
-
Oracle SQL*Loader.
We recommend that you begin by reviewing the following table to understand the tools suitable for your use case.
| Oracle native tools | Supports metadata migration | Suitable for large number of tables | Suitable database sizes | Performance |
|---|---|---|---|---|
|
Oracle Export/Import |
Yes |
Yes |
Less than 10 GB |
Medium |
|
Oracle Data Pump |
Yes |
Yes |
Any size |
High |
|
Database link |
No |
No |
Less than 10 GB |
Medium |
|
Oracle SQL*Loader |
No |
No |
Less than 10 GB |
High |
|
Oracle materialized views |
No |
No |
Less than 500 MB |
Low |
|
SQL Developer database copy |
Yes |
Yes |
Less than 200 MB |
Low |
Note
The sizes that are provided in the table are AWS DMS recommendations based on customer migration experiences and not the limitations of the native tools.
This document doesn’t discuss Oracle external tables because their use is similar to Oracle Data Pump. AWS DMS recommends using Oracle Data Pump instead.
Oracle Data Guard and RMAN are the excellent options to migrate an Oracle instance into EC2, however, Amazon RDS doesn’t support these options.
You can use the Amazon DMS Sample Database for Oracle: version 1.0
The Performance Comparison section to know the performance of these native tools.
The AWS DMS ongoing replication task requires a start position such as system change number (SCN) from the source database. AWS DMS ongoing replication task replicates changes from a position that you specify during the task configuration. If all exported objects are consistent as of same SCN or if there is no data modification after this SCN, we call it as consistent full load.
To avoid data loss and/or duplication with hybrid approach, make sure of the following
-
Full load is consistent.
-
You captured the SCN from the source database before you start the full load when there are no open transactions in the database.
To capture the SCN, use the following command before you start the full load.
select current_scn from v$database;
Oracle Export/Import
Oracle Export/Import is a native database migration tool set that is provided as part of the database installation. Oracle replaced Export/Import with Oracle Data Pump, but many DBAs are familiar with Export/Import because of its long history and usage.
Export/Import may be suitable for your use case if:
-
Your database size is less than 10 GB.
-
You plan to migrate your database metadata, as well as table data.
-
You have a relatively large number of tables to migrate.
Export/Import may not be suitable for your use case if:
-
Your database size is greater than 10 GB.
-
You have LOBs or other binary data values.
One limitation of Export/Import is that it performs a serial migration. If you have a large data volume and/or large objects like LOB or CLOB values, then using Export/Import may be slower than the other options.
Example
You use Oracle exp to unload the source database into a dump file, and Oracle imp to load the dump file into the target database. You can run exp and imp on the same host to avoid copying the dump file between database servers.
For example, you can perform the following steps on the source database to migrate the dms_sample schema using exp and imp. The schema includes tables, views, indexes, packages, stored procedures, and other database objects.
First, capture the current SCN on the source database. Use this value to get a consistent image in the database export.
select current_scn from v$database;

CURRENT_SCN
86409924
Then, export the dms_sample schema using the exp utility. Set flashback_scn to the SCN value that you obtained in the previous step to get a consistent export.
exp <user>/<password> file=export_file.dmp owner=dms_sample log=explog_file.log flashback_scn=86409924 statistics=none
Finally, import the export_file.dmp dump file into the target Amazon RDS database
imp <user>/<password>@targetdb fromuser=dms_sample touser=dms_sample file=export_file.dmp log=implog_file.log
This command imports the dump file into the target dms_user schema.
Oracle Data Pump
Oracle Data Pump is a native database migration tool set that is provided as part of the database installation. Such as exp and imp, Oracle Data Pump has separate utilities for export and import. These utilities are expdp and impdp. You can use Oracle Data Pump to migrate data and database objects such as tables, indexes, views, procedure, packages, and functions, and so on.
Oracle Data Pump may be suitable for your use case if:
-
You want to automate creation of secondary database objects such as views, indexes, and constraints.
-
You have a large number of tables to migrate. Because Oracle Data Pump works at different levels such as table, schema, and database level, it doesn’t add additional steps or complexity with an increase of the number of tables.
Oracle Data Pump may not be suitable for your use case if you have a small database, which is less than 10 GB. Though Oracle Data Pump works well for databases of any size, for smaller data sets you have many native tools available as well.
Example
At a high level, we can use the following steps to migrate the dms_sample database.
-
Export data to one or more dump files.
-
Move the dump file or files.
-
Import the dump file or files.
Export data
To perform a consistent export, make sure that you use the flashback_scn parameter in expdp. Run the following commands on the source database to get the current SCN, and create a database directory to store the dump and log files.
SQL> select current_scn from v$database;

CURRENT_SCN
60045321

SQL> create directory expdp_sample_bkp as '/u001/oraarch';
Directory created.
Now, use the 60045321 SCN and the expdp_sample_bkp directory in the following command to dump the dms_sample schema.
expdp userid=<user>/<password> directory=expdp_sample_bkp dumpfile=exp_dms_sample.dmp logfile=exp_dms_sample.log schemas=dms_sample flashback_scn=60045321
Move the dump file or files
After you export your data, you have the exp_dms_sample.dmp dump file. You can move this file to Amazon RDS using different methods. In this example, we use the Amazon RDS and Amazon S3 integration feature to transfer the dump file to the Amazon RDS instance. For more information, see Amazon S3 integration in the Amazon Relational Database Service User Guide.
The first step is to copy the dump file into the Amazon S3 bucket in the same account and region as the target database.
aws s3 cp exp_dms_sample.dmp s3://YourBucket
Now, use the rdsadmin_s3_tasks package to copy the file from Amazon S3 to your Amazon RDS instance. The file will be copied to the DATA_PUMP_DIR directory which was created as part of your Amazon RDS instance.
select rdsadmin.rdsadmin_s3_tasks.download_from_s3(
    p_bucket_name => 'YourBucket',
    p_directory_name => 'DATA_PUMP_DIR',p_s3_prefix => 'exp%')
as task_id from dual;
The preceding statement returns the ID of the task. You can view the result by displaying the task’s output file.
SELECT text FROM table(rdsadmin.rds_file_util.read_text_file('BDUMP','dbtask-*task-id*.log'));
Replace task-id with the task ID returned by the download_from_s3.
Import the dump file or files
You can use the following command to import the dump file into your Amazon RDS instance.
DECLARE
  v_hdnl NUMBER;
BEGIN
  v_hdnl := DBMS_DATAPUMP.OPEN( operation => 'IMPORT', job_mode  => 'SCHEMA', job_name  => null);
  DBMS_DATAPUMP.ADD_FILE(
    handle    => v_hdnl,
    filename  => 'exp_dms_sample.dmp',
    directory => 'DATA_PUMP_DIR',
    filetype  => dbms_datapump.ku$_file_type_dump_file);
  DBMS_DATAPUMP.ADD_FILE(
    handle    => v_hdnl,
    filename  => 'sample_imp.log',
    directory => 'DATA_PUMP_DIR',
    filetype  => dbms_datapump.ku$_file_type_log_file);
  DBMS_DATAPUMP.METADATA_FILTER(v_hdnl,'SCHEMA_EXPR','IN (''DMS_SAMPLE'')');
  DBMS_DATAPUMP.START_JOB(v_hdnl);
END;
Database Link
In Oracle, a database link enables you to access objects in another database. To migrate tables using a database link, you first create the database link and then run the insert and select statements for individual tables.
Using a database link may suit your use case if:
-
You have a relatively small database size, which is less than 10 GB.
-
you need to migrate table data only.
-
You have a relatively small number of tables to migrate. For large number of tables you need to create a script to perform the migration.
Database link may not suit your use case if:
-
Your database size is greater than 10 GB.
-
You need to migrate schema objects other than table.
Example
The following example migrates the sporting_event_ticket table from the dms_sample schema.
First, create a database link to the source on the target database.
SQL>create database link rdsmigration_link
 CONNECT TO <user> identified by <password>
 USING '(description=(address=(protocol=tcp) (host=<Self Managed Database Hostname>)
 (port=<Listener Port number>)) (connect_data=(sid=<sourcedb sid>)))';
Use the following query to verify that the database link works correctly.
SQL> select sysdate from dual@rdsmigration_link;
Run the following query on the source to generate the DDL statement for the table. You can use the dbms_metadata system package to extract the DDL. After generating the DDL, create the table on the target database.
select dbms_metadata.get_ddl('TABLE','SPORTING_EVENT_TICKET') from dual;
Run the following query on target database to transfer data using the insert and select statements.
insert into dms_sample.sporting_event_ticket select * from sporting_event_ticket@rdsmigration_link;
Commit;
Oracle SQL*Loader
Oracle SQL*Loader or sqlldr is a native database utility. Oracle provides this utility as part of the Oracle installation. Oracle SQL*Loader loads data from flat files into an Oracle database.
Oracle SQL*Loader may be suitable for your use case if:
-
Your database size is less than 10 GB.
-
You need to migrate data only.
-
You have a small number of tables to migrate, the tool requires data export and control file creation for each table.
Oracle SQL*Loader may not be suitable for your use case if:
-
Your database size is greater than 10 GB.
-
You need to migrate database objects along with data.
Example
The migration process includes the following steps.
-
Export the table data and create configuration files.
-
Create the table on the target database.
-
Load the exported files into the target database.
The following example migrates the sporting_event_ticket table from the dms_sample schema.
Export the table data and create configuration files
Use the SQL Developer to connect to your source database. Choose Tools, and then choose Database Export to open the Export Wizard. Choose the following option to generate the data file, control file, and table DDL for the target database.
-
Select your connection from the Connect Panel.
-
Turn on Export DDL.
-
Turn on Export Data.
-
Make sure that the data format is set to loader.
-
Save as separate files.
To export the sporting_event_ticket table, open the Types of Export page and do the following:
-
Choose Table.
-
Search for the
sporting_event_tickettable. -
Use default options for other pages.
-
Choose Finish.
This step exports the sporting_event_ticket data, generates the control file, and the table DDL in separate operating system files.
Create the table on the target database
On the target Amazon RDS database, run the DDL script that was generated by Oracle SQL Developer to create the table.
Load the exported files into the target database
Use SQL*Loader from same host to import data. If required, you can copy the dump files to an Amazon EC2 instance to perform the import.
sqlldr userid=<user>/<password>@targetdb control=sporting_event_ticket.ctl
  log=load.log bad=load.bad discard=load.dsc direct=y skip_index_maintenance=true
This example uses Oracle SQL Developer to generate the configuration file. If you prefer, you can use SQL*Plus to generate the configuration file. For more information, see Oracle SQL*Loader in the Amazon Relational Database Service User Guide.
Oracle SQL Developer Database Copy
Oracle SQL Developer is a graphical SQL client available from Oracle and can be installed on Windows, Linux, or macOS. You can use the Database Copy option in SQL Developer to transfer the data from one database to another; you can choose to copy individual objects or an entire schema.
Oracle SQL Developer database copy may be suitable for your use case if:
-
You have a relatively small database size, which is less than 200 MB.
-
You need to migrate both data and metadata.
Example
Use the following steps to migrate the sporting_event_ticket table to the target database.
-
Install Oracle SQL Developer.
-
Open the Database Copy wizard on the Tools menu.
-
Connect to your source and target databases.
-
Select the appropriate options to migrate the tables in your source database.

-
On the next page, choose the
sporting_event_tickettable, and then choose Finish to start the migration.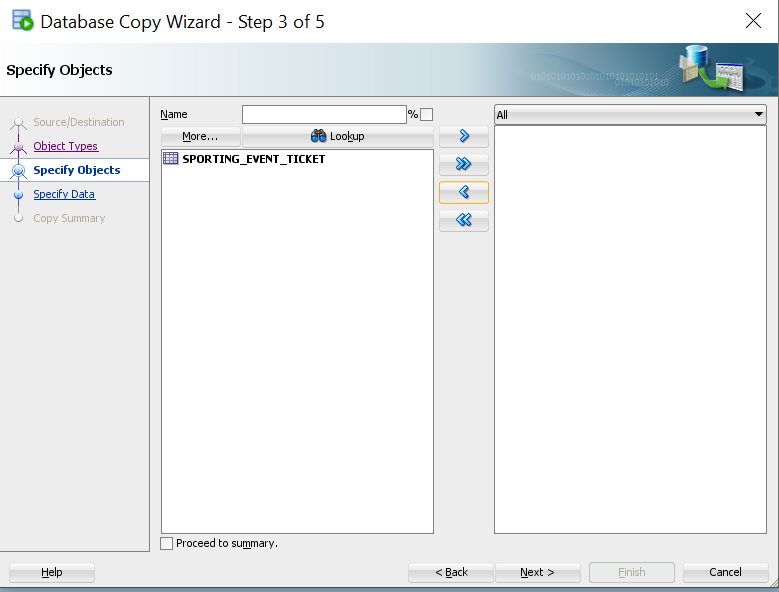
Oracle Materialized Views
A materialized view is an object that contains the results of a query. You can use Oracle materialized views to migrate data over a database link. With Oracle materialized views, you can perform a full load migration and keep your target tables continuously in-sync with the source.
Oracle materialized views may be suitable for your use case if:
-
You have a relatively small database size, which is less than 500 MB.
-
You need to migrate data only.
-
You have a few tables to migrate as it requires preparation for each table.
Oracle materialized views may not be suitable for your use case if You need to migrate objects other than table data.
Example
The following example shows how to migrate the sporting_event_ticket table.
On the target Amazon RDS instance, create a database link to the source database.
create database link rdsmigration_link
CONNECT TO <user> identified by <password>
USING '(description=(address=(protocol=tcp) (host=<Self Managed Database Hostname>)
(port=<Listener Port number>)) (connect_data=(sid=<sourcedb sid>)))';
Test the database link to make sure you can access source database.
Select sysdate from dual@rdsmigration_link;
On source database, create a materialized view log.
create materialized view log on sporting_event_ticket;
On the target Amazon RDS instance, create a materialized view.
create materialized view sporting_event_ticket
  build immediate refresh fast
  as (select *
      from  dms_sample.sporting_event_ticket@rdsmigration);
When you’re ready to switch to the new database, drop the materialized view using the PRESERVE TABLE clause to retain the underlying table and its contents.
drop materialized view sporting_event_ticket preserve table;
For more information, see CREATE MATERIALIZED VIEW
