Best practices for AWS Database Migration Service
To use AWS Database Migration Service (AWS DMS) most effectively, see this section's recommendations on the most efficient way to migrate your data.
Migration planning for AWS Database Migration Service
When planning a database migration using AWS Database Migration Service, consider the following:
-
To connect your source and target databases to an AWS DMS replication instance, you configure a network. Doing this can be as simple as connecting two AWS resources in the same virtual private cloud (VPC) as your replication instance. It can range to more complex configurations such as connecting an on-premises database to an Amazon RDS DB instance over a virtual private network (VPN). For more information, see Network configurations for database migration.
-
Source and target endpoints – Make sure that you know what information and tables in the source database need to be migrated to the target database. AWS DMS supports basic schema migration, including the creation of tables and primary keys. However, AWS DMS doesn't automatically create secondary indexes, foreign keys, user accounts, and so on, in the target database. Depending on your source and target database engine, you might need to set up supplemental logging or modify other settings for a source or target database. For more information, see Sources for data migration and Targets for data migration.
Schema migration – If your source and target use the same database engine, you can use native tools such as Oracle SQL Developer, MySQL Workbench, or pgAdmin 4 to migrate your schema. To convert a schema to a different engine, use DMS Schema Conversion. For more information, see Converting database schemas using DMS Schema Conversion.
Unsupported data types – Make sure that you can convert source data types into the equivalent data types for the target database. For more information on supported data types, see the source or target section for your data store.
-
Diagnostic support script results – When you plan your migration, we recommend that you run diagnostic support scripts. With the results from these scripts, you can find advance information about potential migration failures.
If a support script is available for your database, download it using the link in the corresponding script topic in the following section. After verifying and reviewing the script, you can run it according to the procedure described in the script topic in your local environment. When the script run is complete, you can review the results. We recommend running these scripts as a first step of any troubleshooting effort. The results can be useful while working with an AWS Support team. For more information, see Working with diagnostic support scripts in AWS DMS.
-
Premigration assessments – A premigration assessment evaluates specified components of a database migration task to help identify any problems that might prevent a migration task from running as expected. By using this assessment, you can identify potential problems before you run a new or modified task. For more information on working with premigration assessments, see Enabling and working with premigration assessments for a task.
Converting schema
If you want to convert an existing schema to a different database engine, you can use DMS Schema Conversion. It converts your source database schemas and most of the database code objects to a format compatible with the target database. This conversion includes tables, views, stored procedures, functions, data types, synonyms, and so on. For more information, see Converting database schemas using DMS Schema Conversion.
If your source and target endpoints are on the same database engine, you can use tools such as Oracle SQL Developer, MySQL Workbench, or pgAdmin 4 to move your schema.
Reviewing the AWS DMS public documentation
We highly recommended that you go through the AWS DMS public documentation pages for your source and target endpoints before your first migration. This documentation can help you to identify the prerequisites for the migration and understand the current limitations before you begin. For more information, see Working with AWS DMS endpoints.
During migration, the public documentation can help you to troubleshoot any issues with AWS DMS. Troubleshooting pages in the documentation can help you to resolve common issues using both AWS DMS and selected endpoint databases. For more information, see Troubleshooting migration tasks in AWS Database Migration Service.
Running a proof of concept
To help discover issues with your environment in early phases of your database migration, we recommend that you run a small test migration. Doing this can also help you to set a more realistic migration time line. In addition, you might need to run a full-scale test migration to measure whether AWS DMS can handle the throughput of your database over your network. During this time, we recommend to benchmark and optimize your initial full load and ongoing replication. Doing this can help you to understand your network latency and gauge overall performance.
At this point, you also have an opportunity to understand your data profile and how large your database is, including the following:
-
How many tables are large, medium, and small in size.
-
How AWS DMS handles data type and character-set conversions.
-
How many tables having large object (LOB) columns.
-
How long it takes to run a test migration.
Improving the performance of an AWS DMS migration
A number of factors affect the performance of your AWS DMS migration:
Resource availability on the source.
The available network throughput.
The resource capacity of the replication server.
The ability of the target to ingest changes.
The type and distribution of source data.
The number of objects to be migrated.
You can improve performance by using some or all of the best practices mentioned following. Whether you can use one of these practices depends on your specific use case. You can find some limitations following:
- Provisioning a proper replication server
-
AWS DMS is a managed service that runs on an Amazon EC2 instance. This service connects to the source database, reads the source data, formats the data for consumption by the target database, and loads the data into the target database.
Most of this processing happens in memory. However, large transactions might require some buffering on disk. Cached transactions and log files are also written to disk. In the following sections, you can find what to consider when you choose your replication server.
- CPU
-
AWS DMS is designed for heterogeneous migrations, but it also supports homogeneous migrations. To perform a homogeneous migration, first convert each source data type to its equivalent AWS DMS data type. Then convert each AWS DMS type data to the target data type. You can find references for these conversions for each database engine within the AWS DMS User Guide.
For AWS DMS to perform these conversions optimally, the CPU must be available when the conversions happen. Overloading the CPU and not having enough CPU resources can result in slow migrations, which can also cause other side effects.
- Replication instance class
-
Some of the smaller instance classes are sufficient for testing the service or for small migrations. If your migration involves a large number of tables, or if you intend to run multiple concurrent replication tasks, consider using one of the larger instances. A larger instance can be a good idea because the service consumes a fair amount of memory and CPU.
- AWS DMS support for R5 and C5 instance classes
-
The R5 instance classes are memory-optimized instances that are designed to deliver fast performance for workloads that process large data sets in memory. Ongoing migrations or replications of high-throughput transaction systems using AWS DMS can, at times, consume large amounts of CPU and memory. R5 instances deliver 5 percent additional memory per vCPU than R4 and the largest size provides 768 GiB of memory. In addition, R5 instances deliver a 10 percent price per GiB improvement and a ~20% increased CPU performance over R4.
The C5 instance classes are optimized for compute-intensive workloads and deliver cost-effective high performance at a low price per compute ratio. They achieve significantly higher network performance. Elastic Network Adapter (ENA) provides C5 instances with up to 25 Gbps of network bandwidth and up to 14 Gbps of dedicated bandwidth to Amazon EBS. AWS DMS can be CPU-intensive, especially when performing heterogeneous migrations and replications such as migrating from Oracle to PostgreSQL. C5 instances can be a good choice for these situations.
- Storage
-
Depending on the instance class, your replication server comes with either 50 GB or 100 GB of data storage. This storage is used for log files and any cached changes that are collected during the load. If your source system is busy or takes large transactions, you might need to increase your storage. If you're running multiple tasks on the replication server, you might also need a storage increase. However, the default amount is usually sufficient.
All storage volumes in AWS DMS are GP2 or General-Purpose solid-state drives (SSDs). GP2 volumes come with a base performance of three I/O operations per second (IOPS), with abilities to burst up to 3,000 IOPS on a credit basis. As a rule of thumb, check the
ReadIOPSandWriteIOPSmetrics for the replication instance. Make sure that the sum of these values doesn't cross the base performance for that volume. - Multi-AZ
-
Choosing a Multi-AZ instance can protect your migration from storage failures. Most migrations are transient and aren't intended to run for long periods of time. If you use AWS DMS for ongoing replication purposes, choosing a Multi-AZ instance can improve your availability should a storage issue occur.
When using a single AZ or Multi-AZ replication instance during a FULL LOAD and a failover or host replacement occurs, the full load task is expected to fail. You can restart the task from the point of failure for the remaining tables that didn't complete, or are in an error state.
- Loading multiple tables in parallel
By default, AWS DMS loads eight tables at a time. You might see some performance improvement by increasing this slightly when using a very large replication server, such as a dms.c4.xlarge or larger instance. However, at some point, increasing this parallelism reduces performance. If your replication server is relatively small, such as a dms.t2.medium, we recommend that you reduce the number of tables loaded in parallel.
To change this number in the AWS Management Console, open the console, choose Tasks, choose to create or modify a task, and then choose Advanced Settings. Under Tuning Settings, change the Maximum number of tables to load in parallel option.
To change this number using the AWS CLI, change the
MaxFullLoadSubTasksparameter underTaskSettings.- Using parallel full load
-
You can use a parallel load from Oracle, Microsoft SQL Server, MySQL, Sybase, and IBM Db2 LUW sources based on partitions and subpartitions. Doing this can improve overall full load duration. In addition, while running an AWS DMS migration task, you can accelerate the migration of large or partitioned tables. To do this, split the table into segments and load the segments in parallel in the same migration task.
To use a parallel load, create a table mapping rule of type
table-settingswith theparallel-loadoption. Within thetable-settingsrule, specify the selection criteria for the table or tables that you want to load in parallel. To specify the selection criteria, set thetypeelement forparallel-loadto one of the following settings:-
partitions-auto -
subpartitions-auto -
partitions-list -
ranges -
none
For more information on these settings, see Table and collection settings rules and operations.
-
- Working with indexes, triggers, and referential integrity constraints
Indexes, triggers, and referential integrity constraints can affect your migration performance and cause your migration to fail. How these affect migration depends on whether your replication task is a full load task or an ongoing replication (change data capture, or CDC) task.
For a full load task, we recommend that you drop primary key indexes, secondary indexes, referential integrity constraints, and data manipulation language (DML) triggers. Or you can delay their creation until after the full load tasks are complete. You don't need indexes during a full load task, and indexes incur maintenance overhead if they are present. Because the full load task loads groups of tables at a time, referential integrity constraints are violated. Similarly, insert, update, and delete triggers can cause errors, for example if a row insert is triggered for a previously bulk loaded table. Other types of triggers also affect performance due to added processing.
If your data volumes are relatively small and the additional migration time doesn't concern you, you can build primary key and secondary indexes before a full load task. Always turn off referential integrity constraints and triggers.
For a full load plus CDC task, we recommend that you add secondary indexes before the CDC phase. Because AWS DMS uses logical replication, make sure that secondary indexes that support DML operations are in place to prevent full table scans. You can pause the replication task before the CDC phase to build indexes and create referential integrity constraints before you resume the task.
You should enable triggers right before the cutover.
- Turn off backups and transaction logging
When migrating to an Amazon RDS database, it's a good idea to turn off backups and Multi-AZ on the target until you're ready to cut over. Similarly, when migrating to systems other than Amazon RDS, turning off any logging on the target until after cutover is usually a good idea.
- Use multiple tasks
Sometimes using multiple tasks for a single migration can improve performance. If you have sets of tables that don't participate in common transactions, you might be able to divide your migration into multiple tasks. Transactional consistency is maintained within a task, so it's important that tables in separate tasks don't participate in common transactions. Also, each task independently reads the transaction stream, so be careful not to put too much stress on the source database.
You can use multiple tasks to create separate streams of replication. By doing this, you can parallelize the reads on the source, the processes on the replication instance, and the writes to the target database.
- Optimizing change processing
By default, AWS DMS processes changes in a transactional mode, which preserves transactional integrity. If you can afford temporary lapses in transactional integrity, you can use the batch optimized apply option instead. This option efficiently groups transactions and applies them in batches for efficiency purposes. Using the batch optimized apply option almost always violates referential integrity constraints. So we recommend that you turn these constraints off during the migration process and turn them on again as part of the cutover process.
Using your own on-premises name server
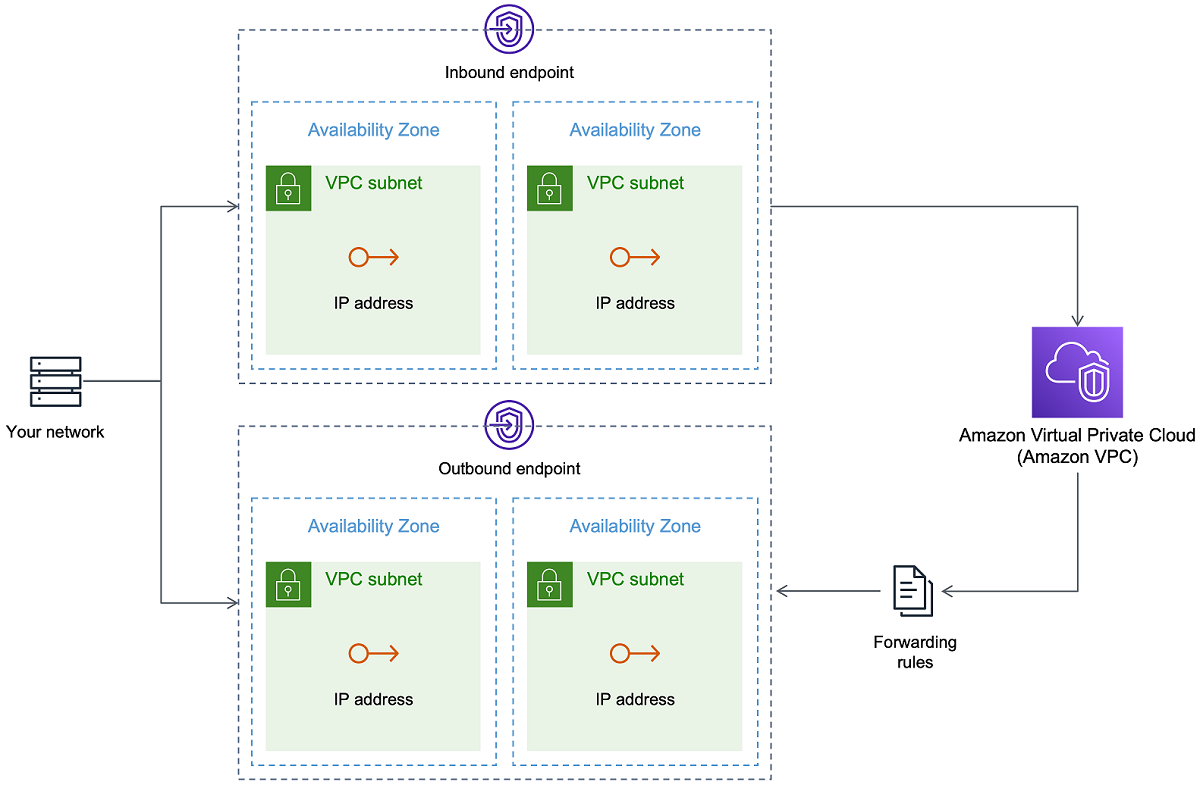
Usually, an AWS DMS replication instance uses the Domain Name System (DNS) resolver in an Amazon EC2 instance to resolve domain endpoints. However, you can use your own on-premises name server to resolve certain endpoints if you use the Amazon Route 53 Resolver. With this tool, you can query between on-premises and AWS using inbound and outbound endpoints, forwarding rules, and a private connection. The benefits of using an on-premises name server include improved security and ease of use behind a firewall.
If you have inbound endpoints, you can use DNS queries that originate on-premises to resolve AWS-hosted domains. To configure the endpoints, assign IP addresses in each subnet that you want to provide a resolver. To establish connectivity between your on-premises DNS infrastructure and AWS, use Direct Connect or a virtual private network (VPN).
Outbound endpoints connect to your on-premises name server. The name server only grants access to IP addresses included in an allow list and set in an outbound endpoint. The IP address of your name server is the target IP address. When you choose a security group for an outbound endpoint, choose the same security group used by the replication instance.
To forward select domains to the name server, use forwarding rules. An outbound endpoint can handle multiple forwarding rules. The scope of the forwarding rule is your virtual private cloud (VPC). By using a forwarding rule associated with a VPC, you can provision a logically isolated section of the AWS Cloud. From this logically isolated section, you can launch AWS resources in a virtual network.
You can configure domains hosted within your on-premises DNS infrastructure as conditional forwarding rules that set up outbound DNS queries. When a query is made to one of those domains, rules trigger an attempt to forward DNS requests to servers that were configured with the rules. Again, a private connection over Direct Connect or VPN is required.
The following diagram shows the Route 53 Resolver architecture.
For more information about Route 53 DNS Resolver, see Getting started with Route 53 Resolver in the Amazon Route 53 Developer Guide.
Using Amazon Route 53 Resolver with AWS DMS
You can create an on-premises name server for AWS DMS to resolve endpoints using
Amazon Route 53 Resolver
To create an on-premises name server for AWS DMS based on Route 53
Sign in to the AWS Management Console and open the Route 53 console at https://console.aws.amazon.com/route53/
. -
On the Route 53 console, choose the AWS Region where you want to configure your Route 53 Resolver. The Route 53 Resolver is specific to a Region.
Choose the query direction—inbound, outbound, or both.
Provide your inbound query configuration:
Enter an endpoint name and choose a VPC.
Assign one or more subnets from within the VPC (for example, choose two for availability).
Assign specific IP addresses to use as endpoints, or have Route 53 Resolver assign them automatically.
Create a rule for your on-premises domain so that workloads inside the VPC can route DNS queries to your DNS infrastructure.
Enter one or more IP addresses for your on-premises DNS servers.
Submit your rule.
When everything is created, your VPC is associated with your inbound and outbound rules and can start routing traffic.
For more information about Route 53 Resolver, see Getting started with Route 53 Resolver in the Amazon Route 53 Developer Guide.
Migrating large binary objects (LOBs)
In general, AWS DMS migrates LOB data in two phases:
AWS DMS creates a new row in the target table and populates the row with all data except the associated LOB value.
AWS DMS updates the row in the target table with the LOB data.
This migration process for LOBs requires that, during the migration, all LOB columns on the target table must be nullable. This is so even if the LOB columns aren't nullable on the source table. If AWS DMS creates the target tables, it sets LOB columns to nullable by default. In some cases, you might create the target tables using some other mechanism, such as import or export. In such cases, make sure that the LOB columns are nullable before you start the migration task.
This requirement has one exception. Suppose that you perform a homogeneous migration from an Oracle source to an Oracle target, and you choose Limited Lob mode. In this case, the entire row is populated at once, including any LOB values. For such a case, AWS DMS can create the target table LOB columns with not-nullable constraints, if needed.
Using limited LOB mode
AWS DMS uses two methods that balance performance and convenience when your migration contains LOB values:
Limited LOB mode migrates all LOB values up to a user-specified size limit (default is 32 KB). LOB values larger than the size limit must be manually migrated. Limited LOB mode, the default for all migration tasks, typically provides the best performance. However, ensure that the Max LOB size parameter setting is correct. Set this parameter to the largest LOB size for all your tables.
Full LOB mode migrates all LOB data in your tables, regardless of size. Full LOB mode provides the convenience of moving all LOB data in your tables, but the process can have a significant impact on performance.
For some database engines, such as PostgreSQL, AWS DMS treats JSON data types like LOBs. Make sure that if you chose Limited LOB mode, the Max LOB size option is set to a value that doesn't cause the JSON data to be truncated.
AWS DMS provides full support for using large object data types (BLOBs, CLOBs, and NCLOBs). The following source endpoints have full LOB support:
Oracle
Microsoft SQL Server
ODBC
The following target endpoints have full LOB support:
Oracle
Microsoft SQL Server
The following target endpoint has limited LOB support. You can't use an unlimited LOB size for this target endpoint.
Amazon Redshift
-
Amazon S3
For endpoints that have full LOB support, you can also set a size limit for LOB data types.
Improved LOB performance
While migrating LOB data, you can specify the following different LOB optimization settings.
Per table LOB settings
Using per table LOB settings, you can override task-level LOB settings for
some or all of your tables. To do this, define the lob-settings in
your table-settings rule. Following is an example table that
includes some large LOB values.
SET SERVEROUTPUT ON
CREATE TABLE TEST_CLOB
(
ID NUMBER,
C1 CLOB,
C2 VARCHAR2(4000)
);
DECLARE
bigtextstring CLOB := '123';
iINT;
BEGIN
WHILE Length(bigtextstring) <= 60000 LOOP
bigtextstring := bigtextstring || '000000000000000000000000000000000';
END LOOP;
INSERT INTO TEST_CLOB (ID, C1, C2) VALUES (0, bigtextstring,'AnyValue');
END;
/
SELECT * FROM TEST_CLOB;
COMMIT
Next, create a migration task and modify the LOB handling for your table using
the new lob-settings rule. The bulk-max-siz value
determines the maximum LOB size (KB). It's truncated if it's bigger
than the size specified.
{
	"rules": [{
			"rule-type": "selection",
			"rule-id": "1",
			"rule-name": "1",
			"object-locator": {
				"schema-name": "HR",
				"table-name": "TEST_CLOB"
			},
			"rule-action": "include"
		},
		{
			"rule-type": "table-settings",
			"rule-id": "2",
			"rule-name": "2",
			"object-locator": {
				"schema-name": "HR",
				"table-name": "TEST_CLOB"
			},
			"lob-settings": {
				"mode": "limited",
				"bulk-max-size": "16"
			}
		}
	]
}
Even if this AWS DMS task is created with FullLobMode : true, the
per table LOB settings direct AWS DMS to truncate LOB data in this particular
table to 16,000. You can check the task logs to confirm this.
721331968: 2018-09-11T19:48:46:979532 [SOURCE_UNLOAD] W: The value of column 'C' in table
'HR.TEST_CLOB' was truncated to length 16384
Inline LOB settings
When you create an AWS DMS task, the LOB mode determines how LOBs are handled.
With full LOB mode and limited LOB mode, each has its own benefits and disadvantages. Inline LOB mode combines the advantages of both full LOB mode and limited LOB mode.
You can use inline LOB mode when you need to replicate both small and large LOBs, and most of the LOBs are small. When you choose this option, during full load the AWS DMS task transfers the small LOBs inline, which is more efficient. The AWS DMS task transfers the large LOBs by performing a lookup from the source table.
During change processing, both small and large LOBs are replicated by performing a lookup from the source table.
When you use inline LOB mode, the AWS DMS task checks all of the LOB sizes to determine which ones to transfer inline. LOBs larger than the specified size are replicated using full LOB mode. Therefore, if you know that most of the LOBs are larger than the specified setting, it's better not to use this option. Instead, allow an unlimited LOB size.
You configure this option using an attribute in task settings,
InlineLobMaxSize, which is only available when
FullLobMode is set to true. The default value for
InlineLobMaxSize is 0 and the range is 1 –102400 kilobytes (100
MB). Setting InlineLobMaxSize to a value larger than 32Kb can lead
to memory pressure and performance degradation depending on the workload.
For example, you might use the following AWS DMS task settings. Here, setting
InlineLobMaxSize to a value of 5 results in all LOBs smaller than
or equal to 5 KiB (5,120 bytes) being transferred inline.
{
  "TargetMetadata": {
  "TargetSchema": "",
  "SupportLobs": true,
  "FullLobMode": true,
  "LobChunkSize": 64,
  "LimitedSizeLobMode": false,
  "LobMaxSize": 32,
  "InlineLobMaxSize": 5,
  "LoadMaxFileSize": 0,
  "ParallelLoadThreads": 0,
  "ParallelLoadBufferSize":0,
  "BatchApplyEnabled": false,
  "TaskRecoveryTableEnabled": false},
  . . .
}
Resource allocation
-
Select the appropriate replication instance size, ensure to allocate sufficient storage for LOB processing. For more information, see Selecting the best size for a replication instance.
-
Ensure the target has adequate free space for tables containing LOB columns.
-
Create separate tasks for LOBs with different characteristics to optimize performance:
-
Frequently updated LOBs vs. rarely modified LOBs
-
Large LOBs vs. small LOBs
-
Frequently accessed tables vs. infrequently accessed tables
-
Improving performance when migrating large tables using row filtering
To improve the performance when migrating a large table, break the migration into more than one task. To break the migration into multiple tasks using row filtering, use a key or a partition key. For example, if you have an integer primary key ID from 1 to 8,000,000, you can create eight tasks using row filtering to migrate 1 million records each.
To apply row filtering in the console:
Open the AWS Management Console.
Choose Tasks, and create a new task.
Choose the Table mappings tab, and expand Selection rules.
Choose Add new selection rule. You can now add a column filter with either a less than or equal to, greater than or equal to, equal to, or a range condition between two values. For more information on column filtering, see Specifying table selection and transformations rules from the console.
If you have a large partitioned table that is partitioned by date, you can migrate data based on date. For example, suppose that you have a table partitioned by month, and only the current month's data is updated. In this case, you can create a full load task for each static monthly partition and create a full load plus CDC task for the currently updated partition.
If your table has a single-column primary key or unique index, you can have your AWS DMS task segment the table using a parallel load of the ranges type to load the data in parallel. For more information, see Table and collection settings rules and operations.
Ongoing replication
Important
AWS DMS ongoing replication (CDC) does not provide real-time replication. AWS DMS does not offer service-level agreements (SLAs) for CDC replication latency.
CDC latency depends on multiple environmental factors, including:
Source database workload and transaction log generation rate
Volume and size of transactions (large batch operations or maintenance jobs can generate significant transaction log volume)
Network bandwidth and latency between the source database, replication instance, and target database
Replication instance class and resource utilization (CPU, memory, storage IOPS)
Target database ingestion capacity and write throughput
Data types being migrated, such as LOB columns, extended VARCHARs, row size, and transaction complexity
Number of tables and tasks running on the replication instance
Source database availability (downtime, upgrades, or failover events can interrupt CDC log reading and increase latency)
Under normal operating conditions, CDC latency is typically low. However, during periods of heavy source workload — such as batch processing, index rebuilds, large ETL jobs, or maintenance operations that generate high volumes of transaction logs — CDC latency can spike to several minutes or longer.
Do not use AWS DMS CDC for use cases that require sub-second or guaranteed low-latency replication. If your application requires real-time data synchronization with strict latency guarantees, consider alternative approaches such as native database replication or purpose-built streaming solutions.
AWS DMS provides ongoing replication of data, keeping the source and target databases in sync. It replicates only a limited amount of data definition language (DDL) statements. AWS DMS doesn't propagate items such as indexes, users, privileges, stored procedures, and other database changes not directly related to table data.
If you plan to use ongoing replication, set the Multi-AZ option when you create your replication instance. By choosing Multi-AZ, you get high availability and failover support for the replication instance. However, this option can have an impact on performance and can slow down replication while applying changes to the target system.
Before you upgrade your source or target databases, we recommend that you stop any AWS DMS tasks that are running on these databases. Resume the tasks after your upgrades are complete.
During ongoing replication, it's critical to identify the network bandwidth between your source database system and your AWS DMS replication instance. Make sure that the network doesn’t cause any bottlenecks during ongoing replication.
It's also important to identify the rate of change and archive log generation per hour on your source database system. Doing this can help you to understand the throughput that you might get during ongoing replication.
Reducing the load on your source database
AWS DMS uses some resources on your source database. During a full load task, AWS DMS performs a full table scan of the source table for each table processed in parallel. Also, each task that you create as part of a migration queries the source for changes as part of the CDC process. For AWS DMS to perform CDC for some sources, such as Oracle, you might need to increase the amount of data written to your database's change log.
If you find that you're overburdening your source database, reduce the number of tasks or tables for each task for your migration. Each task gets source changes independently, so consolidating tasks can decrease the change capture workload.
Reducing the bottlenecks on your target database
During the migration, try to remove any processes that compete for write resources on your target database:
-
Turn off unnecessary triggers.
-
Turn off secondary indexes during initial load and turn them back on later during ongoing replication.
-
With Amazon RDS databases, it's a good idea to turn off backups and Multi-AZ until the cutover.
-
While migrating to non-RDS systems, it's a good idea turn off any logging on the target until the cutover.
Using data validation during migration
To ensure that your data was migrated accurately from the source to the target, we highly recommend that you use data validation. If you turn on data validation for a task, AWS DMS begins comparing the source and target data immediately after a full load is performed for a table.
Data validation works with the following databases wherever AWS DMS supports them as source and target endpoints:
-
Oracle
-
PostgreSQL
-
MySQL
-
MariaDB
-
Microsoft SQL Server
-
Amazon Aurora MySQL-Compatible Edition
-
Amazon Aurora PostgreSQL-Compatible Edition
-
IBM Db2 LUW
-
Amazon Redshift
For more information, see AWS DMS data validation.
Monitoring your AWS DMS tasks using metrics
You have several options for monitoring metrics for your tasks using the AWS DMS console:
- Host metrics
-
You can find host metrics on the CloudWatch metrics tab for each particular replication instance. Here, you can monitor whether your replication instance is sized appropriately.
- Replication task metrics
-
Metrics for replication tasks, including incoming and committed changes, and latency between the replication host and source/target databases can be found on the CloudWatch metrics tab for each particular task.
- Table metrics
-
You can find individual table metrics on the Table statistics tab for each individual task. These metrics include these numbers:
-
Rows loaded during the full load.
-
Inserts, updates, and deletes since the task started.
-
DDL operations since the task started.
-
For more information on metrics monitoring, see Monitoring AWS DMS tasks.
Events and notifications
AWS DMS uses Amazon SNS to provide notifications when an AWS DMS event occurs, for example the creation or deletion of a replication instance. You can work with these notifications in any form supported by Amazon SNS for an AWS Region. These can include email messages, text messages, or calls to an HTTP endpoint.
For more information, see Working with Amazon SNS events and notifications in AWS Database Migration Service.
Using the task log to troubleshoot migration issues
In some cases, AWS DMS can encounter issues for which warnings or error messages appear only in the task log. In particular, data truncation issues or row rejections due to foreign key violations are only written in the task log. Therefore, be sure to review the task log when migrating a database. To view the task log, configure Amazon CloudWatch as part of task creation.
For more information, see Monitoring replication tasks using Amazon CloudWatch.
Troubleshooting replication tasks with Time Travel
To troubleshoot AWS DMS migration issues, you can work with Time Travel. For more information about Time Travel, see Time Travel task settings.
When you work with Time Travel, be aware of the following considerations:
-
To avoid overhead on a DMS replication instance, turn on Time Travel only for tasks that need debugging.
-
When you use Time Travel to troubleshoot replication tasks that might run for several days, monitor replication instance metrics for resource overheads. This approach applies especially in cases where high transaction loads run on source databases for extended periods of time. For more details, see Monitoring AWS DMS tasks.
-
When the Time Travel task setting
EnableRawDatais set totrue, the task memory usage during DMS replication might be higher than when Time Travel isn't turned on. If you turn on Time Travel for extended periods of time, monitor your task. -
Currently, you can turn on Time Travel only at the task level. Changes to all tables are logged in Time Travel logs. If you are troubleshooting for specific tables in a database with high transaction volume, create a separate task .
Changing the user and schema for an Oracle target
When you use Oracle as a target, AWS DMS migrates the data to the schema owned by the target endpoint's user.
For example, suppose that you're migrating a schema named PERFDATA to an
Oracle target endpoint, and that the target endpoint user name is MASTER.
AWS DMS connects to the Oracle target as MASTER and populates the
MASTER schema with database objects from PERFDATA.
To override this behavior, provide a schema transformation. For example, to migrate
the PERFDATA schema objects to a PERFDATA schema at the target
endpoint, use the following transformation.
{
    "rule-type": "transformation",
    "rule-id": "2",
    "rule-name": "2",
    "object-locator": {
        "schema-name": "PERFDATA"
    },
    "rule-target": "schema",
    "rule-action": "rename",
    "value": "PERFDATA"
}
For more information about transformations, see Specifying table selection and transformations rules using JSON.
Changing table and index tablespaces for an Oracle target
When using Oracle as a target, AWS DMS migrates all tables and indexes to the default tablespace in the target. For example, suppose that your source is a database engine other than Oracle. All of the target tables and indexes are migrated to the same default tablespace.
To override this behavior, provide corresponding tablespace transformations. For
example, suppose that you want to migrate tables and indexes to table and index
tablespaces in the Oracle target that are named after the schema in the source. In this
case, you can use transformations similar to the following. Here, the schema in the
source is named INVENTORY and corresponding table and index tablespaces in
the target are named INVENTORYTBL and INVENTORYIDX.
{
   "rule-type": "transformation",
   "rule-id": "3",
   "rule-name": "3",
   "rule-action": "rename",
   "rule-target": "table-tablespace",
   "object-locator": {
      "schema-name": "INVENTORY",
      "table-name": "%",
      "table-tablespace-name": "%"
   },
   "value": "INVENTORYTBL"
},
{
   "rule-type": "transformation",
   "rule-id": "4
   "rule-name": "4",
   "rule-action": "rename",
   "rule-target": "index-tablespace",
   "object-locator": {
      "schema-name": "INVENTORY",
      "table-name": "%",
      "index-tablespace-name": "%"
   },
   "value": "INVENTORYIDX"
}
For more information about transformations, see Specifying table selection and transformations rules using JSON.
When Oracle is both source and target, you can preserve existing table or index
tablespace assignments by setting the Oracle source extra connection attribute
enableHomogenousTablespace=true. For more information, see Endpoint settings when using Oracle as a source for AWS DMS.
Upgrading a replication instance version
AWS periodically releases new versions of the AWS DMS replication engine software, with new features and performance improvements. Each version of the replication engine software has its own version number. It’s critical to test the existing version of your AWS DMS replication instance running a production work load before you upgrade your replication instance to a later version. For more information on available version upgrades, see AWS DMS release notes.
Understanding your migration cost
AWS Database Migration Service helps you migrate databases to AWS easily and securely at a low cost. You only pay for your replication instances and any additional log storage. Each database migration instance includes storage sufficient for swap space, replication logs, and data cache for most replications and inbound data transfer is free.
You might need more resources during initial load or during peak load time. You can closely monitor replication instance resource utilization using cloud watch metrics. You can then scale up and scale down replication instance size based on usage.
For more information on estimating your migration costs, see:
