End of support notice: On September 25, 2025, AWS will discontinue support for NICE EnginFrame.
After September 25, 2025, you will no longer be able to access the NICE EnginFrame console or NICE EnginFrame
resources. For more information, visit this blog post
Common administration tasks
Most of the tasks an EnginFrame administrator has to perform involve editing configuration files. This chapter provides an overview of the main EnginFrame configuration files and then focuses on some common administration tasks, explaining in detail how to accomplish them.
This chapter describes the following tasks:
Topics
Other important administration tasks regarding EnginFrame Portal's specific sub-components (like spooler management, logging, etc.) are described in the next chapters.
Note
Starting March 31, 2022, NICE EnginFrame doesn't support VNC®, HP® RGS, VirtualGL, and Amazon DCV 2016 and previous versions.
Main configuration files
In this section the main EnginFrame configuration files are described. Further details can be found throughout this guide.
Starting from EnginFrame 2015, configuration files are isolated from the rest of EnginFrame installation in $EF_TOP/conf.
Configuration files in $EF_TOP/conf are preserved during updates.
EnginFrame still uses internal configuration files located under $EF_TOP/<VERSION> and organized according to the pre-EnginFrame
2015 directory-tree layout (i.e. $EF_TOP/<VERSION>/enginframe/conf and
$EF_TOP/<VERSION>/enginframe/plugins/<plug-in>/conf, ...).
Some of these files define default values which can be overridden using files with the same name under the
$EF_TOP/conf tree. Note any modifications to files under $EF_TOP/<VERSION> are discouraged and the
files under this directory are subject to change in the next EnginFrame versions without notice.
enginframe.conf-
It is located in
$EF_TOP/confdirectory.As already seen in Fine-tuning your installation, this file configures the JDK running EnginFrame Server and EnginFrame Agent and the execution options passed to the JVM. It also configures other execution environment parameters like locale or user running Tomcat® (referred to as
EF_NOBODY). server.conf-
This is the server's main configuration file.
It is located in
$EF_TOP/<VERSION>/enginframe/confdirectory. Its contents are merged with$EF_TOP/conf/enginframe/server.confif present. In case the same property is defined in both files the latter wins.It also contains some parameters used by the local agent when executing services on EnginFrame Server's host on
EF_NOBODY's behalf. agent.conf-
This is the agent's main configuration file.
It is located in
$EF_TOP/<VERSION>/enginframe/confdirectory. Its contents are merged with$EF_TOP/conf/enginframe/agent.confif present. In case the same property is defined in both files the latter wins. mime-types.xml-
It associates content types to files downloaded through the portal without requiring any change to the JDK settings.
It is located in
$EF_TOP/<VERSION>/enginframe/confdirectory. Its contents are merged, extended or overridden, with$EF_TOP/conf/enginframe/mime-types.xmlif present. In the case the same MIME type is defined in both files the latter overrides the mapping.For more information, see Managing internet media types.
log.server.xconf-
It configures EnginFrame Server's logging.
It is located in
$EF_TOP/<VERSION>/enginframe/confdirectory. Overridden by$EF_TOP/conf/enginframe/log.server.xconfif present. log.agent.xconf-
It configures EnginFrame Agent's logging.
It is located in
$EF_TOP/<VERSION>/enginframe/confdirectory. Overridden by$EF_TOP/conf/enginframe/log.agent.xconfif present. authorization.xconf-
It's a configuration file for the EnginFrame authorization system. It defines users' groups and access control lists (ACLs).
Refer to Configuring authorization.
Deploying a new plugin
Two types of plugins exist from a deployment point-of-view: the official ones distributed by NICE and the custom ones produced in-house or distributed by third parties.
Important
Plug-ins designed for pre-2015 EnginFrame versions cannot be installed on newer EnginFrame. Please contact NICE and check if updated plug-ins are available.
Official NICE plugins
NICE's official plugins are distributed with an installer that sets up the plugin and deploys it inside EnginFrame.
If NICE eftoken plugin (sold separately) were to be installed, it would be done by executing:
#java -jar eftoken-X.Y.Z.jar
The installer asks EnginFrame's root directory, plugin specific configuration options, and then installs the code.
If EnginFrame Server and EnginFrame Agent are installed on two different hosts, unless otherwise specified in plugin documentation, the plugin has to be installed on both hosts.
Unless stated otherwise in plugin documentation, once installed, the plugin is immediately available through EnginFrame Portal without requiring a restart.
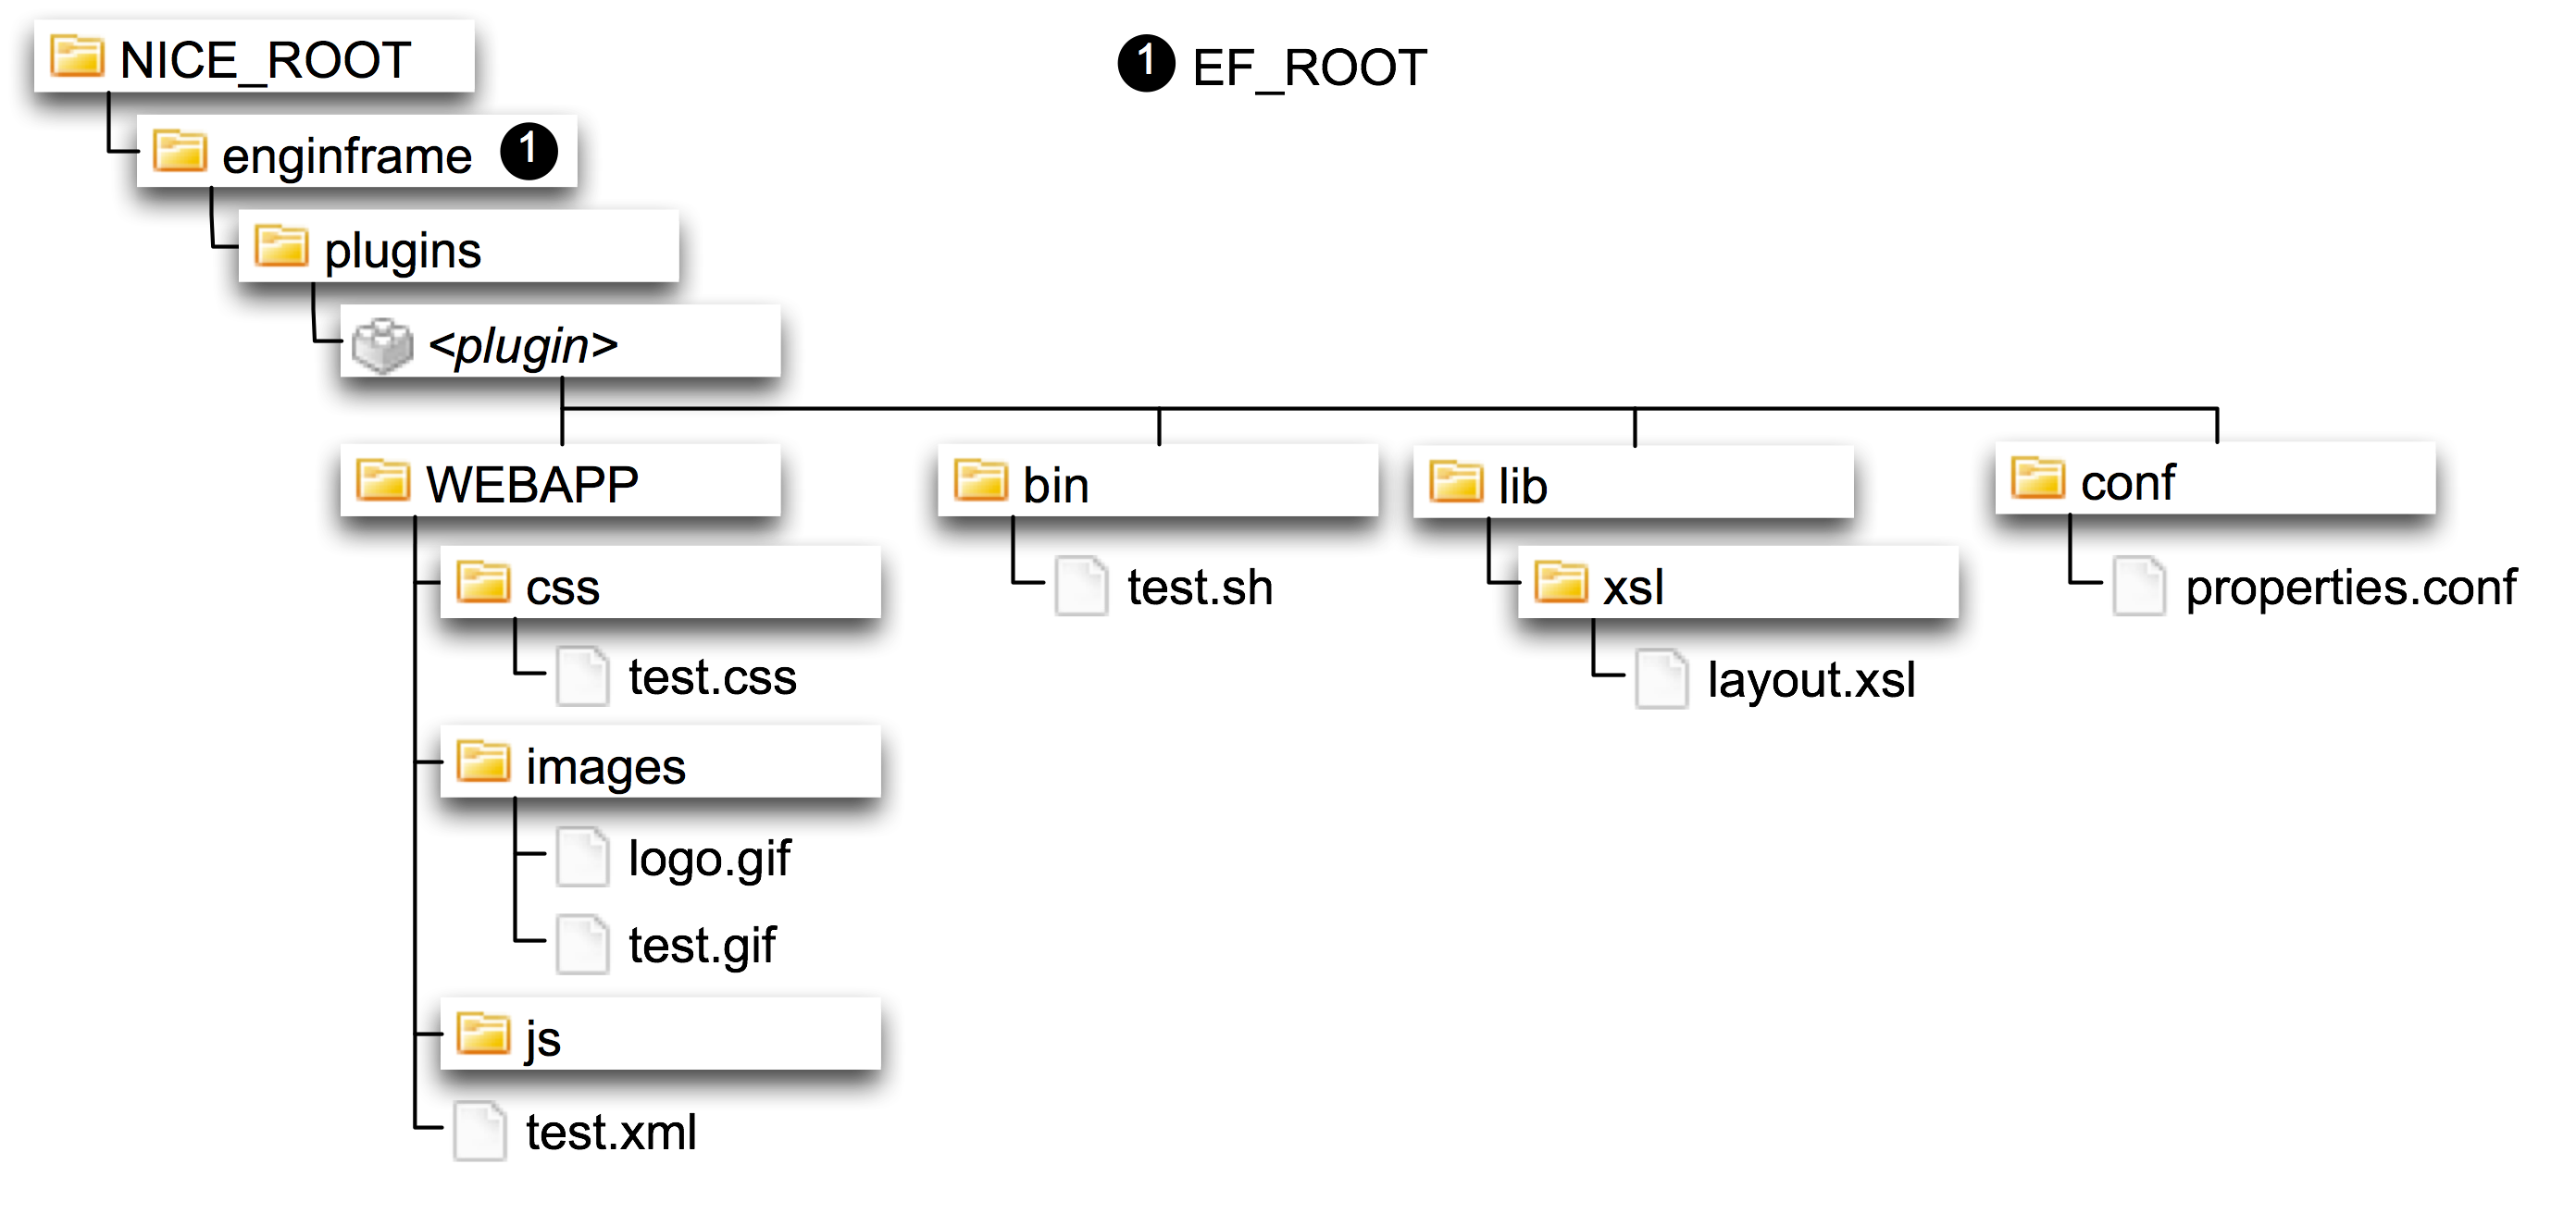
Custom plugins
If you have a custom plugin or are deploying a third party plugin that is not distributed with an installer, a manual deployment is
necessary. All EnginFrame plugins must be placed inside $EF_TOP/<VERSION>/plugins and follow the internal
structure described below.
A plugin directory structure example is:
EnginFrame Plugin Structure
Some plugins may need additional setup operations to work properly. Read and follow the instructions distributed with plugin documentation.
Changing Java™ version
In some cases, such as an important security fix is shipped by Java™ vendor, changing the Java™ Platform running EnginFrame Portal is necessary.
The Java™ Platform running EnginFrame Server and EnginFrame Agent is defined using JAVA_HOME parameter inside
$EF_TOP/conf/enginframe.conf. Changing this value is the only step necessary to use a different Java™ version to run
these components.
Using Java™ installed in the directory /opt/java is done as follows:
JAVA_HOME="/opt/java"
EnginFrame Server and EnginFrame Agent restart is necessary to make changes effective.
Refer to Java™ platform for further information on supported Java™ versions.
Changing the default agent
A single EnginFrame Server can connect to many EnginFrame Agents to execute services.
The remote default agent is specified during installation. When both server and agent are installed on the same host, this agent automatically becomes the default one. When the server is installed alone, the installer asks default agent hostname and TCP port.
The default agent is defined in server.conf with two properties:
-
EF_AGENT_HOSTSpecifies default Agent hostname or IP address. The default value is
localhost. -
EF_AGENT_PORTSpecifies default TCP port where Agent listens for incoming connections (i.e. parameter
ef.agent.portin Agent configuration, see Configuring agent ports for more details). The default value is9999.It is located in
$EF_TOP/<VERSION>/enginframe/confdirectory. Its contents are merged with$EF_TOP/conf/enginframe/server.confif present. In case the same property is defined in both files the latter wins.
Service Definition Files use both properties.
So if an EnginFrame Server wants to set its default agent as agent1.nice listening on port 7777 the parameters mentioned
above become:
EF_AGENT_HOST=agent1.nice
EF_AGENT_PORT=7777
EF_AGENT_HOST can also be set to an IP address, e.g. 192.168.1.16.
Changes to these parameters do not require EnginFrame Server's restart.
Important
You cannot remove EF_AGENT_HOST and EF_AGENT_PORT from server.conf. If
those properties are empty/missing, EnginFrame uses the default values.
Managing internet media types
When a file is downloaded from EnginFrame Portal the browser tries to open it with the application configured to manage its media type content. For example, if an image is downloaded the browser displays it inline, while if a Word document is downloaded, it launches Office.
EnginFrame suggests to browsers the best method to handle files by sending the Internet media type in the download response.
An Internet media type, originally called MIME type, is a two-part identifier for file formats on the Internet. The
identifiers were originally defined in RFC 2046
It is very useful to link uncommon file extensions to specific MIME types, so browsers can handle them correctly. Not all browsers use MIME type information in the same way. Older Microsoft® Internet Explorer® versions relies more on content type detection provided by Windows® operating system than on MIME type specified by the server's response message, especially for some of the most common file name extensions.
EnginFrame uses a built-in list of MIME types provided by the JDK. This list is defined in
JAVA_HOME/jre/lib/content-types.properties.
EnginFrame overrides and extends this list of MIME types with $EF_TOP/<VERSION>/enginframe/conf/mime-types.xml in the
static installation directory and with the optional $EF_TOP/conf/enginframe/mime-types.xml in the EnginFrame custom
configuration directory tree. These files, owned by EnginFrame administrator, are used across the whole system unless more specific settings are found.
Each plugin has the possibility to extend and overrides the EnginFrame MIME types settings, by defining its own static
$EF_TOP/<VERSION>/enginframe/plugins/ and the associated
customizable version plugin_name/conf/mime-types.xml$EF_TOP/conf/plugins/ in the EnginFrame configuration
directory tree. MIME types defined in the plugin plugin_name/mime-types.xmlmime-types.xml files are used when downloading files from spoolers generated
by services defined in the plugin_name plugin.
When EnginFrame receives a download request from the browser, it tries to associate a MIME type to the file. It first looks in the plugin specific
mime-types.xml file, then in EnginFrame mime-types.xml. In the case it cannot associate a MIME type from its
own configuration files, it uses the default definitions specified in JDK's content-types.properties.
More in details, when looking for a MIME type of a file EnginFrame checks resources in the following order:
-
Custom plug-in MIME types,
$EF_TOP/conf/plugins/plugin_name/mime-types.xml -
Static plug-in MIME types,
$EF_TOP/<VERSION>/enginframe/plugins/plugin_name/conf/mime-types.xml -
Custom EnginFrame system-wide MIME types,
$EF_TOP/conf/plugins/plugin_name/mime-types.xml -
Static EnginFrame system-wide MIME types,
$EF_TOP/<VERSION>/enginframe/conf/mime-types.xml -
Default JDK MIME types,
JAVA_HOME/jre/lib/content-types.properties
If this chain of lookup for a specific MIME type fails, the default MIME type, if defined, is returned, otherwise an empty MIME type is sent back in the HTTP response by EnginFrame.
EnginFrame Server dynamically reloads the mime-types.xml files when they are modified, so no restart is necessary.
EnginFrame ships this $EF_TOP/<VERSION>/enginframe/conf/mime-types.xml:
<?xml version="1.0"?>
<ef:mime-types xmlns:ef="http://www.enginframe.com/2000/EnginFrame">

  <ef:default type="text/plain" />

  <ef:mime-type>
    <ef:type type="text/plain"/>
    <ef:desc desc="ASCII Text File"/>
    <ef:extensions>
      <ef:extension ext=".log"/>
    </ef:extensions>
    <ef:match-list>
      <ef:match expr="[A-Z0-9]*.ef" />
      <ef:match expr="README" casesensitive="false" />
    </ef:match-list>
  </ef:mime-type>

  <ef:mime-type>
    <ef:type type="application/x-javascript"/>
    <ef:desc desc="JavaScript File"/>
    <ef:match-list>
      <ef:match expr="^.*[Jj][Ss]" />
    </ef:match-list>
  </ef:mime-type>

  <ef:mime-type>
    <ef:type type="application/json"/>
    <ef:desc desc="JSON File"/>
    <ef:match-list>
      <ef:match expr="^.*\.[Jj][Ss][Oo][Nn]" />
    </ef:match-list>
  </ef:mime-type>

  <ef:mime-type>
    <ef:type type="text/css"/>
    <ef:desc desc="CSS File"/>
    <ef:match-list>
      <ef:match expr="^.*[Cc][Ss][Ss]" />
    </ef:match-list>
  </ef:mime-type>

  <ef:mime-type>
    <ef:type type="image/vnd.microsoft.icon"/>
    <ef:desc desc="ICO File"/>
    <ef:match-list>
      <ef:match expr="^.*[Ii][Cc][Oo]" />
    </ef:match-list>
  </ef:mime-type>
</ef:mime-types>
The <ef:extensions> section contains exact matches. Thus, in this example, EnginFrame associates text/plain MIME type
to any file ending with extension .log or .patch.
The <ef:match-list> section contains regular expressions for matching a file name. Thus, in this example, EnginFrame associates
text/plain MIME type to all files whose name contains only alphanumeric characters and whose extension is .ef and to all
files named README.
Since the casesensitive attribute is set to false in the first <ef:match> tag, a matching is
performed that is not case sensitive. This means, for example, that files named license.ef or LICENSE.EF are matched. If
casesensitive attribute is not explicitly set to false, a case sensitive match is performed. So files named
readme or ReadMe are not matched by the regular expression defined in the second <ef:match> tag.
<ef:default> is a child of <ef:mime-types> tag. It specifies a default MIME type for those cases where
a MIME type cannot be guessed. The syntax is: <ef:default type="
expected_mime_type"
forward-guess="[true|false]" />
Attribute forward-guess set to true allows to interrupt MIME type lookup at the current
mime-types.xml file without considering upstream MIME type settings. Its default value is false.
The default value can be overridden following the same lookup order for mime-types.xml files as reported in the list
above.
Important
There are two settings concerning security and MIME types in the server.conf configuration file that are important to
be described here: ef.download.mimetype.mapping.text and ef.download.mimetype.mapping.octetstream.
ef.download.mimetype.mapping.text: a comma separated list of MIME types that, for security reasons, are mapped to
text/plain in the HTTP response to clients when downloading a file. This further MIME type mapping prevents browsers from
interpreting and rendering the downloaded files protecting against malicious code that could be executed on the client browser (cross-site
scripting attack).
ef.download.mimetype.mapping.octetstream: a comma separated list of MIME types that, for security reasons, are mapped to
application/octet-stream in the HTTP response to clients when downloading a file. This further MIME type mapping prevents browsers
from taking any action on the downloaded files protecting against malicious code that could be executed on the client host.
For more information about these XML tags, see EnginFrame Administrator Reference.
Customizing error page layout
Whenever EnginFrame encounters an error during service execution, it displays an error message on the browser using a well known layout. All errors that end up on browser are displayed with the same look and feel.
Error page layout customization is achieved by changing ef.error.layout value inside server.conf. This
value must be an absolute path to an XSL file containing customized style sheets.
$EF_TOP/<VERSION>/enginframe/lib/xsl/com.enginframe.error.xsl is the default value for ef.error.layout. This
file can be used as a starting point to create customized templates.
So, if $EF_TOP/<VERSION>/enginframe/plugins/mycompany/lib/xsl/mycompany.error.xsl contains the customized XSL
templates, ef.error.layout is set as follows: ef.error.layout=${EF_ROOT}/plugins/mycompany/lib/xsl/mycompany.error.xsl
Changes to ef.error.layout do not require a server restart.
Limiting service output
EnginFrame's usual client is a web browser. Limiting amount of data sent to browsers saves resources on client-side. When a service execution produces a big amount of XML/HTML, the browser could have trouble rendering the page.
To avoid overloading the clients (and server/agent that have to produce/process the data), the maximum amount of data that services can
produce is definable using ef.output.limit. If the limit is exceeded, the service's output is truncated and an error message is
displayed on the browser.
ef.output.limit is specified as number of bytes and the default value is 52428800, i.e. 50 MB.
Since services are usually executed by a remote agent, this property is set inside the agent's
agent.conf.
The following example shows how to set this property to limit service's output to 2 KB (2048 bytes) of data:
ef.output.limit=2048
However, since local agent can also execute services, ef.output.limit is also defined inside
server.conf.
EnginFrame Agent and/or the EnginFrame Server restart is not required when changing this property.
Note
The service execution is not influenced in any way by the specified limit.
The service output is truncated on agent before sending it back to the server.
Configuring agent ports
EnginFrame Agent and EnginFrame Server communicate using Java™ RMI over SSL protocol. Technically speaking, EnginFrame Agent is an RMI server that exposes a remote object whose methods are invoked by EnginFrame Server.
For this reason, EnginFrame Agent needs to open two TCP ports on its host: one port is used by an RMI Registry while the other
one is used by an RMI server. These ports are chosen during installation (by default they are respectively 9999 and
9998).
$EF_TOP/conf/enginframe/agent.conf contains the values specified during installation. Edit this file to change these
values:
-
ef.agent.portSpecifies TCP port on which RMI Registry is listening.
If this property is empty, the default port
9999is used.The specified value must be a valid TCP port that is not used by other processes on the same host.
-
ef.agent.bind.portSpecifies TCP port on which RMI server is listening.
If this property is empty or is
0, a random free port is chosen at EnginFrame Agent startup.The specified value must be
0or a valid TCP port that is not used by other processes on the same host. Furthermore, the specified value must be different fromef.agent.port.
For example, using port 7777 for RMI Registry and port 7778 for RMI server, the two parameters must be set in the
following way:
ef.agent.port=7777
ef.agent.bind.port=7778
EnginFrame Agent must be restarted to make changes effective.
Tip
If there is a firewall between EnginFrame Server and EnginFrame Agent then ef.agent.bind.port has to be set to a value different from zero.
The firewall has to be configured to allow EnginFrame Server to open TCP connections towards EnginFrame Agent using the ports specified by
ef.agent.port and ef.agent.bind.port.
If ef.agent.port is changed, then all <ef:location>'s port attributes have to change accordingly
inside Service Definition Files.
Modify EF_AGENT_PORT inside $EF_TOP/conf/enginframe/server.conf if default agent's ports changed. Refer to Changing the default agent for more details.
Customizing user switching
Unless EnginFrame was installed by an unprivileged user, every time EnginFrame Agent runs a service it impersonates the system user
associated to portal user requesting service execution. This ensures service execution is performed as a regular system user (root is
not allowed to run services) and the files created/modified have proper ownerships and permissions.
EnginFrame allows modifying how user switching is done to affect service execution environment and ultimately service execution itself.
EnginFrame Agent user switching mechanism is based on su shipped with every Linux®.
$EF_TOP/conf/enginframe/agent.conf configures ef.switch.user.params parameter used to specify options passed to
su. Multiple parameters must be separated by a space without using quotes or double quotes like in the following example:
ef.switch.user.params=-f -m
An empty ef.switch.user.params means no options are passed to su: ef.switch.user.params=
A missing ef.switch.user.params is automatically set to - which results in the user's profile being sourced when
su is executed. By default, ef.switch.user.params property is not set.
Tip
If user profiles on EnginFrame Agent's host are complicated and sourcing them affects service execution performance, it is suggested to set
ef.switch.user.params to avoid sourcing them when su is executed. You can, for example, set
ef.switch.user.params to the empty string.
EnginFrame Agent does not have to be restarted when changing this parameter.
Customizing user session timeout
A session defines a user's working period within EnginFrame Portal. A session starts at user login and ends either when user logs out or when EnginFrame Server invalidates it.
Session timeout specifies the number of minutes a user can remain idle before the portal terminates the session automatically. If a user does not interact with EnginFrame within the configured timeout, the session is automatically invalidated and user has to authenticate again to access EnginFrame Portal.
The default session timeout, defined for all users, is set to 30 minutes.
Session timeout can be changed in EF_ROOT/WEBAPP/WEB-INF/web.xml by changing the session-timeout value.
This value is expressed in a whole number of minutes. If the timeout is 0 or less, the container ensures the default behaviour
of sessions is never to time out.
Changing session timeout to two hours, can be achieved modifying session-timeout value in the following way:
<session-config> <session-timeout>120</session-timeout> </session-config>
Changes to session timeout require EnginFrame Server's restart.
Apache®-Tomcat® connection
There are many reasons to integrate Tomcat® with Apache®. And there are reasons why it should not be done too. Starting with newer Tomcat (EnginFrame ships version 9.0.64), performance reasons are harder to justify. So here are the issues to discuss in integrating vs not:
-
Encryption - The Apache HTTP Server module mod_ssl is an interface to the OpenSSL library, which provides Strong Encryption using the Secure Sockets Layer and Transport Layer Security protocols. Tomcat is able to provide a similar encryption using the JVM, which needs to be cross platform, so it is somehow less efficient than Apache. Moreover, Apache has a longer experience on this field.
-
Clustering - By using Apache as a front end you can let Apache act as a front door to your content to multiple Tomcat instances. If one of your Tomcats fails, Apache ignores it and your Sysadmin can sleep through the night. This point could be ignored if you use a hardware load balancer and the clustering capabilities of EnginFrame Enterprise Edition.
-
Clustering/Security - You can also use Apache as a front door to different Tomcats for different URL namespaces (/app1/, /app2/, /app3/, or virtual hosts). The Tomcats can then be each in a protected area and from a security point of view, you only need to worry about the Apache server. Essentially, Apache becomes a smart proxy server.
-
Security - This topic can sway one way or another. Java™ has the security manager while Apache has a larger mindshare and more tricks with respect to security. Details will not be given here, but let Google™ be your friend. Depending on your scenario, one might be better than the other. But also keep in mind, if you run Apache with Tomcat you have two systems to defend, not one.
-
Add-ons - Adding on CGI, Perl, PHP is natural to Apache. It's slower for Tomcat. Apache also has hundreds of modules that can be plugged in at will. Tomcat can have this ability, but the code has not been written yet.
-
Decorators - With Apache in front of Tomcat, you can perform any number of decorators that Tomcat does not support or does not have the immediate code support. For example,
mod_headers,mod_rewrite, andmod_aliascould be written for Tomcat, but why reinvent the wheel when Apache has done it so well? -
Speed - Apache is faster at serving static content than Tomcat. But unless you have a high traffic site, this point is useless. But in some scenarios, Tomcat can be faster than Apache. So benchmark your site.
-
Socket handling/system stability - Apache has better socket handling with respect to error conditions than Tomcat. The main reason is that Tomcat must perform all its socket handling via the JVM which needs to be cross platform. The problem is that socket optimization is a platform specific ordeal. Most of the time the Java™ code is fine, but when you are also bombarded with dropped connections, invalid packets, invalid requests from invalid IPs, Apache does a better job at dropping these error conditions than JVM based program. (YMMV)
[Source: Tomcat Wiki
There are at least two ways to configure an Apache Web Server as a frontend to Tomcat according to the protocol used:
-
AJP
[see Protocol Reference ]. The connection between Apache and Tomcat using protocol AJP can follow two different strategies:
-
Apache Module
mod_proxy_ajp(Apache version 2.2 or higher) -
Tomcat Connector JK
-
Changing charts backend
Charts can be embedded dynamically in EnginFrame web pages.
By default, the internal charts provider is used, but is possible to use any other service compatible with Google™ Chart API.
The chart backend can be changed in two ways:
-
Globally for all charts that EnginFrame produces.
-
Locally for specific chart.
In the first case, edit $EF_TOP/conf/enginframe/server.conf specifying ef.charts.base.url:
ef.charts.base.url=http://chart.apis.google.com/chart
In the second case, set base attribute inside chart root tag:
<ch:chart ... base="http://chart.apis.google.com/chart" ... >
Interactive administration
Topics
Configuration files
Most of the times the values defined during the Interactive Plugin installation provide all the information necessary to have a working setup. However sometimes further configuration is needed to tailor the session broker to specific system and network conditions or to change the values defined during the installation.
All the Interactive Plugin configuration files are located in the conf subdirectory.
Note
All the parameters in the configuration files with extension different from .efconf comply with the following format from
Bourne shell: PARAMETER_NAME="parameter value" In particular,
-
There are no spaces before and after the
=(equals). -
You can use shell variable references with the usual syntax
$variable. Always enclose variable names with curly braces, for example:${HOME}. -
Bourne shell escaping and quoting syntax apply. Be sure to enclose values containing spaces within the most appropriate quotes.
Important
Configuration parameters are automatically loaded upon saving. No need to restart EnginFrame or logout.
Topics
interactive.efconf
This file contains Interactive Plugin's main default configuration parameters, that can be usually overridden by each portal service.
Default Parameters
INTERACTIVE_DEFAULT_OS
-
value: required
-
default: linux
By default, interactive session will be launched on the operating system stated by INTERACTIVE_DEFAULT_OS parameter.
Available values:
-
linux- schedule on Linux® operating systems -
windows- schedule on Windows® operating systems
This behavior can be overridden by each service itself by using --os
<system> option of interactive.submit
Example: INTERACTIVE_DEFAULT_OS=linux
INTERACTIVE_DEFAULT_JOBMANAGER
-
value: optional
-
default: lsf
Default job manager for submitting interactive session jobs. Each session will be scheduled as a single job.
This behaviour can be overridden by each service itself by using
--jobmanager <jobmanager> option of interactive.submit
Note
Your EnginFrame installation requires the related grid middleware plugin to be installed and configured. Interactive Plugin will use it to submit and manage interactive session jobs.
Example: INTERACTIVE_DEFAULT_JOBMANAGER=lsf
INTERACTIVE_DEFAULT_REMOTE
-
value: optional
-
default: dcv2
Default visualization middleware to use.
Available values:
-
dcv2- use Amazon DCV (since 2017.0) visualization middleware
Example: INTERACTIVE_DEFAULT_REMOTE=dcv2
INTERACTIVE_DEFAULT_VNC_QUEUE
-
value: optional
-
default: (not set)
Sets the default resource manager queue to use. Interactive session jobs will be submitted on that queue.
This behaviour can be overridden by each service itself by using --queue
<queue name> option of interactive.submit
Example: INTERACTIVE_DEFAULT_VNC_QUEUE=int_windows
Limits
INTERACTIVE_DEFAULT_MAX_SESSIONS
-
value: optional
-
default: undefined (no limits)
The maximum number of interactive sessions per interactive class.
If you set this default limit to X, each user will be able to start up to X sessions of the same
interactive class.
For more informations about interactive classes and sessions limits, please refer to Session limits
Example: INTERACTIVE_DEFAULT_MAX_SESSIONS=3
interactive.<remote>.resolutions.conf
Inside this file you can specify some presets of the Remote Visualization Technology desktop geometry as a four-valued colon-separated
string plus a label. The label must separated by the previous fields by one or more spaces widthxheight:fullscreen:allmonitors label
width and height are integers and express the size in pixels, fullscreen and allmonitors are
case-sensitive boolean flags {true|false} and label is a human readable string describing the preset.
You can use the keyword auto to let the system guess the current screen resolution. If the list of presets includes a line
containing the string custom (no other content on the same line), the user will be able to specify a custom resolution.
Note
Flag allmonitors is meaningful only when fullscreen is
true. If you set allmonitors=true while fullscreen=false, then
allmonitors parameter will be automatically converted to false.
Default content of the file:
auto                   Fullscreen on single monitor (autodect resolution)
5120x1600:true:true    Fullscreen on two 30' monitors (5120x1600)
3840x1200:true:true    Fullscreen on two 24' monitors (3840x1200)
2560x1600:true:false   Fullscreen on single 30' monitor (2560x1600)
1920x1200:true:false   Fullscreen on single 24' monitor (1920x1200)
1024x768:false:false   Window-mode on singla XGA monitor (1024x768)
custom
authorization.xconf
This file contains the ACL (Access Control List) definitions specific to Interactive Plugin. It defines some ACLs that are used in the demo portal to allow or deny access to the different visualization middlewares to different users.
For more details on EnginFrame ACL system, general EnginFrame authorization and its configuration, please refer to EnginFrame Administrator Guide, Security section, Authorization System chapter.
nat.conf
If you set up NAT (Network Address Translation) so that the client machines connect to the cluster nodes through a different IP:PORT pair, this file allows to map IP:PORT pairs for services running on a node to the corresponding public IP:PORT pair.
Note
Some visualization middleware clients require that the actual port of the service equals the NATted port
The syntax consists of a line made of two pairs: the real IP:PORT pair followed by the public IP:PORT pair. It is possible to specify a group of ports using the fromPORT-toPORT syntax.
Example:
node01 mycompany.com
node01 10.100.0.101
node12:42976 mycompany.com:42976
node01:7900-7910 mycompany.com:5900-5910
node05:7900-7910 10.100.0.101:5900-5910
A session starting on host node01, port 7901 would be returned to the client as mycompany.com:5901
proxy.conf
If you give access to cluster nodes through a proxy, you can configure this file to assign for each connection a specific proxy server to use.
Note
This configuration applies only to DCV connections.
The default configuration is to have a direct connection from any client to any server, so no proxy for all connections.
The syntax consists of a table, each line has the following columns: PRIORITY, CLIENT-FILTER,
SERVER-FILTER, PROXY-TYPE, PROXY-ADDRESS:
- PRIORITY
-
a number to rank the proxy list, 0 is the highest priority
- CLIENT-FILTER
-
the range of IP addresses in the format: NETWORK/PREFIX
Examples:
10.20.0.0/16 0.0.0.0/0 (matches any IP address) - SERVER-FILTER
-
a glob pattern matching the server hostname
Examples:
node* (matches any node starting with "node") node0[1-9] (matches hosts from node01 to node09) - PROXY TYPE
-
the proxy type to use, can be:
- HTTP
-
proxy must support HTTP Connect protocol
- SOCKS
-
proxy must support SOCKS5 protocol
- DIRECT
-
special value to specify no proxy
- PROXY-ADDRESS
-
the proxy hostname and port in the format host:port (not used in case proxy type is DIRECT).
Examples:
squidproxy.domain:3128
danteproxy:80
10.20.1.1:3128
In case multiple proxies with the same priority match, one of them is selected using an internal strategy.
In case no proxy for a priority matches, the proxies in the next priority are checked.
In case no proxy line matches, an error is returned to the client.
Example: no connection will receive a proxy configuration
99 0.0.0.0/0 * DIRECT
Example: only connections to node01 will pass through proxyserver:3128, all other connections will be
direct.
1             0.0.0.0/0     node01        SOCKS    proxyserver:3128
99            0.0.0.0/0     *             DIRECT
Example: connections from IP 10.20.3.20 to node01 will pass through proxyserver:80, other connections to
node01 will pass through proxyserver:3128, all other connections will get an error.
0             10.20.3.20/32 node01        HTTP     proxyserver:80
1             0.0.0.0/0     node01        SOCKS    proxyserver:3128
url.mapping.conf
The new URL mapping configuration allows EnginFrame administrators to configure the target endpoints that will be used by clients to connect
to the Amazon DCV (since 2017.0) remote servers. The configuration file to define the target DCV servers URLs endpoints is
${EF_CONF_ROOT}/plugins/interactive/url.mapping.conf.
In this configuration file the administrator can write multiple mappings each one defining a matching rule and a target endpoint. Each rule can match one or more DCV servers as provided upstream by the system by using a set of predefined variables and glob expression. For each match the configuration provides a mapped endpoint that is a triple that includes the host, port and web URL path that will be used by clients to connect to the target DCV server.
Inside the ${EF_CONF_ROOT}/plugins/interactive/url.mapping.conf configuration file it is possible to use the usual
set of EnginFrame environment variables available during a service execution (e.g. EF_*, session variables) together with the interactive
session metadata and a new set of noteworthy variables:
-
${server_host}- the remote DCV server host as provided by the system in the upstream process; -
${server_port}- the remote DCV server port as configured on the DCV server node; -
${server_web_url_path}- the DCV server web URL path as configured on the DCV server node; -
${session_id}- the DCV session ID; -
${nat_server_host}- the value of the DCV server host coming from${EF_CONF_ROOT}/plugins/interactive/nat.conf; -
${nat_server_port}- the value of the DCV server port coming from${EF_CONF_ROOT}/plugins/interactive/nat.conf; -
${proxy_host}- the proxy host coming from${EF_CONF_ROOT}/plugins/interactive/proxy.conf; -
${proxy_port}- the proxy port coming from${EF_CONF_ROOT}/plugins/interactive/proxy.conf;
Every single value of the tuple, target host, target port and target web URL path, is evaluated separately. Variables are expanded and command substitution executed.
Important
Parameters evaluation is performed on behalf of the user running the Apache Tomcat® server (e.g. efnobody), on the host
where EnginFrame runs.
Note
The only supported protocol for the mapped URL is HTTPS and cannot be changed.
For further information and examples consult directly the ${EF_CONF_ROOT}/plugins/interactive/url.mapping.conf
configuration file.
xstartup files
The configuration directory also contains a collection of sample xstartup files named *.xstartup that
may be used in your service definitions to start a X session with the specified Window Manager.
Common tasks for xstartup scripts are, e.g. launching dbus daemon, opening an xterm window or setting specific Window Manager parameters.
An example xstartup script:
#!/bin/bash
[ -r $HOME/.Xresources ] && xrdb $HOME/.Xresources
xsetroot -solid grey
vncconfig -iconic &
xterm -geometry 80x24+10+10 -ls -title "$VNCDESKTOP Desktop" &
The xstartup files shipped with Interactive Plugin are:
-
gnome.xstartup, xstartup script for GNOME window manager. -
icewm.xstartup, xstartup script for ICE window manager. -
kde.xstartup, xstartup script for KDE window manager. -
mate.xstartup, xstartup script for MATE window manager. -
metacity.xstartup, xstartup script for Metacity window manager. -
mwm.xstartup, xstartup script for Motif window manager. -
xfce.xstartup, xstartup script for Xfce window manager. -
xfwm4.xstartup, xstartup script for Xfwm4 window manager.
Default Xstartup are gnome.xstartup for desktop sessions and mwm.xstartup for standalone interactive applications.
mime-types.xml
This file defines some mime-types useful for Interactive Plugin. Mime-types in this context are used to associate client viewers like VNC® Viewer to files generated by Interactive Plugin with specific extensions.
File extensions specified in this file are .dcv, .vnc, .efrgs, and .rgreceiver.
For more details on EnginFrame mime-types configuration and customization, refer to EnginFrame Administrator Guide, Administration section, Common Administration Tasks chapter.
Interactive Session Life-cycle Extension Points
Interactive Session Dynamic Hooks
EnginFrame, starting from version 2017.2, adds two new extension points (hooks) to the interactive session life cycle.
The first customizable hook, basically a shell script, it's called when the session has been successfully setup on the remote host and it's ready to pass to the “Running” state. This hook is meant to execute some simple setup operations at session startup, e.g. to dynamically configure a gateway technology as the AWS Application Load Balancer (ALB) or an Nginx instance, enabling the clients to access the underlying dynamic infrastructure.
The hook has also the capability to add custom metadata to the session and to configure the target host, port and web URL path tuple to be used by the clients to connect to the session.
In order to set the connection parameters to be used by the clients to connect to the interactive session, the hook script has to export the following variables in the environment:
-
INTERACTIVE_SESSION_TARGET_HOST -
INTERACTIVE_SESSION_TARGET_PORT -
INTERACTIVE_SESSION_TARGET_WEBURLPATH
These variables will be set as session metadata and used to forge the session URL and connection .dcv file upon a client request through
the EnginFrame portal. The configuration of these interactive session settings will have the precedence over the static configuration files (e.g.
nat.conf, url.mapping.conf) in defining the connection parameter for the clients.
Inside the hook script, it is possible to use the usual EnginFrame environment variables together with the session metadata variables. Noteworthy variables that can be useful to the hook logic are:
-
${INTERACTIVE_SESSION_REMOTE_SESSION_ID}- the ID for a DCV 2017 session; -
${INTERACTIVE_SESSION_EXECUTION_HOST}- the execution host of the DCV session as determined internally by the system; -
${INTERACTIVE_SESSION_DCV2_WEBURLPATH}- the web URL path of the DCV server, as configured in/etc/dcv/dcv.confon the DCV server node; -
${INTERACTIVE_DEFAULT_DCV2_WEB_PORT}- the web port of the DCV server, as configured in${EF_CONF_ROOT}/plugins/interactive/interactive.efconf;
The second customizable hook is executed when the session goes in the “Closed” or “Failed” state.
The locations of the starting and closing hooks are configured in
${EF_CONF_ROOT}/plugins/interactive/interactive.efconf through the variables INTERACTIVE_SESSION_STARTING_HOOK
and INTERACTIVE_SESSION_CLOSING_HOOK respectively.
Hooks execution is done by the user running the Apache Tomcat® server (e.g. efnobody), and their standard output and
standard error are logged in two log files in the interactive session spooler. They are accessible via web from the session details view.
Important
In case of errors the starting hook will block the session startup avoiding the session to go in the “Running” state. If the starting hook fails, it will keep the session in the “Starting” status, and the session will be flagged with a warning message.
The result of the closing hook instead doesn't prevent the session to go in the terminal state. If the closing hook fails the session will anyway terminate and it will be flagged with a warning message.
Warning
The execution of the hooks can be triggered either by a user action (e.g. submission or closing operation) or by the EnginFrame internal process that updates the interactive sessions status. At the moment there is no mutual-exclusion mechanism in place and hooks may run concurrently on the same session. It's up to the hook scripts to be concurrency-safe.
Hooks also allow to set custom metadata to the interactive session. Any environment exported variable with prefix SESSION_
will be added as metadata to the interactive session. All the session metadata are available to the hook scripts.
Sample Starting and Closing Hooks to Configure an AWS ALB
Sample starting and closing hooks to dynamically configure the AWS Application Load Balancer (ALB) on session creation and session closing, are provided in:
-
${EF_ROOT}/plugins/interactive/bin/samples/sample.alb.session.starting.hook.sh -
${EF_ROOT}/plugins/interactive/bin/samples/sample.alb.session.closing.hook.sh
It is suggested to copy the scripts under
${EF_DATA_ROOT}/plugins/interactive/bin before configuring or
modifying them.
These scripts configure an AWS ALB to enable a connection to a host where a Amazon DCV (since 2017.0) interactive session is running.
The starting hook script creates a new Target Group containing the instance where the Session is running and adds a new Listener Rule for the HTTPS listener of the ALB.
The Listener Rule has the role to associate the input URL path to the Target Group. This path must be the web URL path of the DCV server running on the execution node.
Important
Since it not possible to do URL path translations with an ALB, every DCV server must have an unique web URL path configured. It is suggested to use the hostname of the node as web URL path for the DCV server running on that node.
The maximum number of Listener Rule(s) per ALB is 100, hence a single ALB can handle at most 100 interactive sessions running concurrently. To increase this limit, please consider to add more ALBs in the infrastructure and to implement a rotation in the starting hook script.
Prerequisites for using the sample hook scripts provided:
-
On EnginFrame node:
-
AWS Command Line Interface (AWS CLI) must be installed;
-
Since this script is going to be executed by the user running the EnginFrame Server, i.e. the Apache Tomcat® user, an AWS CLI profile must be configured for that user, having the permissions to list instances and to manage load balancers. (see CLI Getting Started). Alternatively, if EnginFrame is installed in an EC2 instance, a valid AWS role to perform the above mentioned operations should be added to this instance;
-
-
On AWS account:
-
An AWS Application Load Balancer with an HTTPS listener with a Default Target Group must be already configured and running.
On DCV server nodes:
-
Each DCV server node must be configured with a unique web URL path (see
/etc/dcv/dcv.confconfiguration file).
-
The following is an example of the steps to do in order to use the sample AWS ALB hook scripts provided:
-
Copy the samples from
${EF_ROOT}/plugins/interactive/bin/samplesto${EF_DATA_ROOT}/plugins/interactive/binand be sure that are executable. -
Add the two configuration variables inside
${EF_CONF_ROOT}/plugins/interactive/interactive.efconf:-
INTERACTIVE_SESSION_STARTING_HOOK=${EF_DATA_ROOT}/plugins/interactive/bin/sample.alb.session.starting.hook.sh -
INTERACTIVE_SESSION_CLOSING_HOOK=${EF_DATA_ROOT}/plugins/interactive/bin/sample.alb.session.closing.hook.sh
-
-
Modify the hooks to change the value of the AWS ALB Public DNS name, through the variable
ALB_PUBLIC_DNS_NAME. -
Configure the AWS role to let the EC2 instance where EnginFrame is running to manage the ALB. From the AWS EC2 Console, select EC2 instance -> Instance Settings -> Attach/Replace IAM Role. The following is just an example, more restrictive rules can be used instead:
{
  "Version": "2012-10-17",
  "Statement": [
    {
      "Effect": "Allow",
      "Action": [
        "ec2:DescribeInstances",
        "elasticloadbalancing:*"
      ],
      "Resource": "*"
    }
  ]
Common errors from the hook execution:
-
“An error occurred (AccessDenied) when calling the <xyz> operation: User: <abc> is not authorized to perform <xyz>”. The user running the hook (i.e. the user running the Apache Tomcat® server) is not authorized to perform the required operation. The AWS CLI profile must be configured for that user, having the permissions to list instances and to manage load balancers (see CLI Getting Started) or alternatively, if EnginFrame is installed in an EC2 instance, configure the correct AWS role for that instance.
-
Getting "502 Bad Gateway" when connecting to the interactive session. It often means the Target Group of the ALB listener rule is not yet initialized with the target instance. In this case the system usually requires few more instants before establishing the connection with the instance.
Session limits
Number of sessions
The number of interactive sessions can be limited according to:
-
the interactive session class. An interactive session class is a group of interactive services. Classes defined and customizable by EnginFrame administrators. Interactive classes are defined by setting the following metadata:
-
INTERACTIVE_CLASS- an unique identifier for the class. -
INTERACTIVE_CLASS_LABEL- a label for the class (optional).
The maximum number of interactive sessions for each class is defined by setting
INTERACTIVE_MAX_SESSIONSparameter. The default value is defined in the interactive.efconf configuration file. -
-
the interactive service. Each interactive service can be assigned to a certain class and can define the
INTERACTIVE_MAX_SESSIONSparameter within its code. -
the user or user group. With the use of EnginFrame ACLs (Access control lists) combined with the first two items. For detailed documentation about ACLs, please refer to EnginFrame Administrator Guide.
A full example follows:
<ef:service id="interactive.xterm">
  <ef:name>XTerm</ef:name>
  <ef:metadata attribute="INTERACTIVE_CLASS">xterm</ef:metadata>
  <ef:metadata attribute="INTERACTIVE_CLASS_LABEL">Xterm</ef:metadata>
  <ef:metadata attribute="INTERACTIVE_MAX_SESSIONS">3</ef:metadata>
  <ef:option id="project" label="Project" type="text">Interactive</ef:option>
  <ef:option id="jobmanager" label="Job Manager" type="list">
    <ef:embed id="grid.plugins"/>
  </ef:option>
  <ef:action id="submit" label="Start" result="text/xml">
    "${EF_ROOT}/plugins/interactive/bin/interactive.submit" \
      --name "XTerm" \
      --os "linux" \
      --jobmanager "${jobmanager}" \
      --project "${project}" \
      --remote "vnc" \
      --vnc-xstartup "${EF_ROOT}/plugins/interactive/conf/metacity.xstartup" \
      --close-on-exit \
      --command "xterm"
  </ef:action>
</ef:service>
In the example above, the maximum number of sessions of the "xterm" class will be limited to 3 for each user
Note
Interactive session name and interactive class are not dependent to each other.
Log files
Main interactive log file is located under EnginFrame log directory: ${EF_LOGDIR}/interactive.log.
All others log files (session, debug, authentication) can be found inside each interactive session spooler, and are available via the portal user interface, by reaching session details page.
Interactive Plugin Directory Structure
This section describes the directory structure. Please refer to the EnginFrame Administrator Guide for details about the formats and the purpose of the files.
Interactive Plugin is installed in ${EF_ROOT}/plugins/interactive.
These are the most important contents of the folder:
interactive/
|-- WEBAPP
|-- bin
|-- conf
|   |-- mappers
|   |   |-- interactive.duplicated.sessions.xconf
|   |   `-- interactive.list.sessions.xconf
|   |-- dcv.gpu.balancer.conf
|   |-- dcv2.gpu.balancer.conf
|   |-- gnome.xstartup
|   |-- icewm.xstartup
|   |-- interactive.efconf
|   |-- interactive.vnc.resolutions.conf
|   |-- kde.xstartup
|   |-- log.xconf
|   |-- lxde.xstartup
|   |-- mate.xstartup
|   |-- metacity.xstartup
|   |-- mime-types.xml
|   |-- minimal.xstartup
|   |-- mwm.xstartup
|   |-- nat.conf
|   |-- proxy.conf
|   |-- template.dcv
|   |-- template-dcv2.dcv
|   |-- template.efrgs
|   |-- template.rgreceiver
|   |-- template.vnc
|   |-- xfce.xstartup
|   `-- xfwm4.xstartup
|-- etc
|-- lib
`-- tools
Interactive Plugin follows the conventional EnginFrame plug-in structure and in particular the following directories contain Interactive Plugin system files:
-
WEBAPP- top level service definition files. -
bin- scripts and executables. -
conf- configuration files. -
etc- Interactive Plugin metadata and EnginFrame descriptor files. -
lib- internal files used by Interactive Plugin: XML support services and XSL files. -
tools- Interactive Plugin integration and interface tools.
Each resource manager plugin supported by Interactive Plugin, includes an interactive subdirectory which contains the related interface code with Interactive Plugin:
interactive/
|-- interactive.close
|-- interactive.is.session.ready
|-- interactive.log.data
|-- interactive.retrieve.screenshot
|-- interactive.submit
|-- linux.jobscript.functions
`-- services
    `-- interactive.lsf.linux.xml
in particular:
-
interactive.submit- the session submission script. -
interactive.close- the operations to be performed to close the session. -
services- various service definitions.
Views administration
Virtual Desktop is implemented by the VDI plugin that defines all the services that interact with the backend to provide the high level, user functionalities.
VDI plugin provides a front-end portal that gives EnginFrame administrators an easy way to create, publish and manage Interactive services. End-users instead are provided with a portal to easily access the company Interactive services.
This section explains the configuration files and settings of the VDI plugin.
Configuration files
Most of the times the values defined during the VDI plugin installation provide all the information necessary to have a working setup. However the administrator may have the need to change the folders where services files are stored or to change other settings of the system.
All the VDI plugin configuration files are located in the $EF_TOP/<VERSION>/enginframe/plugins/vdi/conf
subdirectory.
Important
As for the other EnginFrame plugins, the correct way to change the default configuration is to copy the target configuration file under the
$EF_TOP/conf, to the $EF_TOP/conf/plugins/vdi directory, if it doesn't already exist, and edit
the copied file.
Note
Configuration parameters are automatically loaded upon saving. No need to restart EnginFrame or logout.
vdi.conf
This file contains VDI main default configuration parameters.
Users Access Parameters
VDI_ALLOW_ALL_USERS
-
value: required
-
default: true
Enables Virtual Desktop access to all the users able to log into the system. If true, the users will be added to the
VDI default group at login time.
Available values:
-
true- all user are allowed to access to the Virtual Desktop, i.e. VDI plugin services -
false- Virtual Desktop users should be explicitly added or imported by a Views administrator
Example: VDI_ALLOW_ALL_USERS=true
service-manager.efconf
This file contains VDI plugin configuration parameters useful for service management.
General Parameters
VDI_SERVICES_ROOT
-
value: required
-
default:
${EF_DATA_ROOT}/plugins/vdi/serviceswhereEF_DATA_ROOTis$EF_TOP/data
Sets the root folder where services files are stored. Changing this value, you have to change also
-
sdftreeURL value insidehrefattribute ofxi:includetags declared in vdi.xml, vdi.admin.xml XML files. -
load-confvalue ofef:actiontags in the services XML files
Example:
VDI_SERVICES_ROOT=${EF_DATA_ROOT}/plugins/vdi/services
SM_TEMPLATES_ROOT
-
value: required
-
default:
${EF_ROOT}/plugins/vdi/templates
Sets the root folder where templates files for service creation are stored.
Example: SM_TEMPLATES_ROOT=${EF_ROOT}/plugins/vdi/templates
Interactive Services Parameters
SM_CATALOG_INTERACTIVE
-
value: required
-
default: ${VDI_SERVICES_ROOT}/catalog
Sets the folder where unpublished interactive services files are stored.
Example: SM_CATALOG_INTERACTIVE=${VDI_SERVICES_ROOT}/catalog
SM_PUBLISHED
-
value: required
-
default: ${VDI_SERVICES_ROOT}/published
Sets the folder where published interactive services files are stored.
Example: SM_PUBLISHED=${VDI_SERVICES_ROOT}/published
interactive.editor.efconf
This file contains configuration parameters for the interactive service editor in the Virtual Desktop.
Note
In EnginFrame version 2015.0 this file was named vdi.editor.efconf and had a slightly different set of configuration
parameters.
During the installation of a newer version, EnginFrame makes a copy of the old configuration file under
$EF_TOP/conf/plugins/vdi directory, naming it as vdi.editor.efconf.backup.
Interactive Editor Parameters
VDI_EDITOR_OS
-
value: optional
-
default: windows,linux
Sets supported operating systems for interactive sessions. Comma separated list without any blank space.
Available values:
-
windows- Windows® Desktop -
linux- Linux® Desktop
Example: VDI_EDITOR_OS=windows,linux
VDI_EDITOR_CLUSTERS
-
value: optional
-
default: Cluster ids retrieved from system
Sets cluster ids to list on service editor. Comma separated list without any spaces.
Example: VDI_EDITOR_CLUSTERS=clusterid1,clusterid2
VDI_EDITOR_CLUSTERS_ARCH_clusterId
-
value: optional
-
default: linux for all the clusters id
Sets supported operating systems for interactive sessions scheduled in a specific cluster. Comma separated list without any spaces.
clusterId is one of the cluster id defined in the VDI_EDITOR_CLUSTERS list.
Available values:
-
windows- Windows® Desktop -
linux- Linux® Desktop
Example:
VDI_EDITOR_CLUSTERS_ARCH_lsfCluster=linux
VDI_EDITOR_CLUSTERS_ARCH_myCluster=windows,linux
VDI_EDITOR_REMOTES
-
value: optional
-
default: dcv2
Sets the list of supported remote visualization technologies to display in the service editor. Comma separated list without any spaces.
Available values:
dcv2- NICE Desktop Cloud Visualization (since 2017.0)
Example: VDI_EDITOR_REMOTES=dcv2
VDI_EDITOR_REMOTES_ARCH_remoteId
-
value: optional
-
default:
linux,windowsforvnc,dcvanddcv2,linuxforvirtualgl
Sets supported session types for a specific remote id. Comma separated list without any spaces. remoteId is one of the
remote id defined in the VDI_EDITOR_REMOTES list.
Available values:
-
windows- Windows® Desktop -
linux- Linux® Desktop -
linux-app- Linux® Desktop application
Example: VDI_EDITOR_REMOTES_ARCH_vnc=linux
VDI_EDITOR_DESKTOP_MANAGERS
-
value: optional
-
default: none
Sets the list of supported desktop manager ids to display on the service editor. Comma separated list without any spaces.
For each desktop manager, the name to display could also be specified in the configuration parameter
VDI_EDITOR_DESKTOP_MANAGER_NAME_. If omitted it will be equal to the id. desktopManagerId
For each desktop manager, the path to the xstartup file must be specified in the configuration parameter
VDI_EDITOR_DESKTOP_MANAGER_XSTARTUP_. Interactive plugin already provides a set of
preconfigured xstartup files for supported desktop managers under desktopManagerId${EF_ROOT}/plugins/interactive/conf/ directory.
Example:
VDI_EDITOR_DESKTOP_MANAGERS=gnome,kde
VDI_EDITOR_DESKTOP_MANAGER_NAME_gnome=GNOME
VDI_EDITOR_DESKTOP_MANAGER_XSTARTUP_gnome=${EF_ROOT}/path_to_gnome_xstartup
VDI_EDITOR_DESKTOP_MANAGER_XSTARTUP_kde=/path_to_kde_xstartup
Log files
Main VDI log file is located under EnginFrame log directory, ${EF_LOGDIR}/vdi.log, where EF_LOGDIR is
$EF_TOP/logs/<hostname>.
VDI Plugin Directory Structure
This section describes the directory structure.
VDI plugin is installed in ${EF_ROOT}/plugins/vdi.
These are the most important contents of the folder:
vdi/
|-- WEBAPP
|-- bin
|-- conf
|   |-- authorization.xconf
|   |-- log.xconf
|   |-- service-manager.efconf
|   |-- interactive.editor.efconf
|   `-- vdi.conf
|-- etc
|-- lib
`-- templates
VDI follows the conventional EnginFrame plug-in structure and in particular the following directories contain VDI system files:
-
WEBAPP- top level service definition files and web resources. -
bin- scripts and executables. -
conf- configuration files. -
etc- VDI plugin metadata and EnginFrame descriptor files. -
lib- internal files used by VDI plugin: XML support services and XSL files. -
templates- Interactive services templates.
Interactive services are installed in $EF_TOP/data/plugins/vdi/services.
These are the important contents of the folder:
services/
|-- catalog
|-- published
`-- extra
The following directories contain VDI plugin services files:
-
catalog- root folder for unpublished services -
published- root folder for published services -
extra- root folder for custom extra services to be included in the Virtual Desktop.
Applications administration
Applications plugin provides a front-end portal that gives EnginFrame administrators an easy way to create, publish and manage batch and interactive services. End-users instead are provided with a portal to easily access the company HPC services.
This section explains the configuration files and settings of the Applications plugin.
Important
The service examples provided by the Workspace make use of a JOB_WORKING_DIR and assume it is mounted by both EnginFrame hosts and
execution hosts.
By default the JOB_WORKING_DIR is set to the EF_SPOOLER directory of the submitted service, so in order to use the
examples the root spoolers directory should be shared with the execution hosts.
This is not a requirement of EnginFrame Workspace but a simplification used by the examples.
Configuration files
Most of the times the values of the settings collected during the Applications plugin installation provide all the information necessary to have a working setup. However, the administrator may have the need to change the folders where services files are stored or to change other settings of the system.
All the Applications Plugin configuration files are located in the
$EF_TOP/<VERSION>/enginframe/plugins/applications/conf subdirectory.
Important
As for the other EnginFrame plugins the correct way to change default configuration is to copy the target configuration file under the
$EF_TOP/conf, to the $EF_TOP/conf/plugins/applications directory, if it doesn't already exist,
and edit the copied file.
Note
Configuration parameters are automatically loaded upon saving. No need to restart EnginFrame or logout.
applications.conf
This file contains the main default configuration parameters for Applications.
Users Access Parameters
APPLICATIONS_ALLOW_ALL_USERS
-
value: required
-
default: true
Enables Workspace access to all the users able to log into the system. If true, the users will be added to the Applications
default group at login time.
Available values:
-
true- If this value is set, all users are allowed to access to the Workspace. -
false- If this value is set, workspace users can be explicitly added or imported by an Applications administrator.
Example: APPLICATIONS_ALLOW_ALL_USERS=true
service-manager.efconf
This file contains Applications plugin configuration parameters that you can use for service management.
General Parameters
APPLICATIONS_SERVICES_ROOT
-
value: required
-
default: ${EF_DATA_ROOT}/plugins/applications/services where
EF_DATA_ROOTis$EF_TOP/data
Sets the root folder where services files are stored. A change to this value requires that you also make changes to the following:
-
sdftreeURL value insidehrefattribute ofxi:includetags declared in applications.xml, applications.admin.xml XML files -
load-confvalue ofef:actiontags in the services XML files
Example: APPLICATIONS_SERVICES_ROOT=${EF_DATA_ROOT}/plugins/applications/services
SM_TEMPLATES_ROOT
-
value: required
-
default: ${EF_ROOT}/plugins/applications/templates
Sets the root folder where service templates files are stored.
Example: SM_TEMPLATES_ROOT=${EF_ROOT}/plugins/applications/templates
SM_PUBLISHED
-
value: required
-
default: ${APPLICATIONS_SERVICES_ROOT}/published
Sets the root folder where Applications stores files for published services.
Example: SM_PUBLISHED=${APPLICATIONS_SERVICES_ROOT}/published
Batch Services Parameters
SM_CATALOG_BATCH
-
value: required
-
default: ${APPLICATIONS_SERVICES_ROOT}/catalog/batch
Sets the folder where unpublished batch services files are stored.
Example: SM_CATALOG_BATCH=${APPLICATIONS_SERVICES_ROOT}/catalog/batch
Interactive Services Parameters
SM_CATALOG_INTERACTIVE
-
value: required
-
default: ${APPLICATIONS_SERVICES_ROOT}/catalog/interactive
Sets the folder where unpublished interactive services files are stored.
Example: SM_CATALOG_INTERACTIVE=${APPLICATIONS_SERVICES_ROOT}/catalog/interactive
interactive.editor.efconf
This file contains configuration parameters for the interactive service editor in the Workspace.
The file syntax and parameters are the same as interactive.editor.efconf in the Views Administration VDI plugin section.
Log files
The main Applications log file is located under EnginFrame log directory: ${EF_LOGDIR}/applications.log, where EF_LOGDIR is
$EF_TOP/logs/<hostname>.
Applications Directory Structure
This section describes the directory structure.
Applications is installed at this location: ${EF_ROOT}/plugins/applications.
The following are the most important contents of the folder:
applications/
|-- WEBAPP
|-- bin
|-- conf
|   |-- authorization.xconf
|   |-- log.xconf
|   |-- service-manager.efconf
|   |-- interactive.editor.efconf
|   `-- applications.conf
|-- etc
|-- lib
`-- templates
Applications follows the conventional EnginFrame plug-in structure and, in particular, the following directories contain Applications system files:
-
WEBAPP- top-level service definition files and web resources. -
bin- scripts and executables. -
conf- configuration files. -
etc- Applications plugin metadata and EnginFrame descriptor files. -
lib- internal files that are used by the Applications plugin. They are XML support services and XSL files. -
templates- Services templates.
By default, both batch and interactive services are installed at this location:
$EF_TOP/data/plugins/applications/services.
The following are the most important contents of the folder:
services/
|-- catalog
|   |-- batch
|   `-- interactive
|-- published
`-- extra
The following directories contain Applications services files:
-
catalog- root folder for both batch and interactive unpublished services. -
published- root folder for published services. -
extra- root folder for custom extra services to be included in the Workspace.
