Use CloudEndure for disaster recovery of an on-premises database
Created by Nishant Jain (AWS) and Anuraag Deekonda (AWS)
Environment: PoC or pilot | Technologies: Storage & backup; Modernization; Databases |
Summary
Warning: IAM users have long-term credentials, which presents a security risk. To help mitigate this risk, we recommend that you provide these users with only the permissions they require to perform the task and that you remove these users when they are no longer needed. |
This pattern uses CloudEndure Disaster Recovery and the CloudEndure Failback Client for disaster recovery (DR). It sets up DR for an on-premises data center host, using an Amazon Elastic Compute Cloud (Amazon EC2) instance.
You must use the CloudEndure Failback Client for replicating from a non-cloud or other cloud infrastructure to the Amazon Web Services (AWS) Cloud. After your disaster event is over, you will want to fail back your machines. CloudEndure prepares you for failback by reversing the direction of data replication from the target machine back to the source machine. The CloudEndure User Console treats the currently launched target machines as source machines. Replication is reversed from your selected target machines back to your original source infrastructure.
Important: In November 2021, AWS launched AWS Elastic Disaster Recovery Following the successful launch of Elastic Disaster Recovery, AWS will begin to limit the availability of CloudEndure Disaster Recovery in all AWS Regions, including AWS GovCloud (US) Regions (AWS China Regions will continue to be supported). This will take place according to the following schedule:
This publication will be removed on March 31, 2024. If you need it for a migration project in progress, please download and save the PDF file by using the PDF link that is below the title on this page. |
Prerequisites and limitations
Prerequisites
An active AWS account
An on-premises database
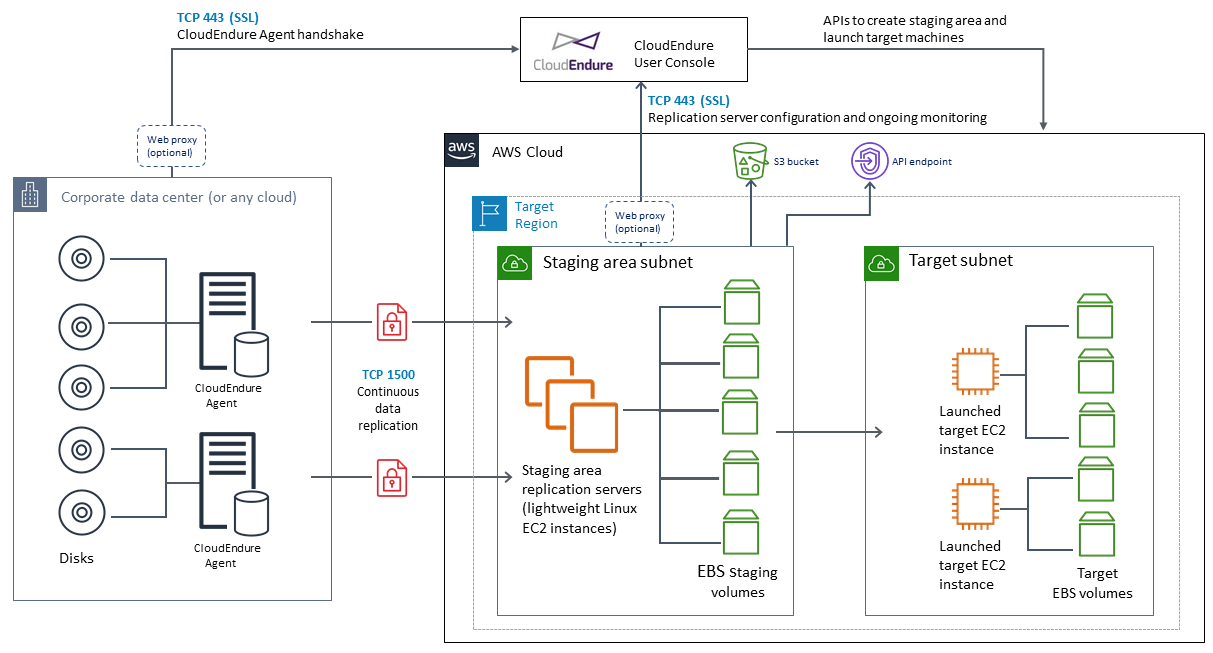
Architecture
Source technology stack
A database in an on-premises data center
Target technology stack
A database on an EC2 instance (for a complete list of supported operating system versions, see Amazon EC2 FAQs
)
Source and target network architecture
Tools
CloudEndure Disaster Recovery
– CloudEndure Disaster Recovery reduces downtime and data loss by providing fast, reliable recovery of physical, virtual, and cloud-based servers into AWS. CloudEndure Disaster Recovery continuously replicates your machines (including operating system, system state configuration, databases, applications, and files) into a low-cost staging area in your target AWS account and preferred Region. If there is a disaster, you can instruct CloudEndure Disaster Recovery to automatically launch thousands of machines in their fully provisioned state in minutes.
Epics
| Task | Description | Skills required |
|---|---|---|
Subscribe to CloudEndure Disaster Recovery. | CloudEndure Disaster Recovery is available in the AWS Marketplace | General AWS |
Create a CloudEndure account. | Register for CloudEndure and create an account. Then, in email, confirm the subscription. | General AWS |
Set the account password and accept terms and conditions. | Passwords must be at least eight characters long and must contain at least one uppercase letter, one lowercase letter, one digit, and one special character. | General AWS |
| Task | Description | Skills required |
|---|---|---|
Sign in to the CloudEndure User Console. | On the CloudEndure User Console | CloudEndure administrator |
Create a new project. | In the upper-left corner of the console, choose the plus (+) button to create a project. Select Disaster Recovery as the project type. You can acquire a license through AWS Marketplace. | CloudEndure administrator |
| Task | Description | Skills required |
|---|---|---|
Create an IAM policy for the CloudEndure solution. | The AWS Identity and Access Management (IAM) policy that you must create for running CloudEndure solution is based on a predefined CloudEndure policy | AWS systems administrator |
Create a new IAM user and generate AWS credentials. | To generate the required AWS credentials for the CloudEndure User Console, create at least one IAM user and assign the CloudEndure permissions policy to this user. The console requires an access key ID and a secret access key To follow best practices for managing AWS access keys, you should rotate IAM keys periodically. Changing IAM keys will cause replication servers to restart, resulting in a temporary lag. | AWS systems administrator |
Set up the staging area account credentials. | Sign in to the CloudEndure User Console On the Setup & Info tab, navigate to AWS credentials, and provide your AWS access key ID and secret access key ID. | AWS systems administrator |
| Task | Description | Skills required |
|---|---|---|
Define the replication servers. | For more information, see the CloudEndure documentation | CloudEndure administrator |
| Task | Description | Skills required |
|---|---|---|
Locate your Agent installation token. | On the CloudEndure User Console, navigate to Machines, Machine Actions, Add Machines. When you run the installer file on a source machine, you are first asked to enter your installation token. The token is a unique string of characters that is automatically generated for you when your CloudEndure account is activated. You can use one installation token to install the Agent on as many source machines as your project allows. | CloudEndure administrator |
On Linux machines, run the installer. | For Linux machines, copy the installer command, log in to your source machines, and run the installer. For detailed instructions, see the CloudEndure documentation | CloudEndure administrator |
On Windows machines, run the installer. | For Windows machines, download the installer file to each machine, and then run the installer command. For detailed instructions, see the CloudEndure documentation | CloudEndure administrator |
Replicate the data. | After the Agent is installed, CloudEndure starts to replicate the source machine starts to the staging area. When the initial sync is completed, the machine appears on the Machines tab on the CloudEndure User Console. | CloudEndure administrator |
| Task | Description | Skills required |
|---|---|---|
Choose the source machine for the Blueprint. | On the CloudEndure User Console, on the Machines tab, choose the source machine to access the Machine Details pane. | CloudEndure administrator |
Configure the Blueprint for the target machine. | On the Blueprint tab, configure the settings for your target machine based on your requirements. For detailed instructions, see the CloudEndure documentation | CloudEndure administrator |
| Task | Description | Skills required |
|---|---|---|
Use Test Mode to test the solution. | For detailed instructions on Test Mode and test cutover verification, see the CloudEndure documentation | CloudEndure administrator |
Test your target instance launched on the Amazon EC2 server. | To test each of your target machines, choose the machine's name. Then open the Target tab, copy the new IP address, and log in to the newly launched server on the Amazon EC2 instance. | CloudEndure administrator |
| Task | Description | Skills required |
|---|---|---|
Verify source machine status. | On the CloudEndure User Console Machines page, verify that the source machine you want to fail over has the following status indications:
| CloudEndure administrator |
Start the cutover. |
| CloudEndure administrator |
Check the job progress and completion status. | The Job Progress window displays details for the target machine launch process. After the failover is complete, the Disaster Recovery Lifecycle status on the CloudEndure User Console changes to Failed over to indicate successful completion. | CloudEndure administrator |
| Task | Description | Skills required |
|---|---|---|
Review the CloudEndure Failback Client requirements. | Use the CloudEndure Failback Client for replicating from an on-premises or other cloud infrastructure to AWS. The CloudEndure Failback Client has the following requirements:
| CloudEndure administrator |
Prepare for failback. | Before you can initiate the Prepare for Failback action, all source machines must have launched target machines in either Test Mode or Recovery Mode. On the Project Actions menu, choose Prepare for Failback, and then choose Continue. When Pair the CloudEndure Agent with the Failback Client is displayed, the machines are ready for failback. | CloudEndure administrator |
Download the CloudEndure Failback Client in your on-premises environment. | To download the CloudEndure Failback Client into your source environment, do the following:
The file will automatically be downloaded. | CloudEndure administrator |
Initiate replication of the on-premises machine. | To initiate replication of source machine, the target machine must be booted into the CloudEndure Failback Client Image ( The CloudEndure Failback Client connects to console.clouendure.com over TCP port 443, and authenticates using the CloudEndure credentials that you are prompted to enter. | CloudEndure administrator |
Follow the instructions to provide the necessary details. | Provide the following details:
Make sure that the CloudEndure Failback Client has connectivity to the CloudEndure User Console and the target machine through public or private IP addresses. | CloudEndure administrator |
Locate the source machine ID. | To locate the source machine ID, choose the machine name on the Machines tab, and copy the ID from the Source tab. | CloudEndure administrator |
Connect the source machine to the target machine. | Provide the source machine ID (the server on AWS is now the source for the failback) in the on-premises server (target machine). The AWS machine (source) connects to the on-premises server (target) on TCP port 1500 to start the replication. After the initial replication is complete, the CloudEndure User Console indicates that replication is in Continuous Data Protection mode. | CloudEndure administrator |
Edit the failback settings, if necessary. | To edit the failback settings, choose the machine name, and then choose the Failback Settings tab. | CloudEndure administrator |
Launch the target machine. | To launch the target machine, do the following: Select the check box to the left of each machine name, and choose Launch x Target Machine, and then choose Recovery Mode. In the dialog box, choose Next. Choose the Latest recovery point, and then choose Continue with Launch. After the launch process is complete, the CloudEndure User Console displays the status Pair the CloudEndure Agent with the Replication Server under Data Replication Progress. | CloudEndure administrator |
Return the machines to normal operation. | Now change the direction of data replication so that the on-premises machine is the source and the AWS machine is the target. Choose Project Actions, and then choose Return to Normal and Continue. The direction of data replication is reversed, and the machines undergo the initial sync process. The failback process is complete when the Data Replication Progress column displays the Continuous Data Protection status for all machines. | CloudEndure administrator |
Related resources
AWS Marketplace
CloudEndure documentation
Tutorials and videos
