翻訳は機械翻訳により提供されています。提供された翻訳内容と英語版の間で齟齬、不一致または矛盾がある場合、英語版が優先します。
CodePipeline のパイプラインで AWS Lambda 関数を呼び出す
AWS Lambda はサーバーのプロビジョニングや管理をする必要がなく、コードを実行できるコンピューティングサービスです。Lambda 関数を作成し、アクションとしてパイプラインに追加できます。Lambda は、ほぼ全てのタスクを実行する関数の書き込みができるため、パイプラインの操作方法をカスタマイズできます。
重要
CodePipeline が Lambda に送信する JSON イベントをログに記録しないでください。これにより、CloudWatch Logs にユーザー認証情報が記録される可能性があるためです。CodePipeline ロールは JSON イベントを使用して、一時的な認証情報を artifactCredentials フィールドの Lambda に渡します。イベント例については、「JSON イベントの例」を参照してください。
パイプラインで Lambda 関数を使用する方法は次の通りです。
-
を使用してパイプラインの 1 つのステージでオンデマンドでリソースを作成し CloudFormation 、別のステージでリソースを削除するには。
-
CNAME 値をスワップする Lambda 関数 AWS Elastic Beanstalk を使用して、ダウンタイムのないアプリケーションバージョンを にデプロイします。
-
Amazon ECS Docker インスタンスにデプロイするため。
-
AMI スナップショットを作成することで、リソースをデプロイまたは作成する前にバックアップするため。
-
IRC クライアントにメッセージを投稿する等、サードパーティー製品によってパイプラインに統合を追加するため。
注記
Lambda 関数を作成して実行すると、 AWS アカウントに料金が発生する可能性があります。詳細については、「料金
このトピックでは、 AWS CodePipeline AWS Lambda と に精通しており、パイプライン、関数、およびそれらが依存する IAM ポリシーとロールを作成する方法を知っていることを前提としています。このトピックでは、以下の方法を示します。
-
ウェブページが正常にデプロイされたかをテストする Lambda 関数を作成する。
-
CodePipeline および Lambda 実行ロール、ならびにパイプラインの一部として関数を実行するために必要な権限を設定する。
-
パイプラインを編集して Lambda 関数をアクションとして追加する。
-
手動で変更をリリースすることでアクションをテストする。
注記
CodePipeline でクロスリージョン Lambda 呼び出しアクションを使用する場合、PutJobSuccessResult と PutJobFailureResult を使用した Lambda 実行のステータスは、CodePipeline が存在する AWS リージョンではなく、Lambda 関数が存在するリージョンに送信する必要があります。
このトピックには、CodePipeline で Lambda 関数を使用する柔軟性を示すためのサンプル関数が含まれています。
-
-
CodePipeline で使用する基本的な Lambda 関数を作成する。
-
アクションの [詳細] リンクの CodePipeline に成功または失敗の結果を返す。
-
-
AWS CloudFormation テンプレートを使用するサンプル Python 関数
-
複数の設定値を関数に渡すために JSON でエンコードされたユーザーパラメータを使用する (
get_user_params)。 -
アーティファクトバケットで、.zip アーティファクトと相互作用する (
get_template)。 -
長時間実行の非同期処理を監視する継続トークンを使用する (
continue_job_later)。これにより、15 分のランタイム (Lambda の制限) を超えてもアクションを続行し、関数を成功させることができます。
-
各サンプル関数には、ロールに追加する必要がある権限についての情報が含まれます。の制限の詳細については AWS Lambda、「 AWS Lambda デベロッパーガイド」の「 の制限」を参照してください。
重要
このトピックに含まれるサンプルコード、ロール、およびポリシーは単なる例であり、現状のまま提供されます。
トピック
ステップ 1: パイプラインを作成する
このステップでは、後で Lambda 関数を追加するパイプラインを作成します。これは、「CodePipeline チュートリアル」で作成したものと同じパイプラインです。このパイプラインがまだアカウントに設定されていて、Lambda 関数を作成するのと同じリージョンにある場合、このステップは省略できます。
パイプラインを作成するには
-
チュートリアル: シンプルなパイプラインを作成する (S3 バケット) の最初の 3 つのステップに従って、Amazon S3 バケット、CodeDeploy リソース、2 ステージパイプラインを作成します。インスタンスタイプに応じて Amazon Linux のオプションを選択します。パイプラインには任意の名前を使用できますが、このトピックの手順では MyLambdaTestPipeline を使用します。
-
パイプラインのステータスページの CodeDeploy アクション で、[詳細] を選択します。デプロイグループのデプロイの詳細ページで、リストからインスタンス ID を選択します。
-
Amazon EC2 コンソールのインスタンスの [詳細] タブで、[パブリック IPv4 アドレス] の IP アドレス (
192.0.2.4など) をコピーします。このアドレスを AWS Lambdaで関数のターゲットとして使用します。
注記
CodePipeline のデフォルトサービスロールポリシーには、関数を呼び出すのに必要な Lambda アクセス権限が含まれています。ただし、デフォルトサービスロールを変更、または別のものを選択した場合、ロールのポリシーが lambda:InvokeFunction および lambda:ListFunctions 権限を許可していることを確認してください。そうしない場合、Lambda アクションを含むパイプラインは失敗します。
ステップ 2 : Lambda 関数を作成する
このステップでは、HTTP リクエストを生成し、ウェブページ上のテキスト行をチェックする Lambda 関数を作成します。このステップの一環として、IAM ポリシーおよび Lambda 実行ロールを作成する必要があります。詳細については、[AWS Lambda デベロッパーガイド]の [権限モデル」を参照してください。
実行ロールを作成するには
にサインイン AWS マネジメントコンソール し、https://console.aws.amazon.com/iam/
で IAM コンソールを開きます。 -
[Policies] を選択してから、[Create Policy] を選択します [JSON] タブを選択して、次のポリシーをフィールドに貼り付けます。
-
[ポリシーの確認] を選択します。
-
[ポリシーの確認] ページで、[名前] に、ポリシー名 (
CodePipelineLambdaExecPolicyなど) を入力します。[説明] でEnables Lambda to execute codeを入力します。[ポリシーを作成] を選択します。
注記
これらは、Lambda 関数が CodePipeline および Amazon CloudWatch とやり取りするために必要な最小限のアクセス権限です。このポリシーを拡張して、他の AWS リソースとやり取りする関数を許可する場合は、これらの Lambda 関数に必要なアクションを許可するようにこのポリシーを変更する必要があります。
-
ポリシーダッシュボードページで、[ロール]、[ロールの作成] の順に選択します。
-
[ロールの作成] ページで、[AWS のサービス] を選択します。[Lambda] を選択し、[Next: Permissions (次へ: アクセス許可)] を選択します。
-
[アクセス許可ポリシーをアタッチする] のページで、[CodePipelineLambdaExecPolicy] の横にあるチェックボックスを選択して [次へ: タグ] を選択します。[次へ: レビュー] を選択します。
-
[確認] ページの、[ロール名] で名前を入力し、[ロールの作成] を選択します。
CodePipeline で使用するサンプル Lambda 関数を作成するには
にサインイン AWS マネジメントコンソール し、https://console.aws.amazon.com/lambda/
で AWS Lambda コンソールを開きます。 -
[ 関数] ページで、[関数の作成] を選択します。
注記
[Lambda] のページの代わりに [Welcome] のページが表示された場合は、[今すぐ始める] を選択します。
-
[関数の作成] ページで、[一から作成] を選択します。[関数の名前] に、Lambda 関数の名前を入力します (例:
MyLambdaFunctionForAWSCodePipeline)。[ランタイム] で、[Node.js 20.x] を選択します。 -
[Role (ロール)] で、[既存のロールを選択] を選択します。[Existing role (既存のロール)] でロールを選択し、[Create function (関数の作成)] を選択します。
作成した関数の詳細ページが開きます。
-
次のコードを関数コードボックスに貼り付けます。
注記
CodePipeline.job キーの下にあるイベントオブジェクトには、ジョブの詳細が含まれます。CodePipeline が Lambda に返す JSON イベントの完全な例については、JSON イベントの例 を参照してください。
import { CodePipelineClient, PutJobSuccessResultCommand, PutJobFailureResultCommand } from "@aws-sdk/client-codepipeline"; import http from 'http'; import assert from 'assert'; export const handler = (event, context) => { const codepipeline = new CodePipelineClient(); // Retrieve the Job ID from the Lambda action const jobId = event["CodePipeline.job"].id; // Retrieve the value of UserParameters from the Lambda action configuration in CodePipeline, in this case a URL which will be // health checked by this function. const url = event["CodePipeline.job"].data.actionConfiguration.configuration.UserParameters; // Notify CodePipeline of a successful job const putJobSuccess = async function(message) { const command = new PutJobSuccessResultCommand({ jobId: jobId }); try { await codepipeline.send(command); context.succeed(message); } catch (err) { context.fail(err); } }; // Notify CodePipeline of a failed job const putJobFailure = async function(message) { const command = new PutJobFailureResultCommand({ jobId: jobId, failureDetails: { message: JSON.stringify(message), type: 'JobFailed', externalExecutionId: context.awsRequestId } }); await codepipeline.send(command); context.fail(message); }; // Validate the URL passed in UserParameters if(!url || url.indexOf('http://') === -1) { putJobFailure('The UserParameters field must contain a valid URL address to test, including http:// or https://'); return; } // Helper function to make a HTTP GET request to the page. // The helper will test the response and succeed or fail the job accordingly const getPage = function(url, callback) { var pageObject = { body: '', statusCode: 0, contains: function(search) { return this.body.indexOf(search) > -1; } }; http.get(url, function(response) { pageObject.body = ''; pageObject.statusCode = response.statusCode; response.on('data', function (chunk) { pageObject.body += chunk; }); response.on('end', function () { callback(pageObject); }); response.resume(); }).on('error', function(error) { // Fail the job if our request failed putJobFailure(error); }); }; getPage(url, function(returnedPage) { try { // Check if the HTTP response has a 200 status assert(returnedPage.statusCode === 200); // Check if the page contains the text "Congratulations" // You can change this to check for different text, or add other tests as required assert(returnedPage.contains('Congratulations')); // Succeed the job putJobSuccess("Tests passed."); } catch (ex) { // If any of the assertions failed then fail the job putJobFailure(ex); } }); }; -
[Handler (ハンドラ)] はデフォルト値のままにし、[Role (ロール)] もデフォルトの
CodePipelineLambdaExecRoleのままにします。 -
基本設定のタイムアウトに
20秒と入力します。 -
[保存] を選択します。
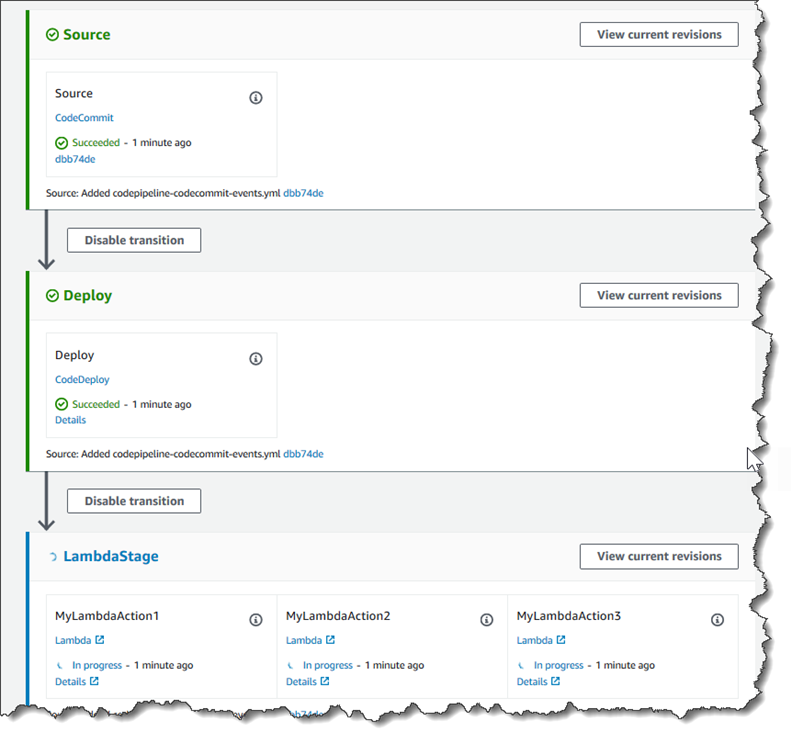
ステップ 3: CodePipeline コンソールでパイプラインに Lambda 関数を追加する
このステップでは、パイプラインに新しいステージを追加し、そのステージに関数を呼び出す Lambda アクションを追加します。
ステージを追加するには
にサインイン AWS マネジメントコンソール し、http://console.aws.amazon.com/codesuite/codepipeline/home
で CodePipeline コンソールを開きます。 -
[Welcome (ようこそ)] ページで、作成したパイプラインを選択します。
-
パイプラインビューページで、[編集] を選択します。
-
[Edit (編集)] ページで、[+ Add stage (ステージの追加)] を選択し、CodeDeploy アクションでデプロイステージの後にステージを追加します。ステージの名前を入力し (たとえば、
LambdaStage)、[Add stage (ステージの追加)] を選択します。注記
Lambda アクションを既存のステージに追加することもできます。デモンストレーション用に、ステージでの唯一のアクションとして Lambda 関数を追加し、パイプラインでアーティファクトが進行するにつれてその進行状況を簡単に表示できるようにしています。
-
[+ Add action group (+ アクションの追加)] を選択します。[アクションの編集] の、[アクション名] に、Lambda アクション (例:
MyLambdaAction) の名前を入力します。[プロバイダ] で、[AWS Lambda] を選択します。[関数名] に Lambda 関数の名前 (例えば、MyLambdaFunctionForAWSCodePipeline) を選択または入力します。[ユーザーパラメータ] で、先ほどコピーした Amazon EC2 インスタンスの IP アドレス (例:http://) を指定し、[完了] を選択します。192.0.2.4注記
このトピックでは、IP アドレスを使用していますが、実際のシナリオでは、代わりに登録済みのウェブサイト名 (
http://など) を指定できます。のイベントデータとハンドラーの詳細については AWS Lambda、「 AWS Lambda デベロッパーガイド」の「プログラミングモデル」を参照してください。www.example.com -
[アクションの編集] ページで、[保存] を選択します。
ステップ 4 : Lambda 関数でパイプラインをテストする
関数をテストするには、パイプラインを通して最新の変更をリリースします。
コンソールを使用してパイプラインによりアーティファクトの最新バージョンを実行するには
-
パイプラインの詳細ページで、[Release change] を選択します。これにより、ソースアクションで指定した各ソース場所における最新のリビジョンがパイプラインで実行されます。
-
Lambda アクションが完了したら、[詳細] リンクを選択して、Amazon CloudWatch での関数のログストリーム (イベントの課金期間を含む) を表示します。関数が失敗した場合は、CloudWatch ログからその原因について情報を得られます。
ステップ 5: 次のステップ
Lambda 関数を作成し、アクションとしてパイプラインに追加したので、次を実行できます。
-
さらに Lambda アクションをステージに追加して他のウェブページをチェックします。
-
Lambda 関数を変更し、別の文字列をチェックします。
-
[Lambda 関数を試し]、パイプラインに独自の Lambda 関数を作成して追加します。
Lambda 関数の実験が完了したら、料金が発生しないように、パイプラインから削除し、から削除し AWS Lambda、IAM からロールを削除することを検討してください。詳細については、CodePipeline でパイプラインを編集する、CodePipeline でパイプラインを作成します。およびロールまたはインスタンスプロファイルの削除を参照してください。
JSON イベントの例
以下の例では、CodePipeline によって Lambda に送られたサンプル JSON イベントを示しています。このイベントの構造は、GetJobDetails API へのレスポンスと似ていますが、actionTypeId および pipelineContext データタイプがありません。2 つのアクション設定の詳細、FunctionName および UserParameters は、JSON イベントと GetJobDetails API へのレスポンスの両方に含まれます。赤いイタリック体のテキスト の値は例または説明であり、実際の値ではありません。
{
    "CodePipeline.job": {
        "id": "11111111-abcd-1111-abcd-111111abcdef",
        "accountId": "111111111111",
        "data": {
            "actionConfiguration": {
                "configuration": {
                    "FunctionName": "MyLambdaFunctionForAWSCodePipeline",
                    "UserParameters": "some-input-such-as-a-URL"
                }
            },
            "inputArtifacts": [
                {
                    "location": {
                        "s3Location": {
                            "bucketName": "the name of the bucket configured as the pipeline artifact store in Amazon S3, for example codepipeline-us-east-2-1234567890",
                            "objectKey": "the name of the application, for example CodePipelineDemoApplication.zip"
                        },
                        "type": "S3"
                    },
                    "revision": null,
                    "name": "ArtifactName"
                }
            ],
            "outputArtifacts": [],
            "artifactCredentials": {
                "secretAccessKey": "wJalrXUtnFEMI/K7MDENG/bPxRfiCYEXAMPLEKEY",
                "sessionToken": "MIICiTCCAfICCQD6m7oRw0uXOjANBgkqhkiG9w
 0BAQUFADCBiDELMAkGA1UEBhMCVVMxCzAJBgNVBAgTAldBMRAwDgYDVQQHEwdTZ
 WF0dGxlMQ8wDQYDVQQKEwZBbWF6b24xFDASBgNVBAsTC0lBTSBDb25zb2xlMRIw
 EAYDVQQDEwlUZXN0Q2lsYWMxHzAdBgkqhkiG9w0BCQEWEG5vb25lQGFtYXpvbi5
 jb20wHhcNMTEwNDI1MjA0NTIxWhcNMTIwNDI0MjA0NTIxWjCBiDELMAkGA1UEBh
 MCVVMxCzAJBgNVBAgTAldBMRAwDgYDVQQHEwdTZWF0dGxlMQ8wDQYDVQQKEwZBb
 WF6b24xFDASBgNVBAsTC0lBTSBDb25zb2xlMRIwEAYDVQQDEwlUZXN0Q2lsYWMx
 HzAdBgkqhkiG9w0BCQEWEG5vb25lQGFtYXpvbi5jb20wgZ8wDQYJKoZIhvcNAQE
 BBQADgY0AMIGJAoGBAMaK0dn+a4GmWIWJ21uUSfwfEvySWtC2XADZ4nB+BLYgVI
 k60CpiwsZ3G93vUEIO3IyNoH/f0wYK8m9TrDHudUZg3qX4waLG5M43q7Wgc/MbQ
 ITxOUSQv7c7ugFFDzQGBzZswY6786m86gpEIbb3OhjZnzcvQAaRHhdlQWIMm2nr
 AgMBAAEwDQYJKoZIhvcNAQEFBQADgYEAtCu4nUhVVxYUntneD9+h8Mg9q6q+auN
 KyExzyLwaxlAoo7TJHidbtS4J5iNmZgXL0FkbFFBjvSfpJIlJ00zbhNYS5f6Guo
 EDmFJl0ZxBHjJnyp378OD8uTs7fLvjx79LjSTbNYiytVbZPQUQ5Yaxu2jXnimvw
 3rrszlaEXAMPLE=",
                "accessKeyId": "AKIAIOSFODNN7EXAMPLE"
            },
            "continuationToken": "A continuation token if continuing job",
            "encryptionKey": {
              "id": "arn:aws:kms:us-west-2:111122223333:key/1234abcd-12ab-34cd-56ef-1234567890ab",
              "type": "KMS"
            }
        }
    }
}
追加のサンプル関数
以下のサンプルLambda 関数は、CodePipeline のパイプラインに利用できる追加の機能を示しています。これらの機能を使うには、各サンプルの概要に示されている通りに、Lambda 実行ロールのポリシーを変更する必要がある場合があります。
AWS CloudFormation テンプレートを使用するサンプル Python 関数
次のサンプルは、指定された CloudFormation テンプレートに基づいてスタックを作成または更新する 関数を示しています。テンプレートによって Amazon S3 バケットが作成されます。コストを最小限に抑えるため、デモンストレーション用に過ぎません。理想的には、バケットに何かアップロードする前に、スタックを削除した方が良いでしょう。バケットにファイルをアップロードすると、スタックを削除する際にバケットを削除することはできません。バケット自体を削除するには、バケット内をすべて手動で削除する必要があります。
この Python サンプルは、Amazon S3 バケットをソースアクションとして使用するパイプラインがあること、またはパイプラインでバージョニングされた Amazon S3 バケットにアクセスできることを前提としています。 CloudFormation テンプレートを作成して圧縮し、.zip ファイルとしてそのバケットにアップロードします。次に、この .zip ファイルをバケットから取得するソースアクションをパイプラインに追加する必要があります。
注記
Amazon S3 がパイプラインのソースプロバイダーである場合、ソースファイルを 1 つの .zip に圧縮し、その .zip をソースバケットにアップロードできます。解凍されたファイルを 1 つアップロードすることもできます。ただし、.zip ファイルを想定するダウンストリームアクションは失敗します。
このサンプルは、以下を紹介します:
-
複数の設定値を関数に渡すために JSON でエンコードされたユーザーパラメータの使用 (
get_user_params)。 -
アーティファクトバケットにおける .zip アーティファクトとの相互作用 (
get_template)。 -
長時間実行の非同期処理を監視する継続トークンの使用 (
continue_job_later)。これにより、15 分のランタイム (Lambda の制限) を超えてもアクションを続行し、関数を成功させることができます。
このサンプル Lambda 関数を使用するには、このサンプルポリシーに示すように、Lambda 実行ロールのポリシーに CloudFormation、、Amazon S3、および CodePipeline のAllowアクセス許可が必要です。
CloudFormation テンプレートを作成するには、プレーンテキストエディタを開き、次のコードをコピーして貼り付けます。
{
  "AWSTemplateFormatVersion" : "2010-09-09",
  "Description" : "CloudFormation template which creates an S3 bucket",
  "Resources" : {
    "MySampleBucket" : {
      "Type" : "AWS::S3::Bucket",
      "Properties" : {
      }
    }
  },
  "Outputs" : {
    "BucketName" : {
      "Value" : { "Ref" : "MySampleBucket" },
      "Description" : "The name of the S3 bucket"
    }
  }
}
これを template.json という名前の JSON ファイルとして、template-package という名前のディレクトリに保存します。このディレクトリと template-package.zip という名前のファイルを圧縮して (.zip) ファイルを作成し、圧縮されたファイルをバージョニングされた Amazon S3 バケットにアップロードします。すでにパイプラインに設定したバケットがある場合、それを使用できます。次に、パイプラインを編集して .zip ファイルを取得するソースアクションを追加します。このアクションの出力に MyTemplate と名前を付けます。詳細については、「CodePipeline でパイプラインを編集する」を参照してください。
注記
サンプル Lambda 関数は、これらのファイル名と圧縮された構造を想定しています。ただし、このサンプルの代わりに独自の CloudFormation テンプレートを使用できます。独自のテンプレートを使用する場合は、 CloudFormation テンプレートに必要な追加機能を許可するように Lambda 実行ロールのポリシーを変更してください。
以下のコードを Lambda の 関数として追加するには
-
Lambda コンソールを開き、[関数の作成] を選択します。
-
[関数の作成] ページで、[一から作成] を選択します。[関数の名前] に、Lambda 関数の名前を入力します。
-
[ランタイム] で [Python2.7] を選択します。
-
[実行ロールを選択または作成] で、[既存のロールを使用する] を選択します。[Existing role (既存のロール)] でロールを選択し、[Create function (関数の作成)] を選択します。
作成した関数の詳細ページが開きます。
-
次のコードを関数コードボックスに貼り付けます。
from __future__ import print_function from boto3.session import Session import json import urllib import boto3 import zipfile import tempfile import botocore import traceback print('Loading function') cf = boto3.client('cloudformation') code_pipeline = boto3.client('codepipeline') def find_artifact(artifacts, name): """Finds the artifact 'name' among the 'artifacts' Args: artifacts: The list of artifacts available to the function name: The artifact we wish to use Returns: The artifact dictionary found Raises: Exception: If no matching artifact is found """ for artifact in artifacts: if artifact['name'] == name: return artifact raise Exception('Input artifact named "{0}" not found in event'.format(name)) def get_template(s3, artifact, file_in_zip): """Gets the template artifact Downloads the artifact from the S3 artifact store to a temporary file then extracts the zip and returns the file containing the CloudFormation template. Args: artifact: The artifact to download file_in_zip: The path to the file within the zip containing the template Returns: The CloudFormation template as a string Raises: Exception: Any exception thrown while downloading the artifact or unzipping it """ tmp_file = tempfile.NamedTemporaryFile() bucket = artifact['location']['s3Location']['bucketName'] key = artifact['location']['s3Location']['objectKey'] with tempfile.NamedTemporaryFile() as tmp_file: s3.download_file(bucket, key, tmp_file.name) with zipfile.ZipFile(tmp_file.name, 'r') as zip: return zip.read(file_in_zip) def update_stack(stack, template): """Start a CloudFormation stack update Args: stack: The stack to update template: The template to apply Returns: True if an update was started, false if there were no changes to the template since the last update. Raises: Exception: Any exception besides "No updates are to be performed." """ try: cf.update_stack(StackName=stack, TemplateBody=template) return True except botocore.exceptions.ClientError as e: if e.response['Error']['Message'] == 'No updates are to be performed.': return False else: raise Exception('Error updating CloudFormation stack "{0}"'.format(stack), e) def stack_exists(stack): """Check if a stack exists or not Args: stack: The stack to check Returns: True or False depending on whether the stack exists Raises: Any exceptions raised .describe_stacks() besides that the stack doesn't exist. """ try: cf.describe_stacks(StackName=stack) return True except botocore.exceptions.ClientError as e: if "does not exist" in e.response['Error']['Message']: return False else: raise e def create_stack(stack, template): """Starts a new CloudFormation stack creation Args: stack: The stack to be created template: The template for the stack to be created with Throws: Exception: Any exception thrown by .create_stack() """ cf.create_stack(StackName=stack, TemplateBody=template) def get_stack_status(stack): """Get the status of an existing CloudFormation stack Args: stack: The name of the stack to check Returns: The CloudFormation status string of the stack such as CREATE_COMPLETE Raises: Exception: Any exception thrown by .describe_stacks() """ stack_description = cf.describe_stacks(StackName=stack) return stack_description['Stacks'][0]['StackStatus'] def put_job_success(job, message): """Notify CodePipeline of a successful job Args: job: The CodePipeline job ID message: A message to be logged relating to the job status Raises: Exception: Any exception thrown by .put_job_success_result() """ print('Putting job success') print(message) code_pipeline.put_job_success_result(jobId=job) def put_job_failure(job, message): """Notify CodePipeline of a failed job Args: job: The CodePipeline job ID message: A message to be logged relating to the job status Raises: Exception: Any exception thrown by .put_job_failure_result() """ print('Putting job failure') print(message) code_pipeline.put_job_failure_result(jobId=job, failureDetails={'message': message, 'type': 'JobFailed'}) def continue_job_later(job, message): """Notify CodePipeline of a continuing job This will cause CodePipeline to invoke the function again with the supplied continuation token. Args: job: The JobID message: A message to be logged relating to the job status continuation_token: The continuation token Raises: Exception: Any exception thrown by .put_job_success_result() """ # Use the continuation token to keep track of any job execution state # This data will be available when a new job is scheduled to continue the current execution continuation_token = json.dumps({'previous_job_id': job}) print('Putting job continuation') print(message) code_pipeline.put_job_success_result(jobId=job, continuationToken=continuation_token) def start_update_or_create(job_id, stack, template): """Starts the stack update or create process If the stack exists then update, otherwise create. Args: job_id: The ID of the CodePipeline job stack: The stack to create or update template: The template to create/update the stack with """ if stack_exists(stack): status = get_stack_status(stack) if status not in ['CREATE_COMPLETE', 'ROLLBACK_COMPLETE', 'UPDATE_COMPLETE']: # If the CloudFormation stack is not in a state where # it can be updated again then fail the job right away. put_job_failure(job_id, 'Stack cannot be updated when status is: ' + status) return were_updates = update_stack(stack, template) if were_updates: # If there were updates then continue the job so it can monitor # the progress of the update. continue_job_later(job_id, 'Stack update started') else: # If there were no updates then succeed the job immediately put_job_success(job_id, 'There were no stack updates') else: # If the stack doesn't already exist then create it instead # of updating it. create_stack(stack, template) # Continue the job so the pipeline will wait for the CloudFormation # stack to be created. continue_job_later(job_id, 'Stack create started') def check_stack_update_status(job_id, stack): """Monitor an already-running CloudFormation update/create Succeeds, fails or continues the job depending on the stack status. Args: job_id: The CodePipeline job ID stack: The stack to monitor """ status = get_stack_status(stack) if status in ['UPDATE_COMPLETE', 'CREATE_COMPLETE']: # If the update/create finished successfully then # succeed the job and don't continue. put_job_success(job_id, 'Stack update complete') elif status in ['UPDATE_IN_PROGRESS', 'UPDATE_ROLLBACK_IN_PROGRESS', 'UPDATE_ROLLBACK_COMPLETE_CLEANUP_IN_PROGRESS', 'CREATE_IN_PROGRESS', 'ROLLBACK_IN_PROGRESS', 'UPDATE_COMPLETE_CLEANUP_IN_PROGRESS']: # If the job isn't finished yet then continue it continue_job_later(job_id, 'Stack update still in progress') else: # If the Stack is a state which isn't "in progress" or "complete" # then the stack update/create has failed so end the job with # a failed result. put_job_failure(job_id, 'Update failed: ' + status) def get_user_params(job_data): """Decodes the JSON user parameters and validates the required properties. Args: job_data: The job data structure containing the UserParameters string which should be a valid JSON structure Returns: The JSON parameters decoded as a dictionary. Raises: Exception: The JSON can't be decoded or a property is missing. """ try: # Get the user parameters which contain the stack, artifact and file settings user_parameters = job_data['actionConfiguration']['configuration']['UserParameters'] decoded_parameters = json.loads(user_parameters) except Exception as e: # We're expecting the user parameters to be encoded as JSON # so we can pass multiple values. If the JSON can't be decoded # then fail the job with a helpful message. raise Exception('UserParameters could not be decoded as JSON') if 'stack' not in decoded_parameters: # Validate that the stack is provided, otherwise fail the job # with a helpful message. raise Exception('Your UserParameters JSON must include the stack name') if 'artifact' not in decoded_parameters: # Validate that the artifact name is provided, otherwise fail the job # with a helpful message. raise Exception('Your UserParameters JSON must include the artifact name') if 'file' not in decoded_parameters: # Validate that the template file is provided, otherwise fail the job # with a helpful message. raise Exception('Your UserParameters JSON must include the template file name') return decoded_parameters def setup_s3_client(job_data): """Creates an S3 client Uses the credentials passed in the event by CodePipeline. These credentials can be used to access the artifact bucket. Args: job_data: The job data structure Returns: An S3 client with the appropriate credentials """ key_id = job_data['artifactCredentials']['accessKeyId'] key_secret = job_data['artifactCredentials']['secretAccessKey'] session_token = job_data['artifactCredentials']['sessionToken'] session = Session(aws_access_key_id=key_id, aws_secret_access_key=key_secret, aws_session_token=session_token) return session.client('s3', config=botocore.client.Config(signature_version='s3v4')) def lambda_handler(event, context): """The Lambda function handler If a continuing job then checks the CloudFormation stack status and updates the job accordingly. If a new job then kick of an update or creation of the target CloudFormation stack. Args: event: The event passed by Lambda context: The context passed by Lambda """ try: # Extract the Job ID job_id = event['CodePipeline.job']['id'] # Extract the Job Data job_data = event['CodePipeline.job']['data'] # Extract the params params = get_user_params(job_data) # Get the list of artifacts passed to the function artifacts = job_data['inputArtifacts'] stack = params['stack'] artifact = params['artifact'] template_file = params['file'] if 'continuationToken' in job_data: # If we're continuing then the create/update has already been triggered # we just need to check if it has finished. check_stack_update_status(job_id, stack) else: # Get the artifact details artifact_data = find_artifact(artifacts, artifact) # Get S3 client to access artifact with s3 = setup_s3_client(job_data) # Get the JSON template file out of the artifact template = get_template(s3, artifact_data, template_file) # Kick off a stack update or create start_update_or_create(job_id, stack, template) except Exception as e: # If any other exceptions which we didn't expect are raised # then fail the job and log the exception message. print('Function failed due to exception.') print(e) traceback.print_exc() put_job_failure(job_id, 'Function exception: ' + str(e)) print('Function complete.') return "Complete." -
[ハンドラー] をデフォルト値のままにし、[ロール] 以前に選択または作成した名前
CodePipelineLambdaExecRoleのままにします。 -
基本設定のタイムアウトで、デフォルトの 3 秒を
20に置き換えます。 -
[保存] を選択します。
-
CodePipeline コンソールから、パイプラインを編集して、関数をパイプラインのステージのアクションとして追加します。変更するパイプラインステージの [編集] を選択し、[アクショングループを追加] します。[アクションの編集] ページで、[Action name (アクション名)] にアクションの名前を入力します。[アクションプロバイダー] で、[Lambda] を選択します。
[アーティファクト入力] で
MyTemplateを選択します。[UserParameters] で JSON 文字列に次の 3 つのパラメータを指定する必要があります。-
スタック名
-
CloudFormation テンプレート名とファイルへのパス
-
アーティファクト入力
中括弧 ({ }) を使用し、パラメータをカンマで区切ります。例えば、
MyTemplateのパイプラインに、[アーティファクト入力] でMyTestStackというスタックを作成するには、UserParameters に {"stack":"MyTestStack","file":"template-package/template.json","artifact":"MyTemplate"} を入力します。注記
[UserParameters] で入力アーティファクトを指定した場合でも、[入力アーティファクト] のアクションに対しては、この入力アーティファクトをやはり指定する必要があります。
-
-
変更をパイプラインに保存したら、手動で変更をリリースして、アクションと Lambda 関数をテストします。
