Oracle VM Server
Oracle VM Server is based on the Xen hypervisor and works in conjunction with OVM Manager (OVMM) to provide a hosting and management platform for running virtual machines. This software is free to download and distribute.
The high-level steps to deploy OVM Server onto Amazon EC2 bare metal instances is shown in the diagram below.
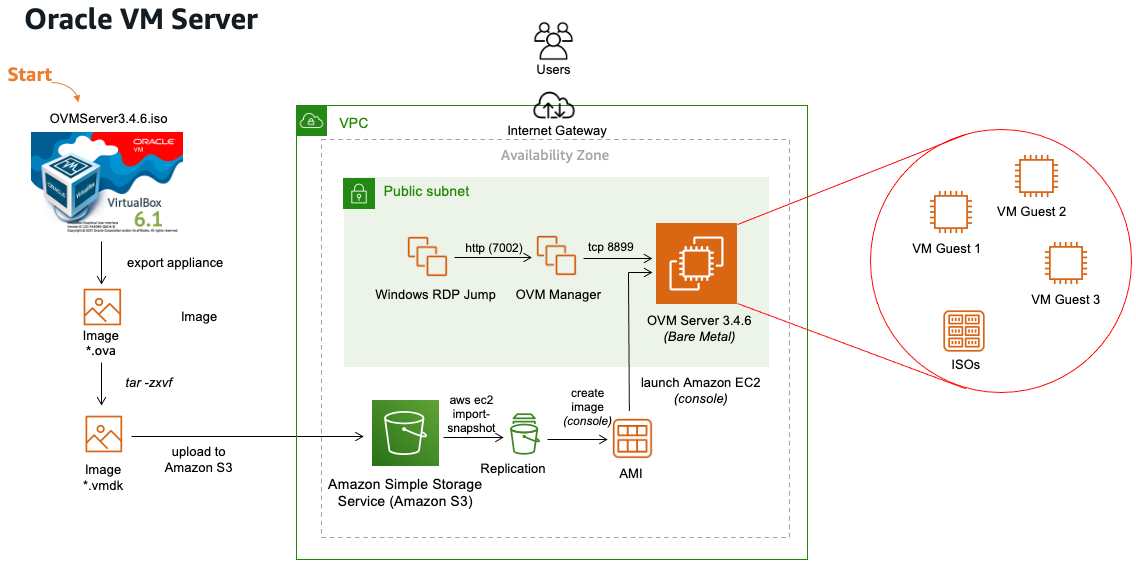
Oracle VM Server deployment on EC2 Bare Metal
To deploy an operating system or hypervisor to an EC2 bare metal instance you need an Amazon Machine Image (AMI). You can obtain an AMI for OVM Server in one of the following ways:
-
Download an AMI from the AWS Marketplace (if one exists)
-
Download an AMI from the Community AMI repository (if one exists)
-
Create your own AMI
At the time of publication there are no publicly available AMIs in either the AWS Marketplace or Community repository for a recent version of OVM Server.
To create your own AMI for Oracle VM Server use the following procedure:
-
Download Oracle VM Server 3.4.6 from the official download site
(in ISO format). -
Download a recent version of Virtualbox
onto your laptop or PC. -
Create a VM Guest in Virtualbox using the downloaded ISO file in Step 1.
-
Verify that the Elastic Network Adaptor (ENA) and NVMe drivers are included in the OVM Server kernel.
-
Shutdown the OVM Server guest VM.
-
Export
the OVM Server guest VM using Open Virtualisation Format v1 ( *.ova). -
Extract the
*.vmdkfile from the*.ovafile from Step 6 above (usingtarorzip). -
Upload the
*.vmdkfile to an Amazon S3 bucket. -
Import the
*.vmdkfile to an EC2 snapshot using the following command.# aws ec2 import-snapshot --description "OVM Server 3.4.6 from VMDK" \ --disk-container file://VMDK.json { "Description": "OVMServer VMDK", "Format": "VMDK", "UserBucket": { "S3Bucket": "my-s3-bucket", "S3Key": "OVMServer-disk001.vmdk" } } -
Using the AWS Management Console, create an AMI (image) from the snapshot imported in Step 9.
You will now have an Amazon Machine Image which contains OVM Server 3.4.6 that can be used to launch EC2 instances. This image will boot on traditional shared tenancy instances, dedicated hosts, and bare metal instances.
To launch this AMI onto an EC2 bare metal instance, choose a *.metal instance type in the
AWS console or CLI (for example, m5.metal).
The most intuitive interface for administering OVM Server and its guest VMs is Oracle VM Manager (OLMM), a separate product distributed by Oracle. OVMM talks to OVM Server over HTTP and allows administrators to create and manage VM guests using their web browser across one or more OVM Server hypervisors. OVMM is available as a separately downloadable software image from Oracle.
Use the following procedure to install OVMM and use it to create a virtual machine guest on the OVM Server.
-
Download OVM Manager
(OVMM) in ISO file format. -
Launch a standard EC2 instance using a recent RHEL or Amazon Linux AMI.
-
Install OVMM onto the EC2 instance created in Step 2 above (mount ISO from Step 1.)
-
Open TCP Port 7002 incoming to the OVMM instance from your laptop or bastion server (RDP Jump host).
-
Open TCP Port 8899 outgoing from the OVM Server metal instance, and incoming to the OVMM instance.
-
Log in
to the OVMM console ( https://)<hostname>:7002/ovm/console -
Choose Discover Servers, and type the private IP of the OVM Server metal instance, and type the Agent password you chose when installing OVM Server
-
Create a Server Pool in OVMM and add the discovered OVM Server to it. Do not create a Cluster pool.
-
Add an additional gp2 EBS volume to the OVM Server metal instance. Do not partition this volume.
-
In the OVMM Console using the previous EBS Volume, create a new Repository.
OVMM is now ready to create guest virtual machines that are hosted on the remote Oracle VM server, as shown in the previous architecture diagram.
Use the following procedure, to create a guest VM:
-
Create
a VM guest in the OVMM Console using the previously created Repository (use the default network created by OVM Server). -
In the OVMM Console, add a CDROM and virtual disk to the VM guest.
-
Download a publicly available ISO for an operating system image (for example, Centos7) onto a directory on the OVM Server instance.
-
Using the OVMM Console, import the ISO image into the Repository (using HTTP).
-
Edit the VM guest’s CDROM device to point to the ISO image from Step 4.
-
Boot the VM Guest using the ISO, and install the operating system.
-
Verify that you can connect to the VM Guest from the metal instance hypervisor host.
To adhere to the licensing requirement for hard partitioning with
OVM Server you must
bind
vCPUs to physical CPU threads or cores
