Create a Puppet Enterprise Master
Important
The AWS OpsWorks for Puppet Enterprise service reached end of life on March 31, 2024 and has been disabled for both new and existing customers. We strongly recommend customers migrate
their workloads to other solutions as soon as possible. If you have questions about migration, reach out to the AWS Support Team on AWS re:Post
You can create a Puppet master by using the OpsWorks for Puppet Enterprise console, or the AWS CLI.
Topics
Create a Puppet Enterprise Master by using the AWS Management Console
Sign in to the AWS Management Console and open the OpsWorks console at https://console.aws.amazon.com/opsworks/
. -
On the OpsWorks home page, choose Go to OpsWorks for Puppet Enterprise.

-
On the OpsWorks for Puppet Enterprise home page, choose Create Puppet Enterprise server.
-
On the Set name, region, and type page, specify a name for your server. Puppet master names can be a maximum of 40 characters, must start with a letter, and can contain only alphanumeric characters and dashes. Select a supported region, and then choose an instance type that supports the number of nodes that you want to manage. You can change the instance type after your server has been created, if needed. For this walkthrough, we are creating a m5.xlarge instance type in the US West (Oregon) Region. Choose Next.

-
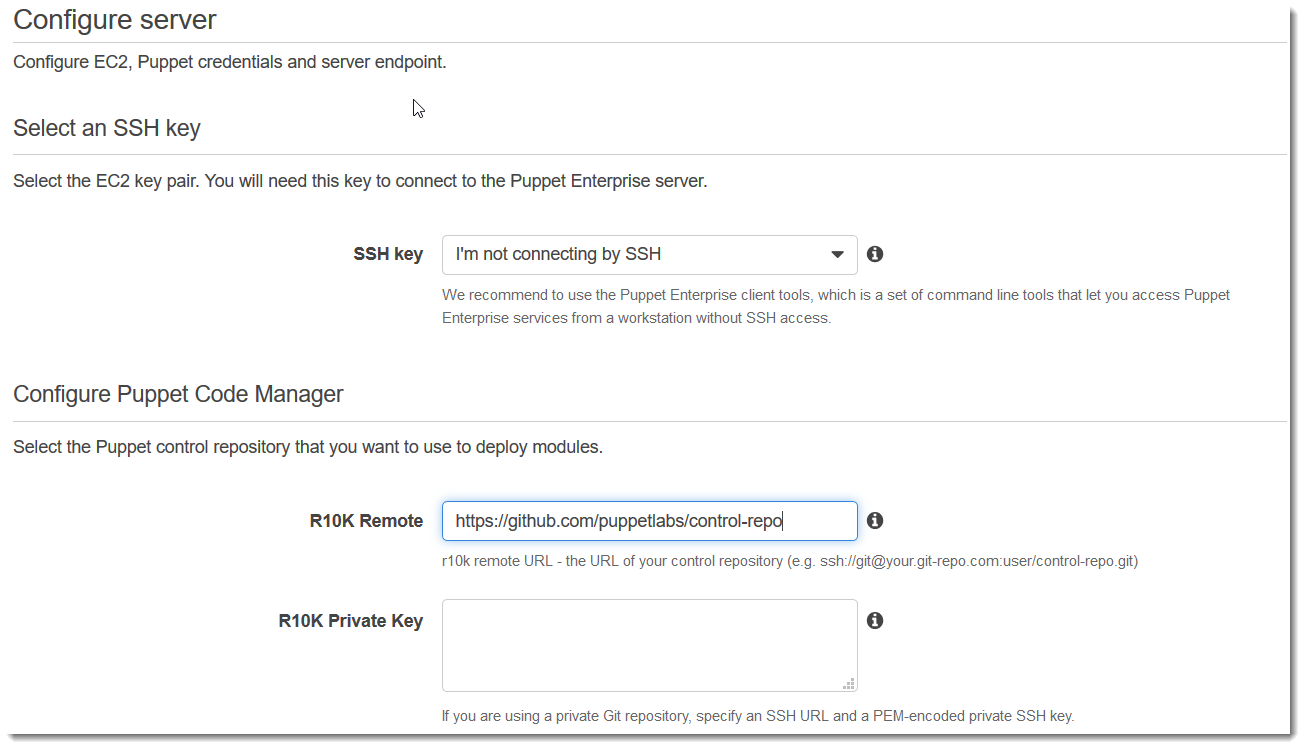
On the Configure server page, leave the default selection in the SSH key drop-down list, unless you want to specify a key pair name. In the r10k remote field of the Configure Puppet Code Manager area, specify a valid SSH or HTTPS URL of your Git remote. In the r10k private key field, paste in the SSH private key that OpsWorks can use to access the r10k remote repository. This is provided by Git when you create a private repository, but not required if you are using HTTPS authentication to access your control repository. Choose Next.
-
For Specify server endpoint, leave the default, Use an automatically-generated endpoint and then choose Next, unless you want your server on a custom domain of your own. To configure a custom domain, go on to the next step.
-
To use a custom domain, for Specify server endpoint, choose Use a custom domain from the drop-down list.
-
For Fully qualified domain name (FQDN), specify an FQDN. You must own the domain name that you want to use.
-
For SSL certificate, paste in the entire PEM-formatted certificate, beginning with
–––--BEGIN
                           CERTIFICATE-----
and ending with–––--END CERTIFICATE-----. The SSL certificate subject must match the FQDN you entered in the preceding step. Remove any extra lines before and after the certificate. -
For SSL private key, paste in the entire RSA private key, beginning with
–––--BEGIN RSA PRIVATE KEY-----and ending with–––--END RSA PRIVATE KEY-----. The SSL private key must match the public key in the SSL certificate that you entered in the preceding step. Remove any extra lines before and after the private key. Choose Next.
-
-
On the Configure advanced settings page, in the Network and security area, choose a VPC, subnet, and one or more security groups. OpsWorks can generate a security group, service role, and instance profile for you, if you do not already have ones that you want to use. Your server can be a member of multiple security groups. You cannot change network and security settings for the Puppet master after you have left this page.

-
In the System maintenance section, set the day and hour that you want system maintenance to begin. Because you should expect the server to be offline during system maintenance, choose a time of low server demand within regular office hours.
The maintenance window is required. You can change the start day and time later by using the AWS Management Console, AWS CLI, or the APIs.

-
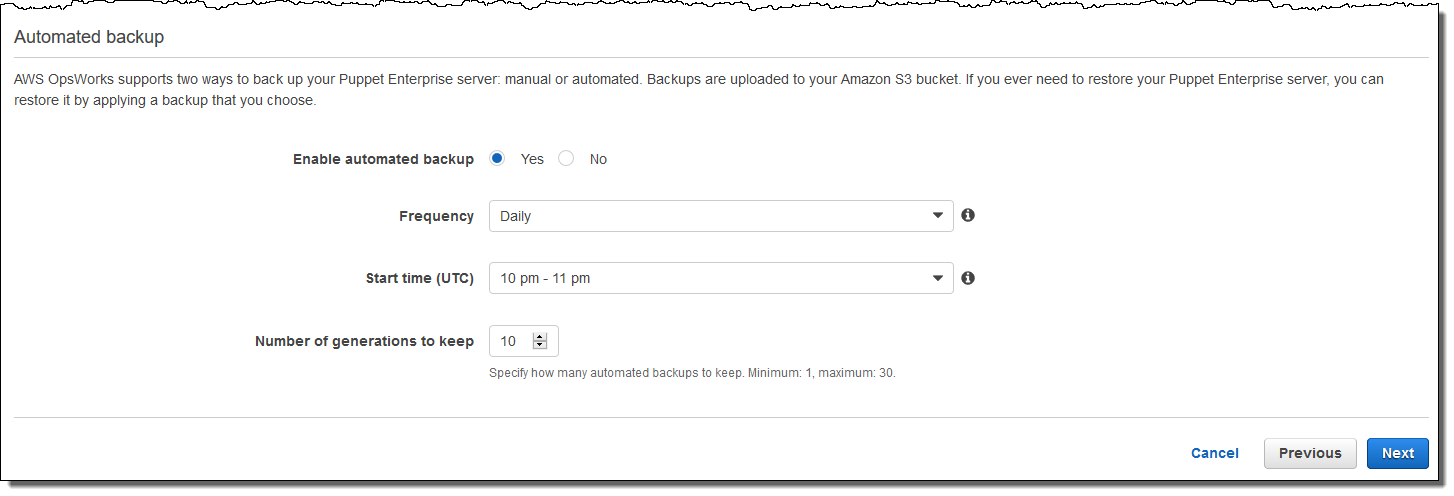
Configure backups. By default, automatic backups are enabled. Set a preferred frequency and hour for automatic backup to start, and set the number of backup generations to store in Amazon Simple Storage Service. A maximum of 30 backups can be kept; when the maximum is reached, OpsWorks for Puppet Enterprise deletes the oldest backups to make room for new ones.
-
(Optional) In Tags, add tags to the server and related resources, such as the EC2 instance, Elastic IP address, security group, S3 bucket, and backups. For more information about tagging an OpsWorks for Puppet Enterprise server, see Working with Tags on AWS OpsWorks for Puppet Enterprise Resources.
-
When you are finished configuring advanced settings, choose Next.
-
On the Review page, review your choices. When you are ready to create the server, choose Launch.
While you are waiting for OpsWorks to create your Puppet master, go on to Configure the Puppet Master Using the Starter Kit and download the Starter Kit and the Puppet Enterprise console credentials. Do not wait until your server is online to download these items.
When server creation is finished, your Puppet master is available on the OpsWorks for Puppet Enterprise home page, with a status of online. After the server is online, the Puppet Enterprise console is available on the server's domain, at a URL in the following format:
https://.your_server_name-randomID.region.opsworks-cm.io
Create a Puppet Enterprise Master by using the AWS CLI
Important
The AWS OpsWorks for Puppet Enterprise service reached end of life on March 31, 2024 and has been disabled for both new and existing customers. We strongly recommend customers migrate
their workloads to other solutions as soon as possible. If you have questions about migration, reach out to the AWS Support Team on AWS re:Post
Creating an OpsWorks for Puppet Enterprise master server by running AWS CLI commands differs from creating a
server in the console. In the console, OpsWorks creates a service role and security group
for you, if you do not specify existing ones that you want to use. In the AWS CLI, OpsWorks
can create a security group for you if you do not specify one, but it does not
automatically create a service role; you must provide a service role ARN as part of your
create-server command. In the console, while OpsWorks is creating your
Puppet master, you download the starter kit and the sign-in credentials for the Puppet
Enterprise console. Because you cannot do this when you create an OpsWorks for Puppet Enterprise master by
using the AWS CLI, you use a JSON processing utility to get the sign-in credentials and
the starter kit from the results of the create-server command after your
new OpsWorks for Puppet Enterprise master is online.
If your local computer is not already running the AWS CLI, download and install the
AWS CLI by following installation
instructions in the AWS Command Line Interface User
Guide. This section does not describe all parameters that you can use with
the create-server command. For more information about
create-server parameters, see create-server in the AWS CLI
Reference.
-
Be sure to complete the Prerequisites. To create your Puppet master, you need a subnet ID, so you must have a VPC.
-
Create a service role and an instance profile.
-
Find and copy the ARNs of service roles in your account.
aws iam list-roles --path-prefix "/service-role/" --no-paginateIn the results of the
list-rolescommand, look for service role ARN entries that resemble the following. Make a note of the service role ARNs. You need these values to create your Puppet Enterprise master. -
Find and copy the ARNs of instance profiles in your account.
aws iam list-instance-profiles --no-paginateIn the results of the
list-instance-profilescommand, look for instance profile ARN entries that resemble the following. Make a note of the instance profile ARNs. You need these values to create your Puppet Enterprise master. -
Create the OpsWorks for Puppet Enterprise master by running the
create-servercommand.-
The
--enginevalue isPuppet,--engine-modelisMonolithic, and--engine-versioncan be2019or2017. -
The server name must be unique within your AWS account, within each region. Server names must start with a letter; then letters, numbers, or hyphens (-) are allowed, up to a maximum of 40 characters.
-
Use the instance profile ARN and service role ARN that you copied in Steps 3 and 4.
-
Valid instance types are
m5.xlarge,c5.2xlarge, orc5.4xlarge. For more information about the specifications of these instance types, see Instance Types in the Amazon EC2 User Guide. -
The
--engine-attributesparameter is optional; if you don't specify a Puppet administrator password, the server creation process generates one for you. If you add--engine-attributes, specify aPUPPET_ADMIN_PASSWORD, an administrator password for signing in to the Puppet Enterprise console webpage. The password must use between 8 and 32 ASCII characters. -
An SSH key pair is optional, but can help you connect to your Puppet master if you need to reset the console administrator password. For more information about creating an SSH key pair, see Amazon EC2 Key Pairs in the Amazon EC2 User Guide.
-
To use a custom domain, add the following parameters to your command. Otherwise, the Puppet master creation process automatically generates an endpoint for you. All three parameters are required to configure a custom domain. For information about additional requirements for using these parameters, see CreateServer in the OpsWorks CM API Reference.
-
--custom-domain- An optional public endpoint of a server, such ashttps://aws.my-company.com. -
--custom-certificate- A PEM-formatted HTTPS certificate. The value can be be a single, self-signed certificate, or a certificate chain. -
--custom-private-key- A private key in PEM format for connecting to the server by using HTTPS. The private key must not be encrypted; it cannot be protected by a password or passphrase.
-
-
Weekly system maintenance is required. Valid values must be specified in the following format:
DDD:HH:MM. The specified time is in coordinated universal time (UTC). If you do not specify a value for--preferred-maintenance-window, the default value is a random, one-hour period on Tuesday, Wednesday, or Friday. -
Valid values for
--preferred-backup-windowmust be specified in one of the following formats:HH:MMfor daily backups, orDDD:HH:MMfor weekly backups. The specified time is in UTC. The default value is a random, daily start time. To opt out of automatic backups, add the parameter--disable-automated-backupinstead. -
For
--security-group-ids, enter one or more security group IDs, separated by a space. -
For
--subnet-ids, enter a subnet ID.
aws opsworks-cm create-server --engine "Puppet" --engine-model "Monolithic" --engine-version "2019" --server-name "server_name" --instance-profile-arn "instance_profile_ARN" --instance-type "instance_type" --engine-attributes '{"PUPPET_ADMIN_PASSWORD":"ASCII_password"}' --key-pair "key_pair_name" --preferred-maintenance-window "ddd:hh:mm" --preferred-backup-window "ddd:hh:mm" --security-group-idssecurity_group_id1security_group_id2--service-role-arn "service_role_ARN" --subnet-idssubnet_IDThe following is an example.
aws opsworks-cm create-server --engine "Puppet" --engine-model "Monolithic" --engine-version "2019" --server-name "puppet-02" --instance-profile-arn "arn:aws:iam::111122223333:instance-profile/aws-opsworks-cm-ec2-role" --instance-type "m5.xlarge" --engine-attributes '{"PUPPET_ADMIN_PASSWORD":"zZZzDj2DLYXSZFRv1d"}' --key-pair "amazon-test" --preferred-maintenance-window "Mon:08:00" --preferred-backup-window "Sun:02:00" --security-group-ids sg-b00000001 sg-b0000008 --service-role-arn "arn:aws:iam::111122223333:role/service-role/aws-opsworks-cm-service-role" --subnet-ids subnet-383daa71The following example creates a Puppet master that uses a custom domain.
aws opsworks-cm create-server \
    --engine "Puppet" \
    --engine-model "Monolithic" \
    --engine-version "2019" \
    --server-name "puppet-02" \
    --instance-profile-arn "arn:aws:iam::111122223333:instance-profile/aws-opsworks-cm-ec2-role" \
    --instance-type "m5.xlarge" \
    --engine-attributes '{"PUPPET_ADMIN_PASSWORD":"zZZzDj2DLYXSZFRv1d"}' \
    --custom-domain "my-puppet-master.my-corp.com" \
    --custom-certificate "-----BEGIN CERTIFICATE----- EXAMPLEqEXAMPLE== -----END CERTIFICATE-----" \
    --custom-private-key "-----BEGIN RSA PRIVATE KEY----- EXAMPLEqEXAMPLE= -----END RSA PRIVATE KEY-----" \
    --key-pair "amazon-test"
    --preferred-maintenance-window "Mon:08:00" \
    --preferred-backup-window "Sun:02:00" \
    --security-group-ids sg-b00000001 sg-b0000008 \
    --service-role-arn "arn:aws:iam::111122223333:role/service-role/aws-opsworks-cm-service-role" \
    --subnet-ids subnet-383daa71
The following example creates a Puppet master that adds two tags:
Stage: ProductionandDepartment: Marketing. For more information about adding and managing tags on OpsWorks for Puppet Enterprise servers, see Working with Tags on AWS OpsWorks for Puppet Enterprise Resources in this guide.aws opsworks-cm create-server \ --engine "Puppet" \ --engine-model "Monolithic" \ --engine-version "2019" \ --server-name "puppet-02" \ --instance-profile-arn "arn:aws:iam::111122223333:instance-profile/aws-opsworks-cm-ec2-role" \ --instance-type "m5.xlarge" \ --engine-attributes '{"PUPPET_ADMIN_PASSWORD":"zZZzDj2DLYXSZFRv1d"}' \ --key-pair "amazon-test" --preferred-maintenance-window "Mon:08:00" \ --preferred-backup-window "Sun:02:00" \ --security-group-ids sg-b00000001 sg-b0000008 \ --service-role-arn "arn:aws:iam::111122223333:role/service-role/aws-opsworks-cm-service-role" \ --subnet-ids subnet-383daa71 \ --tags [{\"Key\":\"Stage\",\"Value\":\"Production\"},{\"Key\":\"Department\",\"Value\":\"Marketing\"}] -
-
OpsWorks for Puppet Enterprise takes about 15 minutes to create a new server. Do not dismiss the output of the
create-servercommand or close your shell session, because the output can contain important information that is not shown again. To get passwords and the starter kit from thecreate-serverresults, go on to the next step.If you are using a custom domain with the server, in the output of the
create-servercommand, copy the value of theEndpointattribute. The following is an example."Endpoint": "puppet-07-exampleexample.opsworks-cm.us-east-1.amazonaws.com" -
If you opted to have OpsWorks for Puppet Enterprise generate a password for you, you can extract it in a usable format from the
create-serverresults by using a JSON processor such as jq. After you install jq , you can run the following commands to extract the Puppet administrator password and starter kit. If you did not provide your own password in Step 3, be sure to save the extracted administrator password in a convenient but secure location. #Get the Puppet password: cat resp.json | jq -r '.Server.EngineAttributes[] | select(.Name == "PUPPET_ADMIN_PASSWORD") | .Value' #Get the Puppet Starter Kit: cat resp.json | jq -r '.Server.EngineAttributes[] | select(.Name == "PUPPET_STARTER_KIT") | .Value' | base64 -D > starterkit.zipNote
You cannot regenerate a new Puppet master starter kit in the AWS Management Console. When you create a Puppet master by using the AWS CLI, run the preceding
jqcommand to save the base64-encoded starter kit in thecreate-serverresults as a ZIP file. -
If you are not using a custom domain, go on to the next step. If you are using a custom domain with the server, create a CNAME entry in your enterprise's DNS management tool to point your custom domain to the OpsWorks for Puppet Enterprise endpoint that you copied in step 6. You cannot reach or sign in to a server with a custom domain until you complete this step.
-
Go on to the next section, Configure the Puppet Master Using the Starter Kit.
