Create an AWS OpsWorks for Puppet Enterprise Master by using AWS CloudFormation
Important
The AWS OpsWorks for Puppet Enterprise service reached end of life on March 31, 2024 and has been disabled for both new and existing customers. We strongly recommend customers migrate
their workloads to other solutions as soon as possible. If you have questions about migration, reach out to the AWS Support Team on AWS re:Post
AWS OpsWorks for Puppet Enterprise lets you run a Puppet Enterprise
Starting May 3, 2021, OpsWorks for Puppet Enterprise stores some Puppet Enterprise server attributes in AWS Secrets Manager. For more information, see Integration with AWS Secrets Manager.
The following walkthrough helps you create a Puppet master in OpsWorks for Puppet Enterprise by creating a stack in AWS CloudFormation.
Prerequisites
Before you create a new Puppet master, create the resources outside of OpsWorks for Puppet Enterprise that you'll need to access and manage your Puppet master. For more information, see Prerequisites in the Getting Started section of this guide.
If you are creating a server that uses a custom domain, you need a custom domain,
certificate, and private key. You must specify values for all three of these parameters in
your AWS CloudFormation template. For more information about requirements for the
CustomDomain, CustomCertificate, and
CustomPrivateKey parameters, see CreateServer in the OpsWorks CM API Reference.
Review the OpsWorks-CM section of the AWS CloudFormation User Guide Template Reference to learn about the supported and required values in the AWS CloudFormation template that you use to create your server.
Create a Puppet Enterprise Master in AWS CloudFormation
This section describes how to use an AWS CloudFormation template to build a stack that creates an
OpsWorks for Puppet Enterprise master server. You can do this by using the AWS CloudFormation console or the AWS CLI. An example AWS CloudFormation template is available
for you to use to build an OpsWorks for Puppet Enterprise server stack. Be sure to update the example template
with your own server name, IAM roles, instance profile, server description, backup
retention count, maintenance options, and optional tags. If your server will use a custom
domain, you must specify values for the CustomDomain,
CustomCertificate, and CustomPrivateKey parameters in your
AWS CloudFormation template. For more information about these options, see Create a Puppet Enterprise Master
by using the AWS Management Console in the Getting Started section of this
guide.
Topics
Create a Puppet Enterprise Master by using AWS CloudFormation (Console)
Sign in to the AWS Management Console and open the AWS CloudFormation console at https://console.aws.amazon.com/cloudformation
. -
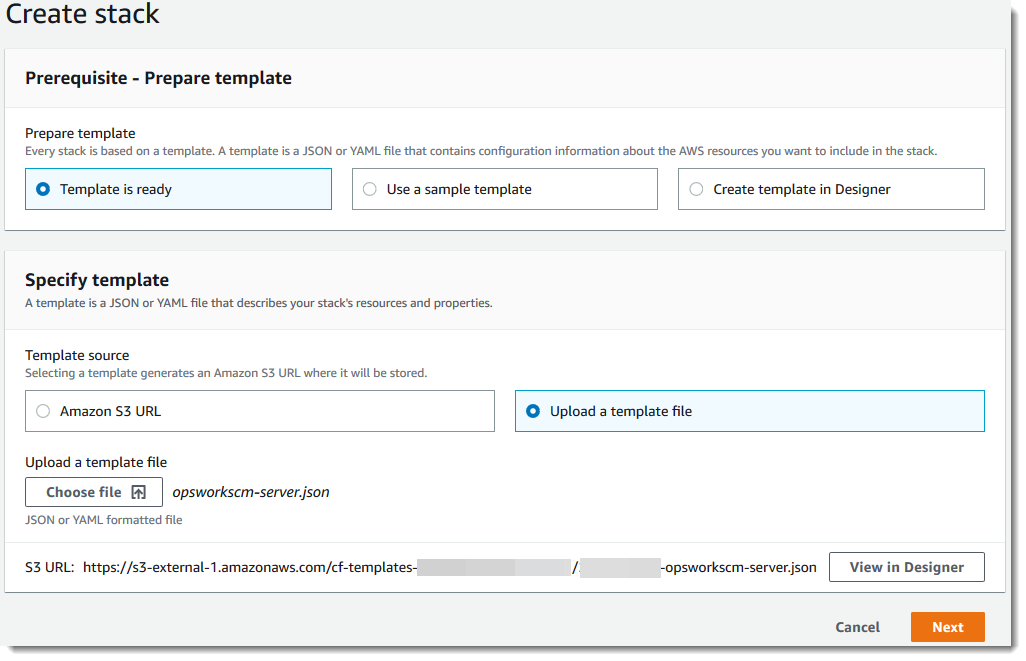
On the AWS CloudFormation home page, choose Create stack.
-
In Prerequisite - Prepare template, if you are using the example AWS CloudFormation template, choose Template is ready.
-
In Specify template, choose the source of your template. For this walkthrough, choose Upload a template file, and upload an AWS CloudFormation template that creates a Puppet Enterprise server. Browse for your template file, and then choose Next.
An AWS CloudFormation template can be in either YAML or JSON format. An example AWS CloudFormation template is available for you to use; be sure to replace example values with your own. You can use the AWS CloudFormation template designer to build a new template or validate an existing one. For more information about how to do this, see AWS CloudFormation Designer Interface Overview in the AWS CloudFormation User Guide.
-
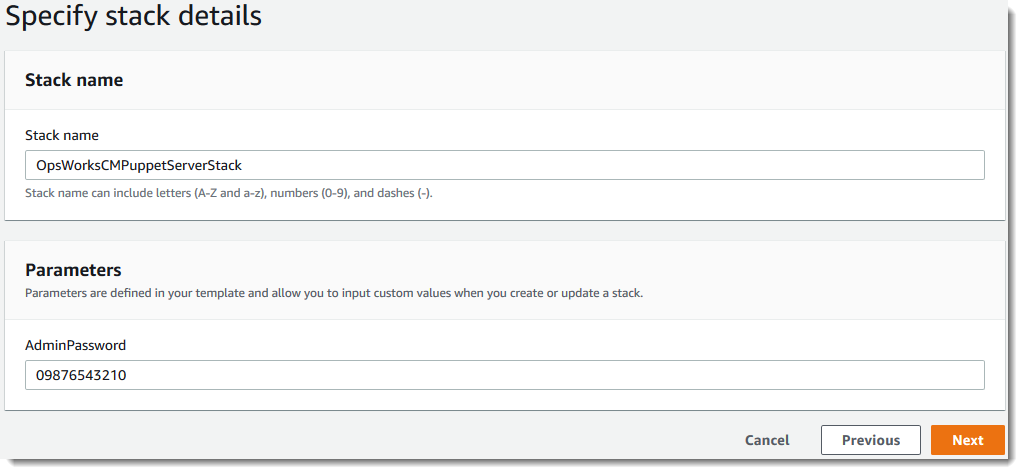
On the Specify stack details page, enter a name for your stack. This won't be the same as the name of your server, it is only a stack name. In the Parameters area, enter an administrator password for signing in to the Puppet Enterprise console webpage. The password must use between 8 and 32 ASCII characters. Choose Next.
-
On the Options page, you can add tags to the server you're creating with the stack, and choose an IAM role for creating resources if you have not already specified an IAM role to use in your template. When you're finished specifying options, choose Next. For more information about advanced options such as rollback triggers, see Setting AWS CloudFormation Stack Options in the AWS CloudFormation User Guide.
-
On the Review page, review your choices. When you are ready to create the server stack, choose Create.
While you are waiting for AWS CloudFormation to create the stack, view the stack creation status. If stack creation fails, review the error messages shown in the console to help you resolve the issues. For more information about troubleshooting errors in AWS CloudFormation stacks, see Troubleshooting Errors in the AWS CloudFormation User Guide.
When server creation is finished, your Puppet master is available on the OpsWorks for Puppet Enterprise home page, with a status of online. After the server is online, the Puppet Enterprise console is available on the server's domain, at a URL in the following format:
https://.your_server_name-randomID.region.opsworks-cm.ioNote
If you specified a custom domain, certificate, and private key for your server, create a CNAME entry in your enterprise's DNS management tool that maps your custom domain to the endpoint that OpsWorks for Puppet Enterprise automatically generated for the server. You cannot manage the server or connect to the Puppet Enterprise management website for the server until you map the generated endpoint to your custom domain value.
To get the generated endpoint value, run the following AWS CLI command after your server is online:
aws opsworks describe-servers --server-nameserver_name
Create a Puppet Enterprise Master by using AWS CloudFormation (CLI)
If your local computer is not already running the AWS CLI, download and install the AWS CLI by following installation instructions in the AWS Command Line Interface User Guide. This section does not describe all parameters that you can use with the create-stack command. For more information about create-stack parameters, see create-stack in the AWS CLI Reference.
-
Be sure to complete the Prerequisites for creating an OpsWorks for Puppet Enterprise master.
-
Create a service role and an instance profile.
Find and copy the ARNs of service roles in your account.
aws iam list-roles --path-prefix "/service-role/" --no-paginateIn the results of the
list-rolescommand, look for service role and instance profile entries that resemble the following. Make a note of the ARNs of the service role and instance profile, and add them to the AWS CloudFormation template that you are using to create your Puppet master server stack. -
Create the OpsWorks for Puppet Enterprise master by running the create-stack command again.
-
Replace
stack_namewith the name of your stack. This is the name of the AWS CloudFormation stack, not your Puppet master. The Puppet master name is the value ofServerNamein your AWS CloudFormation template. -
Replace
templatewith the path to your template file, and the extensionyaml or jsonwith.yamlor.jsonas appropriate. -
The values for
--parameterscorrespond to EngineAttributes from the CreateServer API. For Puppet, the following are user-provided engine attributes to create a server. r10k engine attributes connect your Puppet master to a code repository to manage the server’s environment configuration. For more information about r10k engine attributes, see Managing code with r10kin the Puppet Enterprise documentation. -
PUPPET_ADMIN_PASSWORD, an administrator password for signing in to the Puppet Enterprise console webpage. The password must use between 8 and 32 ASCII characters, and requires at least one upper case letter, one lower case letter, one number, and one special character. -
PUPPET_R10K_REMOTE, the URL of your control repository (for example, ssh://git@your.git-repo.com:user/control-repo.git). Specifying an r10k remote opens TCP port 8170. -
PUPPET_R10K_PRIVATE_KEY. If you are using a private Git repository, add PUPPET_R10K_PRIVATE_KEY to specify an SSH URL and a PEM-encoded private SSH key.
-
aws cloudformation create-stack --stack-namestack_name--template-body file://template.yaml or json--parameters ParameterKey=AdminPassword,ParameterValue="password"The following is an example.
aws cloudformation create-stack --stack-name "OpsWorksCMPuppetServerStack" --template-body file://opsworkscm-puppet-server.json --parameters ParameterKey=AdminPassword,ParameterValue="09876543210Ab#"The following example specifies r10k engine attributes as parameters, when they are not provided in the AWS CloudFormation template. An example template that includes the r10k engine attributes,
puppet-server-param-attributes.yaml, is included in the example AWS CloudFormation templates.aws cloudformation create-stack --stack-name MyPuppetStack --template-body file://puppet-server-param-attributes.yaml --parameters ParameterKey=AdminPassword,ParameterValue="superSecret1%3" ParameterKey=R10KRemote,ParameterValue="https://www.yourRemote.com" ParameterKey=R10KKey,ParameterValue="$(cat puppet-r10k.pem)"The following example specifies r10k engine attributes and their values in the AWS CloudFormation template; the command only needs to point to the template file. The template specified as the value of
--template-body,puppet-server-in-file-attributes.yaml, is included in the example AWS CloudFormation templates.aws cloudformation create-stack --stack-name MyPuppetStack --template-body file://puppet-server-in-file-attributes.yaml -
-
(Optional) To get stack creation status, run the following command.
aws cloudformation describe-stacks --stack-namestack_name -
When stack creation has finished, go on to the next section, Configure the Puppet Master Using the Starter Kit. If stack creation fails, review the error messages shown in the console to help you resolve the issues. For more information about troubleshooting errors in AWS CloudFormation stacks, see Troubleshooting Errors in the AWS CloudFormation User Guide.
