Configure the message
After you specify the target segment for the campaign, you can configure the message for the campaign.
If you created the campaign as a standard campaign, you configure a single message. If you set up the campaign as an A/B test campaign, you define two or more treatments. A treatment is a variation of your message that the campaign sends to different portions of the segment.
Prerequisite
Before you begin, complete Specify the audience for the campaign.
Set up the campaign
-
If you created this campaign as an A/B test campaign (as opposed to a standard campaign), specify the percentage of segment members who should receive each treatment. An A/B test campaign can include up to five treatments. Choose Add another treatment to add additional treatments.
-
On the Create your message page, configure the message for the campaign. The message options vary depending on the channel that you chose for the campaign.
If you're creating an email campaign, see Configuring an email message.
If you're creating an in-app campaign, see Configuring an in-app message.
If you're creating an SMS campaign, see Configuring an SMS message.
If you're creating a push notification campaign, see Configuring a push notification.
If you're creating a campaign that sends messages through a custom channel, see Configuring a custom channel message.
To configure an email message
-
Choose the priority level for the Create your message page, do one of the following:
-
To design and write a new message for the campaign, select Create a new email message.
Note
The maximum email message size for Create a new message is 200 KB. You can use email templates to send larger email messages.
-
To create a message that's based on an email template:
-
Select Choose an existing email template, and then select Choose a template.
-
Browse for the template that you want to use. When you select a template from the list, Amazon Pinpoint displays a preview of the active version of the template. (The active version is usually the version of a template that's been reviewed and approved for use, depending on your workflow.)
-
When you find the template that you want, select it, and then select Choose template.
-
Under Template version, specify whether you want Amazon Pinpoint to automatically update the message to include any changes that you might make to the template before the message is sent. To learn more about these options, see Managing versions of message templates.
-
When you finish choosing template options for the message, skip to step 5.
-
-
-
For Subject, enter the subject line for your email message.
-
For Message, enter the email body.
Tip
You can enter the email body by using either HTML or Design view. In HTML view, you can manually enter HTML content for the email body, including features such as formatting and links. In Design view, you can use a rich text editor with a formatting toolbar to apply formatting features such as links. To switch views, choose HTML or Design from the view selector above the message editor.
Note
You must set up an email orchestration sending role before you can use email headers. For more information, see Creating an email orchestration sending role in Amazon Pinpoint.
Under Headers, choose Add new headers, to add up to 15 headers for the email message. For a list of supported headers, see Amazon SES header fields in the Amazon Simple Email Service Developer Guide.
-
For Name, enter the name of the header.
-
For Value, enter the value of the header.
(Optional) To add a One-click unsubscribe link to a promotional email, add the following two headers:
Create a header with
List-Unsubscribefor Name and set Value to your unsubscribe link. The link must support HTTP POST requests to process the recipients unsubscribe request.Create a header with
List-Unsubscribe-Postfor Name and set Value toList-Unsubscribe=One-Click.
-
-
(Optional) In the field below the message editor, enter the content that you want to display in the body of messages that are sent to recipients whose email applications don't display HTML.
-
If you created this campaign as an A/B test campaign (as opposed to a standard campaign), repeat the steps in this section for each treatment. You can switch between treatments by using the tabs at the top of the Email details section.
-
For Sender email address, choose the verified email address used to set up the email channel.
-
Choose where you want to send the test message to. This can be an existing segment of up to ten email addresses or endpoint IDs.
-
Choose Next.
Use in-app messages to send targeted messages to users of your applications. In-app messages are highly customizable. They can include buttons that open websites or take users to specific parts of your app. You can configure background and text colors, position the text, and add images to the notification. You can send a single message, or create a carousel that contains up to five unique messages that your users can scroll through.
When creating an in-app message, you can either choose to create a campaign from an existing template or create a new message.
If you chose to create an A/B testing campaign, you can apply a different template to each treatment. An A/B testing campaign can contain up to five different treatments.
-
On the Create your message page, do one of the following:
-
To create a new message for the campaign, select Create a new in-app message, and then proceed to step 2.
-
To create a message that's based on an existing in-app template, do the following:
-
Select Choose an existing in-app messaging template, and then select Choose a template.
-
Select the template that you want to use. When you select a template from the list, Amazon Pinpoint displays a preview of the active version of the template. The active version is typically the version of a template that's been reviewed and approved for use.
-
When you find the template that you want do use, select it, and then select Choose template.
-
Under Template version, specify whether you want Amazon Pinpoint to automatically update the message to include changes that are made to the template before the message is sent. To learn more about these options, see Managing versions of message templates.
-
When you finish choosing template options for the message, proceed to step 11.
-
-
-
In the In-app message details section, under Layout, choose the type of layout for the message. You can choose from the following options:
-
Top banner – a message that appears as a banner at the top of the page.
-
Bottom banner – a message that appears as a banner at the bottom of the page.
-
Middle banner – a message that appears as a banner in the middle of the page.
-
Full screen – a message that covers the entire screen.
-
Modal – a message that appears in a window in front of the page.
-
Carousel – a scrollable layout of up to five unique messages.
-
-
Under Header, configure the title that appears at the beginning of the message. If you created a Carousel message, you must create the first message for the Carousel, which includes the header.
-
For Header text to display in the banner. You can enter up to 64 characters.
-
For Header text color, choose the text color for the header. You can optionally enter RGB values or a hex color code.
-
For Header alignment, choose whether you want the text to be Left, Center, or Right justified.
-
-
Under Message, configure the body of the message.
-
For Message, enter the body text for the message. The message can contain up to 150 characters.
-
For Text color, choose the text color for the message body. You can optionally enter RGB values or a hex color code.
-
For Text alignment, choose whether you want the text to be Left, Center, or Right justified.
-
-
(Optional) Change the background color of the message. Under Background , choose a background color for the message. You can optionally enter RGB values or a hex color code.
-
(Optional) Add an image to the message. Under Image URL, enter the URL of the image that you want to appear in the message. Only .jpg and .png files are accepted. The dimensions of the image depend on the message type:
-
For a Banner, the image should be 100 pixels by 100 pixels, or a 1:1 aspect ratio.
-
For a Carousel, the image should be 300 pixels by 200 pixels, or a 3:2 aspect ratio.
-
For a Fullscreen message, the image should be 300 pixels by 200 pixels, or a 3:2 aspect ratio.
-
-
(Optional) Add a button to the message. Under Primary button, do the following:
-
Choose Add primary button.
-
For Button text, enter the text to display on the button. You can enter up to 64 characters.
-
(Optional) For Button text color, choose a color for the button text. You can optionally enter RGB values or a hex color code.
-
(Optional) For Background color, choose a background color for the button. You can optionally enter RGB values or a hex color code.
-
(Optional) For Border radius, enter a radius value. Lower values result in sharper corners, while higher numbers result in more rounded corners.
-
Under Actions, choose the event that occurs when the user taps the button:
-
Close – Dismisses the message.
-
Go to URL – Opens a website.
-
Go to deep link – Opens an app or opens a particular place in an app.
If you want the button behavior to be different for different device types, you can override the default action. Under Action, use the tabs to choose the device type that you want to modify the button behavior for. For example, choose iOS to modify the button behavior for iOS devices. Next, choose Override the default actions. Finally, specify an action.
-
-
-
(Optional) Add a secondary button to the message. Under Secondary button, choose Add secondary button. Follow the procedures in the preceding step to configure the secondary button.
-
(Optional) Add custom data to the message. Custom data are key-value pairs delivered with your message. For example, you might want to pass a promotional code along with your message. If you're sending a carousel message, you can add custom data to each of the carousel messages. To add custom data, do the following:
-
Under Custom data, choose Add new item.
-
Enter a Key. For example, this might be
PromoCode. -
Enter a Value for the key. Your
PromoCodemight be12345. -
When the message is sent, the code
12345is included in your message. -
To add more key-value pairs, choose Add new item. You can add up to 10 key-value pairs to the message. When you finish adding custom data, proceed to the next step.
-
-
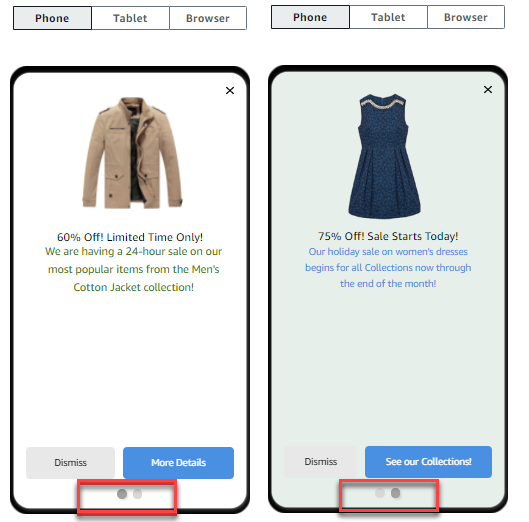
If your message is a carousel, you can add up to four more unique messages. To add messages to a carousel, expand the Carousel overview section. Next, choose Add new message. Repeat the preceding steps to configure the message.
As you add messages to the carousel, the Preview page updates by displaying icons at the bottom of the page showing the number of messages included in the carousel.
The following image shows a carousel with two messages:
-
(Optional) If you created this campaign as an A/B test campaign (as opposed to a standard campaign), repeat the steps in this section for each treatment. You can switch between treatments by using the tabs at the top of the In-app messaging template section.
-
Choose Next.
Important
If you send SMS messages to recipients in India using a Sender ID, you must complete additional steps. For more information, see India sender ID registration process in the AWS End User Messaging SMS User Guide.
To configure an SMS message
-
On the Create your message page, do one of the following:
-
To design and write a new message for the campaign, select Create a new SMS message, and then proceed to step 2.
-
To create a message that's based on an SMS template, do the following:
-
Select Choose an existing SMS template, and then select Choose a template.
-
Select the template that you want to use. When you select a template from the list, Amazon Pinpoint displays a preview of the active version of the template. The active version is typically the version of a template that's been reviewed and approved for use.
-
When you find the template that you want, select it, and then select Choose template.
-
Under Template version, specify whether you want Amazon Pinpoint to automatically update the message to include changes that are made to the template before the message is sent. To learn more about these options, see Managing versions of message templates.
-
When you finish choosing template options for the message, proceed to step 6.
-
-
-
In the SMS settings section, for Message type, choose one of the following:
-
Promotional – Non-critical messages, such as marketing messages.
-
Transactional – Critical messages that support customer transactions, such as one-time passwords for multi-factor authentication.
Note
This campaign-level setting overrides your default message type, which you set on the SMS settings page.
-
-
(Optional) For the Origination phone number, select a phone number to send the message from. This list contains all of the dedicated phone numbers that are associated with your account. If your account contains multiple dedicated phone numbers, and you don't choose an origination number, Amazon Pinpoint looks for a short code in your account; if it finds one, it uses that short code to send the message. If a short code isn't found in your account, then it looks for a 10DLC number (US recipients only), and then a toll-free number (US recipients only), and then a long code.
-
(Optional) For Sender ID, enter the alphanumeric Sender ID that you want to use to send this message.
Important
Sender IDs are only supported in certain countries. In some countries, you must register your Sender ID with government or regulatory entities before you can use it. Only specify a Sender ID if you know that Sender IDs are supported in the countries of your recipients. For more information about Sender ID availability and requirements, see Supported countries and regions (SMS channel) in the AWS End User Messaging SMS User Guide.
-
For Message, enter the body of the message.
Tip
SMS messages can contain a limited number of characters. Long messages are split into multiple message parts, and you're charged separately for each of those parts. The maximum number of characters that you can include depends on the characters that you use in your messages. For more information, see SMS character limits in the AWS End User Messaging SMS User Guide.
-
(Optional) If you created this campaign as an A/B test campaign (as opposed to a standard campaign), repeat the steps in this section for each treatment. You can switch between treatments by using the tabs at the top of the SMS details section.
-
Choose Next.
To configure a push notification
-
On the Create your message page, do one of the following:
-
To design and write a new message for the campaign, select Create a new push notification.
-
To create a message that's based on a push notification template:
-
Select Choose an existing push notification template, and then select Choose a template.
-
Browse for the template that you want to use. When you select a template from the list, Amazon Pinpoint displays a preview of the active version of the template. (The active version is typically the version of a template that's been reviewed and approved for use, depending on your workflow.)
-
When you find the template that you want, select it, and then select Choose template.
-
Under Template version, specify whether you want Amazon Pinpoint to automatically update the message to include any changes that you might make to the template before the message is sent. To learn more about these options, see Managing versions of message templates.
-
If you created this campaign as an A/B test campaign (as opposed to a standard campaign), repeat the steps in this section for each treatment. You can switch between treatments by using the tabs at the top of the Push notification details section.
-
When you finish, choose Next.
-
-
-
For Notification type, specify the type of message that you want to send:
-
Standard notification – A push notification that has a title, a message body, and other content and settings. Recipients are alerted by their mobile devices when they receive the message.
-
Silent notification – A custom JSON attribute-value pair that Amazon Pinpoint sends to your app without producing notifications on recipients' devices. Use silent notifications to send data that your app is designed to receive and handle. For example, you can use silent notifications to update the app's configuration or to show messages in an in-app message center.
-
Raw message – A push notification that specifies all of a notification's content and settings as a JSON object. Use raw messages for cases such as sending custom data to an app for processing by that app, instead of the push notification service.
If you choose the Raw message option, the message editor displays an outline of the code to use for the message. In the message editor, enter the content and settings that you want to use for each push notification service, including any optional settings—such as images, sounds, and actions—that you want to specify. For more information, see the documentation for the push notification services that you use. After you enter all the raw message content, repeat this step for each treatment, if you created this campaign as an A/B test campaign. When you finish, choose Next.
-
To create a standard notification
-
For Title, enter the title that you want to display above the message.
-
For Body, enter the message body. Your push notification can have up to 200 characters. A character counter below the field counts down from 200 as you add characters to the message.
-
For Action, select the action that you want to occur when a recipient taps the notification:
-
Open your app – Your app launches, or it becomes the foreground app if it was sent to the background.
-
Go to a URL – The default mobile browser on the recipient's device launches and opens a webpage at the URL that you specify. For example, this action can be useful for sending users to a blog post.
-
Open a deep link – Your app opens to a specific page or component in the app. For example, this action can be useful to direct users to special promotions for in-app purchases.
-
-
(Optional) Under Media URLs, enter the URLs for any media files that you want to display in the push notification. The URLs must be publicly accessible so that the push notification services for Android or iOS can retrieve the images.
-
If you created this campaign as an A/B test campaign (as opposed to a standard campaign), repeat the steps in this section for each treatment. You can switch between treatments by using the tabs at the top of the Push notification details section.
-
Choose Next.
To create a silent notification
-
For Message, enter the content of the message in JSON format. The exact content of the message varies depending on the notification service that you use and the values that your app expects to receive.
-
If you created this campaign as an A/B test campaign (as opposed to a standard campaign), repeat the steps in this section for each treatment. You can switch between treatments by using the tabs at the top of the Push notification details section.
-
Choose Next.
This section contains information about configuring a campaign to send messages by using a custom channel. You can use custom channels to send messages to your customers through any service that has an API or webhook functionality, including third-party services.
Sending a custom message using a Lambda function
To send messages through a service that has an API, you must create an AWS Lambda function that calls the API. For more information about creating these functions, see Creating custom channels in the Amazon Pinpoint Developer Guide.
To configure a custom channel that uses a Lambda function to call an API
-
On the Create your message page, for Choose your custom message channel type, choose Lambda function.
-
For Lambda function, choose the name of the Lambda function that you want to execute when the campaign runs.
-
For Endpoint options, choose the endpoint types that you want Amazon Pinpoint to send to the Lambda function or webhook that's associated with the custom channel.
For example, if the segment you chose for this campaign contains several endpoint types, but you only want to send the campaign to endpoints that have the Custom endpoint type attribute, choose Custom. You aren't required to choose the Custom endpoint type. For example, you could choose to only send the custom channel campaign to endpoints with the Email endpoint type attribute.
-
Choose Next.
Sending a custom message using a webhook
You can also create custom channels that send information about your segment members to services that use webhooks.
To configure a custom channel that uses webhooks
-
On the Create your message page, for Choose your custom message channel type, choose URL.
-
For Enter your custom message channel URL, enter the URL of the webhook.
The URL that you specify has to begin with "https://." It can only contain alphanumeric characters, plus the following symbols: hyphen (-), period (.), underscore (_), tilde (~), question mark (?), slash or solidus (/), pound or hash sign (#), and semicolon (;). The URL must comply with RFC3986
. -
For Endpoint options, choose the endpoint types that you want Amazon Pinpoint to send to the Lambda function. For example, if the segment that you chose for this campaign contains several endpoint types, but you only want to send the campaign to endpoints that have the "Custom" endpoint type attribute, choose Custom.
-
Choose Next.
Use message variables
To create a message that's personalized for each recipient, use message variables. Message variables refer to specific user attributes. These attributes can include characteristics that you create and store for users, such as the user's name, city, device, or operating system. When Amazon Pinpoint sends the message, it replaces the variables with the corresponding attribute values for the recipient. For information about the attributes that you can use, see Endpoint properties in the Amazon Pinpoint API Reference.
To include a variable in your message, add the name of an existing attribute to the
message. Enclose the name in two sets of curly braces ({}), and use the exact
capitalization of the name—for example,
{{Demographic.AppVersion}}.
Often, the most useful attributes for message variables are custom attributes that you create and store for users. By using custom attributes and variables, you can send personalized messages that are unique for each recipient.
For example, if your app is a fitness app for runners and it includes custom attributes for each user's first name, preferred activity, and personal record, you could use variables in the following message:
Hey {{User.UserAttributes.FirstName}}, congratulations on your new
                {{User.UserAttributes.Activity}} record of
                {{User.UserAttributes.PersonalRecord}}!
When Amazon Pinpoint sends this message, the content varies for each recipient after the variables are replaced. Possible final messages are:
Hi Jane Doe, congratulations on your new half marathon record of
            1:42:17!
Or:
Hi John Doe, congratulations on your new 5K record of 20:52!
Test the message
Amazon Pinpoint can display a preview of an email message that you can view before you schedule the message to be sent. For email and other types of messages, you can also send a test message to a small group of recipients for testing purposes. You can send test messages in the following channels —email, push notification, in-app notification, or SMS.
Previewing an email message without sending it
The Design view in the Amazon Pinpoint message editor shows a preview of an email message as it would appear if it was rendered by your web browser.
If you're working in HTML view, instead of Design view, you can display a preview of an email message next to the HTML content of the message. This feature is helpful when you want to verify that a message renders as you expect, before you send a test.
Note that this preview only shows how the message would appear if it was rendered by your web browser. As a best practice, you should still send test emails to several recipients and view those test messages by using a variety of devices and email clients.
To preview an email
-
In the area above the HTML view of the message editor, choose No preview, and then choose Preview. Amazon Pinpoint displays a preview pane next to the HTML editor.
-
(Optional) To display the HTML content and the preview in a larger window, choose Fullscreen in the area above the message editor.
Sending a test message
It's often helpful to send a test message to actual recipients to make sure that your message appears correctly when your customers receive it. By sending a test version of a message, you can test incremental improvements to the content and appearance of your message without impacting the status of your campaign.
When you send test messages, consider the following factors:
-
You're charged for sending test messages as if they were regular campaign messages. For example, if you send 10,000 test emails in a month, you're charged $1.00 (USD) for sending the test emails. For more information about pricing, see Amazon Pinpoint pricing
. -
Test messages count toward your account's sending quotas. For example, if your account is authorized to send 10,000 emails per 24-hour period, and you send 100 test emails, you can send up to 9,900 additional emails in the same 24-hour period.
-
When you send a test message to specific users, you can specify up to 10 addresses. Use commas to separate multiple addresses.
Note
The word "address" (as it's used in this section) can refer to any of the following: an email address, a mobile phone number, an endpoint ID, or a device token.
-
When you send a test SMS message to specific phone numbers, the numbers must be listed in E.164 format. That is, they must include a plus sign (+), the country code without a leading zero, and the complete subscriber number, including area code—for example, +12065550142. E.164-formatted numbers shouldn't contain parentheses, periods, hyphens, or any symbols other than the plus sign. E.164 phone numbers can have a maximum of 15 digits.
-
When you send a test push notification, the addresses must be either endpoint IDs or device tokens.
-
When you send a test in-app notification, the test message is only active for 30 minutes after you send it. Also, if you send multiple test messages to the same endpoint, the new message overrides all previous messages. Finally, when you remove an endpoint from a test message, the message is no longer available for that endpoint.
-
When you send a test message to a segment, you can only choose one segment. Additionally, you can only choose segments that contain 100 endpoints or fewer.
-
When you send a test message to a segment, Amazon Pinpoint creates a campaign for that test. The name of the campaign contains the word "test", followed by four random alphanumeric characters, followed by the name of the campaign. These campaigns aren't counted toward the maximum number of active campaigns that your account can contain. Amazon Pinpoint doesn't create a new campaign when you send a test message to specific recipients.
-
Events that are associated with test messages are counted in the metrics for the parent campaign. For example, the Endpoint deliveries chart on the Campaigns analytics page includes the number of test messages that were successfully delivered.
There are two ways to send a test message. You can send it to an existing segment or you can send it to a list of addresses that you specify. The method that you should choose depends on your use case. For example, if you have a regular group of people who test your messages, you might find it helpful to create a segment that contains all of their endpoints. If you need to send test messages to a group of testers that changes regularly, or to a dynamically generated address, you might want to specify your recipients manually.
To send a test message to a segment
-
Under the message editor, choose Send a test message.
-
In the Send a test message dialog box, under Send a test message to, choose A segment.
-
Use the dropdown list to choose the segment that you want to send the test message to.
Note
Amazon Pinpoint automatically excludes all segments that contain 100 endpoints or more from this list.
-
Choose Send message.
To send a test message to specific recipients
-
Under the message editor, choose Send a test message.
-
In the Send a test message dialog box, under Send a test message to, choose one of the options in the following table.
If you're sending... Choose... And then enter... An email Email addresses A comma-separated list of valid email addresses. An in-app message Either Endpoint IDs or A Segment. A comma-separated list of endpoint IDs, or a single segment. You can also build a new segment for the test. An SMS message Phone numbers A comma-separated list of E.164-formatted phone numbers. A mobile push notification Either Endpoint IDs or Device tokens A comma-separated list of endpoint IDs or device tokens, depending on the type of address you chose. -
Choose Send message.
Next
