End of support notice: On October 30, 2026, AWS will end support for Amazon Pinpoint. After October 30, 2026, you will no longer be able to access the Amazon Pinpoint console or Amazon Pinpoint resources (endpoints, segments, campaigns, journeys, and analytics). For more information, see Amazon Pinpoint end of support. Note: APIs related to SMS, voice, mobile push, OTP, and phone number validate are not impacted by this change and are supported by AWS End User Messaging.
Importing segments
With Amazon Pinpoint, you can define a user segment by importing a file that contains information about the users who belong to the segment. Importing segments is useful if you define user segments outside of Amazon Pinpoint but you want to engage your users with Amazon Pinpoint campaigns.
Unlike the dynamic segments that you create with the segment builder in the console, an imported segment is an unchanging set of endpoints or user IDs:
- Endpoint
-
A destination that you can send messages to, such as an email address, mobile device identifier, or mobile phone number. An endpoint definition can include attributes that describe the user or device that you send messages to. It can also include a user ID.
You can define a segment by importing a list of endpoint definitions. Amazon Pinpoint creates the segment, and it updates any endpoints that you previously added to Amazon Pinpoint with the new information.
- User ID
-
An ID that represents an individual user in your audience. This ID must be assigned to one or more endpoints. For example, if a person uses your app on more than one device, your app could assign that person's user ID to the endpoint for each device.
You can define a segment by importing user IDs only if you've added the endpoints that are associated with the user IDs to Amazon Pinpoint.
An imported segment consists of endpoints, user IDs, or a combination of both. When you use Amazon Pinpoint to send a message to the segment, the potential destinations include:
-
Each endpoint that you list in the imported file.
-
Each endpoint that's associated with each user ID that you list in the imported file.
When you create a new segment, you can use an imported segment as the base segment. You can then apply filters to the base segment to refine it according to your needs.
Imported segment considerations
Consider the following factors when you create imported segments:
-
When you create a campaign, you must choose a segment. When you choose a dynamic segment, Amazon Pinpoint provides an estimate of the size of that segment. However, when you choose an imported segment, Amazon Pinpoint can't provide an estimate.
-
If you create a campaign that sends messages when certain events happen, you can't use imported segments. Event-based campaigns can only use dynamic segments. For more information about creating dynamic segments, see Building segments.
Segment files
You define the endpoints or user IDs that belong to your segment in a comma-separated values (CSV) or JSON file. Then, you import the file into Amazon Pinpoint to create the segment.
When you import a segment, remember the following:
-
Amazon Pinpoint can't import compressed files.
-
The files that you import must use UTF-8 character encoding.
-
If you're importing new endpoints, the
AddressandChannelTypeattributes are required. -
If you're updating existing endpoints, the
Idattribute is required for each endpoint that you want to update. -
Your endpoint definitions can include only certain attributes. For a list, see Supported attributes. In addition, an attribute name must be 50 or fewer characters. An attribute value must be 100 or fewer characters.
Example segment files
The example files in this section are based on the following data:
| ChannelType | Address | Location.Country | Demographic.Platform | Demographic.Make | User.UserId |
|---|---|---|---|---|---|
| SMS | +16045550182 | CA | Android | LG | example-user-id-1 |
| APNS | 1a2b3c4d5e6f7g8h9i0j1a2b3c4d5e6f | US | iOS | Apple | example-user-id-2 |
| john.stiles@example.com | US | iOS | Apple | example-user-id-2 | |
| GCM | 4d5e6f1a2b3c4d5e6f7g8h9i0j1a2b3c | CN | Android | example-user-id-3 | |
| wang.xiulan@example.com | CN | Android | OnePlus | example-user-id-3 |
Each row in this table represents an individual endpoint. Note that the user IDs
example-user-id-2 and example-user-id-3 are assigned
to two endpoints each.
Example File with endpoint definitions
Importing a segment
There are two ways to import segments into Amazon Pinpoint: you can upload files directly from your computer, or you can import files that are stored in an Amazon Simple Storage Service (Amazon S3) bucket.
We recommend that you upload files from your computer, especially if you already have the customer data on your computer. However, you can import only 10 files at a time, and you can only upload files that are smaller than 1 gigabyte (GB).
If you need to import more than 10 files at once, or if you need to upload files that are larger than 1 GB, then you should import files from Amazon S3. The Amazon S3 import option is also useful if you already have processes that send customer data files to Amazon S3 for storage.
This section includes procedures for importing segments by using both of these methods.
You can create segments by uploading up to 10 files directly from your computer. The files that you upload can be in CSV or JSON format. You can upload files in any combination of formats. For example, you can upload one JSON file and three CSV files.
To import a segment
Open the Amazon Pinpoint console at https://console.aws.amazon.com/pinpoint/
. -
On the All projects page, choose the project that you want to add the segment to.
-
In the navigation pane, choose Segments.
-
Choose Create a segment.
-
Under Create a segment, choose Import a segment.
-
Under Import method, choose Upload files from your computer.
-
Under Files to import, select Choose files. Select the file or files that you want to import.
Note
You can also drag files from your computer's file explorer and drop them directly on the Drop files here area.
-
When you upload files to Amazon Pinpoint, you have to provide a segment name for each file that you import. Under Segment names, enter a segment name for each file that you want to import.
By default, Amazon Pinpoint provides a segment name that is equal to the name of the imported file, but without the file name extension. You can change these default values to any name.
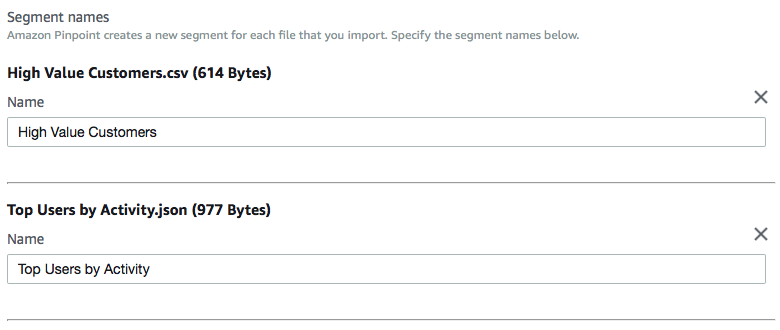
Note
You can use the same name for multiple segments. If you do, Amazon Pinpoint creates a distinct segment for each file, and assigns a unique ID to each file. The creation date is also slightly different for each file that you import. You can use these factors to distinguish between segments that have the same name.
-
When you finish, choose Create segment.
Before you use this procedure to import a segment, you must first create an Amazon S3 bucket and upload your file to that bucket. You can organize the files for different segments into separate folders. When Amazon Pinpoint imports the endpoints or user IDs for a segment, it includes the files within all folders and subfolders that belong to the Amazon S3 location that you specify.
For an introduction to creating buckets and uploading objects, see the What is Amazon S3? in the Amazon Simple Storage Service User Guide.
Amazon Pinpoint can import only one file format (CSV or JSON) per segment, so the Amazon S3 path that you specify should only contain files of a single type.
To import a segment
Open the Amazon Pinpoint console at https://console.aws.amazon.com/pinpoint/
. -
On the All projects page, choose the project that you want to add the segment to.
-
In the navigation pane, choose Segments.
-
Choose Create a segment.
-
Under Create a segment, choose Import a segment.
-
For Segment name, enter a name for your segment.
-
For Amazon S3 URL, enter the location of the Amazon S3 bucket that contains the file for your segment. The address of the bucket must be in the following format:
s3://bucket-name/folder-nameAmazon Pinpoint imports the files from the path that you specify, and from any subfolders in that path.
-
For IAM role, complete one of the following steps:
-
If you want to have Amazon Pinpoint create a role that allows it to read from an Amazon S3 bucket, choose Automatically create a role. Then, for IAM role, enter a name for the role that you're creating.
-
If you've already created an IAM role that allows Amazon Pinpoint to read from an Amazon S3 bucket, choose Choose an existing role. Then, for IAM role, choose a role that contains the appropriate permissions.
If you want to create the IAM role yourself, see IAM role for importing endpoints or segments in the Amazon Pinpoint Developer Guide. After you create the role, specify it in the Amazon Pinpoint console.
-
-
Under What type of file are you importing, choose either JavaScript Object Notation (JSON) or Comma-Separated Values (CSV), depending on the format the file that you uploaded to Amazon S3.
-
Choose Create segment.
Supported attributes
The table in this section lists and describes the attributes that you can specify, in endpoint definitions, that you import into Amazon Pinpoint. If you import segments by using CSV files, the headers in the file should match the names shown in the Attribute column.
For JSON files, a period in the attribute name indicates that the name following the
period is an object that's nested in a parent object with a name that's equal to the
value preceding the period. For example, a JSON file that contains the
Demographic.Make and Demographic.Model attributes has the
following structure:
{
...
"Demographic": {
  ...
  "Make":"Apple",
  "Model":"iPhone"
  ...
  }
...
}
The full JSON structure closely resembles the example endpoint request in the Amazon Pinpoint API Reference. However, not all attributes in the Endpoint request
schema are supported when you import segments, including EndpointStatus and
EffectiveDate.
For a custom field to have multiple values in CSV, you must replicate the header and keep one value per header. For example:
...,User.UserId, User.UserAttributes.new_multi_field,User.UserAttributes.new_multi_field
...,example-user-id-2,test10,test20
You can replace attribute names that are shown as
custom_attributeFirstName and LastName, you can create custom attributes
named User.UserAttributes.FirstName and
User.UserAttributes.LastName, respectively. An attribute name can
contain up to 50 characters. An attribute value can contain up to 100 characters.
Attribute names are case sensitive.
In JSON, the custom attribute must be formatted at
"Attributes":{"Ride":["Bus"]}.
| Attribute | Description | ||||||
|---|---|---|---|---|---|---|---|
Address |
The unique destination address for messages or push notifications that you send to the endpoint—for example, an email address, phone number, or device token. NoteIf the endpoint address is a phone number, you must specify it
in E.164 format. For more information about the E.164 format,
see E.164 |
||||||
Attributes. |
A custom attribute that describes the endpoint. You can use this type
of attribute as selection criteria when you create a segment. You can
replace |
||||||
ChannelType |
The channel to use when sending messages or push notifications to the
endpoint. For example:
|
||||||
Demographic.AppVersion |
The version number of the application that's associated with the endpoint. | ||||||
Demographic.Locale |
The locale of the endpoint, in the following format: the ISO 639-1
alpha-2en_US is the
English language locale for the United States. |
||||||
Demographic.Make |
The manufacturer of the endpoint device, such as apple
or samsung. |
||||||
Demographic.Model |
The model name or number of the endpoint device, such as
iPhone or SM-G900F. |
||||||
Demographic.ModelVersion |
The model version of the endpoint device. | ||||||
Demographic.Platform |
The operating system on the endpoint device, such as ios
or android. |
||||||
Demographic.PlatformVersion |
The version of the operating system on the endpoint device. | ||||||
Demographic.Timezone |
The endpoint's time zone, as a tz databaseAmerica/Los_Angeles for Pacific Time (North
America).NoteThe following time zones are no longer supported and are automatically remapped to supported time zones.
|
||||||
EffectiveDate |
The date and time when the endpoint was last updated, in ISO 8601
format2019-08-23T10:54:35.220Z for
10:54 AM UTC August 23, 2019. |
||||||
Id |
A unique identifier for the endpoint. | ||||||
Location.City |
The city where the endpoint is located. | ||||||
Location.Country |
The two-character code, in ISO 3166-1
alpha-2 formatUS for the United States. |
||||||
Location.Latitude |
The latitude coordinate of the endpoint's location, rounded to one decimal place. | ||||||
Location.Longitude |
The longitude coordinate of the endpoint's location, rounded to one decimal place. | ||||||
Location.PostalCode |
The postal or ZIP code for the area where the endpoint is located. | ||||||
Location.Region |
The name of the region, such as a state or province, where the endpoint is located. | ||||||
Metrics. |
A custom numeric metric that your application reports to Amazon Pinpoint for
the endpoint—for example, the number of sessions or number of
items left in a cart—to use for segmentation purposes. You can
replace These custom values can only be numeric. Because they're numeric, Amazon Pinpoint can perform arithmetic operations, such as average or sum, on them. |
||||||
OptOut |
Indicates whether a user opted out of receiving messages and push
notifications from you. Acceptable values are: ALL, the
user opted out and doesn't want to receive any messages or push
notifications, or NONE, the user hasn't opted out and wants
to receive all messages and push notifications. |
||||||
RequestId |
The unique identifier for the most recent request to update the endpoint. | ||||||
User.UserAttributes. |
A custom attribute that describes the user. You can replace
FirstName or Age. |
||||||
User.UserId |
A unique identifier for the user. |
You can create as many as 250 custom attributes for endpoints and users in each project. For more information, see Amazon Pinpoint quotas in the Amazon Pinpoint Developer Guide.
