Assess application readiness for migration to the AWS Cloud by using CAST Highlight
Greg Rivera, Amazon Web Services
Summary
CAST Highlight is a software as a service (SaaS) solution for performing rapid application portfolio analysis. This pattern describes how to configure and use CAST Highlight to assess the cloud readiness of custom software applications across an organization’s IT portfolio, and to plan for modernization or migration to the Amazon Web Services (AWS) Cloud.
CAST Highlight generates insights into an application’s cloud readiness, identifies code blockers that need to be removed before a migration, estimates the effort to remove these blockers, and recommends AWS services that individual applications could use after the migration.
This pattern describes the procedure for setting up and using CAST Highlight, which consists of five steps: new user setup, application management, campaign management, source code analysis, and results analysis. You must complete all the steps in the Epics section of this pattern to ensure a successful application scan and analysis.
Prerequisites and limitations
Prerequisites
An active CAST Highlight account with Portfolio Manager permissions.
At least 300 MB free disk space and 4 GB memory on your local computer to install the CAST Highlight Local Agent.
Microsoft Windows 8 or later.
Your application source code must be stored in text files that are accessible from the machine where the Local Agent is installed. No source code leaves the premises and all code is locally scanned.
Architecture
The following diagram illustrates the workflow for using CAST Highlight.
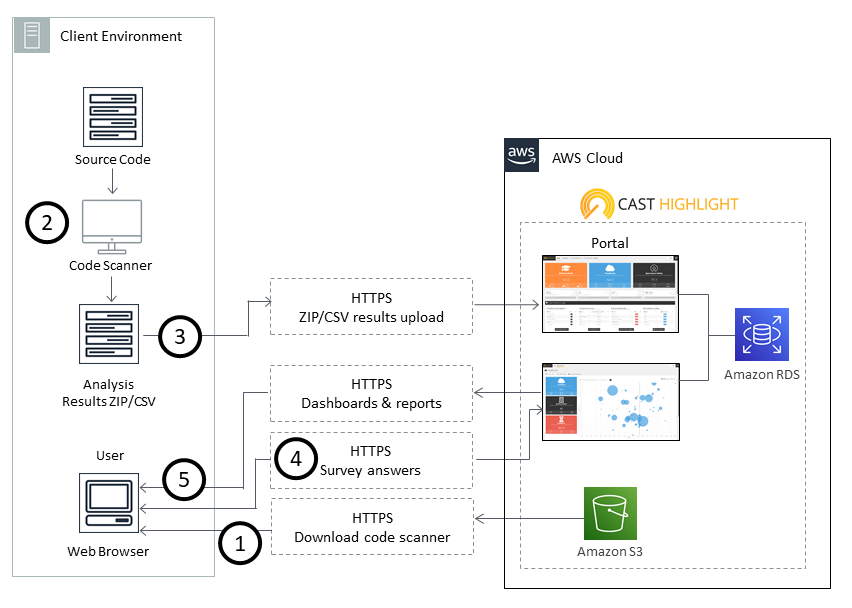
The workflow consists of the following steps:
Log in to the CAST Highlight portal, download the Local Agent, and install it on your local computer. Amazon Simple Storage Service (Amazon S3) stores the Local Agent installation package.
Scan your source code files and produce a results file.
Important
Upload the results file to the CAST Highlight portal. : No source code is included in the results file.
Answer survey questions for each application that you scanned.
View the dashboards and reports available in the CAST Highlight portal. Amazon Relational Database Service (Amazon RDS) stores the code scan, analysis results, and the CAST Highlight software data.
Technology stack
CAST Highlight supports the following technologies to analyze application cloud readiness:
Java
COBOL
C#
C++
Clojure
PHP
JavaScript
TypeScript
Python
Microsoft Transact-SQL
VB.Net
Kotlin
Scala
Swift
Automation and scale
A CLI analyzer
can be used to automate the CAST Highlight analysis process.
Tools
No tools are required for this pattern if all the prerequisites are met. However, you can choose to use optional tools, such as source code management (SCM) utilities, code extractors, or other tools to manage your source code files.
Epics
| Task | Description | Skills required |
|---|---|---|
Activate your CAST Highlight account and choose your password. | All first-time CAST Highlight users receive an account activation email. Follow the activation link to activate your CAST Highlight account and enter a password to complete the activation process. | N/A |
Log in to the CAST Highlight portal. | The CAST Highlight homepage appears after you enter your new password. Log in to the CAST Highlight portal with your user credentials. | N/A |
| Task | Description | Skills required |
|---|---|---|
Create an application record. | In the CAST Highlight portal, navigate to the Manage Application tab in the Manage Portfolio section. In the Applications tile at the top of the screen, choose Add. | N/A |
Choose an application name. | Enter a name for your application, and then choose Save. This name is used for your application record in CAST Highlight. | N/A |
Repeat the steps for all applications. | Repeat these steps for each application that you want to scan. | N/A |
| Task | Description | Skills required |
|---|---|---|
Create a campaign. | CAST Highlight uses "campaign" to describe a set of applications that will be analyzed at a specific time. In the CAST Highlight portal, navigate to the Manage Campaigns tab in the Manage Portfolio section. Choose Create Campaign to launch the campaign creation screen. | N/A |
Enter a name and choose a closing date for the campaign. | Enter a name for your campaign and choose a closing date for it. ImportantContributors cannot submit application analysis results after the campaign’s closing date. | N/A |
Decide to include source code scan, survey answers, and domain and application scope. | Choose one or more of the standard surveys that are used to enhance the source code analysis data with qualitative information. The survey categories are Business impact, Software maintenance effort, CloudReady, Application properties, and Green Impact. Choose the domain and applications that are analyzed during the campaign. ImportantMake sure that you add all applications you want to scan in the Manage Applications section before you begin the campaign. | N/A |
Customize the launch message. | Customize the launch message that will be sent by email to all contributors associated with the applications in the campaign. | N/A |
Launch the campaign. | Choose Complete to launch the campaign. | N/A |
| Task | Description | Skills required |
|---|---|---|
Download the CAST Highlight Local Agent. | In the CAST Highlight portal, choose Application Scans and download the Local Agent to your local computer. | N/A |
Install the Local Agent. | Launch the CASTHighlightSetup.exe installation program and follow the setup instructions that appear. After the Local Agent is installed, you are ready to analyze your applications. | N/A |
Define the scope of the Local Agent code scan. | The code analysis is performed at the file level and doesn't consider the logical links or dependencies among files. All files are considered equal and part of the application. To provide accurate and consistent results, prepare your code scan scope by using the file or folder exclusion features available in the Local Agent. | N/A |
Include open-source or COTS packages. | (Optional) If you want to include open-source or commercial off-the-shelf (COTS) packages, make sure they're included in the folders that you’re planning to scan. Typically, external libraries are grouped in a subfolder called "third-party" or something similar, and the main code is often located in the "src/main" file folder. | N/A |
Exclude test classes. | Test classes are typically excluded from the source code analysis because they are generally not part of the compiled application. However, you can choose to include them in the scan if required. | N/A |
Exclude SCM, build, and deployment folders. | For more consistent results, you should avoid including SCM, build, or deployment folders (for example, .git or .svn files) in your scan. | N/A |
Include dependency files. | If you want insights into frameworks and dependencies whose physical files are not part of the folder you're scanning, then make sure you include the dependency files (such as pom.xml, build.gradle, package.json, or .vcsproj files). | N/A |
Invoke the Local Agent. | Run the Local Agent on your local Windows machine. | N/A |
Choose the folder that contains your source code. | Choose the folder that contains your source code. You can add multiple folders to be discovered by the Local Agent. Although the Local Agent does support source discovery through network paths, you should make sure source folders are located on your local machine. ImportantWe recommend running multiple scans if there are more than 10,000 files in your source folders. | N/A |
Start file discovery. | On the Local Agent dashboard, choose Discover Files. The Local Agent discovers files in your folders and subfolders, and detects their technologies. You can choose the Cancel button to cancel the discovery at any time. After the file discovery finishes, the Local Agent lists the folders and files that were found. The Technologies column shows associated technologies and file count. The Path column shows the location of the folders and files. | N/A |
Refine the source code scan configuration. | (Optional) To refine the Local Agent scan, you can deactivate one or more technologies for a specific folder or file. If all technologies are deactivated, your folder or file will be excluded from the scan’s scope. To deactivate technologies, choose the yellow label of the technology you want to deactivate. You can also choose the filter icon when hovering over a file or a folder to associate a technology with a specific file or folder. These settings are saved and speed up the discovery process for the folder or file. | N/A |
Start source code scan. | After you configure your scan, choose "Scan Files" to begin the scanning process. | N/A |
Check for green or grey labels. | After the source code scan is complete, a status label is shown at folder and file levels. A green label means that files were correctly scanned with the associated technology. A grey label means that files were not scanned and are excluded. The reason for their exclusion is shown when you hover over the label of each file. Possible reasons for file exclusion include binary files, unreadable files, missing files, external library, encoded files, generated files, syntax errors, content that isn’t in the expected language, code that isn’t compliant with enough analysis criteria, files that exceed the size limit (10 MB), timeout issues, or unavailability of the analyzer. | N/A |
Modify the scan configuration and scan code again. | (Optional) You can modify your scan configuration settings and choose Scan Files to scan the files again. | N/A |
Confirm scan results. | Choose Confirm Results if the scan results meet your requirements. | N/A |
View frameworks and software libraries found by the Local Agent. | View the frameworks and software libraries used or referenced by your applications, and discovered by the Local Agent during the code scan. You can keep or ignore elements from these lists by choosing their individual switch button. Choose Confirm dependencies to proceed. ImportantIf a framework is turned off, it is not listed in the CAST Highlight portal or attached to your application. | N/A |
Save code scan results. | The Local Agent displays a summary of your code scan results grouped by technology. Choose Save and specify the folder you want the results to be saved to. The Local Agent generates one .zip file per scan, which contains all the analysis results. Depending on the number of distinct technologies and root source folders, the Local Agent automatically generates one or several .csv files with the FolderName.Technology.date.csv naming structure. | N/A |
Upload the code scan results to the CAST Highlight portal. | In the CAST Highlight portal, choose the applications you analyzed in the Application Scans section. Choose Upload Results and choose the .csv files. You can also upload the .csv files individually. After each file is uploaded, a record of the upload appears on your screen. | N/A |
Delete analysis result files, if required. | (Optional) An analysis results file can be deleted at any time during the upload process by choosing the trash can icon. ImportantOnly users with Portfolio Manager privileges or the contributor who uploaded the results can delete the results. | N/A |
Answer application survey. | A Survey button appears on applications that require a survey. Choose Survey, answer the questions for each section of the survey, and choose Submit after you finish. The progress of your survey is displayed at the top of your screen. You are able to submit your results after all mandatory information is submitted. However, you can enrich the data in your organization’s CAST Highlight instance by answering all the questions. | N/A |
Submit code scan results. | After you upload all the .csv result files for the application and complete the survey questions, choose Submit in the Application Scans section. This step is required to complete the process and ensure that the results are available in the CAST Highlight portal. | N/A |
| Task | Description | Skills required |
|---|---|---|
View CAST Highlight portal homepage. | The CAST Highlight portal homepage includes tiles that have high-level information about your application portfolio, such as software health, CloudReady, and open-source safety scores for your entire portfolio. The homepage also includes the number of onboarded applications. For more information about the CAST Highlight metrics definitions and measurement methodology, see CAST Highlight – Metrics and methodology (Microsoft PowerPoint presentation). | N/A |
View the CloudReady dashboard. | Choose the CloudReady tile to open the CloudReady dashboard. This is the primary portfolio-level dashboard for assessing the cloud readiness of your applications. It helps you plan and develop a portfolio roadmap for your cloud migration | N/A |
View the Portfolio Advisor for Cloud dashboard. | The Portfolio Advisor for Cloud dashboard automatically segments applications into recommended migration categories. Segmentation is based on the technical characteristics of each application. Factors include the source code analysis (cloud readiness, software resiliency, and more) and the business impact, which comes from the survey. In the upper right, choose Compute to generate the initial segmentation recommendations. The bubbles in the charts at the top of the dashboard represent each application in the portfolio, organized by the recommended segmentation. Each application is also listed in a data table below the charts, including relevant metrics for each application. The possible segments that are recommended include:
| N/A |
Modify segmentation recommendations. | In some cases, you might choose to change the segment recommended by CAST Highlight. You can do this by browsing to the application in the data table and selecting a different segment from the drop-down list next to the application name. Then choose Save in the upper right to save your changes. You can also export this data at any time by choosing Export in the upper right. | N/A |
Choose an application to analyze. | On the Portfolio Advisor for Cloud dashboard, choose an application bubble to analyze that application. Choose the name of the application in the table after the bubble chart to begin the deeper analysis. Different dashboards are available to analyze individual applications, such as Code Insights (software health patterns), Trends, and Software Composition (open-source risks). | N/A |
Analyze the CloudReady results of an individual application. | Choose the CloudReady tab, which shows the application's overall CloudReady score. This score is a weighted average based on a combination of the CloudReady survey answers and the CloudReady code scan. The answers to the survey questions appear in the table below the tiles. Choose CloudReady Code Scan to view the code scan results. There is a list of CloudReady patterns that the application code was scanned for. This list includes the following columns:
| N/A |
Export data to Microsoft Excel. | (Optional) Choose Export to Excel to export the data for further analysis. The application analysis results data can be used to further analyze the cloud readiness of an application and determine what code must to be updated before a migration. | N/A |
View recommendations. | Choose Recommendations next to CloudReady Code Scan to view the Cloud Service Recommendations screen. This identifies AWS services that the application could adopt based on its characteristics. Repeat this step to view recommendations for all the applications that you analyzed. | N/A |
Related resources
Campaign management
Source code analysis
Other resources
