Step 4: Analyze an image with your model
You analyze an image by calling the DetectCustomLabels API. In this step, you use the
detect-custom-labels AWS Command Line Interface (AWS CLI) command to analyze an example
image. You get the AWS CLI command from the Amazon Rekognition Custom Labels console. The console configures
the AWS CLI command to use your model. You only need to supply an image that's stored in
an Amazon S3 bucket. This topic provides an image that you can use for each example project.
Note
The console also provides Python example code.
The output from detect-custom-labels includes a list of labels found in
the image, bounding boxes (if the model finds object locations), and the confidence that
the model has in the accuracy of the predictions.
For more information, see Analyzing an image with a trained model.
To analyze an image (console)
-
<textobject><phrase>Model status showing as Running, with Stop button to stop the running model.</phrase></textobject>
If you haven't already, set up the AWS CLI. For instructions, see Step 4: Set up the AWS CLI and AWS SDKs.
-
If you haven't already, start running your model. For more information, see Step 3: Start your model.
-
Choose the Use Model tab and then choose API code. The model status panel shown below shows the model as Running, with a Stop button to stop the running model, and an option to display the API.

Choose AWS CLI command.
-
In the Analyze image section, copy the AWS CLI command that calls
detect-custom-labels. The following image of the Rekognition console shows the "Analyze Image" section with the AWS CLI command to detect custom labels on an image using a machine learning model, and instructions to start the model and provide image details.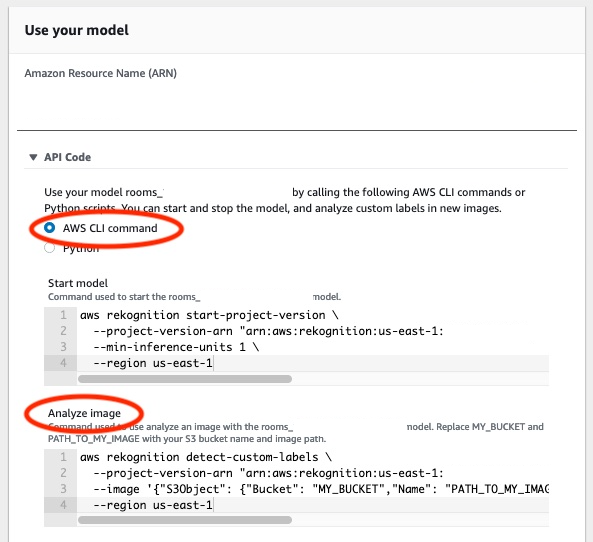
-
Upload an example image to an Amazon S3 bucket. For instructions, see Getting an example image.
-
At the command prompt, enter the AWS CLI command that you copied in the previous step. It should look like the following example.
The value of
--project-version-arnshould be Amazon Resource Name (ARN) of your model. The value of--regionshould be the AWS Region in which you created the model.Change
MY_BUCKETandPATH_TO_MY_IMAGEto the Amazon S3 bucket and image that you used in the previous step.If you are using the custom-labels-access profile to get credentials, add the
--profile custom-labels-accessparameter.aws rekognition detect-custom-labels \ --project-version-arn "model_arn" \ --image '{"S3Object": {"Bucket": "MY_BUCKET","Name": "PATH_TO_MY_IMAGE"}}' \ --regionus-east-1\ --profile custom-labels-accessIf the model finds objects, scenes, and concepts, the JSON output from the AWS CLI command should look similar to the following.
Nameis the name of the image-level label that the model found.Confidence(0-100) is the model's confidence in the accuracy of the prediction.{ "CustomLabels": [ { "Name": "living_space", "Confidence": 83.41299819946289 } ] }If the model finds object locations or finds brand, labeled bounding boxes are returned.
BoundingBoxcontains the location of a box that surrounds the object.Nameis the object that the model found in the bounding box.Confidenceis the model's confidence that the bounding box contains the object.{ "CustomLabels": [ { "Name": "textract", "Confidence": 87.7729721069336, "Geometry": { "BoundingBox": { "Width": 0.198987677693367, "Height": 0.31296101212501526, "Left": 0.07924537360668182, "Top": 0.4037395715713501 } } } ] } -
Continue to use the model to analyze other images. Stop the model if you are no longer using it. For more information, see Step 5: Stop your model.
Getting an example image
You can use the following images with the DetectCustomLabels
operation. There is one image for each project. To use the images, you upload them
to an S3 bucket.
To use an example image
-
Right-click the following image that matches the example project that you are using. Then choose Save image to save the image to your computer. The menu option might be different, depending on which browser you are using.
-
Upload the image to an Amazon S3 bucket that's owned by your AWS account and is in the same AWS region in which you are using Amazon Rekognition Custom Labels.
For instructions, see Uploading Objects into Amazon S3 in the Amazon Simple Storage Service User Guide.
Image classification

Multi-label classification

Brand detection

Object localization

