Register a model version in the SageMaker AI model registry
With SageMaker Canvas, you can build multiple iterations, or versions, of your model to improve it over time. You might want to build a new version of your model if you acquire better training data or if you want to attempt to improve the model’s accuracy. For more information about adding versions to your model, see Update a model.
After you’ve built a model that you feel confident about, you might want to evaluate its performance and have it reviewed by a data scientist or MLOps engineer in your organization before using it in production. To do this, you can register your model versions to the SageMaker Model Registry. The SageMaker Model Registry is a repository that data scientists or engineers can use to catalog machine learning (ML) models and manage model versions and their associated metadata, such as training metrics. They can also manage and log the approval status of a model.
After you register your model versions to the SageMaker Model Registry, a data scientist or your
MLOps team can access the SageMaker Model Registry through SageMaker Studio Classic, which is a web-based
integrated development environment (IDE) for working with machine learning models. In
the SageMaker Model Registry interface in Studio Classic, the data scientist or MLOps team can
evaluate your model and update its approval status. If the model doesn’t perform to
their requirements, the data scientist or MLOps team can update the status to
Rejected. If the model does perform to their requirements, then the
data scientist or MLOps team can update the status to Approved. Then, they
can deploy your model
to an endpoint or automate model deployment
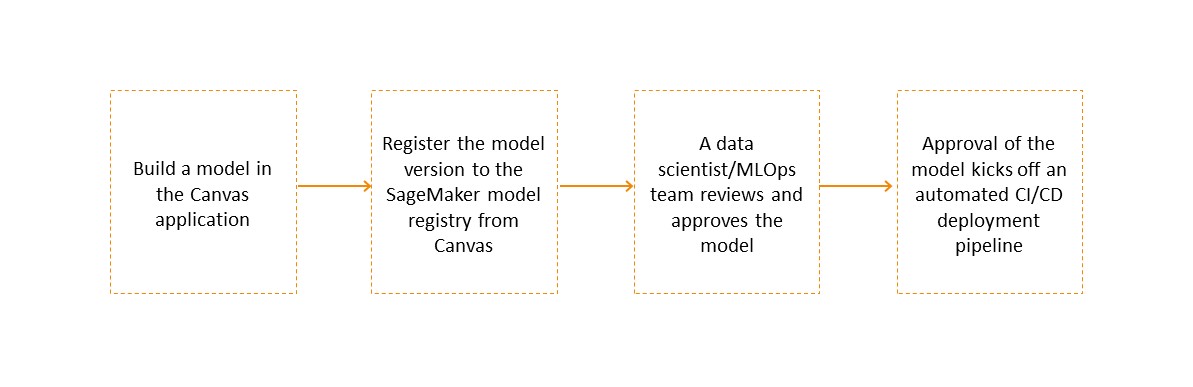
The following diagram summarizes an example of registering a model version built in Canvas to the SageMaker Model Registry for integration into an MLOps workflow.
You can register tabular, image, and text model versions to the SageMaker Model Registry. This includes time series forecasting models and JumpStart based fine-tuned foundation models.
Note
Currently, you can't register Amazon Bedrock based fine-tuned foundation models built in Canvas to the SageMaker Model Registry.
The following sections show you how to register a model version to the SageMaker Model Registry from Canvas.
Permissions management
By default, you have permissions to register model versions to the SageMaker Model Registry. SageMaker AI grants these permissions for all new and existing Canvas user profiles through the AmazonSageMakerCanvasFullAccess policy, which is attached to the AWS IAM execution role for the SageMaker AI domain that hosts your Canvas application.
If your Canvas administrator is setting up a new domain or user profile, when they're setting up the domain and following the prerequisite instructions in the Getting started guide, SageMaker AI turns on the model registration permissions through the ML Ops permissions configuration option, which is enabled by default.
The Canvas administrator can manage model registration permissions at the user profile level as well. For example, if the administrator wants to grant model registration permissions to some user profiles but remove permissions for others, they can edit the permissions for a specific user. The following procedure shows how to turn off model registration permissions for a specific user profile:
Open the SageMaker AI console at https://console.aws.amazon.com/sagemaker/
. -
On the left navigation pane, choose Admin configurations.
-
Under Admin configurations, choose domains.
From the list of domains, select the user profile’s domain.
On the domain details page, choose the User profile whose permissions you want to edit.
On the User Details page, choose Edit.
In the left navigation pane, choose Canvas settings.
In the ML Ops permissions configuration section, turn off the Enable Model Registry registration permissions toggle.
Choose Submit to save the changes to your domain settings.
The user profile should no longer have model registration permissions.
Register a model version to the SageMaker AI model registry
SageMaker Model Registry tracks all of the model versions that you build to solve a particular problem in a model group. When you build a SageMaker Canvas model and register it to SageMaker Model Registry, it gets added to a model group as a new model version. For example, if you build and register four versions of your model, then a data scientist or MLOps team working in the SageMaker Model Registry interface can view the model group and review all four versions of the model in one place.
When registering a Canvas model to the SageMaker Model Registry, a model group is automatically created and named after your Canvas model. Optionally, you can rename it to a name of your choice, or use an existing model group in the SageMaker Model Registry. For more information about creating a model group, see Create a Model Group.
Note
Currently, you can only register models built in Canvas to the SageMaker Model Registry in the same account.
To register a model version to the SageMaker Model Registry from the Canvas application, use the following procedure:
Open the SageMaker Canvas application.
In the left navigation pane, choose My models.
On the My models page, choose your model. You can Filter by problem type to find your model more easily.
After choosing your model, the Versions page opens, listing all of the versions of your model. You can turn on the Show advanced metrics toggle to view the advanced metrics, such as Recall and Precision, to compare your model versions and determine which one you’d like to register.
From the list of model versions, for the the version that you want to register, choose the More options icon (
 ). Alternatively, you can double click on the version that you need to register, and then on the version details page, choose the
More options icon (
).
). Alternatively, you can double click on the version that you need to register, and then on the version details page, choose the
More options icon (
).In the dropdown list, choose Add to Model Registry. The Add to Model Registry dialog box opens.
-
In the Add to Model Registry dialog box, do the following:
(Optional) In the SageMaker Studio Classic model group section, for the Model group name field, enter the name of the model group to which you want to register your version. You can specify the name for a new model group that SageMaker AI creates for you, or you can specify an existing model group. If you don’t specify this field, Canvas registers your version to a default model group with the same name as your model.
Choose Add.
Your model version should now be registered to the model group in the SageMaker Model Registry. When you register a model version to a model group in the SageMaker Model Registry, all subsequent versions of the Canvas model are registered to the same model group (if you choose to register them). If you register your versions to a different model group, you need to go to the SageMaker Model Registry and delete the model group. Then, you can re-register your model versions to the new model group.
To view the status of your models, you can return to the Versions page for your model in the Canvas application.
This page shows you the Model Registry status of each version. If the status is Registered, then the model has been successfully registered.
If you want to view the details of your registered model version, for the Model Registry status, you can hover over the Registered field to see the Model registry details pop-up box. These details contain more info, such as the following:
The Model package group name is the model group that your version is registered to in the SageMaker Model Registry.
The Approval status, which can be
Pending Approval,Approved, orRejected. If a Studio Classic user approves or rejects your version in the SageMaker Model Registry, then this status is updated on your model versions page when you refresh the page.
The following screenshot shows the Model registry details box, along with an Approval status of
Approved for this particular model version.

