Use linear traffic shifting
Linear traffic shifting enables you to gradually shift traffic from your old fleet (blue fleet) to your new fleet (green fleet). With linear traffic shifting, you can shift traffic in multiple steps, minimizing the chance of a disruption to your endpoint. This blue/green deployment option gives you the most granular control over traffic shifting.
You can choose either the number of instances or the percentage of the green fleet’s capacity to activate during each step. Each linear step should only be between 10-50% of the green fleet's capacity. For each step, there is a baking period during which your pre-specified Amazon CloudWatch alarms monitor metrics on the green fleet. Once the baking period finishes and no alarms trip, the active portion of your green fleet continues receiving traffic and a new step begins. If alarms trip during any of the baking periods, 100% of the endpoint traffic rolls back to the blue fleet.
The following diagram shows how linear traffic shifting routes traffic to the blue and green fleets.
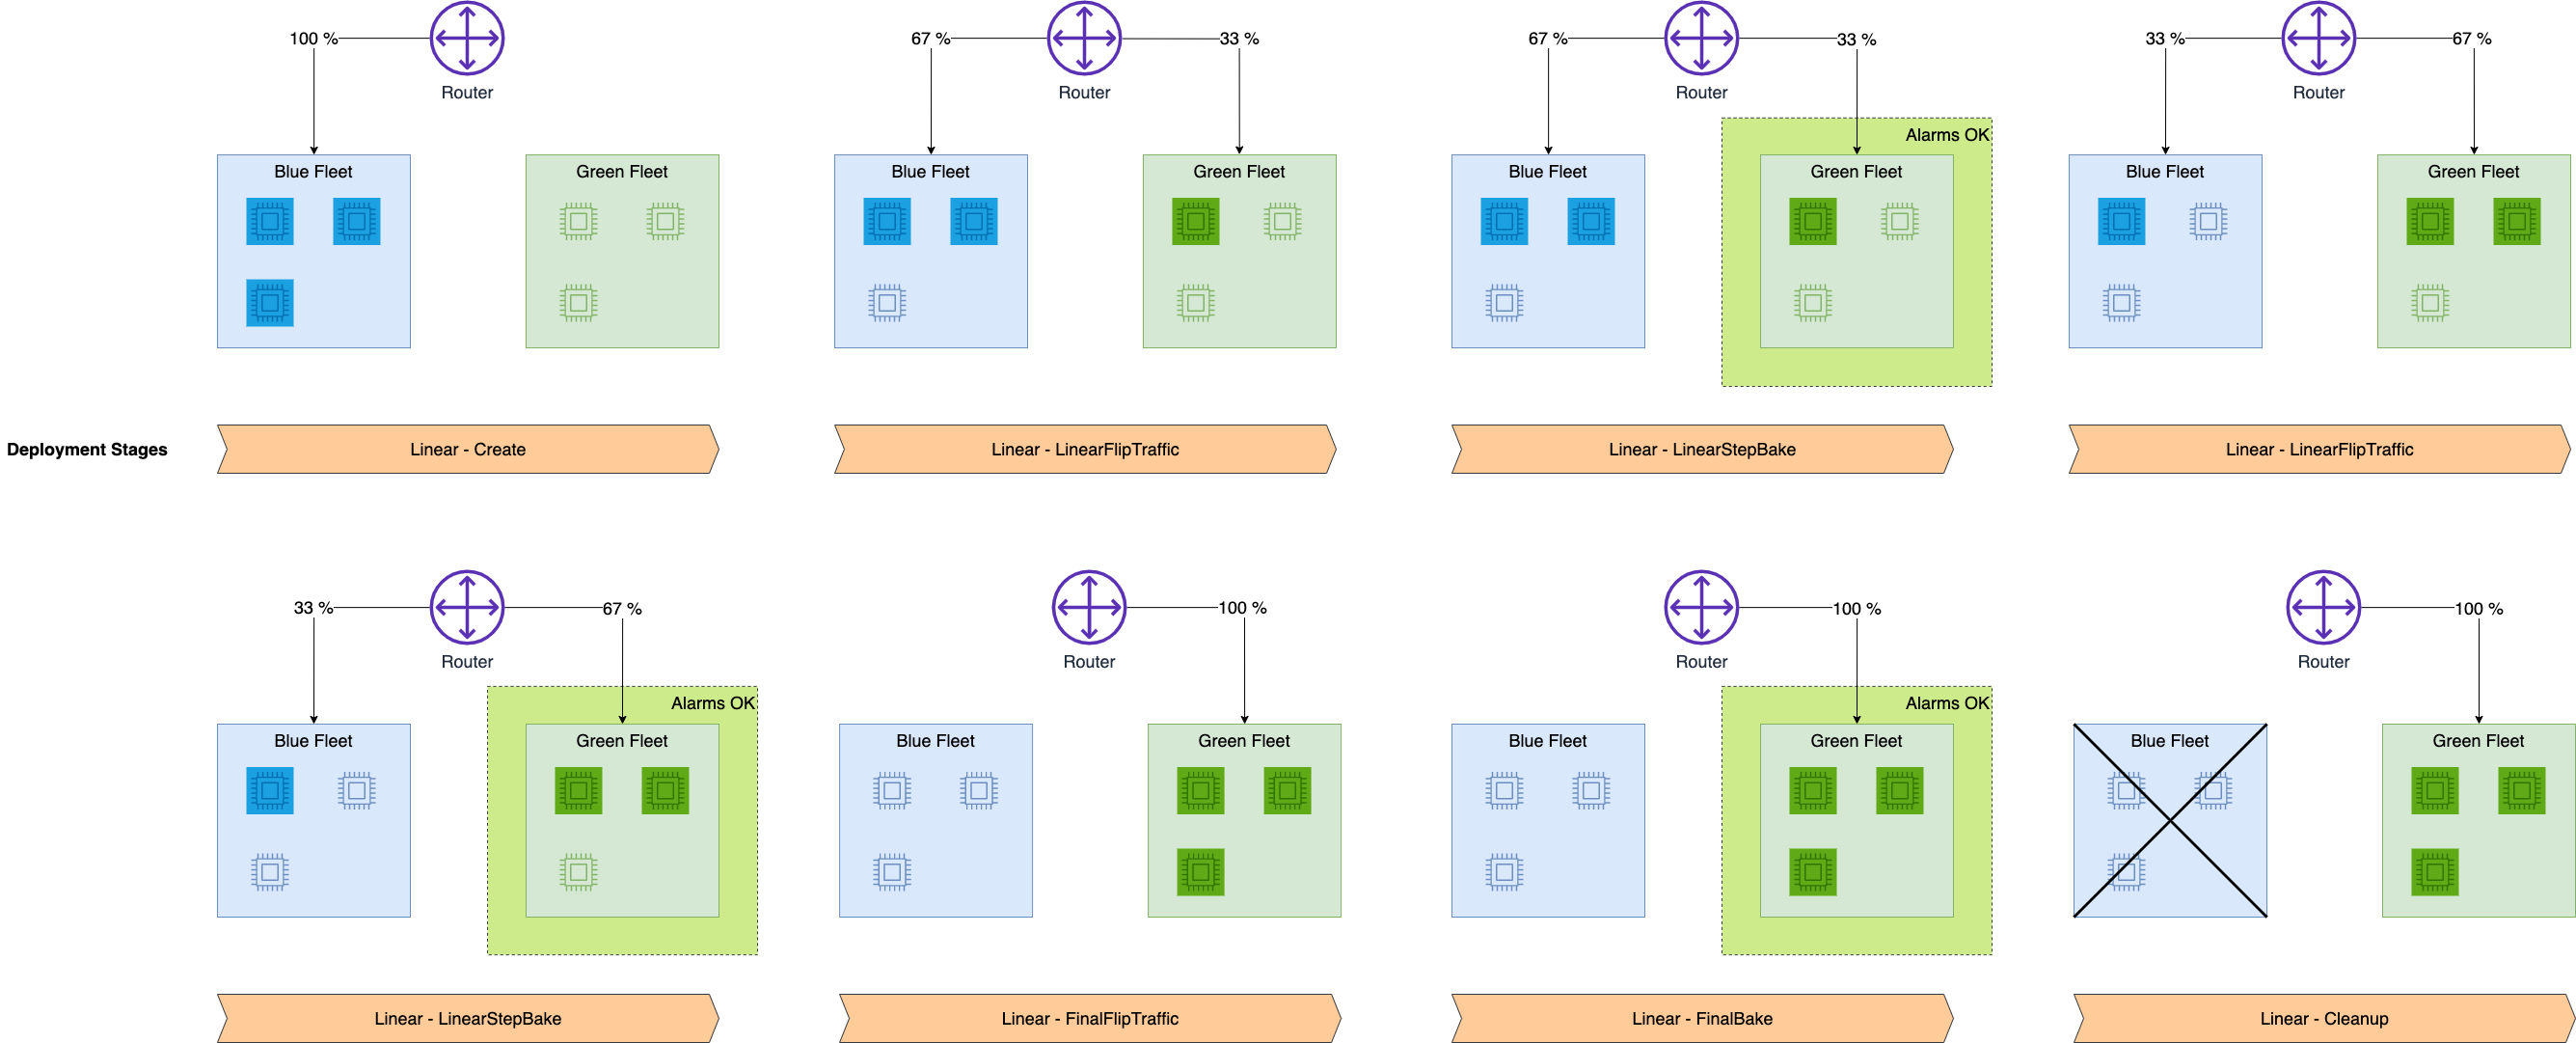
Once SageMaker AI provisions the new fleet, the first portion of the green fleet turns on and receives traffic. SageMaker AI deactivates the same size portion of the blue fleet, and the baking period begins. If any alarms trip, all of the endpoint traffic rolls back to the blue fleet. If the baking period finishes, then the next step begins. Another portion of the green fleet activates and receives traffic, part of the blue fleet deactivates, and another baking period begins. The same process repeats until the blue fleet is fully deactivated and the green fleet is fully active and receiving all traffic. If an alarm goes off at any point, SageMaker AI terminates the shifting process and 100% of the traffic rolls back to the blue fleet.
Prerequisites
Before setting up a deployment with linear traffic shifting, you must create CloudWatch alarms to monitor metrics from your endpoint. The alarms are active during the baking period, and if any alarms trip, then all endpoint traffic rolls back to the blue fleet. To learn how to set up CloudWatch alarms on an endpoint, see the prerequisite page Auto-Rollback Configuration and Monitoring. To learn more about CloudWatch alarms, see Using Amazon CloudWatch alarms in the Amazon CloudWatch User Guide.
Configure Linear Traffic Shifting
Once you are ready for your deployment and have set up CloudWatch alarms for your endpoint, you can use either the Amazon SageMaker AI UpdateEndpoint API or the update-endpoint command in the AWS CLI to initiate the deployment.
Topics
How to update an endpoint (API)
The following example of the UpdateEndpoint API shows how you can update an endpoint with linear traffic shifting.
import boto3
client = boto3.client("sagemaker")

response = client.update_endpoint(
    EndpointName="<your-endpoint-name>",
    EndpointConfigName="<your-config-name>",
    DeploymentConfig={
        "BlueGreenUpdatePolicy": {
            "TrafficRoutingConfiguration": {
                "Type": "LINEAR",
                "LinearStepSize": {
                    "Type": "CAPACITY_PERCENT",
                    "Value": 20
                },
                "WaitIntervalInSeconds": 300
            },
            "TerminationWaitInSeconds": 300,
            "MaximumExecutionTimeoutInSeconds": 3600
        },
        "AutoRollbackConfiguration": {
            "Alarms": [
                {
                    "AlarmName": "<your-cw-alarm>"
                }
            ]
        }
    }
)
To configure the linear traffic shifting option, do the following:
For
EndpointName, use the name of the existing endpoint you want to update.For
EndpointConfigName, use the name of the endpoint configuration you want to use.Under
DeploymentConfigandBlueGreenUpdatePolicy, inTrafficRoutingConfiguration, set theTypeparameter toLINEAR. This specifies that the deployment uses linear traffic shifting.In the
LinearStepSizefield, you can change the size of the steps by modifying theTypeandValueparameters. ForType, useCAPACITY_PERCENT, meaning the percentage of your green fleet you want to use as the step size, and then setValueto20. In this example, you turn on 20% of the green fleet’s capacity for each traffic shifting step. Note that when customizing your linear step size, you should only use steps that are 10-50% of the green fleet's capacity.For
WaitIntervalInSeconds, use300. The parameter tells SageMaker AI to wait for the specified amount of time (in seconds) between each traffic shift. This interval is the duration of the baking period between each linear step. In the preceding example, SageMaker AI waits for 5 minutes between each traffic shift.For
TerminationWaitInSeconds, use300. This parameter tells SageMaker AI to wait for the specified amount of time (in seconds) after your green fleet is fully active before terminating the instances in the blue fleet. In this example, SageMaker AI waits for 5 minutes after the final baking period before terminating the blue fleet.For
MaximumExecutionTimeoutInSeconds, use3600. This parameter sets the maximum amount of time that the deployment can run before it times out. In the preceding example, your deployment has a limit of 1 hour to finish.In
AutoRollbackConfiguration, within theAlarmsfield, you can add your CloudWatch alarms by name. Create oneAlarmName:entry for each alarm you want to use.<your-cw-alarm>
How to update an endpoint with an existing blue/green update policy (API)
When you use the CreateEndpoint API to create an endpoint, you can optionally specify a
deployment configuration to reuse for future endpoint updates. You can use the same
DeploymentConfig options as the previous UpdateEndpoint API
example. There are no changes to the CreateEndpoint API behavior. Specifying the
deployment configuration does not automatically perform a blue/green update on your
endpoint.
The option to use a previous deployment configuration happens when using the UpdateEndpoint API to update your endpoint. When updating your endpoint, you can use
the RetainDeploymentConfig option to keep the deployment configuration you
specified when you created the endpoint.
When calling the UpdateEndpoint API, set
RetainDeploymentConfig to True to keep the
DeploymentConfig options from your original endpoint configuration.
response = client.update_endpoint(
    EndpointName="<your-endpoint-name>",
    EndpointConfigName="<your-config-name>",
    RetainDeploymentConfig=True
)
How to update an endpoint (CLI)
If you are using the AWS CLI, the following example shows how to start a blue/green linear deployment using the update-endpoint command.
update-endpoint --endpoint-name<your-endpoint-name>--endpoint-config-name<your-config-name>--deployment-config '{"BlueGreenUpdatePolicy": {"TrafficRoutingConfiguration": {"Type": "LINEAR", "LinearStepSize": {"Type": "CAPACITY_PERCENT", "Value": 20}, "WaitIntervalInSeconds": 300}, "TerminationWaitInSeconds": 300, "MaximumExecutionTimeoutInSeconds": 3600}, "AutoRollbackConfiguration": {"Alarms": [{"AlarmName": "<your-alarm>"}]}'
To configure the linear traffic shifting option, do the following:
For
endpoint-name, use the name of the endpoint you want to update.For
endpoint-config-name, use the name of the endpoint configuration you want to use.For
deployment-config, use a BlueGreenUpdatePolicy JSON object.
Note
If you would rather save your JSON object in a file, see Generating AWS CLI skeleton and input parameters in the AWS CLI User Guide.
