Creating a job to order a Snowball Edge device
To order a Snowball Edge device, you create a job to order a Snowball Edge device in the AWS Snow Family Management Console. A job is a term that AWS uses to describe the lifecycle of the use of a Snowball Edge device by a customer. A job begins when you order a device, continues when AWS prepares the device and ships it to you and you use it, and completes after AWS receives and processes the device after you return it. Jobs are categorized by type: export, import, and local compute and storage. For more information, see Understanding AWS Snowball Edge jobs.
After you create the job to order a device, you can use the AWS Snow Family Management Console to view the job status and monitor the progress of the device you ordered as AWS prepares the device to ship to you and after it is returned. For more information, see Job Statuses. After the device is returned and processed by AWS, you can access a job completion report and logs through the AWS Snow Family Management Console. For more information, see Getting your job completion report and logs on the console.
You can also create and manage jobs using the job management API. For more information, see the AWS Snowball Edge API Reference.
Topics
Choosing a job type
The first step in creating a job is to determine the type of job that you need and to start planning it using the AWS Snow Family Management Console.
To choose your job type
-
Sign in to the AWS Management Console, and open the AWS Snow Family Management Console
. If this is your first time creating a job in this AWS Region, you will see the AWS Snowball Edge page. Otherwise you will see the list of existing jobs. -
If this is your first job to order a device, choose Order an AWS Snowball Edge device. If you're expecting multiple jobs to migrate over 500 TB of data, choose Create your large data migration plan greater than 500 TB. Otherwise, choose Create Job in the left navigation bar. Choose Next step to open the Plan your job page.
-
In the Job name section, provide a name for your job in the Job name box.
-
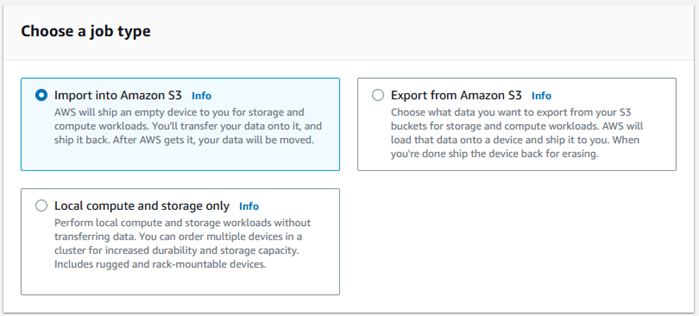
Depending on your need, choose one of the following job types:
-
Import into Amazon S3 – Choose this option to have AWS ship an empty Snowball Edge device to you. You connect the device to your local network and run the Snowball Edge client. You copy data onto the device using NFS share or the S3 adapter, ship it back to AWS, and your data is uploaded to AWS.
-
Export from Amazon S3 – Choose this option to export data from your Amazon S3 bucket to your device. AWS loads your data on the device and ships it to you. You connect the device to your local network and run the Snowball Edge client. You copy data from your device to your servers. When you are done, ship the device to AWS, and your data is erased from the device.
-
Local compute and storage only – Perform compute and storage workloads on the device without transferring data.
-
-
Choose Next to continue.
Choosing your compute and storage options
Choose the hardware specifications for your Snowball Edge device, which of your Amazon EC2-compatible instances to include on it, how data will be stored, and pricing.
To choose your device's compute and storage options
-
In the Snow devices section, choose the Snowball Edge device to order.
Note
Some Snowball Edge might not be available depending on the AWS Region you are ordering from and the job type you chose.
-
In the Choose your pricing option section, from the Choose your pricing option menu, choose the type of pricing to apply to this job. If you choose 1 year or 3 year commit upfront pricing, in Auto-renew, choose On to automatically renew the pricing when the current period ends or Off to not automatically renew the pricing when the current period ends. For more information about long-term pricing options for Snowball Edge devices, see Long-term pricing for Snowball Edge devices in this guide. For device pricing for your AWS Region, see AWS Snowball Edge Pricing
. -
In the Select the storage type section, make a choice according to your need:
S3 Adapter: Use the S3 adapter to transfer data programmatically to and from Snowball Edge using Amazon S3 REST API actions.
Amazon S3 compatible storage: Use Amazon S3 compatible storage to deploy S3 compatible durable, scalable object storage on single Snowball Edge device or in a multi-device cluster.
NFS based data transfer: Use Network File System (NFS) based data transfer to drag and drop files from your computer into Amazon S3 buckets on Snowball Edge.
Warning
NFS based data transfer doesn't support the S3 adapter. If you proceed with NFS based data transfer, you must mount the NFS share to transfer objects. Using the AWS CLI to transfer objects will fail.
See Using NFS for Offline Data Transfer in the AWS Snowball Edge Edge Developer Guide for more information.
Note
Storage type options available depend on the job type and Snow device you chose.
-
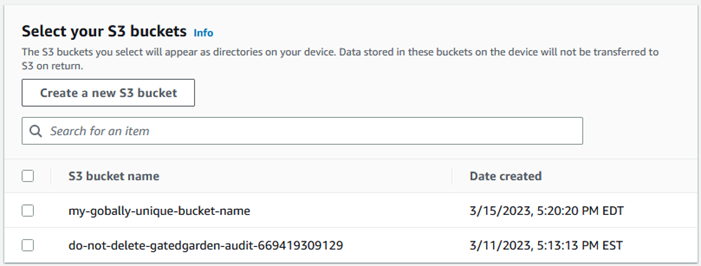
If you selected S3 Adapter as the storage type or if you selected a device that supports block storage, do the following to select one or more S3 buckets to include on the device:
In the Select your S3 buckets section, do one or more of the following to select one or more S3 buckets:
Choose the S3 bucket that you want to use in the S3 bucket name list.
In the Search for an item field, enter all or part a bucket name to filter the list of available buckets on your entry, then choose the bucket.
Choose the Create a new S3 bucket to create a new S3 bucket. The new bucket name appears in the Bucket name list. Choose it.
You can include one or more S3 buckets. These buckets appear on your device as local S3 buckets.
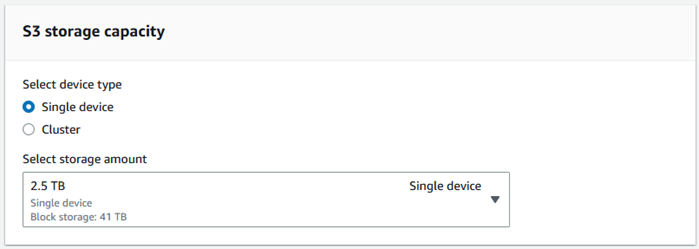
If you selected Amazon S3 compatible storage as the storage type, in the S3 storage capacity section, do the following:
Select to use Amazon S3 compatible storage on Snowball Edge on a single device or a cluster of devices. See Using a AWS Snowball Edge cluster in this guide.
Select the amount of device storage to use for Amazon S3 compatible storage on Snowball Edge.
Note
When using Amazon S3 compatible storage on Snowball Edge, you can manage and create Amazon S3 buckets after you receive the device, so you don't need to choose them while ordering. See Amazon S3 compatible storage on Snowball Edge in this guide.
If you selected NFS based data transfer as the storage type, in the Select your S3 buckets section, do one or more of the following to select one or more S3 buckets:
Choose the S3 bucket that you want to use in the S3 bucket name list.
In the Search for an item field, enter all or part a bucket name to filter the list of available buckets on your entry, then choose the bucket.
Choose the Create a new S3 bucket to create a new S3 bucket. The new bucket name appears in the Bucket name list. Choose it.
After choosing S3 buckets to use with NFS data transfer, also choose an S3 bucket to use as block storage for AMIs. See the steps to choose an S3 bucket.
You can include one or more S3 buckets. These buckets appear on your device as local S3 buckets.

-
In the Compute using EC2-compatible instances - optional section, choose Amazon EC2-compatible AMIs from your account to include on the device. Or, in the search field, enter all or part the name of an AMI to filter the list of available AMIs on your entry, then choose the AMI.
To learn about configuring an AMI for secure shell (SSH), see Configuring an AMI for a Snowball Edge and SSH
For more information, see Adding an AMI When Ordering Your Device in this guide.
This feature incurs additional charges. For more information, see AWS Snowball Edge Pricing.
-
Choose the Next button.
Choosing your features and options
Choose the features and options to include in your AWS Snowball Edge device job, including Amazon EKS Anywhere for Snow, an AWS IoT Greengrass instance, and remote device management capability.
To choose your features and options
-
In the Amazon EKS Anywhere on AWS Snow section, to include Amazon EKS Anywhere on AWS Snow, select Include Amazon EKS Anywhere on Snow and then do the following.
Note
We recommend that you create your Kubernetes cluster with the latest available Kubernetes version supported by Amazon EKS Anywhere. For more information, see Amazon EKS-Anywhere Versioning
. If your application requires a specific version of Kubernetes, use any version of Kubernetes offered in standard or extended support by Amazon EKS. Consider the release and support dates of Kubernetes versions when planning the lifecycle of your deployment. This will help you avoid the potential loss of support for the version of Kubernetes you intend to use. For more information, see Amazon EKS Kubernetes release calendar. In the Build your own AMI section, choose the AMIs you have built for Amazon EKS Anywhere. See Actions to complete before ordering a Snowball Edge device for Amazon EKS Anywhere on AWS Snow.
In the High availability section, to operate Amazon EKS Anywhere clusters across multiple Snowball Edge devices, choose the number of devices to include in your order.
-
In the AWS IoT Greengrass on Snow section, to include a validated AMI for IoT workloads, select Install AWS IoT Greengrass validated AMI on my Snow device.
-
To enable remote management of your Snowball Edge device by AWS OpsHub or Snowball Edge Client, select Manage your Snow device remotely with AWS OpsHub or Snowball Edge Client.
-
Select the Next button.
Choosing security, shipping, and notification preferences
Topics
Choose security preferences for the Snowball Edge
Setting security adds the permissions and encryption settings for your AWS Snowball Edge job to help protect your data while in transit.
Topics
To set security for your job
-
In the Encryption section, choose the KMS key that you want to use.
-
If you want to use the default AWS Key Management Service (AWS KMS) key, choose AWS/importexport (default). This is the default key that protects your import and export jobs when no other key is defined.
-
If you want to provide your own AWS KMS key, choose Enter a key ARN, provide the Amazon Resource Name (ARN) in the key ARN box, and choose Use this KMS key. The key ARN will be added to the list.
-
-
In the Choose service access type section, do one of the following:
-
Choose Snow console will create and use a service-linked role to access AWS resources on your behalf. to grant AWS Snowball Edge permissions to use Amazon S3 and Amazon Simple Notification Service (Amazon SNS) on your behalf. The role grants AWS Security Token Service (AWS STS) AssumeRole trust to the Snow service
-
Choose Add an existing service role to use, to specify the Role ARN that you want, or you can use the default role.
-
-
Choose Next.
Choose your shipping preferences for receiving and returning the Snowball Edge
Receiving and returning a Snowball Edge device involves shipping the device back and forth, so it's important that you provide accurate shipping information.
To provide shipping details
-
In the Shipping Address section, choose an existing address or add a new address.
-
If you choose Use recent address, the addresses on file are displayed. Carefully choose the address that you want from the list.
-
If you choose Add a new address, provide the requested address information. The AWS Snow Family Management Console saves your new shipping information.
Note
The country that you provide in the address must match the destination country for the device and must be valid for that country.
-
-
In the Shipping speed section, choose a shipping speed for the job. The shipping speed doesn’t indicate how soon you can expect to receive the device from the day you created the job. Rather, it indicates the time that the device is in transit between AWS and your shipping address.
It may take up to 4 weeks to provision and prepare the device for your job before it is shipped. This timeline should be factored into your project plan to ensure a seamless transition.
The shipping speeds you can choose are:
-
One-Day Shipping (1 business day)
-
Two-Day Shipping (2 business days)
-
Choose preferences for notifications about the Snowball Edge job
Notifications update you on the latest status of your AWS Snowball Edge jobs. You create an SNS topic and receive emails from Amazon Simple Notification Service (Amazon SNS) as your job status changes.
To set up notifications
-
In the Set notifications section, do one of the following:
-
If you want to use an existing SNS topic, choose Use an existing SNS topic, and choose the topic Amazon Resource Name (ARN) from the list.
-
If you want to create a new SNS topic, choose Create a new SNS topic. Enter a name for your topic and provide an email address.
Note
Jobs to order Snow devices created in the US West (N. California) and US West (Oregon) regions are routed through US East (N. Virginia) region. Because of this, service calls like Amazon SNS are also directed through US East (N. Virginia). We recommend creating any new SNS topics in the US East (N. Virginia) region for the best experience.
-
Notifications will be about one of the following states of your job:
-
Job created
-
Preparing device
-
Preparing shipment
-
In transit to you
-
Delivered to you
-
In transit to AWS
-
At sorting facility
-
At AWS
-
Importing
-
Completed
-
Canceled
For more information about job status change notifications and encrypted SNS topics, see Notifications for Snowball Edge in this guide.
Select the Next.
Reviewing the job summary and create your job
After you provide all the necessary information for your AWS Snowball Edge job, review the job and create it. After you create the job, AWS will begin preparing the Snowball Edge for shipment to you.
Jobs are subject to export control laws in specific countries and might require an export license. US export and re-export laws also apply. Diversion from the country and US laws and regulations is prohibited.
-
In the Job summary page, review all the sections before you create the job. If you want to make changes, choose Edit for the appropriate section, and edit the information.
-
When you are done reviewing and editing, choose Create job.
Note
After you create a job to order a Snowball Edge device, you can cancel it while it is in the Job created state without incurring any charges. For more information, see Cancelling a job through the AWS Snow Family Management Console.
After your job is created, you can see the status of the job in the Job status section. For detailed information about job statuses, see Job Statuses.
