Querying inventory data from multiple Regions and accounts
AWS Systems Manager Inventory integrates with Amazon Athena to help you query inventory data from multiple AWS Regions and AWS accounts. Athena integration uses resource data sync so that you can view inventory data from all of your managed nodes on the Detailed View page in the AWS Systems Manager console.
Important
This feature uses AWS Glue to crawl the data in your Amazon Simple Storage Service (Amazon S3) bucket, and
Amazon Athena to query the data. Depending on how much data is crawled and queried, you
can be charged for using these services. With AWS Glue, you pay an hourly rate, billed
by the second, for crawlers (discovering data) and ETL jobs (processing and loading
data). With Athena, you're charged based on the amount of data scanned by each query.
We encourage you to view the pricing guidelines for these services before you use
Amazon Athena integration with Systems Manager Inventory. For more information, see Amazon Athena pricing
You can view inventory data on the Detailed View page in all AWS Regions where Amazon Athena is available. For a list of supported Regions, see Amazon Athena Service Endpoints in the Amazon Web Services General Reference.
Before you begin
Athena integration uses resource data sync. You must set up and configure resource data sync to use this feature. For more information, see Walkthrough: Using resource data sync to aggregate inventory data.
Also, be aware that the Detailed View page displays inventory data for the owner of the central Amazon S3 bucket used by resource data sync. If you aren't the owner of the central Amazon S3 bucket, then you won't see inventory data on the Detailed View page.
Configuring access
Before you can query and view data from multiple accounts and Regions on the Detailed View page in the Systems Manager console, you must configure your IAM entity with permission to view the data.
If the inventory data is stored in an Amazon S3 bucket that uses AWS Key Management Service (AWS KMS)
encryption, you must also configure your IAM entity and the
Amazon-GlueServiceRoleForSSM service role for AWS KMS encryption.
Topics
Configuring your IAM entity to access the Detailed View page
The following describes the minimum permissions required to view inventory data on the Detailed View page.
The AWSQuicksightAthenaAccess managed
policy
The following PassRole and additional required permissions
block
(Optional) If the Amazon S3 bucket used to store inventory data is encrypted by using AWS KMS, you must also add the following block to the policy.
{
    "Effect": "Allow",
    "Action": [
        "kms:Decrypt"
    ],
    "Resource": [
        "arn:aws:kms:Region:account_ID:key/key_ARN"
    ]
}
To provide access, add permissions to your users, groups, or roles:
-
Users and groups in AWS IAM Identity Center:
Create a permission set. Follow the instructions in Create a permission set in the AWS IAM Identity Center User Guide.
-
Users managed in IAM through an identity provider:
Create a role for identity federation. Follow the instructions in Create a role for a third-party identity provider (federation) in the IAM User Guide.
-
IAM users:
-
Create a role that your user can assume. Follow the instructions in Create a role for an IAM user in the IAM User Guide.
-
(Not recommended) Attach a policy directly to a user or add a user to a user group. Follow the instructions in Adding permissions to a user (console) in the IAM User Guide.
-
(Optional) Configure permissions for viewing AWS KMS encrypted data
If the Amazon S3 bucket used to store inventory data is encrypted by using the
AWS Key Management Service (AWS KMS), you must configure your IAM entity and the
Amazon-GlueServiceRoleForSSM role with
kms:Decrypt permissions for the AWS KMS key.
Before you begin
To provide the kms:Decrypt permissions for the AWS KMS key, add
the following policy block to your IAM entity:
{
    "Effect": "Allow",
    "Action": [
        "kms:Decrypt"
    ],
    "Resource": [
        "arn:aws:kms:Region:account_ID:key/key_ARN"
    ]
}
If you haven't done so already, complete that procedure and add
kms:Decrypt permissions for the AWS KMS key.
Use the following procedure to configure the
Amazon-GlueServiceRoleForSSM role with
kms:Decrypt permissions for the AWS KMS key.
To configure the Amazon-GlueServiceRoleForSSM role
with kms:Decrypt permissions
Open the IAM console at https://console.aws.amazon.com/iam/
. -
In the navigation pane, choose Roles, and then use the search field to locate the Amazon-GlueServiceRoleForSSM role. The Summary page opens.
-
Use the search field to find the Amazon-GlueServiceRoleForSSM role. Choose the role name. The Summary page opens.
-
Choose the role name. The Summary page opens.
-
Choose Add inline policy. The Create policy page opens.
-
Choose the JSON tab.
-
Delete the existing JSON text in the editor, and then copy and paste the following policy into the JSON editor.
-
Choose Review policy
-
On the Review Policy page, enter a name in the Name field.
-
Choose Create policy.
Querying data on the inventory detailed view page
Use the following procedure to view inventory data from multiple AWS Regions and AWS accounts on the Systems Manager Inventory Detailed View page.
Important
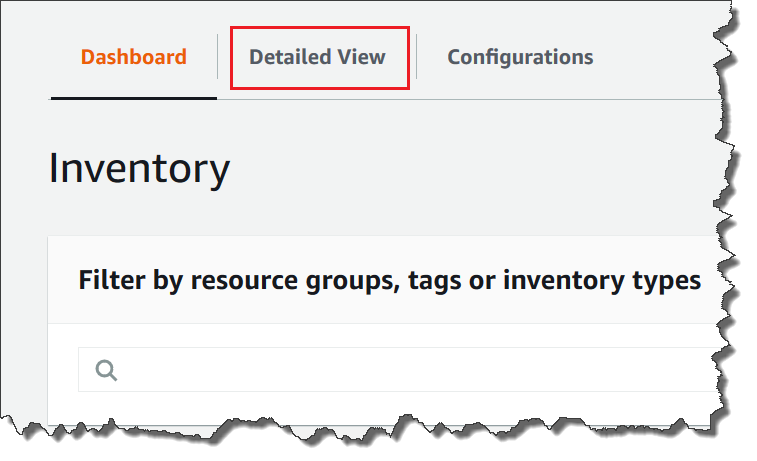
The Inventory Detailed View page is only available in AWS Regions that offer Amazon Athena. If the following tabs aren't displayed on the Systems Manager Inventory page, it means Athena isn't available in the Region and you can't use the Detailed View to query data.
To view inventory data from multiple Regions and accounts in the AWS Systems Manager console
Open the AWS Systems Manager console at https://console.aws.amazon.com/systems-manager/
. In the navigation pane, choose Inventory.
-
Choose the Detailed View tab.
-
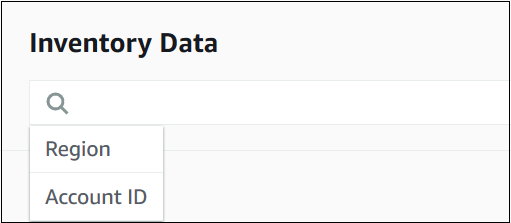
Choose the resource data sync for which you want to query data.

-
In the Inventory Type list, choose the type of inventory data that you want to query, and then press Enter.

-
To filter the data, choose the Filter bar, and then choose a filter option.
You can use the Export to CSV button to view the current query set in a spreadsheet application such as Microsoft Excel. You can also use the Query History and Run Advanced Queries buttons to view history details and interact with your data in Amazon Athena.
Editing the AWS Glue crawler schedule
AWS Glue crawls the inventory data in the central Amazon S3 bucket twice daily, by default. If you frequently change the types of data to collect on your nodes then you might want to crawl the data more frequently, as described in the following procedure.
Important
AWS Glue charges your AWS account based on an hourly rate, billed by
the second, for crawlers (discovering data) and ETL jobs (processing and
loading data). Before you change the crawler schedule, view the AWS Glue pricing
To change the inventory data crawler schedule
Open the AWS Glue console at https://console.aws.amazon.com/glue/
. -
In the navigation pane, choose Crawlers.
-
In the crawlers list, choose the option next to the Systems Manager Inventory data crawler. The crawler name uses the following format:
AWSSystemsManager-s3-bucket-name-Region-account_ID -
Choose Action, and then choose Edit crawler.
-
In the navigation pane, choose Schedule.
-
In the Cron expression field, specify a new schedule by using a cron format. For more information about the cron format, see Time-Based Schedules for Jobs and Crawlers in the AWS Glue Developer Guide.
Important
You can pause the crawler to stop incurring charges from AWS Glue. If you pause the crawler, or if you change the frequency so that the data is crawled less often, then the Inventory Detailed View might display data that isn't current.
