本文為英文版的機器翻譯版本,如內容有任何歧義或不一致之處,概以英文版為準。
在 CodePipeline 的管道中叫用 AWS Lambda 函數
AWS Lambda 是一種運算服務,讓您無需設定或管理伺服器即可運行程式碼。您可以建立 Lambda 函數,並將其新增為管道中的動作。由於 Lambda 可讓您編寫函數來執行幾乎任何任務,因此您可以自訂管道的運作方式。
重要
請勿記錄 CodePipeline 傳送給 Lambda 的 JSON 事件,因為這可能會導致使用者登入資料記錄在 CloudWatch Logs 中。CodePipeline 角色使用 JSON 事件,在 artifactCredentials 欄位中將臨時登入資料傳遞給 Lambda。如需範例事件,請參閱JSON 事件範例。
以下是可在管道中使用 Lambda 函數的一些方式:
-
使用 在管道的一個階段隨需建立資源, CloudFormation 並在另一個階段將其刪除。
-
AWS Elastic Beanstalk 使用交換 CNAME 值的 Lambda 函數在 中部署零停機時間的應用程式版本。
-
部署至 Amazon ECS Docker 執行個體。
-
建立 AMI 快照以在建置或部署之前備份資源。
-
在管道新增與第三方產品的整合,例如發布訊息到 IRC 用戶端。
注意
建立和執行 Lambda 函數可能會導致 AWS 您的帳戶產生費用。如需詳細資訊,請參閱 定價
本主題假設您熟悉 AWS CodePipeline AWS Lambda ,並知道如何建立管道、函數,以及它們所依賴的 IAM 政策和角色。本主題將說明如何:
-
建立 Lambda 函數,以測試網頁是否已成功部署。
-
設定 CodePipeline 和 Lambda 執行角色,以及作為管道的一部分執行函數所需的許可。
-
編輯管道,將 Lambda 函數新增為動作。
-
手動釋出變更以測試動作。
注意
在 CodePipeline 中使用跨區域 Lambda 調用動作時,使用 PutJobSuccessResult 和 PutJobFailureResult 的 lambda 執行狀態應傳送至 Lambda 函數存在 AWS 的區域,而不是 CodePipeline 存在的區域。
本主題包含示範在 CodePipeline 中使用 Lambda 函數彈性的範例函數:
-
-
建立要與 CodePipeline 搭配使用的基本 Lambda 函數。
-
在動作的詳細資訊連結中,將成功或失敗結果傳回 CodePipeline。
-
-
使用 AWS CloudFormation 範本的範例 Python 函數
-
使用 JSON 編碼使用者參數來傳遞多個組態值到函數 (
get_user_params)。 -
與成品儲存貯體中的 .zip 成品互動 (
get_template)。 -
使用連續字符來監控長時間執行的非同步處理 (
continue_job_later)。這可讓動作繼續,即使超過 15 分鐘的執行時間 (Lambda 中的限制),函數也會成功。
-
每個範例函數皆包含關於您必須新增到角色的許可資訊。如需 中限制的相關資訊 AWS Lambda,請參閱《 AWS Lambda 開發人員指南》中的限制。
重要
在此主題中的範本程式碼、角色與政策皆僅做為範例使用,並依原樣提供。
主題
步驟 1:建立管道
在此步驟中,您會建立管道,稍後再將 Lambda 函數新增至其中。此管道與您在 CodePipeline 教學課程 中所建立的管道相同。如果該管道仍為您的帳戶設定,且位於您計劃建立 Lambda 函數的相同區域,您可以略過此步驟。
建立管道
-
遵循中的前三個步驟教學:建立簡易管道 (S3 儲存貯體)來建立 Amazon S3 儲存貯體、CodeDeploy 資源和兩階段管道。為您的執行個體類型選擇 Amazon Linux 選項。您可以使用管道所需的任何名稱,但本主題中的步驟會使用 MyLambdaTestPipeline。
-
在管道的狀態頁面上,於 CodeDeploy 動作中選擇詳細資訊。請在部署群組的部署詳細資訊頁面上,從清單中選擇一個執行個體 ID。
-
在 Amazon EC2 主控台中,在執行個體的詳細資訊索引標籤上,複製公有 IPv4 地址中的 IP 地址 (例如,
192.0.2.4)。您會使用此地址做為 AWS Lambda中函數的目標。
注意
CodePipeline 的預設服務角色政策包含叫用函數所需的 Lambda 許可。但是,若您已修改預設服務角色或選取不同角色,請確認該角色的政策允許 lambda:InvokeFunction 與 lambda:ListFunctions 許可。否則,包含 Lambda 動作的管道會失敗。
步驟 2:建立 Lambda 函數
在此步驟中,您會建立 Lambda 函數,該函數會發出 HTTP 請求並檢查網頁上的一行文字。在此步驟中,您還必須建立 IAM 政策和 Lambda 執行角色。如需詳細資訊,請參閱《 AWS Lambda 開發人員指南》中的許可模型。
建立執行角色
登入 AWS 管理主控台 並開啟位於 https://https://console.aws.amazon.com/iam/
的 IAM 主控台。 -
選擇政策,然後選擇建立政策。選擇 JSON (JSON) 索引標籤,然後將下列政策貼到欄位中。
-
選擇檢閱政策。
-
在 Review policy (檢閱政策) 頁面上的 Name (名稱) 中,輸入政策名稱 (例如
CodePipelineLambdaExecPolicy)。在 Description (說明) 中,輸入Enables Lambda to execute code。選擇建立政策。
注意
這些是 Lambda 函數與 CodePipeline 和 Amazon CloudWatch 交互操作所需的最低許可。如果您想要展開此政策以允許與其他 AWS 資源互動的函數,您應該修改此政策以允許這些 Lambda 函數所需的動作。
-
在政策儀表板頁面上,選擇 Roles (角色),然後選擇 Create role (建立角色)。
-
在建立角色頁面上,選擇 AWS 服務。選擇 Lambda (Lambda),然後選擇 Next: Permissions (下一步:許可)。
-
在連接許可政策頁面上,選取 CodePipelineLambdaExecPolicy 旁的核取方塊,然後選擇下一步:標籤。選擇下一步:檢閱。
-
在 Review (檢閱) 頁面上的 Role name (角色名稱) 中輸入名稱,然後選擇 Create role (建立角色)。
建立要與 CodePipeline 搭配使用的範例 Lambda 函數
登入 AWS 管理主控台 ,並在 https://https://console.aws.amazon.com/lambda/
開啟 AWS Lambda 主控台。 -
在 Functions (函數) 頁面上,選擇 Create function (建立函數)。
注意
如果您看到歡迎頁面,而不是 Lambda 頁面,請選擇立即開始。
-
在 Create function (建立函數) 頁面上,選擇 Author from scratch (從頭開始撰寫)。在函數名稱中,輸入 Lambda 函數的名稱 (例如
MyLambdaFunctionForAWSCodePipeline)。在執行時間中,選擇 Node.js 20.x。 -
在 Role (角色) 下,請選取 Choose an existing role (選擇現有的角色)。在 Existing role (現有角色) 中選擇您的角色,然後選擇 Create function (建立函數)。
會開啟建立的函數詳細資訊頁面。
-
複製下列程式碼到 Function code (函數程式碼) 方塊中:
import { CodePipelineClient, PutJobSuccessResultCommand, PutJobFailureResultCommand } from "@aws-sdk/client-codepipeline"; import http from 'http'; import assert from 'assert'; export const handler = (event, context) => { const codepipeline = new CodePipelineClient(); // Retrieve the Job ID from the Lambda action const jobId = event["CodePipeline.job"].id; // Retrieve the value of UserParameters from the Lambda action configuration in CodePipeline, in this case a URL which will be // health checked by this function. const url = event["CodePipeline.job"].data.actionConfiguration.configuration.UserParameters; // Notify CodePipeline of a successful job const putJobSuccess = async function(message) { const command = new PutJobSuccessResultCommand({ jobId: jobId }); try { await codepipeline.send(command); context.succeed(message); } catch (err) { context.fail(err); } }; // Notify CodePipeline of a failed job const putJobFailure = async function(message) { const command = new PutJobFailureResultCommand({ jobId: jobId, failureDetails: { message: JSON.stringify(message), type: 'JobFailed', externalExecutionId: context.awsRequestId } }); await codepipeline.send(command); context.fail(message); }; // Validate the URL passed in UserParameters if(!url || url.indexOf('http://') === -1) { putJobFailure('The UserParameters field must contain a valid URL address to test, including http:// or https://'); return; } // Helper function to make a HTTP GET request to the page. // The helper will test the response and succeed or fail the job accordingly const getPage = function(url, callback) { var pageObject = { body: '', statusCode: 0, contains: function(search) { return this.body.indexOf(search) > -1; } }; http.get(url, function(response) { pageObject.body = ''; pageObject.statusCode = response.statusCode; response.on('data', function (chunk) { pageObject.body += chunk; }); response.on('end', function () { callback(pageObject); }); response.resume(); }).on('error', function(error) { // Fail the job if our request failed putJobFailure(error); }); }; getPage(url, function(returnedPage) { try { // Check if the HTTP response has a 200 status assert(returnedPage.statusCode === 200); // Check if the page contains the text "Congratulations" // You can change this to check for different text, or add other tests as required assert(returnedPage.contains('Congratulations')); // Succeed the job putJobSuccess("Tests passed."); } catch (ex) { // If any of the assertions failed then fail the job putJobFailure(ex); } }); }; -
將 Handler (處理常式) 保留為預設值,並且將 Role (角色) 保留為預設值
CodePipelineLambdaExecRole。 -
在 Basic settings (基本設定) 的 Timeout (逾時 ) 中,輸入
20秒。 -
選擇儲存。
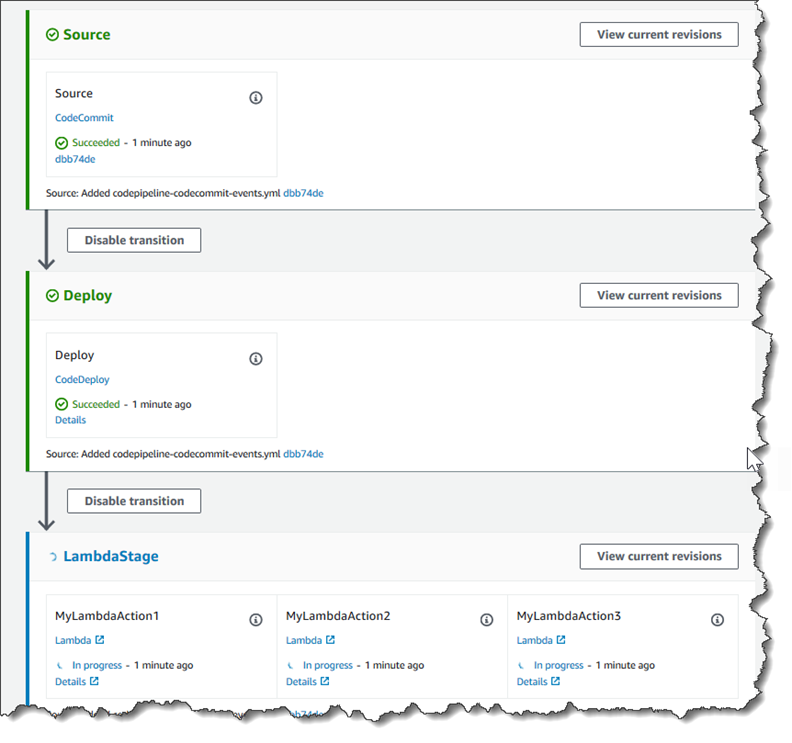
步驟 3:將 Lambda 函數新增至 CodePipeline 主控台中的管道
在此步驟中,您會將新階段新增至管道,然後新增 Lambda 動作來呼叫您的函數至該階段。
新增階段
登入 AWS 管理主控台 ,並在 https://http://console.aws.amazon.com/codesuite/codepipeline/home
開啟 CodePipeline 主控台。 -
在 Welcome (歡迎使用) 頁面上,選擇您建立的管道。
-
在管道檢視頁面上,選擇 Edit (編輯)。
-
在編輯頁面上,選擇 + 新增階段以使用 CodeDeploy 動作在部署階段之後新增階段。輸入階段的名稱 (例如
LambdaStage),然後選擇 Add stage (新增階段)。注意
您也可以選擇將 Lambda 動作新增至現有階段。基於示範目的,我們將 Lambda 函數新增為階段中唯一可讓您在成品透過管道進行時輕鬆檢視其進度的動作。
-
選擇 + Add action group (+ 新增動作群組)。在編輯動作的動作名稱中,輸入 Lambda 動作的名稱 (例如
MyLambdaAction)。在 Provider (提供者) 中,選擇 AWS Lambda。在函數名稱中,選擇或輸入 Lambda 函數的名稱 (例如MyLambdaFunctionForAWSCodePipeline)。在使用者參數中,指定您先前複製之 Amazon EC2 執行個體的 IP 地址 (例如,http://),然後選擇完成。192.0.2.4注意
此主題使用 IP 地址,但是在現實情況中,您可以提供已註冊的網站名稱 (例如
http://)。如需 中事件資料和處理常式的詳細資訊 AWS Lambda,請參閱《 AWS Lambda 開發人員指南》中的程式設計模型。www.example.com -
在 Edit action (編輯動作) 頁面中,選擇 Save (儲存)。
步驟 4:使用 Lambda 函數測試管道
若要測試函數,請透過管道釋出最近一次的變更。
使用主控台來透過管道執行最新的成品版本
-
在管道詳細資訊頁面上,選擇發行變更。這將會在管道的來源動作所指定的各個來源位置中執行最新的可用版本。
-
當 Lambda 動作完成時,請選擇詳細資訊連結,以在 Amazon CloudWatch 中檢視函數的日誌串流,包括事件的計費持續時間。如果函數失敗,CloudWatch 日誌會提供原因的相關資訊。
步驟 5:後續步驟
現在您已成功建立 Lambda 函數,並將其新增為管道中的動作,您可以嘗試下列動作:
-
將更多 Lambda 動作新增至您的階段,以檢查其他網頁。
-
修改 Lambda 函數以檢查是否有不同的文字字串。
-
探索 Lambda 函數,並建立您自己的 Lambda 函數並將其新增至管道。
完成 Lambda 函數的實驗後,請考慮將其從管道中移除、將其刪除 AWS Lambda,並從 IAM 中刪除角色,以避免可能產生的費用。如需更多資訊,請查看 在 CodePipeline 中編輯管道、在 CodePipeline 中刪除管道 以及刪除角色或執行個體描述檔。
JSON 事件範例
下列範例顯示 CodePipeline 傳送至 Lambda 的範例 JSON 事件。此事件的結構類似於對 GetJobDetails API 的回應,但是不包含 actionTypeId 與 pipelineContext 資料類型。兩個動作組態詳細資訊,FunctionName 與 UserParameters,皆包含在 JSON 事件與對 GetJobDetails API 的回應中。使用紅色斜體文字顯示的值為範例或說明,並非實際值。
{
    "CodePipeline.job": {
        "id": "11111111-abcd-1111-abcd-111111abcdef",
        "accountId": "111111111111",
        "data": {
            "actionConfiguration": {
                "configuration": {
                    "FunctionName": "MyLambdaFunctionForAWSCodePipeline",
                    "UserParameters": "some-input-such-as-a-URL"
                }
            },
            "inputArtifacts": [
                {
                    "location": {
                        "s3Location": {
                            "bucketName": "the name of the bucket configured as the pipeline artifact store in Amazon S3, for example codepipeline-us-east-2-1234567890",
                            "objectKey": "the name of the application, for example CodePipelineDemoApplication.zip"
                        },
                        "type": "S3"
                    },
                    "revision": null,
                    "name": "ArtifactName"
                }
            ],
            "outputArtifacts": [],
            "artifactCredentials": {
                "secretAccessKey": "wJalrXUtnFEMI/K7MDENG/bPxRfiCYEXAMPLEKEY",
                "sessionToken": "MIICiTCCAfICCQD6m7oRw0uXOjANBgkqhkiG9w
 0BAQUFADCBiDELMAkGA1UEBhMCVVMxCzAJBgNVBAgTAldBMRAwDgYDVQQHEwdTZ
 WF0dGxlMQ8wDQYDVQQKEwZBbWF6b24xFDASBgNVBAsTC0lBTSBDb25zb2xlMRIw
 EAYDVQQDEwlUZXN0Q2lsYWMxHzAdBgkqhkiG9w0BCQEWEG5vb25lQGFtYXpvbi5
 jb20wHhcNMTEwNDI1MjA0NTIxWhcNMTIwNDI0MjA0NTIxWjCBiDELMAkGA1UEBh
 MCVVMxCzAJBgNVBAgTAldBMRAwDgYDVQQHEwdTZWF0dGxlMQ8wDQYDVQQKEwZBb
 WF6b24xFDASBgNVBAsTC0lBTSBDb25zb2xlMRIwEAYDVQQDEwlUZXN0Q2lsYWMx
 HzAdBgkqhkiG9w0BCQEWEG5vb25lQGFtYXpvbi5jb20wgZ8wDQYJKoZIhvcNAQE
 BBQADgY0AMIGJAoGBAMaK0dn+a4GmWIWJ21uUSfwfEvySWtC2XADZ4nB+BLYgVI
 k60CpiwsZ3G93vUEIO3IyNoH/f0wYK8m9TrDHudUZg3qX4waLG5M43q7Wgc/MbQ
 ITxOUSQv7c7ugFFDzQGBzZswY6786m86gpEIbb3OhjZnzcvQAaRHhdlQWIMm2nr
 AgMBAAEwDQYJKoZIhvcNAQEFBQADgYEAtCu4nUhVVxYUntneD9+h8Mg9q6q+auN
 KyExzyLwaxlAoo7TJHidbtS4J5iNmZgXL0FkbFFBjvSfpJIlJ00zbhNYS5f6Guo
 EDmFJl0ZxBHjJnyp378OD8uTs7fLvjx79LjSTbNYiytVbZPQUQ5Yaxu2jXnimvw
 3rrszlaEXAMPLE=",
                "accessKeyId": "AKIAIOSFODNN7EXAMPLE"
            },
            "continuationToken": "A continuation token if continuing job",
            "encryptionKey": {
              "id": "arn:aws:kms:us-west-2:111122223333:key/1234abcd-12ab-34cd-56ef-1234567890ab",
              "type": "KMS"
            }
        }
    }
}
其他函數範例
以下範例 Lambda 函數示範您可以在 CodePipeline 中用於管道的其他功能。若要使用這些函數,您可能需要修改 Lambda 執行角色的政策,如每個範例的簡介所述。
使用 AWS CloudFormation 範本的範例 Python 函數
以下範例顯示根據提供的 CloudFormation 範本建立或更新堆疊的 函數。範本會建立 Amazon S3 儲存貯體。僅做為示範用途,以將成本降至最低。在理想情況下,您應該在上傳任何內容到儲存貯體前刪除堆疊。若您上傳檔案到儲存貯體,將不能在刪除堆疊時刪除儲存貯體。您需要手動刪除儲存貯體中所有內容,才可刪除儲存貯體本身。
此 Python 範例假設您的管道使用 Amazon S3 儲存貯體做為來源動作,或您可以存取可與管道搭配使用的版本控制 Amazon S3 儲存貯體。您可以建立 CloudFormation 範本、壓縮範本,並將其上傳到該儲存貯體做為 .zip 檔案。接著您必須新增來源動作到自儲存貯體擷取此 .zip 檔案的管道。
注意
當 Amazon S3 是管道的來源提供者時,您可以將來源檔案壓縮為單一 .zip,並將 .zip 上傳至來源儲存貯體。您也可以上傳單一解壓縮檔案;不過,預期 .zip 檔案的下游動作會失敗。
此範例將示範:
-
使用 JSON 編碼使用者參數來傳遞多個組態值到函數 (
get_user_params)。 -
與成品儲存貯體中的 .zip 成品互動 (
get_template)。 -
使用連續字符來監控長時間執行的非同步處理 (
continue_job_later)。這可讓動作繼續,即使超過 15 分鐘的執行時間 (Lambda 中的限制),函數也會成功。
若要使用此範例 Lambda 函數,Lambda 執行角色的政策必須具有 CloudFormation、Amazon S3 和 CodePipeline 中的Allow許可,如此範例政策所示:
若要建立 CloudFormation 範本,請開啟任何純文字編輯器,然後複製並貼上下列程式碼:
{
  "AWSTemplateFormatVersion" : "2010-09-09",
  "Description" : "CloudFormation template which creates an S3 bucket",
  "Resources" : {
    "MySampleBucket" : {
      "Type" : "AWS::S3::Bucket",
      "Properties" : {
      }
    }
  },
  "Outputs" : {
    "BucketName" : {
      "Value" : { "Ref" : "MySampleBucket" },
      "Description" : "The name of the S3 bucket"
    }
  }
}
在名為 template-package 的目錄中將此另存為使用名稱 template.json 的 JSON 檔案。建立此目錄的壓縮 (.zip) 檔案和名為 的檔案template-package.zip,並將壓縮檔案上傳到版本控制的 Amazon S3 儲存貯體。若您已為管道設定儲存貯體,便可以使用。接著,編輯您的管道以新增擷取該 .zip 檔的來源動作。將此動作的輸出命名為 MyTemplate。如需詳細資訊,請參閱在 CodePipeline 中編輯管道。
注意
範例 Lambda 函數預期這些檔案名稱和壓縮結構。不過,您可以用自己的 CloudFormation 範本取代此範例。如果您使用自己的範本,請務必修改 Lambda 執行角色的政策,以允許 CloudFormation 範本所需的任何其他功能。
在 Lambda 中將下列程式碼新增為函數
-
開啟 Lambda 主控台,然後選擇建立函數。
-
在 Create function (建立函數) 頁面上,選擇 Author from scratch (從頭開始撰寫)。在函數名稱中,輸入 Lambda 函數的名稱。
-
在 Runtime (執行時間) 中,選擇 Python 2.7。
-
在選擇或建立執行角色下,選取使用現有角色。在 Existing role (現有角色) 中選擇您的角色,然後選擇 Create function (建立函數)。
會開啟建立的函數詳細資訊頁面。
-
複製下列程式碼到 Function code (函數程式碼) 方塊中:
from __future__ import print_function from boto3.session import Session import json import urllib import boto3 import zipfile import tempfile import botocore import traceback print('Loading function') cf = boto3.client('cloudformation') code_pipeline = boto3.client('codepipeline') def find_artifact(artifacts, name): """Finds the artifact 'name' among the 'artifacts' Args: artifacts: The list of artifacts available to the function name: The artifact we wish to use Returns: The artifact dictionary found Raises: Exception: If no matching artifact is found """ for artifact in artifacts: if artifact['name'] == name: return artifact raise Exception('Input artifact named "{0}" not found in event'.format(name)) def get_template(s3, artifact, file_in_zip): """Gets the template artifact Downloads the artifact from the S3 artifact store to a temporary file then extracts the zip and returns the file containing the CloudFormation template. Args: artifact: The artifact to download file_in_zip: The path to the file within the zip containing the template Returns: The CloudFormation template as a string Raises: Exception: Any exception thrown while downloading the artifact or unzipping it """ tmp_file = tempfile.NamedTemporaryFile() bucket = artifact['location']['s3Location']['bucketName'] key = artifact['location']['s3Location']['objectKey'] with tempfile.NamedTemporaryFile() as tmp_file: s3.download_file(bucket, key, tmp_file.name) with zipfile.ZipFile(tmp_file.name, 'r') as zip: return zip.read(file_in_zip) def update_stack(stack, template): """Start a CloudFormation stack update Args: stack: The stack to update template: The template to apply Returns: True if an update was started, false if there were no changes to the template since the last update. Raises: Exception: Any exception besides "No updates are to be performed." """ try: cf.update_stack(StackName=stack, TemplateBody=template) return True except botocore.exceptions.ClientError as e: if e.response['Error']['Message'] == 'No updates are to be performed.': return False else: raise Exception('Error updating CloudFormation stack "{0}"'.format(stack), e) def stack_exists(stack): """Check if a stack exists or not Args: stack: The stack to check Returns: True or False depending on whether the stack exists Raises: Any exceptions raised .describe_stacks() besides that the stack doesn't exist. """ try: cf.describe_stacks(StackName=stack) return True except botocore.exceptions.ClientError as e: if "does not exist" in e.response['Error']['Message']: return False else: raise e def create_stack(stack, template): """Starts a new CloudFormation stack creation Args: stack: The stack to be created template: The template for the stack to be created with Throws: Exception: Any exception thrown by .create_stack() """ cf.create_stack(StackName=stack, TemplateBody=template) def get_stack_status(stack): """Get the status of an existing CloudFormation stack Args: stack: The name of the stack to check Returns: The CloudFormation status string of the stack such as CREATE_COMPLETE Raises: Exception: Any exception thrown by .describe_stacks() """ stack_description = cf.describe_stacks(StackName=stack) return stack_description['Stacks'][0]['StackStatus'] def put_job_success(job, message): """Notify CodePipeline of a successful job Args: job: The CodePipeline job ID message: A message to be logged relating to the job status Raises: Exception: Any exception thrown by .put_job_success_result() """ print('Putting job success') print(message) code_pipeline.put_job_success_result(jobId=job) def put_job_failure(job, message): """Notify CodePipeline of a failed job Args: job: The CodePipeline job ID message: A message to be logged relating to the job status Raises: Exception: Any exception thrown by .put_job_failure_result() """ print('Putting job failure') print(message) code_pipeline.put_job_failure_result(jobId=job, failureDetails={'message': message, 'type': 'JobFailed'}) def continue_job_later(job, message): """Notify CodePipeline of a continuing job This will cause CodePipeline to invoke the function again with the supplied continuation token. Args: job: The JobID message: A message to be logged relating to the job status continuation_token: The continuation token Raises: Exception: Any exception thrown by .put_job_success_result() """ # Use the continuation token to keep track of any job execution state # This data will be available when a new job is scheduled to continue the current execution continuation_token = json.dumps({'previous_job_id': job}) print('Putting job continuation') print(message) code_pipeline.put_job_success_result(jobId=job, continuationToken=continuation_token) def start_update_or_create(job_id, stack, template): """Starts the stack update or create process If the stack exists then update, otherwise create. Args: job_id: The ID of the CodePipeline job stack: The stack to create or update template: The template to create/update the stack with """ if stack_exists(stack): status = get_stack_status(stack) if status not in ['CREATE_COMPLETE', 'ROLLBACK_COMPLETE', 'UPDATE_COMPLETE']: # If the CloudFormation stack is not in a state where # it can be updated again then fail the job right away. put_job_failure(job_id, 'Stack cannot be updated when status is: ' + status) return were_updates = update_stack(stack, template) if were_updates: # If there were updates then continue the job so it can monitor # the progress of the update. continue_job_later(job_id, 'Stack update started') else: # If there were no updates then succeed the job immediately put_job_success(job_id, 'There were no stack updates') else: # If the stack doesn't already exist then create it instead # of updating it. create_stack(stack, template) # Continue the job so the pipeline will wait for the CloudFormation # stack to be created. continue_job_later(job_id, 'Stack create started') def check_stack_update_status(job_id, stack): """Monitor an already-running CloudFormation update/create Succeeds, fails or continues the job depending on the stack status. Args: job_id: The CodePipeline job ID stack: The stack to monitor """ status = get_stack_status(stack) if status in ['UPDATE_COMPLETE', 'CREATE_COMPLETE']: # If the update/create finished successfully then # succeed the job and don't continue. put_job_success(job_id, 'Stack update complete') elif status in ['UPDATE_IN_PROGRESS', 'UPDATE_ROLLBACK_IN_PROGRESS', 'UPDATE_ROLLBACK_COMPLETE_CLEANUP_IN_PROGRESS', 'CREATE_IN_PROGRESS', 'ROLLBACK_IN_PROGRESS', 'UPDATE_COMPLETE_CLEANUP_IN_PROGRESS']: # If the job isn't finished yet then continue it continue_job_later(job_id, 'Stack update still in progress') else: # If the Stack is a state which isn't "in progress" or "complete" # then the stack update/create has failed so end the job with # a failed result. put_job_failure(job_id, 'Update failed: ' + status) def get_user_params(job_data): """Decodes the JSON user parameters and validates the required properties. Args: job_data: The job data structure containing the UserParameters string which should be a valid JSON structure Returns: The JSON parameters decoded as a dictionary. Raises: Exception: The JSON can't be decoded or a property is missing. """ try: # Get the user parameters which contain the stack, artifact and file settings user_parameters = job_data['actionConfiguration']['configuration']['UserParameters'] decoded_parameters = json.loads(user_parameters) except Exception as e: # We're expecting the user parameters to be encoded as JSON # so we can pass multiple values. If the JSON can't be decoded # then fail the job with a helpful message. raise Exception('UserParameters could not be decoded as JSON') if 'stack' not in decoded_parameters: # Validate that the stack is provided, otherwise fail the job # with a helpful message. raise Exception('Your UserParameters JSON must include the stack name') if 'artifact' not in decoded_parameters: # Validate that the artifact name is provided, otherwise fail the job # with a helpful message. raise Exception('Your UserParameters JSON must include the artifact name') if 'file' not in decoded_parameters: # Validate that the template file is provided, otherwise fail the job # with a helpful message. raise Exception('Your UserParameters JSON must include the template file name') return decoded_parameters def setup_s3_client(job_data): """Creates an S3 client Uses the credentials passed in the event by CodePipeline. These credentials can be used to access the artifact bucket. Args: job_data: The job data structure Returns: An S3 client with the appropriate credentials """ key_id = job_data['artifactCredentials']['accessKeyId'] key_secret = job_data['artifactCredentials']['secretAccessKey'] session_token = job_data['artifactCredentials']['sessionToken'] session = Session(aws_access_key_id=key_id, aws_secret_access_key=key_secret, aws_session_token=session_token) return session.client('s3', config=botocore.client.Config(signature_version='s3v4')) def lambda_handler(event, context): """The Lambda function handler If a continuing job then checks the CloudFormation stack status and updates the job accordingly. If a new job then kick of an update or creation of the target CloudFormation stack. Args: event: The event passed by Lambda context: The context passed by Lambda """ try: # Extract the Job ID job_id = event['CodePipeline.job']['id'] # Extract the Job Data job_data = event['CodePipeline.job']['data'] # Extract the params params = get_user_params(job_data) # Get the list of artifacts passed to the function artifacts = job_data['inputArtifacts'] stack = params['stack'] artifact = params['artifact'] template_file = params['file'] if 'continuationToken' in job_data: # If we're continuing then the create/update has already been triggered # we just need to check if it has finished. check_stack_update_status(job_id, stack) else: # Get the artifact details artifact_data = find_artifact(artifacts, artifact) # Get S3 client to access artifact with s3 = setup_s3_client(job_data) # Get the JSON template file out of the artifact template = get_template(s3, artifact_data, template_file) # Kick off a stack update or create start_update_or_create(job_id, stack, template) except Exception as e: # If any other exceptions which we didn't expect are raised # then fail the job and log the exception message. print('Function failed due to exception.') print(e) traceback.print_exc() put_job_failure(job_id, 'Function exception: ' + str(e)) print('Function complete.') return "Complete." -
將處理常式保留為預設值,並將角色保留為您先前選取或建立的名稱
CodePipelineLambdaExecRole。 -
在 Basic settings (基本設定) 的 Timeout (逾時) 中,以
20取代預設值 3 秒。 -
選擇儲存。
-
從 CodePipeline 主控台,編輯管道,將函數新增為管道中階段的動作。針對您要變更的管道階段選擇編輯,然後選擇新增動作群組。在編輯動作頁面上的動作名稱中,輸入動作的名稱。在動作提供者中,選擇 Lambda。
在輸入成品下,選擇
MyTemplate。在 UserParameters (使用者參數) 中,您必須使用三個參數提供 JSON 字串:-
Stack name (堆疊名稱)
-
CloudFormation 範本名稱和檔案的路徑
-
輸入成品
使用大括弧 ({ }),並以逗號分隔參數。例如,若要建立名為
MyTestStack的堆疊,對於具有輸入成品MyTemplate的管道,請在 UserParameters 中輸入:{"stack":"MyTestStack","file":"template-package/template.json","artifact":"MyTemplate"}。注意
雖然您已指定 UserParameters 中的輸入成品,您還是必須將此輸入成品指定為 Input artifacts (輸入成品) 中的動作。
-
-
將變更儲存至管道,然後手動釋出變更以測試動作和 Lambda 函數。
