本文為英文版的機器翻譯版本,如內容有任何歧義或不一致之處,概以英文版為準。
使用 C2C Cloud-to-Cloud) 連接器
C2C 連接器可管理請求和回應訊息的轉譯,並啟用受管整合與第三方廠商雲端之間的通訊。它有助於跨不同的裝置類型、平台和通訊協定進行統一控制,以便加入和管理第三方裝置。
下列程序列出使用 C2C 連接器的步驟。
使用 C2C 連接器的步驟:
-
CreateCloudConnector
設定連接器以啟用受管整合和第三方供應商雲端之間的雙向通訊。
設定連接器時,請提供下列詳細資訊:
-
名稱:選擇連接器的描述性名稱。
-
描述:提供連接器目的和功能的簡短摘要。
-
AWS Lambda ARN:指定將為連接器供電之 AWS Lambda 函數的 Amazon Resource Name (ARN)。
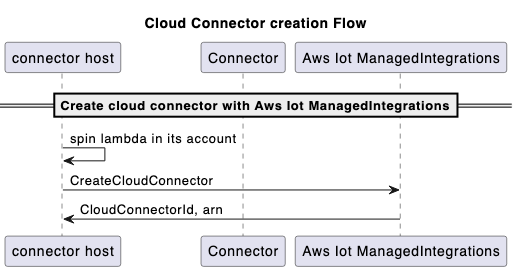
建置和部署 AWS Lambda 函數,以與第三方廠商 APIs通訊來建立連接器。接著,在受管整合中呼叫 CreateCloudConnector API,並提供用於註冊的 AWS Lambda 函數 ARN。確保 AWS Lambda 函數部署在您在受管整合中建立連接器的相同 AWS 帳戶中。您將獲指派一個唯一的連接器 ID 來識別整合。
CreateCloudConnector API 請求和回應範例:
Request:

{
    "Name": "CreateCloudConnector",
    "Description": "Testing for C2C",
    "EndpointType": "LAMBDA",
    "EndpointConfig": {
        "lambda": {
            "arn": "arn:aws:lambda:us-east-1:xxxxxx:function:TestingConnector"
        }
    },
    "ClientToken": "abc"
}

Response:

{
    "Id": "string"
}
建立流程:
注意
-
-
CreateConnectorDestination
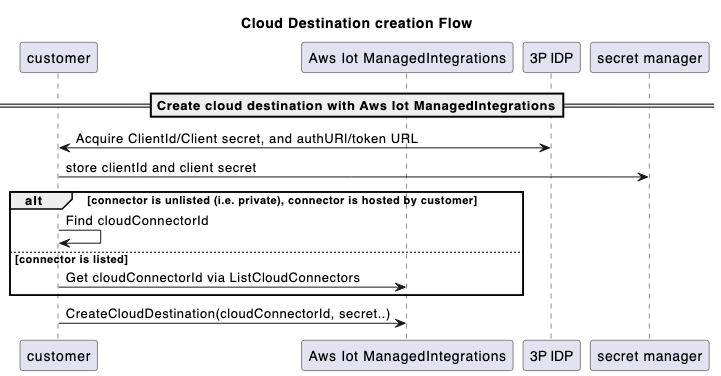
設定目的地以提供連接器與第三方廠商雲端建立安全連線所需的設定和身分驗證憑證。使用目的地向受管整合註冊您的第三方身分驗證登入資料,例如 OAuth 2.0 授權詳細資訊,包括授權 URL、身分驗證機制,以及登入資料在其中的位置 AWS Secrets Manager。
先決條件
建立 ConnectorDestination 之前,您必須:
呼叫 CreateCloudConnector API 來建立連接器。函數傳回的 ID 用於 CreateConnectorDestination API 呼叫。
擷取連接器
tokenUrl3P 平台的 。(您可以將 authCode 交換為 accessToken)。擷取連接器 3P 平台的 authUrl。(最終使用者可以使用其使用者名稱和密碼進行身分驗證)。
在帳戶的秘密管理員中使用
clientId和clientSecret(從 3P 平台)。
CreateConnectorDestination API 請求和回應範例:
Request:

{
    "Name": "CreateConnectorDestination",
    "Description": "CreateConnectorDestination",
    "AuthType": "OAUTH",
    "AuthConfig": {
        "oAuth": {
            "authUrl": "https://xxxx.com/oauth2/authorize",
            "tokenUrl": "https://xxxx/oauth2/token",
            "scope": "testScope",
            "tokenEndpointAuthenticationScheme": "HTTP_BASIC",
            "oAuthCompleteRedirectUrl": "about:blank",
            "proactiveRefreshTokenRenewal": {
                "enabled": false,
                "DaysBeforeRenewal": 30
            }
        }
    },
    "CloudConnectorId": "<connectorId>", // The connectorID instance from response of Step 1.
    "SecretsManager": {
        "arn": "arn:aws:secretsmanager:*****:secret:*******",
        "versionId": "********"
    },
    "ClientToken": "***"
}

Response:

{
    "Id":"string"
}
雲端目的地建立流程:
注意
-
CreateAccountAssociation
關聯代表最終使用者的第三方雲端帳戶與連接器目的地之間的關係。建立關聯並將最終使用者連結至受管整合之後,即可透過唯一的關聯 ID 存取其裝置。此整合可啟用三個關鍵函數:探索裝置、傳送命令和接收事件。
先決條件
在建立 AccountAssociation 之前,您必須完成下列操作:
呼叫 CreateConnectorDestination API 來建立目的地。函數傳回的 ID 用於 CreateAccountAssociation API 呼叫。
叫用 CreateAccountAssociation API。
CreateAccountAssociation API 請求和回應範例:
Request:

{
    "Name": "CreateAccountAssociation",
    "Description": "CreateAccountAssociation",
    "ConnectorDestinationId": "<destinationId>", //The destinationID from destination creation.
    "ClientToken": "***"
}

Response:

{
    "Id":"string"
}
注意
AccountAssociation 具有從 GetAccountAssociation 和 ListAccountAssociations APIs 查詢的狀態。這些 APIs會顯示關聯的狀態。StartAccountAssociationRefresh API 允許在其重新整理權杖過期時重新整理 AccountAssociation 狀態。
-
裝置探索
每個受管物件都會連結到裝置特定的詳細資訊,例如其序號和資料模型。資料模型說明裝置的功能,指出裝置是燈泡、開關、調溫器或其他類型的裝置。若要探索 3P 裝置並為 3P 裝置建立 managedThing,您必須依序遵循下列步驟。
-
呼叫 StartDeviceDiscovery API 以啟動裝置探索程序。
StartDeviceDiscovery API 請求和回應範例:
Request: { "DiscoveryType": "CLOUD", "AccountAssociationId": "*****", "ClientToken": "abc" } Response: { "Id": "string", "StartedAt": number } -
叫用 GetDeviceDiscovery API 來檢查探索程序的狀態。
-
叫用 ListDiscoveredDevices API 來列出探索到的裝置。
範例 ListDiscoveredDevices API 請求和回應:
Request: //Empty body Response: { "Items": [ { "Brand": "string", "ConnectorDeviceId": "string", "ConnectorDeviceName": "string", "DeviceTypes": [ "string" ], "DiscoveredAt": number, "ManagedThingId": "string", "Model": "string", "Modification": "string" } ], "NextToken": "string" } -
叫用 CreateManagedThing API,從探索清單中選擇要匯入受管整合的裝置。
CreateManagedThing API 請求和回應範例:
Request: { "Role": "DEVICE", "AuthenticationMaterial": "CLOUD:XXXX:<connectorDeviceId1>", "AuthenticationMaterialType": "DISCOVERED_DEVICE", "Name": "sample-device-name" "ClientToken": "xxx" } Response: { "Arn": "string", // This is the ARN of the managedThing "CreatedAt": number, "Id": "string" } -
叫用 GetManagedThing API 來檢視這個新建立的
managedThing。狀態將為UNASSOCIATED。 -
叫用 RegisterAccountAssociation API 以將此
managedThing與特定 建立關聯accountAssociation。在成功的 RegisterAccountAssociation API 結束時,狀態會managedThing變更為ASSOCIATED狀態。RegisterAccountAssociation API 請求和回應範例:
Request:

{
    "AccountAssociationId": "string",
    "DeviceDiscoveryId": "string",
    "ManagedThingId": "string"
}

Response:

{
    "AccountAssociationId": "string",
    "DeviceDiscoveryId": "string",
    "ManagedThingId": "string"
}
-
-
將命令傳送至 3P 裝置
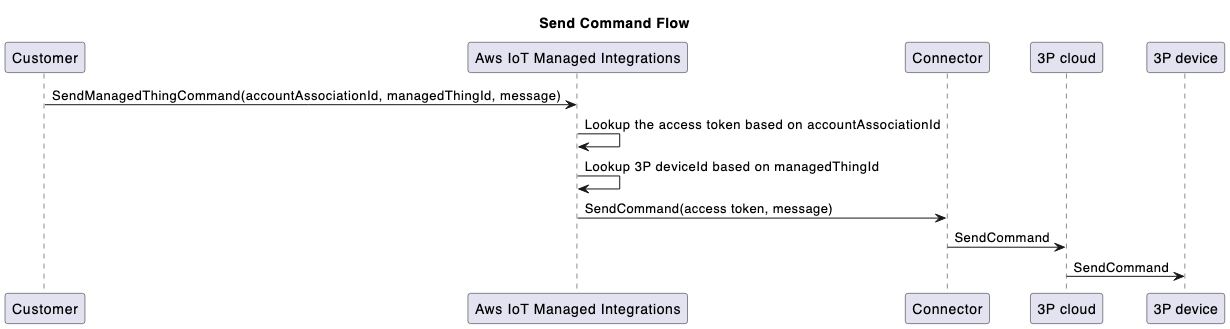
若要控制新加入的裝置,請使用 SendManagedThingCommand API,搭配先前建立的關聯 ID 和以裝置支援的功能為基礎的控制動作。連接器使用來自帳戶連結程序的預存登入資料來驗證第三方雲端,並叫用 操作的相關 API 呼叫。
SendManagedThingCommand API 請求和回應範例:
Request:

{
    "AccountAssociationId": "string",
    "ConnectorAssociationId": "string",
    "Endpoints": [
       {
          "capabilities": [
             {
                "actions": [
                   {
                      "actionTraceId": "string",
                      "name": "string",
                      "parameters": JSON value,
                      "ref": "string"
                   }
                ],
                "id": "string",
                "name": "string",
                "version": "string"
             }
          ],
          "endpointId": "string"
       }
    ]
}

Response:

{
   "TraceId": "string"
}
將命令傳送至 3P 裝置流程:
-
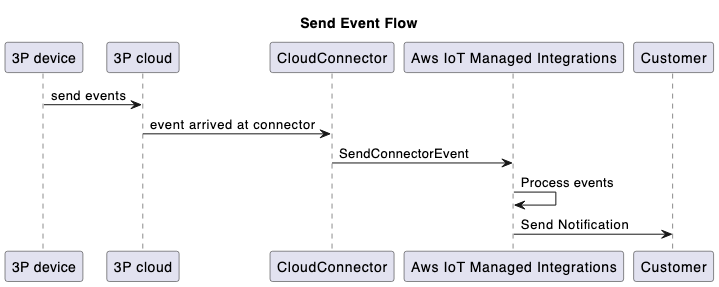
連接器會將事件傳送至受管整合
SendConnectorEvent API 會擷取從連接器到受管整合的四種事件類型,以操作類型參數的下列列舉值表示:
-
DEVICE_COMMAND_RESPONSE:連接器為了回應命令而傳送的非同步回應。
-
DEVICE_DISCOVERY:為了回應裝置探索程序,連接器會將探索到的裝置清單傳送至受管整合,並使用 SendConnectorEvent API。
-
DEVICE_EVENT:傳送收到的裝置事件。
-
DEVICE_COMMAND_REQUEST:從裝置啟動的命令請求。例如,WebRTC 工作流程。
連接器也可以使用 SendConnectorEvent API 搭配選用
userId參數轉送裝置事件。-
對於具有 的裝置事件
userId:SendConnectorEvent API 請求和回應範例:
Request: { "UserId": "*****", "Operation": "DEVICE_EVENT", "OperationVersion": "1.0", "StatusCode": 200, "ConnectorId": "****", "ConnectorDeviceId": "***", "TraceId": "***", "MatterEndpoint": { "id": "**", "clusters": [{ ..... } }] } } Response: { "ConnectorId": "string" } -
對於沒有 的裝置事件
userId:SendConnectorEvent API 請求和回應範例:
Request:

{
    "Operation": "DEVICE_EVENT",
    "OperationVersion": "1.0",
    "StatusCode": 200,
    "ConnectorId": "*****",
    "ConnectorDeviceId": "****",
    "TraceId": "****",
    "MatterEndpoint": {
        "id": "**",
        "clusters": [{
            ....
        }]
    }
}

Response:

{
    "ConnectorId": "string"
}
若要移除特定
managedThing與帳戶關聯之間的連結,請使用取消註冊機制:DeregisterAccountAssociation API 請求和回應範例:
Request:

{
    "AccountAssociationId": "****",
    "ManagedThingId": "****"
}

Response:

HTTP/1.1 200 // Empty body
傳送事件流程:
-
-
將連接器狀態更新為「已列出」,讓其他受管整合客戶可以看到
根據預設,連接器是私有的,只有建立連接器 AWS 的帳戶才能看見。您可以選擇讓其他受管整合客戶看見連接器。
若要與其他使用者共用您的連接器,請使用連接器詳細資訊頁面上 AWS Management Console 的讓連接器 ID 可見選項,將連接器 ID 提交至 AWS 以供檢閱。核准後,連接器可供相同 中的所有受管整合使用者使用 AWS 區域。此外,您可以透過修改連接器關聯 AWS Lambda 函數上的存取政策,限制對特定 AWS 帳戶 IDs 的存取。為了確保您的連接器可供其他客戶使用,請管理 Lambda 函數上從其他 AWS 帳戶到可見連接器的 IAM 存取許可。
在讓其他受管整合客戶看見連接器之前,請檢閱管理連接器共用和存取許可 AWS 服務 的條款和組織的政策。
