部署模型以進行即時推論 - Amazon SageMaker AI

本文為英文版的機器翻譯版本,如內容有任何歧義或不一致之處,概以英文版為準。

部署模型以進行即時推論

即時推論非常適合具有即時、互動、低延遲需求的推論工作負載。本節說明如何使用即時推論,以互動方式從模型取得預測。

若要在 Autopilot 實驗中部署產生最佳驗證指標的模型,您有多種選項。例如,在 SageMaker Studio Classic 中使用 Autopilot 時,您可以自動或手動部署模型。您也可以使用 SageMaker API 手動部署 Autopilot 模型。

以下索引標籤顯示三個用於部署模型的選項。這些指示假設您已在 Autopilot 中建立模型。如果您沒有模型,則請參閱使用 AutoML API 建立表格式資料的迴歸或分類任務。若要查看每個選項的範例,請開啟每個索引標籤。

Autopilot 使用者介面包含實用的下拉式功能表、切換、工具提示等,可協助您完成模型部署。您可以使用下列程序之一部署:自動或手動。

  • 自動部署:將 Autopilot 實驗中的最佳模型自動部署到端點

    1. 在 SageMaker Studio Classic 中建立實驗

    2. 自動部署值切換為

      注意

      如果區域中端點執行個體的預設資源配額或客戶配額過於限制,則自動部署將會失敗。在超參數最佳化 (HPO) 模式中,您至少需要有兩個 ml.m5.2xlarge 執行個體。在集成模式中,您必須至少有一個 ml.m5.12xlarge 執行個體。如果您遇到與配額相關的故障,您可以請求提高 SageMaker AI 端點執行個體的服務限制。 SageMaker

  • 手動部署:將 Autopilot 實驗中的最佳模型手動部署到端點

    1. 在 SageMaker Studio Classic 中建立實驗

    2. 自動部署值切換為

    3. 模型名稱下選取您想要部署的模型。

    4. 選取位於排行榜右側的橘色部署和進階設定按鈕。隨即開啟新索引索引標籤。

    5. 設定端點名稱、執行個體類型和其他選用資訊。

    6. 選取橘色的部署模型,部署到端點。

    7. 瀏覽至端點區段,在 https://console.aws.amazon.com/sagemaker/ 檢查端點建立程序的進度。該區段位於導覽面板的推論下拉式功能表。

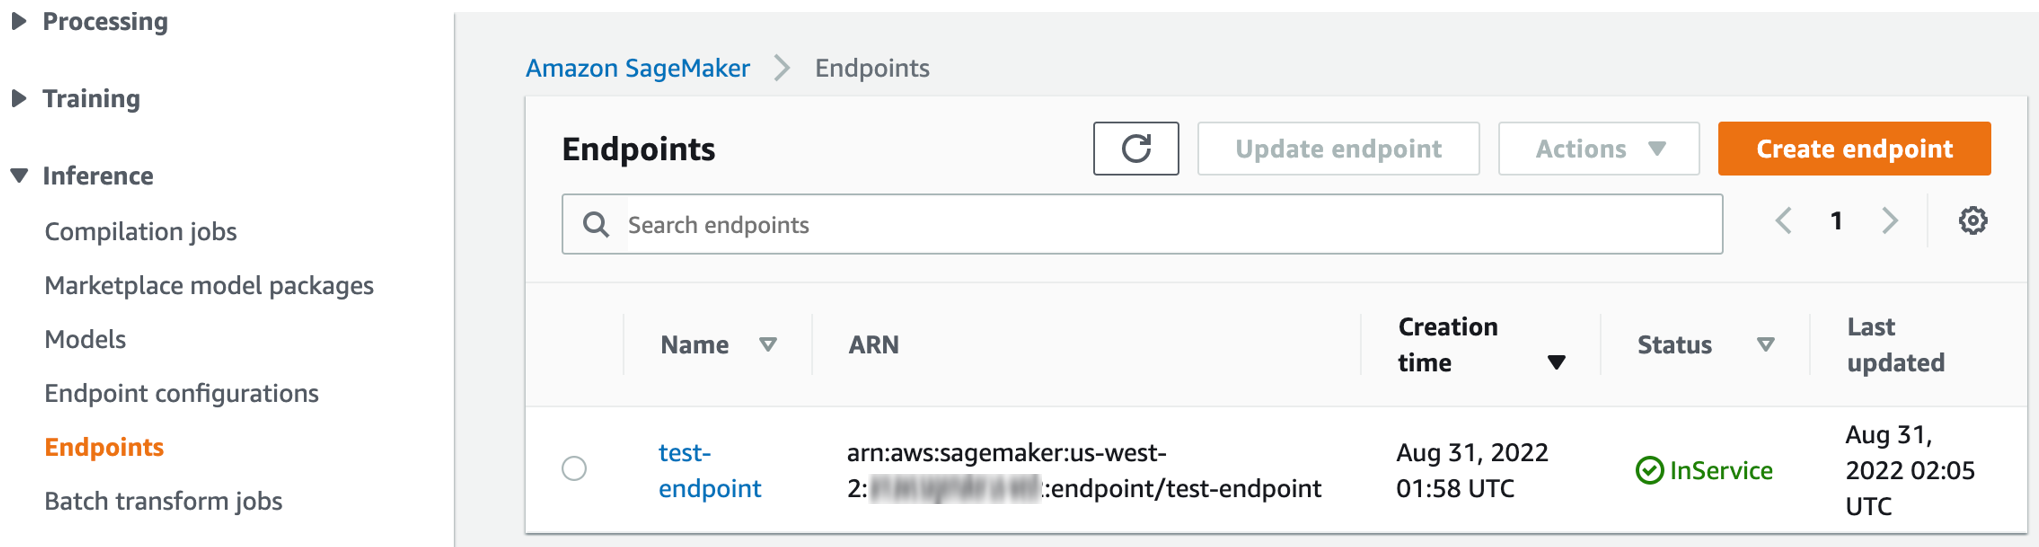
    8. 在端點狀態從建立變更為 InService 之後,如下所示,返回 Studio Classic 並叫用端點。

      SageMaker AI 主控台:建立端點或檢查端點狀態的端點頁面。

您也可以使用 API 呼叫部署模型,取得即時推論。本節顯示使用 AWS Command Line Interface (AWS CLI) 程式碼片段進行此程序的五個步驟。

如需適用於 Python (boto3) 的 AWS CLI 命令和 AWS SDK 的完整程式碼範例,請直接依照下列步驟開啟索引標籤。

  1. 取得候選定義

    InferenceContainers 取得候選容器定義。這些候選定義用於建立 SageMaker AI 模型。

    下列範例使用 DescribeAutoMLJob API 取得最佳模型候選項目的候選定義。請參閱下列 AWS CLI 命令做為範例。

    aws sagemaker describe-auto-ml-job --auto-ml-job-name <job-name> --region <region>
  2. 列出候選項目

    下列範例使用 ListCandidatesForAutoMLJob API 列出所有候選項目。請參閱 AWS CLI 命令作為範例。

    aws sagemaker list-candidates-for-auto-ml-job --auto-ml-job-name <job-name> --region <region>
  3. 建立 SageMaker AI 模型

    使用先前步驟中的容器定義,透過 CreateModel API 來建立 SageMaker AI 模型。請參閱下列 AWS CLI 命令做為範例。

    aws sagemaker create-model --model-name '<your-custom-model-name>' \ --containers ['<container-definition1>, <container-definition2>, <container-definition3>]' \ --execution-role-arn '<execution-role-arn>' --region '<region>
  4. 建立一個端點組態

    下列範例使用 CreateEndpointConfig API 建立一個端點組態。請參閱下列 AWS CLI 命令做為範例。

    aws sagemaker create-endpoint-config --endpoint-config-name '<your-custom-endpoint-config-name>' \ --production-variants '<list-of-production-variants>' \ --region '<region>'
  5. 建立端點

    下列 AWS CLI 範例使用 CreateEndpoint API 來建立端點。

    aws sagemaker create-endpoint --endpoint-name '<your-custom-endpoint-name>' \ --endpoint-config-name '<endpoint-config-name-you-just-created>' \ --region '<region>'

    使用 DescribeEndpoint API來檢查端點部署的進度。請參閱下列 AWS CLI 命令做為範例。

    aws sagemaker describe-endpoint —endpoint-name '<endpoint-name>' —region <region>

    EndpointStatus變更為後InService,端點即可用於即時推論。

  6. 調用端點

    下列命令結構會調用端點以進行即時推論。

    aws sagemaker invoke-endpoint --endpoint-name '<endpoint-name>' \ --region '<region>' --body '<your-data>' [--content-type] '<content-type>' <outfile>

下列索引標籤包含完整的程式碼範例,說明如何使用適用於 Python 的 AWS SDK (boto3) 或 AWS CLI部署模型。

AWS SDK for Python (boto3)
  1. 使用下列程式碼範例取得候選定義

    import sagemaker import boto3 session = sagemaker.session.Session() sagemaker_client = boto3.client('sagemaker', region_name='us-west-2') job_name = 'test-auto-ml-job' describe_response = sm_client.describe_auto_ml_job(AutoMLJobName=job_name) # extract the best candidate definition from DescribeAutoMLJob response best_candidate = describe_response['BestCandidate'] # extract the InferenceContainers definition from the caandidate definition inference_containers = best_candidate['InferenceContainers']
  2. 使用下列程式碼範例建立模型

    # Create Model model_name = 'test-model' sagemaker_role = 'arn:aws:iam:444455556666:role/sagemaker-execution-role' create_model_response = sagemaker_client.create_model( ModelName = model_name, ExecutionRoleArn = sagemaker_role, Containers = inference_containers )
  3. 使用下列程式碼範例建立端點組態

    endpoint_config_name = 'test-endpoint-config' instance_type = 'ml.m5.2xlarge' # for all supported instance types, see # https://docs.aws.amazon.com/sagemaker/latest/APIReference/API_ProductionVariant.html#sagemaker-Type-ProductionVariant-InstanceType # Create endpoint config endpoint_config_response = sagemaker_client.create_endpoint_config( EndpointConfigName=endpoint_config_name, ProductionVariants=[ { "VariantName": "variant1", "ModelName": model_name, "InstanceType": instance_type, "InitialInstanceCount": 1 } ] ) print(f"Created EndpointConfig: {endpoint_config_response['EndpointConfigArn']}")
  4. 使用下列程式碼範例建立端點並部署模型。

    # create endpoint and deploy the model endpoint_name = 'test-endpoint' create_endpoint_response = sagemaker_client.create_endpoint( EndpointName=endpoint_name, EndpointConfigName=endpoint_config_name) print(create_endpoint_response)

    使用下列程式碼範例檢查建立端點的狀態

    # describe endpoint creation status status = sagemaker_client.describe_endpoint(EndpointName=endpoint_name)["EndpointStatus"]
  5. 使用下列命令結構,調用端點進行即時推論。

    # once endpoint status is InService, you can invoke the endpoint for inferencing if status == "InService": sm_runtime = boto3.Session().client('sagemaker-runtime') inference_result = sm_runtime.invoke_endpoint(EndpointName='test-endpoint', ContentType='text/csv', Body='1,2,3,4,class')
AWS Command Line Interface (AWS CLI)
  1. 使用下列程式碼範例取得候選定義

    aws sagemaker describe-auto-ml-job --auto-ml-job-name 'test-automl-job' --region us-west-2
  2. 使用下列程式碼範例建立模型

    aws sagemaker create-model --model-name 'test-sagemaker-model' --containers '[{ "Image": "348316444620.dkr.ecr.us-west-2.amazonaws.com/sagemaker-sklearn-automl:2.5-1-cpu-py3", amzn-s3-demo-bucket1 "ModelDataUrl": "s3://amzn-s3-demo-bucket/output/model.tar.gz", "Environment": { "AUTOML_SPARSE_ENCODE_RECORDIO_PROTOBUF": "1", "AUTOML_TRANSFORM_MODE": "feature-transform", "SAGEMAKER_DEFAULT_INVOCATIONS_ACCEPT": "application/x-recordio-protobuf", "SAGEMAKER_PROGRAM": "sagemaker_serve", "SAGEMAKER_SUBMIT_DIRECTORY": "/opt/ml/model/code" } }, { "Image": "348316444620.dkr.ecr.us-west-2.amazonaws.com/sagemaker-xgboost:1.3-1-cpu-py3", "ModelDataUrl": "s3://amzn-s3-demo-bucket/output/model.tar.gz", "Environment": { "MAX_CONTENT_LENGTH": "20971520", "SAGEMAKER_DEFAULT_INVOCATIONS_ACCEPT": "text/csv", "SAGEMAKER_INFERENCE_OUTPUT": "predicted_label", "SAGEMAKER_INFERENCE_SUPPORTED": "predicted_label,probability,probabilities" } }, { "Image": "348316444620.dkr.ecr.us-west-2.amazonaws.com/sagemaker-sklearn-automl:2.5-1-cpu-py3", aws-region "ModelDataUrl": "s3://amzn-s3-demo-bucket/output/model.tar.gz", "Environment": { "AUTOML_TRANSFORM_MODE": "inverse-label-transform", "SAGEMAKER_DEFAULT_INVOCATIONS_ACCEPT": "text/csv", "SAGEMAKER_INFERENCE_INPUT": "predicted_label", "SAGEMAKER_INFERENCE_OUTPUT": "predicted_label", "SAGEMAKER_INFERENCE_SUPPORTED": "predicted_label,probability,labels,probabilities", "SAGEMAKER_PROGRAM": "sagemaker_serve", "SAGEMAKER_SUBMIT_DIRECTORY": "/opt/ml/model/code" } }]' \ --execution-role-arn 'arn:aws:iam::1234567890:role/sagemaker-execution-role' \ --region 'us-west-2'

    如需其他詳細資訊,請參閱建立模型

    create model 命令以下列格式傳回回應。

    { "ModelArn": "arn:aws:sagemaker:us-west-2:1234567890:model/test-sagemaker-model" }
  3. 使用下列程式碼範例建立端點組態

    aws sagemaker create-endpoint-config --endpoint-config-name 'test-endpoint-config' \ --production-variants '[{"VariantName": "variant1", "ModelName": "test-sagemaker-model", "InitialInstanceCount": 1, "InstanceType": "ml.m5.2xlarge" }]' \ --region us-west-2

    create endpoint 組態命令會以下列格式傳回回應。

    { "EndpointConfigArn": "arn:aws:sagemaker:us-west-2:1234567890:endpoint-config/test-endpoint-config" }
  4. 使用下列程式碼範例建立端點

    aws sagemaker create-endpoint --endpoint-name 'test-endpoint' \ --endpoint-config-name 'test-endpoint-config' \ --region us-west-2

    create endpoint 命令以下列格式傳回回應。

    { "EndpointArn": "arn:aws:sagemaker:us-west-2:1234567890:endpoint/test-endpoint" }

    使用下列描述端點 CLI 程式碼範例,檢查端點部署的進度。

    aws sagemaker describe-endpoint --endpoint-name 'test-endpoint' --region us-west-2

    先前的進度檢查會以下列格式傳回回應。

    { "EndpointName": "test-endpoint", "EndpointArn": "arn:aws:sagemaker:us-west-2:1234567890:endpoint/test-endpoint", "EndpointConfigName": "test-endpoint-config", "EndpointStatus": "Creating", "CreationTime": 1660251167.595, "LastModifiedTime": 1660251167.595 }

    EndpointStatus 變更為 InService 後,端點即可用於即時推論。

  5. 使用下列命令結構,調用端點進行即時推論。

    aws sagemaker-runtime invoke-endpoint --endpoint-name 'test-endpoint' \ --region 'us-west-2' \ --body '1,51,3.5,1.4,0.2' \ --content-type 'text/csv' \ '/tmp/inference_output'

    如需更多選項,請參閱調用端點

您可以使用與產生模型之原始帳戶不同的帳戶部署 Autopilot 模型。本節說明如何執行下列操作,實作跨帳戶模型部署:

  1. 授予部署帳戶的許可

    若要扮演產生帳戶的角色,您必須授予許可至部署帳戶。這可讓部署帳戶描述產生帳戶中的 Autopilot 任務。

    下列範例使用具有受信任 sagemaker-role 實體的產生帳戶。此範例顯示如何授予部署帳戶識別碼 111122223333 的許可,扮演產生帳戶的角色。

    "Statement": [ { "Effect": "Allow", "Principal": { "Service": [ "sagemaker.amazonaws.com" ], "AWS": [ "111122223333"] }, "Action": "sts:AssumeRole" }

    識別碼 111122223333 的新帳戶現在可以扮演產生帳號的角色。

    接下來,從部署帳戶呼叫 DescribeAutoMLJob API,取得產生帳戶所建立之任務的描述。

    下列程式碼範例描述部署帳戶的模型。

    import sagemaker import boto3 session = sagemaker.session.Session() sts_client = boto3.client('sts') sts_client.assume_role role = 'arn:aws:iam::111122223333:role/sagemaker-role' role_session_name = "role-session-name" _assumed_role = sts_client.assume_role(RoleArn=role, RoleSessionName=role_session_name) credentials = _assumed_role["Credentials"] access_key = credentials["AccessKeyId"] secret_key = credentials["SecretAccessKey"] session_token = credentials["SessionToken"] session = boto3.session.Session() sm_client = session.client('sagemaker', region_name='us-west-2', aws_access_key_id=access_key, aws_secret_access_key=secret_key, aws_session_token=session_token) # now you can call describe automl job created in account A job_name = "test-job" response= sm_client.describe_auto_ml_job(AutoMLJobName=job_name)
  2. 部署帳戶的存取權授予產生帳戶中的模型成品。

    部署帳戶僅需要產生帳戶中模型成品的存取權即可部署成品。這些位於模型產生期間在原始 CreateAutoMLJob API 呼叫中指定的 S3OutPutPath

    若要授予部署帳戶模型成品的存取權,請選擇下列其中一個選項:

    1. 從產生帳戶將 ModelDataUrl存取權授予部署帳戶。

      接下來,您必須授予部署帳戶扮演該角色的許可。請遵循即時推論步驟進行部署。

    2. 將產生帳戶之原始 S3OutputPath模型成品複製到產生帳戶。

      若要授予模型成品的存取權,您必須定義 best_candidate 模型,並將模型容器重新指派給新帳戶。

      下列範例顯示如何定義 best_candidate 模型並重新指派 ModelDataUrl

      best_candidate = automl.describe_auto_ml_job()['BestCandidate'] # reassigning ModelDataUrl for best_candidate containers below new_model_locations = ['new-container-1-ModelDataUrl', 'new-container-2-ModelDataUrl', 'new-container-3-ModelDataUrl'] new_model_locations_index = 0 for container in best_candidate['InferenceContainers']: container['ModelDataUrl'] = new_model_locations[new_model_locations_index++]

      指派此容器之後,請遵循 使用 SageMaker API 進行部署 中的步驟進行部署。

若要在即時推論構建承載,請參閱筆記本範例,定義測試承載。若要從 CSV 檔案建立承載並調用端點,請參閱自動建立機器學習模型中的使用模型預測一節。