Root volumes for your Amazon EC2 instances
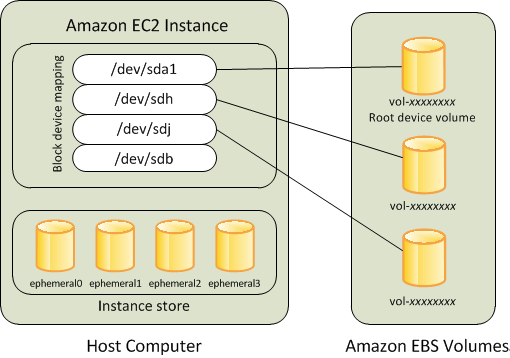
When you launch an instance, we create a root volume for the instance. The root volume contains the image used to boot the instance. Each instance has a single root volume. You can add storage volumes to your instances during or after launch.
The AMI that you use to launch an instance determines the type of root volume. You can launch an instance from either an Amazon EBS-backed AMI (Linux and Windows instances) or an Amazon S3-backed AMI (Linux instances only). There are significant differences between what you can do with each type of AMI. For more information about these differences, see Root volume type.
We recommend that you use AMIs backed by Amazon EBS, because these instances launch faster and use persistent storage.
We reserve specific device names for root volumes. For more information, see Device names for volumes on Amazon EC2 instances.
Contents
Instances with an Amazon EBS root volume
Instances that use Amazon EBS for the root volume automatically have an Amazon EBS volume attached. When you launch an instance with an Amazon EBS-AMI, we create an Amazon EBS volume for each Amazon EBS snapshot referenced by the AMI. You can optionally use other Amazon EBS volumes or instance store volumes, depending on the instance type.
An instance with an EBS root volume can be stopped and later restarted without affecting data stored in the attached volumes. There are various instance– and volume-related tasks you can do when an instance with an EBS root volume is in a stopped state. For example, you can modify the properties of the instance, change its size, or update the kernel it is using, or you can attach its root volume to a different running instance for debugging or any other purpose. For more information, see Amazon EBS volumes.
Limitation
You can't use st1 or sc1 EBS volumes as root volumes.
Instance failure
If an instance with an EBS root volume fails, you can restore your session by following one of these methods:
-
Stop and then start again (try this method first).
-
Automatically snapshot all relevant volumes and create a new AMI. For more information, see Create an Amazon EBS-backed AMI.
-
Attach the volume to the new instance by following these steps:
-
Create a snapshot of the root volume.
-
Register a new AMI using the snapshot.
-
Launch a new instance from the new AMI.
-
Detach the remaining Amazon EBS volumes from the old instance.
-
Reattach the Amazon EBS volumes to the new instance.
-
Instances with an instance store root volume (Linux instances only)
Note
Windows instances do not support instance store root volumes.
Instances that use instance store for the root volume automatically have one or more instance store volumes available, with one volume serving as the root volume. When an instance is launched from an Amazon S3-backed AMI, the AMI is copied to the root volume. Note that you can optionally use additional instance store volumes, depending on the instance type.
Any data on the instance store volumes persists as long as the instance is running, but this data is deleted when the instance is terminated (instances with an instance store root volume do not support the Stop action) or if it fails (such as if an underlying drive has issues). For more information, see Instance store temporary block storage for EC2 instances.

Supported instance types
Only the following instance types support an instance store volume as the root volume: C1, C3, D2, I2, M1, M2, M3, R3, and X1.
Instance failure
After an instance with an instance store root volume fails or terminates, it can't be restored. If you plan to use an instances with an instance store root volume, we highly recommend that you distribute the data on your instance store volumes across multiple Availability Zones. You should also back up critical data from your instance store volumes to persistent storage on a regular basis.
