Example: VPC for a test environment
This example demonstrates how to create a VPC that you can use as a development or test environment. Because this VPC is not intended to be used in production, it is not necessary to deploy your servers in multiple Availability Zones. To keep the cost and complexity low, you can deploy your servers in a single Availability Zone.
Overview
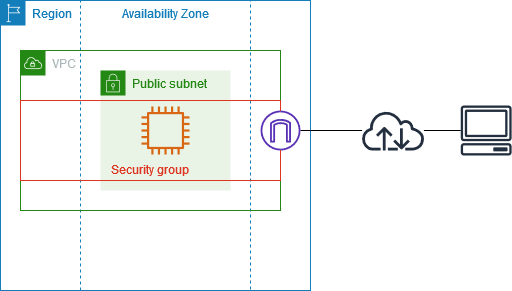
The following diagram provides an overview of the resources included in this example. The VPC has a public subnet in a single Availability Zone and an internet gateway. The server is an EC2 instance that runs in the public subnet. The security group for the instance allows SSH traffic from your own computer, plus any other traffic specifically required for your development or testing activities.
Routing
When you create this VPC by using the Amazon VPC console, we create a route table for the public subnet with local routes and routes to the internet gateway. The following is an example of the route table with routes for both IPv4 and IPv6. If you create an IPv4-only subnet instead of a dual stack subnet, your route table has only the IPv4 routes.
| Destination | Target |
|---|---|
10.0.0.0/16 |
local |
2001:db8:1234:1a00::/56 |
local |
| 0.0.0.0/0 | igw-id |
| ::/0 | igw-id |
Security
For this example configuration, you must create a security group for your instance that allows the traffic that your application needs. For example, you might need to add a rule that allows SSH traffic from your computer or HTTP traffic from your network.
The following are example inbound rules for a security group, with rules for both IPv4 and IPv6. If you create IPv4-only subnets instead of dual stack subnets, you need only the rules for IPv4.
| Source | Protocol | Port range | Description |
|---|---|---|---|
| 0.0.0.0/0 | TCP | 80 | Allows inbound HTTP access from all IPv4 addresses |
| ::/0 | TCP | 80 | Allows inbound HTTP access from all IPv6 addresses |
| 0.0.0.0/0 | TCP | 443 | Allows inbound HTTPS access from all IPv4 addresses |
| ::/0 | TCP | 443 | Allows inbound HTTPS access from all IPv6 addresses |
Public IPv4 address range of your network |
TCP | 22 | (Optional) Allows inbound SSH access from IPv4 IP addresses in your network |
IPv6 address range of your network |
TCP | 22 | (Optional) Allows inbound SSH access from IPv6 IP addresses in your network |
Public IPv4 address range of your network |
TCP | 3389 | (Optional) Allows inbound RDP access from IPv4 IP addresses in your network |
IPv6 address range of your network |
TCP | 3389 | (Optional) Allows inbound RDP access from IPv6 IP addresses in your network |
1. Create the VPC
Use the following procedure to create a VPC with a public subnet in one Availability Zone. This configuration is suitable for a development or testing environment.
To create the VPC
Open the Amazon VPC console at https://console.aws.amazon.com/vpc/
. -
On the dashboard, choose Create VPC.
-
For Resources to create, choose VPC and more.
-
Configure the VPC
-
For Name tag auto-generation, enter a name for the VPC.
-
For IPv4 CIDR block, you can keep the default suggestion, or alternatively you can enter the CIDR block required by your application or network. For more information, see VPC CIDR blocks.
-
(Optional) If your application communicates by using IPv6 addresses, choose IPv6 CIDR block, Amazon-provided IPv6 CIDR block.
-
-
Configure the subnets
-
For Number of Availability Zones, choose 1. You can keep the default Availability Zone, or alternatively you can expand Customize AZs and select an Availability Zone.
-
For Number of public subnets, choose 1.
-
For Number of private subnets, choose 0.
-
You can keep the default CIDR block for the public subnet, or alternatively you can expand Customize subnet CIDR blocks and enter a CIDR block. For more information, see Subnet CIDR blocks.
-
-
For NAT gateways, keep the default value, None.
-
For VPC endpoints, choose None. A gateway VPC endpoint for S3 is used only to access Amazon S3 from private subnets.
-
For DNS options, keep both options selected. As a result, your instance will receive a public DNS hostname that corresponds to its public IP address.
-
Choose Create VPC.
2. Deploy your application
There are a variety of ways to deploy EC2 instances. For example:
After you deploy an EC2 instance, you can connect to the instance, install the software
that you need for your application, and then create an image for future use. For more
information, see Create an AMI
in the Amazon EC2 User Guide. Alternatively, you can use EC2 Image Builder
3. Test your configuration
After you've finished deploying your application, you can test it. If you can't connect to your EC2 instance, or if your application can't send or receive the traffic that you expect, you can use Reachability Analyzer to help you troubleshoot. For example, Reachability Analyzer can identify configuration issues with your route tables or security groups. For more information, see the Reachability Analyzer Guide.
4. Clean up
When you are finished with this configuration, you can delete it. Before you can delete the VPC, you must terminate your instance. For more information, see Delete your VPC.
